Introduction
![]() MongoDB comes with SSL support, which can secure your end-to-end communication. However, setting up a MongoDB SSL Connection may require some configuration on both sides (i.e., Server and Client side). In this post, we aim to secure your MongoDB Integration in SSIS.
MongoDB comes with SSL support, which can secure your end-to-end communication. However, setting up a MongoDB SSL Connection may require some configuration on both sides (i.e., Server and Client side). In this post, we aim to secure your MongoDB Integration in SSIS.
Now, let’s look at the steps to configure SSL in MongoDB.
Configure SSL Support in MongoDB Server
To configure MongoDB for SSL connectivity, the very first step is to generate a self-signed certificate in *.pem format (This must be stored on the server)
Download and Install OpenSSL
First step is to download and install OpenSSL. Assuming you are running a 64 Bit Windows OS, you can download the 64 Bit Lite version of OpenSSL (about 3 MB). If you install it using default settings, then all binaries will be installed under C:\OpenSSL-Win64\bin\
Create a self-signed certificate and *.pem file using OpenSSL.
If you don’t have a trust issue and want to use a self-signed certificate rather than buying from a 3rd-party SSL Certificate Authority, you can create a self-signed certificate using the OpenSSL Command line as shown below. Now let’s look at how to generate a private key, a certificate file, and finally the *.pem file, which is the only required file by MongoDB.
A PEM file is the most common file format (container file format), which includes a Certificate and a Private Key in a single file.
Let’s look at how to create a PEM file using OpenSSL.
- First, run the command below. When prompted, enter “passphrase” (in our case, enter “test”).
1openssl genrsa -des3 -out server.key 2048 - Now run the command below to generate a private key (*.key file)
1openssl rsa -in server.key -out server.key - After the private key is created, run the command below to create a CSR file (i.e., “Certificate Signing Request”). This file is needed to generate an actual certificate (Self-Signed or Signed by a 3rd Party, such as VeriSign or RapidSSL). If you omit the sub argument from below, then it may ask you a few questions (e.g, company name, department, etc), but for testing purposes, let’s make it easy 🙂
To enter full details or just provide CN=xxxx
123openssl req -sha256 -new -key server.key -out server.csr -subj "/C=US/ST=Georgia/L=Atlanta/O=ZappySys LLC/OU=Org/E=testuser@zappysys.com/CN=localhost"-- or --openssl req -sha256 -new -key server.key -out server.csr -subj "/CN=localhost" - Now, let’s run the command below to generate a certificate file (*.crt). We are setting the expiration to 365 days; you can adjust as per your needs.
1openssl x509 -req -sha256 -days 365 -in server.csr -signkey server.key -out server.crt - Now, the last step is to combine the certificate (*.crt) and private key (*.key) files into a single PEM file using the command below. It will generate the desired *.pem file format, which can be used by the MongoDB server (In Unix OS, you can use the cat command rather than typing)
1type server.crt server.key > cert.pem
Once done, your cert.pem file will look like the following (Open and view in Notepad)
|
1 2 3 4 5 6 7 8 9 10 11 12 13 14 15 16 17 18 |
-----BEGIN CERTIFICATE----- MIIDjjCCAnYCCQCDKO4/pCBfqTANBgkqhkiG9w0BAQsFADCBiDELMAkGA1UEBhMC VVMxCzAJBgNVBAgMAkdBMRAwDgYDVQQHDAdBdGxhbnRhMREwDwYDVQQKDAhaYXBw eVN5czELMAkGA1UECwwCSVQxFTATBgNVBAMMDHphcHB5c3lzLmNvbTEjMCEGCSqG RF5DmNx6gKlRWlOFmokMCz7wAglErDL4h/I3w6iZaVVkBmeDj30cms/fQ+upAI8U KrBpNEwOglU9fjqjpnW0u8qGpXIk3NfdCm+6Lr91GL/u/9+gmSYw5YCCF6kYaRA/ 2mqLXZ3Xp6WfTfVyQskKMB9D1+7QljqBZmFnTjLCaJ9MdJzzMpFyWPRB4Ix1kAzV yZk= -----END CERTIFICATE----- -----BEGIN RSA PRIVATE KEY----- MIIEowIBAAKCAQEAyo++fr54Wh8anfEDZrr5O1NXwrPZW6KI3dPQ8FVHVDcBPETi VX3qGcq8vywXH/LdwMEC4EQGED+zo50GmQdNiIzUfsnDbkq6rkqVNKjh7agkDlip 5vK3yuHtYAVp+laJ8X8kKISRttY7kcnl9gSkfTilwpN8//49G45Nx0JFu3o3Ortb H4FPWjidQBAA6hPxoQi2h7YfEfpICL1RwYDCaQpdwMEJJqzcvaHCpdYVYd5PHLks xRi8iwKBgA/S5w4/pwrzq0Jab/Afzf8AleZm/xLmXFpglgZF25AtVhpnayoHiTIk 9BdCXydi0ZOg4LtMqkSwt427UWCEnoRRH1WbKH2F9ZRWaELw/ix9RrZgTNmF821F 1/ILtO+QrN8tFnrLX3NAWurxUJxvzhBnvq40ZIHCyWvhRXUTkzTH -----END RSA PRIVATE KEY----- |
Edit the MongoDB Server config file (v3.0 or higher)
Now that we have the *.pem file, we can use it to launch a MongoDB server instance. Before we do that, one more step is needed. We have to specify a few parameters in the MongoDB config file.
- Navigate to the MongoDB installation directory (where mongod.exe is found)
- Create an empty text file called mongo-config.txt and enter the following text (assuming cer.pem, mongo-config.txt, and all mongod.exe are in the same folder). The password was tested when we created the PEM file. If you used a different one, then change it below.
mongo-config.txt
12345678net:bindIp: localhostssl:mode: requireSSLPEMKeyFile: cert.pemPEMKeyPassword: testallowInvalidCertificates: trueallowInvalidHostnames: true
Start the MongoDB Server using the Config file
Once you create a config file, we can start the MongoDB instance using the following command line to use the new config file with SSL mode enabled. That’s it, your server is now accepting Secure connections using SSL.
|
1 |
mongod -f "mongod-config.txt" |
Using the SSL option in the SSIS MongoDB Connection
Now, let’s look at the steps to secure the MongoDB connection in SSIS.
Prerequisites
Before we look at the Step-By-Step section on securing the MongoDB Connection in SSIS, let’s make sure you meet the following requirements.
- SSIS designer installed. Sometimes it is referred to as BIDS or SSDT (download it from the Microsoft site).
- Basic knowledge of SSIS package development using Microsoft SQL Server Integration Services.
- ZappySys SSIS PowerPack installed. Click on the link to download a FREE trial.
- You have basic familiarity with MongoDB.
Using SSL in the SSIS MongoDB Connection Manager
To enable SSL in SSIS, open the MongoDB connection manager and go to the SSL Tab. Check the Enable SSL option as shown below. Once you do this, and if your MongoDB server is configured correctly to use SSL, then your connection Test will be green, and any traffic between you and your MongoDB server will be encrypted using SSL.
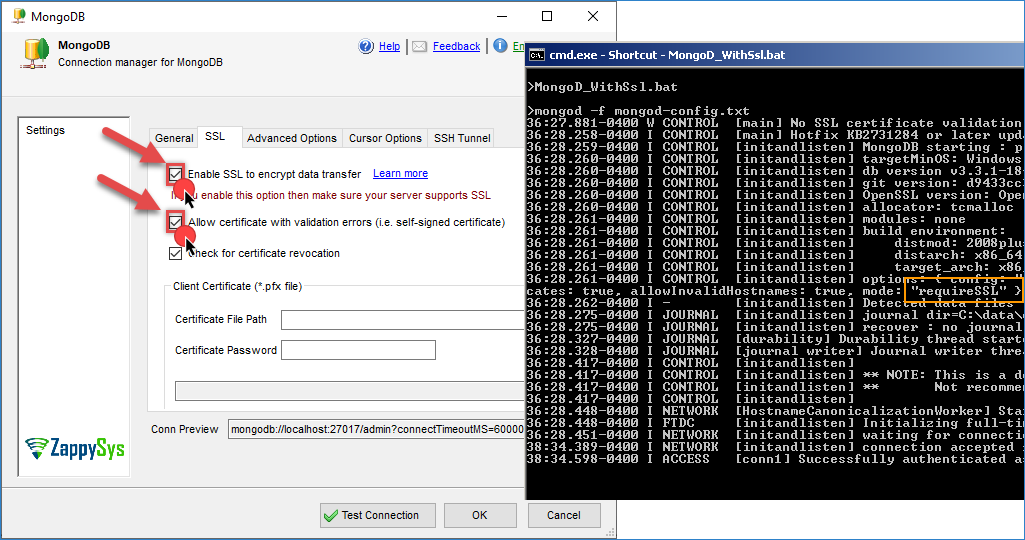
SSIS MongoDB Connection – SSL Settings
Using X509 Client Authentication in SSIS MongoDB Connection Manager
Now, let’s look at how to authenticate using the X509 Client Certificate (X509) method. For this method, you must use the PFX certificate format (do not use PEM). To create a PFX file from the PEM we created earlier, you can run the following command. When prompted, use the same password you used before to generate a private key.
|
1 |
openssl pkcs12 -export -out cert.pfx -inkey server.key -in server.crt |
To learn more about the whole process of how to configure the MongoDB Server to use Client X509 Certificate, check this Article.
Let’s look at the steps to configure the SSIS MongoDB Connection Manager to use X509 Client Certificate Mode.
- Open ZappySys MongoDB Connection Manager UI
- Enter the User ID you created in the $external database (This UserID usually matches the Subject of your Certificate). For example, in our case, UserID may appear as follows. Leave the password blank because it’s not used in the X. 509 method.
1emailAddress=user@myemail.com,CN=127.0.0.1,OU=UNIT,O=DEMO,L=city,ST=test,C=AU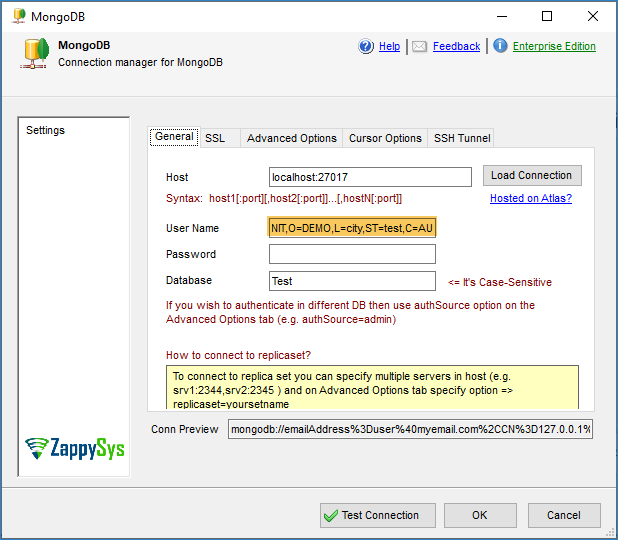
Configure SSIS MongoDB Connection for Client X509 Certificate (Set UserID of $external database)
- Now go to the SSL Tab. Check SSL Option, You can check Ignore SSL Validation error (If it’s a signed certificate)
- Select the PFX file path and enter the certificate password if needed. If you type Path, then Subject Line appears automatically (You can use it as UserID field if you were unsure in Step#1 however, we still recommend making sure UserID is an exact match based on the original name your System Admin created in $external DB)
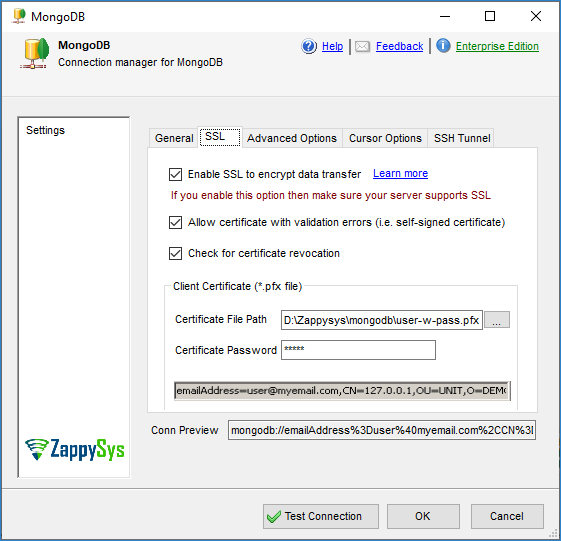
Configure SSIS MongoDB Connection for Client X509 Certificate (Select PFX File – Specify Password)
- Now go to the Advanced Tab and enter the Below Option. By default, MongoDB Connection Manager uses the userid/password mode. To use X509 Auth mode, you must set an option in the Advanced Options table as shown below.
1authMechanism=MONGODB-X509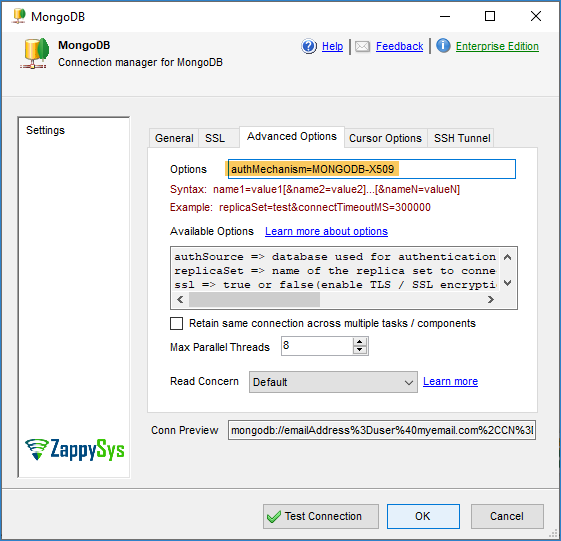
Configure SSIS MongoDB Connection for Client X509 Certificate (Specify authMechanism=MONGODB-X509)
- Click Test connection to make sure it’s successful.