Introduction
![]() Notion is a popular workspace platform used by teams to manage projects, documentation, tasks, and databases in one place. Many organisations store operational data in Notion and need to migrate it to SQL Server for reporting, analytics, and business intelligence.
Notion is a popular workspace platform used by teams to manage projects, documentation, tasks, and databases in one place. Many organisations store operational data in Notion and need to migrate it to SQL Server for reporting, analytics, and business intelligence.
Using Zappysys SSIS PowerPack, you can connect SSIS to Notion REST APIs and extract pages, database records, users, and other objects without writing custom code. This tutorial demonstrates how to connect SSIS to Notion and load data into SQL Server tables using the ZappySys REST API Source.
Prerequisites
- SQL Server Integration Services (SSIS) is installed.
- Visual Studio with SSIS extension or SQL Server Data Tools (SSDT).
- A Notion workspace with at least one database and records.
- Zappysys SSIS PowerPack is installed on your system.
Steps
Create a Notion Integration and Token
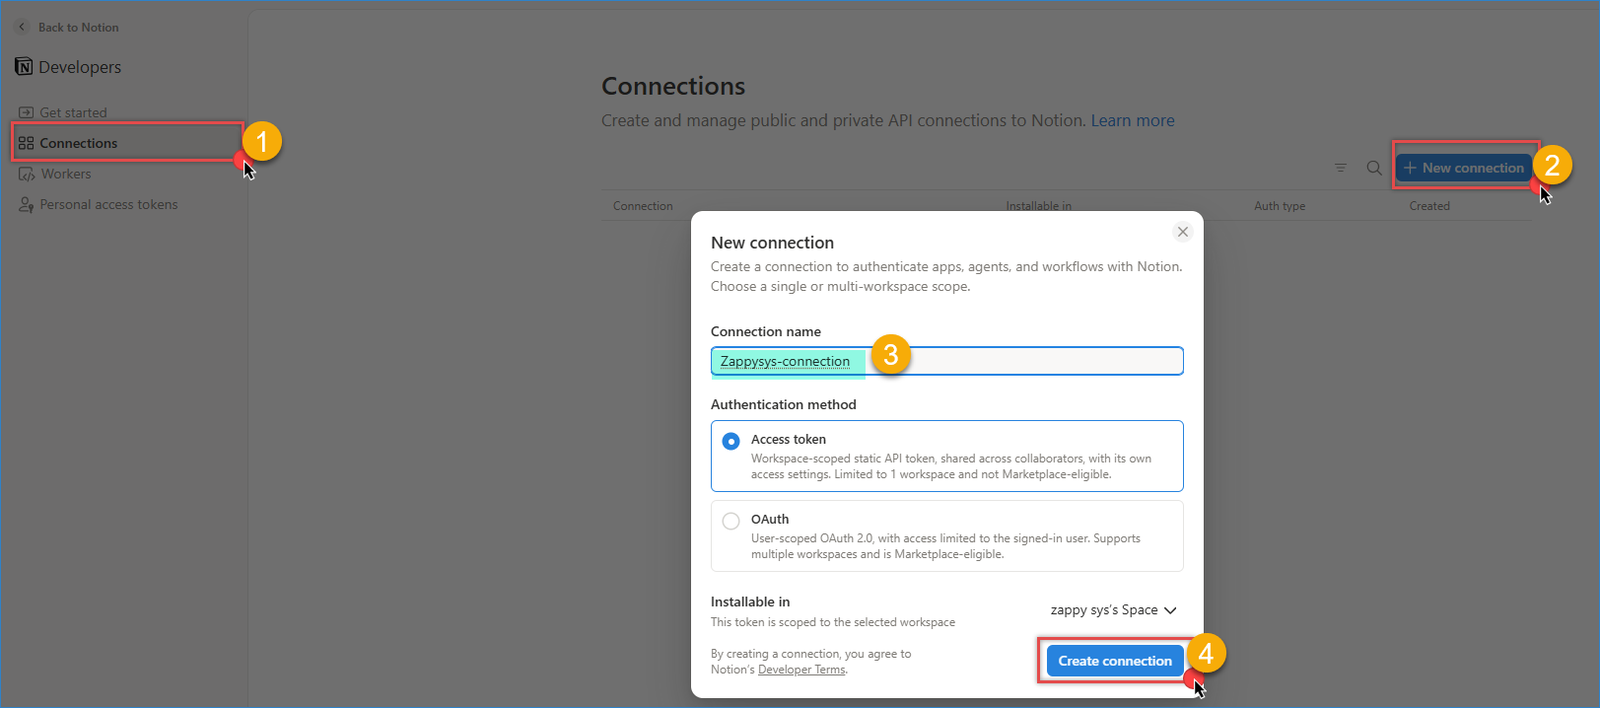
- Go to Notion Integrations and sign in.
- Click New integration.
- Enter a name for your integration and select the target workspace.
- Click Create connection to proceed.
Notion – Create a new connection
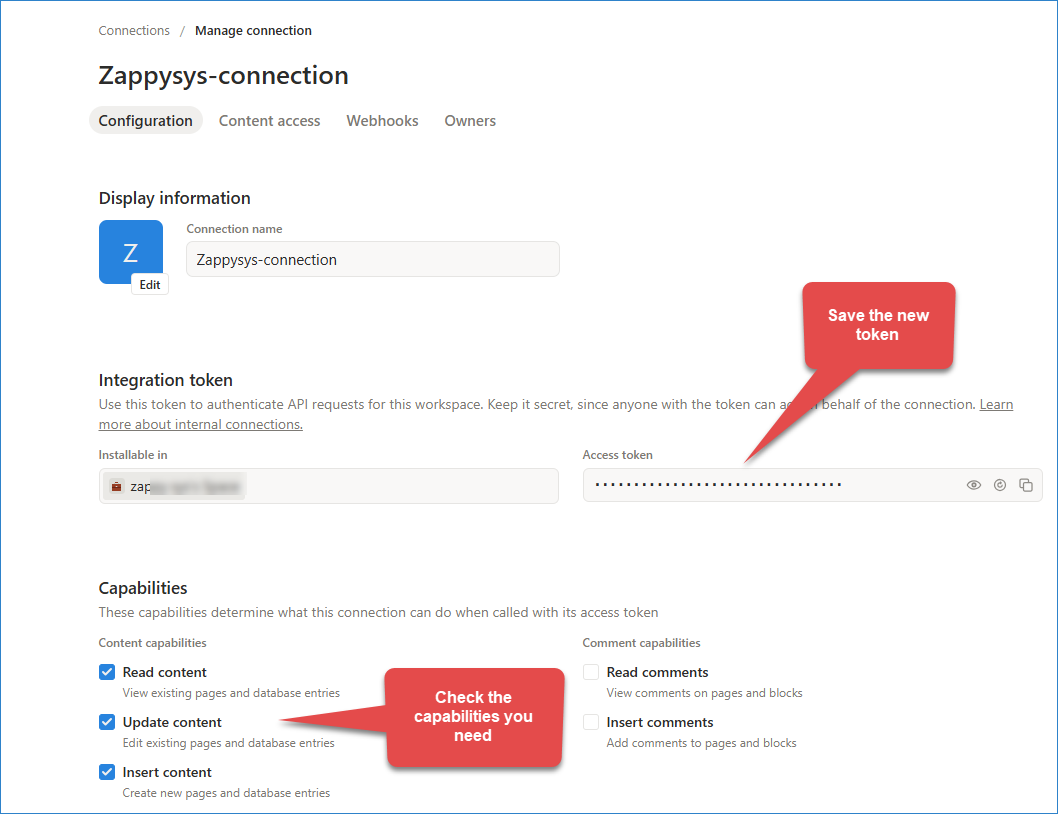
- Configure the capabilities you need by checking or unchecking the relevant options.
- Copy the generated Access Token and store it securely.
Notion – Configure new token
- If you have difficulty creating a new connection, try using the Personal Access Token tab.
Connect your Notion database with your new connection
- Open your target Notion database page in the browser.
- Click … in the top-right corner.
- Click Connections, search for your connection, and select it.
- Confirm access to the connection.
- Copy the database ID from the URL. For example:
- Set URL to:
1https://app.notion.com/p/<<DATABASE_ID>>?v=..........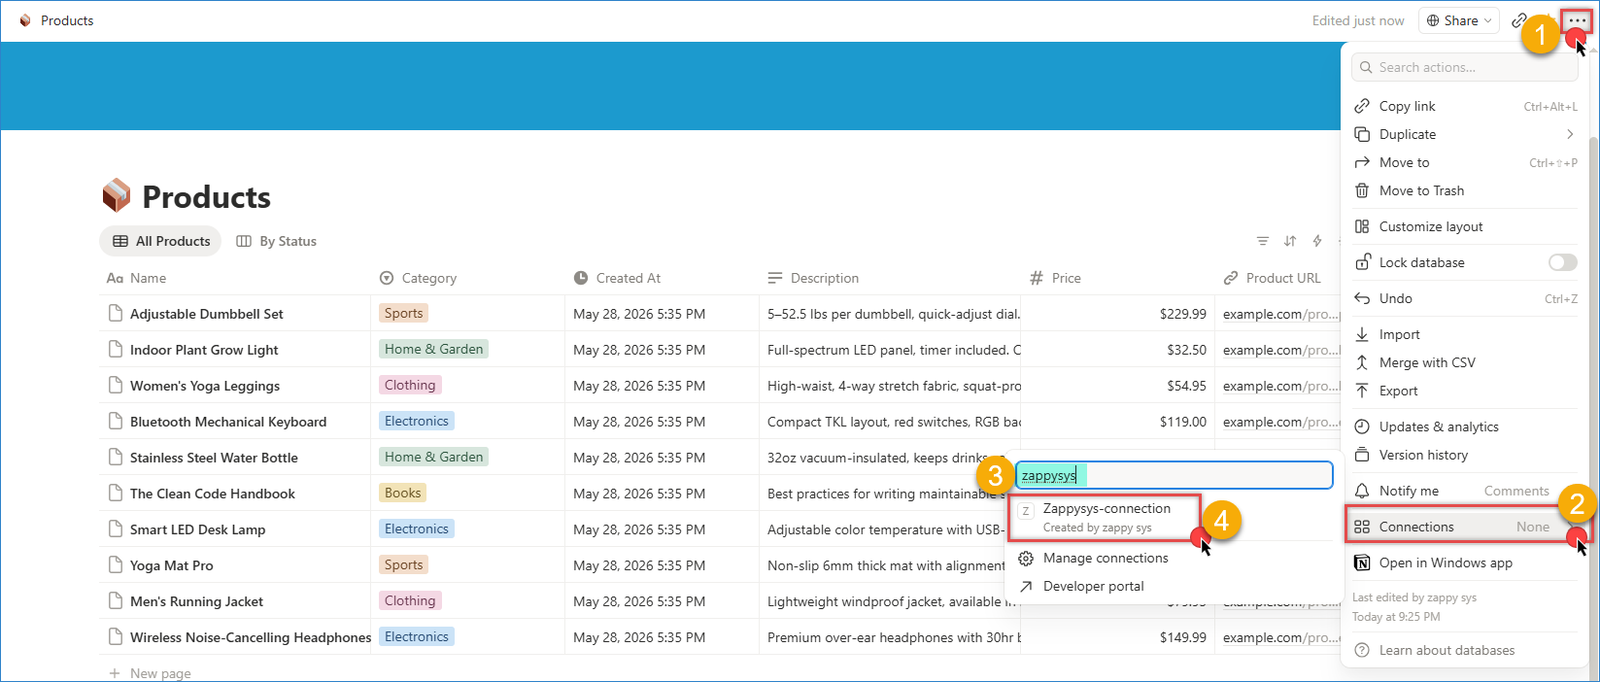
Notion – Set a connection to your table
Create an HTTP connection in SSIS
- Create or open your SSIS project and package.
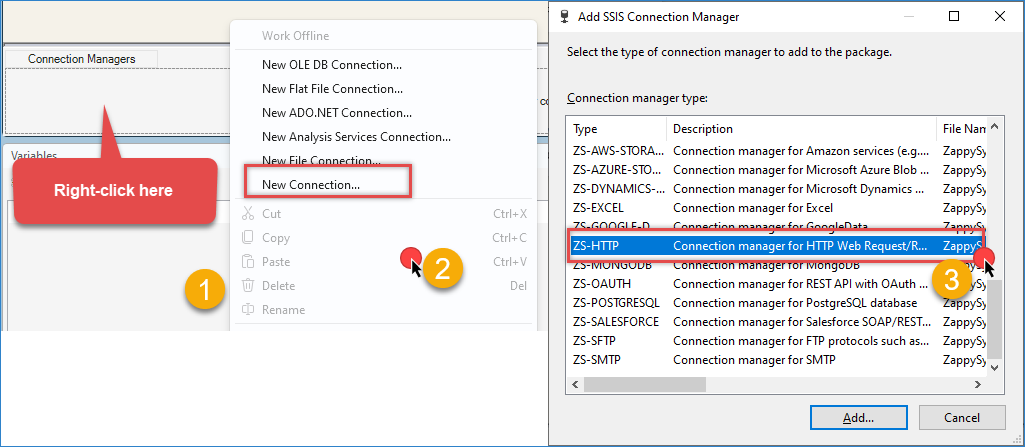
- In Connection Managers, right-click and choose New Connection…
- Select ZS-HTTP from the SSIS connectors list.
Create a new HTTP connection
- Set Credentials Type to Static token/API key.
- Paste your Notion Access token in the token value field.
- Click OK to save the configuration.
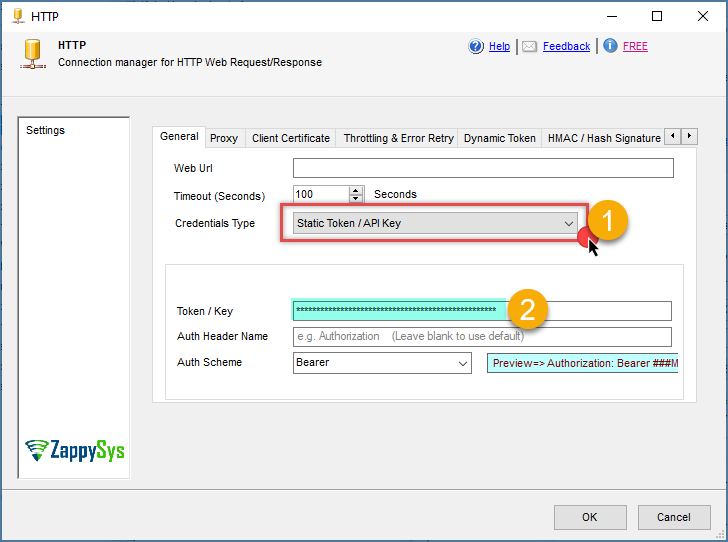
Notion – Connection configuration
Create and Configure REST API Source
- Add a Data Flow Task to the Control Flow and double-click to open it.
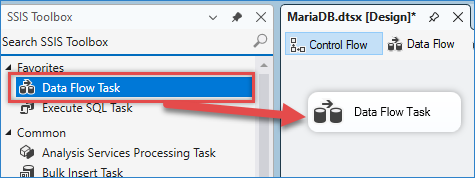
Drag and drop Data flow
- In Data Flow, drag and drop the ZS JSON Source.
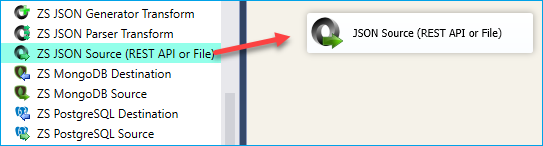
SSIS JSON Source – Drag and Drop
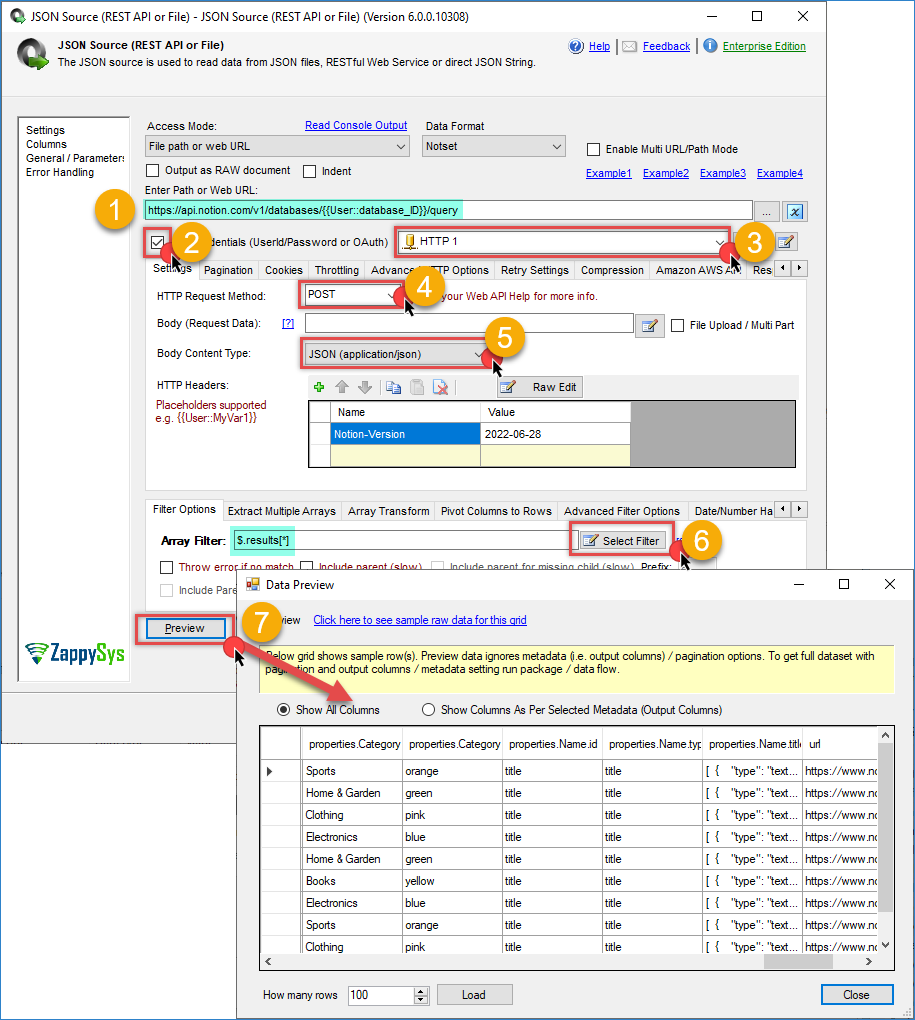
- Open the JSON Source editor and enable Use credentials.
- Select the Notion HTTP connection you created earlier.
- Set URL to:
1https://api.notion.com/v1/databases/{{User::DatabaseId}}/query - Set HTTP Request Method to POST.
- Set Body content type to JSON (application/json).
- Under headers, add: Notion-Version: {NotionVersion}. (Example: 2022-06-28)
- Set JSON Path Filter to extract the object array. Example: $.results[*]
- Click Preview to confirm rows are returned, then click OK to save the configuration.
Notion – JSON source configuration
Configure the destination and run the package
- Drag and drop a destination component (such as OLE DB Destination, Flat File Destination, or Trash Destination) into the Data Flow.
- Connect the output arrow from the JSON Source component to the destination component.
- Double-click the destination component to open its configuration dialogue.
- Configure the destination to point to your target table or file where Notion database data will be stored.
- In the Mappings section, map the columns from the JSON response to the corresponding destination columns.
- Click OK to save the destination configuration.
- Execute the package and verify that the data extraction is working correctly.
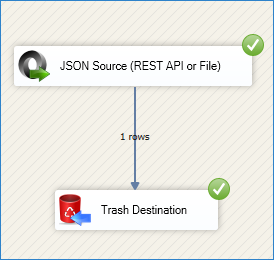
Notion – Final Result
Conclusion
Connecting SSIS to Notion using Zappysys REST API Source enables reliable extraction of workspace data into SQL Server for reporting and analytics. With proper token setup, database sharing, and JSON mapping, you can operationalize Notion data pipelines without custom .NET code.
Explore the full capabilities of the ZappySys SSIS PowerPack to optimize your data integration tasks. By applying this pattern, you can extend your solution to include additional transformations, data validation, error handling, and scheduling through SQL Server Agent.
Need Help?
If you encounter any issues, our support team is here to help:
- Live Chat — Use the chat widget (bottom-right corner of this page)
- Email — support@zappysys.com
- Support Center — Visit the ZappySys Support Portal