How to integrate Outlook Mail (Office 365) with SSAS
Learn how to quickly and efficiently connect Outlook Mail (Office 365) with SSAS for smooth data access.
Read and write Microsoft Outlook Mail (Office 365) data effortlessly. Send, manage, and sync messages, attachments, and folders — almost no coding required. You can do it all using the high-performance Outlook Mail (Office 365) ODBC Driver (powered by Outlook Mail (Office 365) Connector for ZappySys API Driver). We'll walk you through the entire setup.
Ready to dive in? Download the product to jump right in, or follow the step-by-step guide below to see how it works.
Create data source in ZappySys Data Gateway
In this section we will create a data source for Outlook Mail (Office 365) in the Data Gateway. Let's follow these steps to accomplish that:
-
Download and install ODBC PowerPack (if you haven't already).
-
Search for
gatewayin the Windows Start Menu and open ZappySys Data Gateway Configuration:
-
Go to the Users tab and follow these steps to add a Data Gateway user:
- Click the Add button
-
In the Login field enter a username, e.g.,
john - Then enter a Password
- Check the Is Administrator checkbox
- Click OK to save

-
Now we are ready to add a data source:
- Click the Add button
- Give the Data source a name (have it handy for later)
- Then select Native - ZappySys API Driver
- Finally, click OK
OutlookMailOffice365DSNZappySys API Driver
-
When the Configuration window appears give your data source a name if you haven't done that already, then select "Outlook Mail (Office 365)" from the list of Popular Connectors. If "Outlook Mail (Office 365)" is not present in the list, then click "Search Online" and download it. Then set the path to the location where you downloaded it. Finally, click Continue >> to proceed with configuring the DSN:
OutlookMailOffice365DSNOutlook Mail (Office 365)
-
Select your authentication scenario below to expand connection configuration steps to:
- Configure the authentication in Outlook Mail (Office 365).
- Enter those details into the ZappySys API Driver data source configuration.
Outlook Mail (Office 365) authentication
Use delegated access (User Credentials) whenever you want to let a signed-in user work with their own resources or resources they can access. Whether it's an admin setting up policies for their entire organization or a user deleting an email in their inbox, all scenarios involving user actions should use delegated access. [API reference]
Follow these simple steps below to create Microsoft Entra ID application with delegated access:
WARNING: If you are planning to automate processes, we recommend that you use a Application Credentials authentication method. In case, you still need to use User Credentials, then make sure you use a system/generic account (e.g.automation@my-company.com). When you use a personal account which is tied to a specific employee profile and that employee leaves the company, the token may become invalid and any automated processes using that token will start to fail.- Navigate to the Azure Portal and log in using your credentials.
- Access Microsoft Entra ID.
-
Register a new application by going to
App registrations
and clicking on New registration button:
 INFO: Find more information on how to register an application in Graph API reference.
 -
When configuration window opens, configure these fields:
-
Supported account type
- Use
Accounts in this organizational directory only, if you need access to data in your organization only.
- Use
-
Supported account type
-
Redirect URI:
- Set the type to
Public client/native (mobile & desktop). - Use
https://zappysys.com/oauthas the URL.
- Set the type to
-
After registering the app, copy the Application (client) ID for later:

-
Then copy OAuth authorization endpoint (v2) & OAuth token endpoint (v2) URLs to use later in the configuration:

-
Now go to SSIS package or ODBC data source and use the copied values in User Credentials authentication configuration:
- In the Authorization URL field paste the OAuth authorization endpoint (v2) URL value you copied in the previous step.
- In the Token URL field paste the OAuth token endpoint (v2) URL value you copied in the previous step.
- In the Client ID field paste the Application (client) ID value you copied in the previous step.
-
In the Scope field use the default value or select individual scopes, e.g.:
-
email -
offline_access -
openid -
profile -
Mail.Read -
Mail.Read.Shared -
Mail.ReadBasic -
Mail.ReadBasic.Shared -
Mail.ReadWrite -
Mail.ReadWrite.Shared -
Mail.Send -
Mail.Send.Shared -
User.Read -
User.ReadBasic.All -
Group.Read.All
-
- Press Generate Token button to generate Access and Refresh Tokens.
- Optional step. Choose Default User Id from the drop down menu (if someone shared a mailbox with you).
- Click Test Connection to confirm the connection is working.
- Done! Now you are ready to use the API Connector!

API Connection Manager configuration
Just perform these simple steps to finish authentication configuration:
-
Set Authentication Type to
User Credentials [OAuth] - Optional step. Modify API Base URL if needed (in most cases default will work).
- Fill in all the required parameters and set optional parameters if needed.
- Press Generate Token button to generate the tokens.
- Finally, hit OK button:
OutlookMailOffice365DSNOutlook Mail (Office 365)User Credentials [OAuth]https://graph.microsoft.com/v1.0Required Parameters Authorization URL Fill-in the parameter... Token URL Fill-in the parameter... Client ID Fill-in the parameter... Scope Fill-in the parameter... Return URL Fill-in the parameter... Optional Parameters Client Secret Refresh Token File Path Login Prompt Option Default User Id (Select after clicking **Generate Token**) me RetryMode RetryWhenStatusCodeMatch RetryStatusCodeList 429|503 RetryCountMax 5 RetryMultiplyWaitTime True  Find full details in the Outlook Mail (Office 365) Connector authentication reference.
Outlook Mail (Office 365) authentication
Application-only access is broader and more powerful than delegated access (User Credentials), so you should only use app-only access where needed. Use it when: 1. The application needs to run in an automated way, without user input (for example, a daily script that checks emails from certain contacts and sends automated responses). 2. The application needs to access resources belonging to multiple different users (for example, a backup or data loss prevention app might need to retrieve messages from many different chat channels, each with different participants). 3. You find yourself tempted to store credentials locally and allow the app to sign in 'as' the user or admin. [API reference]
Follow these simple steps below to create Microsoft Entra ID application with application access permissions.
- Navigate to the Azure Portal and log in using your credentials.
- Access Microsoft Entra ID.
-
Register a new application by going to
App registrations
and clicking on New registration button:
INFO: Find more information on how to register an application in Graph API reference.
-
When configuration window opens, configure these fields:
-
Supported account type
- e.g. select
Accounts in this organizational directory onlyif you need access to data in your organization only.
- e.g. select
-
Supported account type
-
Redirect URI:
- Set the type to
Public client/native (mobile & desktop). - Leave the URL field empty.
- Set the type to
-
After registering the app, copy the Application (client) ID for later:
-
Then copy OAuth authorization endpoint (v2) & OAuth token endpoint (v2) URLs:
-
Continue and create Client secret:

-
Then copy the Client secret for later steps:

-
Continue by adding permissions for the app by going to the API permissions section, and clicking on Add a permission:

-
Select Microsoft Graph:

-
Then choose Application permissions option:

-
Continue by adding these Mail (Outlook) permissions:

-
Finish by clicking Add permissions button:

-
Now it's time to Grant admin consent for your application:

-
Confirm all the permissions are granted:

-
Now go to SSIS package or ODBC data source and use the copied values in Application Credentials authentication configuration:
- In the Token URL field paste the OAuth token endpoint (v2) URL value you copied in the previous step.
- In the Client ID field paste the Application (client) ID value you copied in the previous step.
- In the Client Secret field paste the Client secret value you copied in the previous step.
- Choose Default User Id from the drop down menu.
- Click Test Connection to confirm the connection is working.
- That's it! Now you can use the connector.
API Connection Manager configuration
Just perform these simple steps to finish authentication configuration:
-
Set Authentication Type to
Application Credentials [OAuth] - Optional step. Modify API Base URL if needed (in most cases default will work).
- Fill in all the required parameters and set optional parameters if needed.
- Finally, hit OK button:
OutlookMailOffice365DSNOutlook Mail (Office 365)Application Credentials [OAuth]https://graph.microsoft.com/v1.0Required Parameters Token URL Fill-in the parameter... Client ID Fill-in the parameter... Client Secret Fill-in the parameter... Scope Fill-in the parameter... Default User Id Fill-in the parameter... Optional Parameters RetryMode RetryWhenStatusCodeMatch RetryStatusCodeList 429|503 RetryCountMax 5 RetryMultiplyWaitTime True  Find full details in the Outlook Mail (Office 365) Connector authentication reference.
 -
Once the data source connection has been configured, it's time to configure the SQL query. Select the Preview tab and then click Query Builder button to configure the SQL query:
 ZappySys API Driver - Outlook Mail (Office 365)Read and write Microsoft Outlook Mail (Office 365) data effortlessly. Send, manage, and sync messages, attachments, and folders — almost no coding required.OutlookMailOffice365DSN
-
Start by selecting the Table or Endpoint you are interested in and then configure the parameters. This will generate a query that we will use in SSAS to retrieve data from Outlook Mail (Office 365). Hit OK button to use this query in the next step.
SELECT * FROM MyMessages Some parameters configured in this window will be passed to the Outlook Mail (Office 365) API, e.g. filtering parameters. It means that filtering will be done on the server side (instead of the client side), enabling you to get only the meaningful data
much faster . -
Now hit Preview Data button to preview the data using the generated SQL query. If you are satisfied with the result, use this query in SSAS:
ZappySys API Driver - Outlook Mail (Office 365)Read and write Microsoft Outlook Mail (Office 365) data effortlessly. Send, manage, and sync messages, attachments, and folders — almost no coding required.OutlookMailOffice365DSNSELECT * FROM MyMessages You can also access data quickly from the tables dropdown by selecting <Select table>.A
WHEREclause,LIMITkeyword will be performed on the client side, meaning that thewhole result set will be retrieved from the Outlook Mail (Office 365) API first, and only then the filtering will be applied to the data. If possible, it is recommended to use parameters in Query Builder to filter the data on the server side (in Outlook Mail (Office 365) servers). -
Click OK to finish creating the data source.
-
Once done, go to the Network Settings tab and Add a firewall rule for inbound traffic:
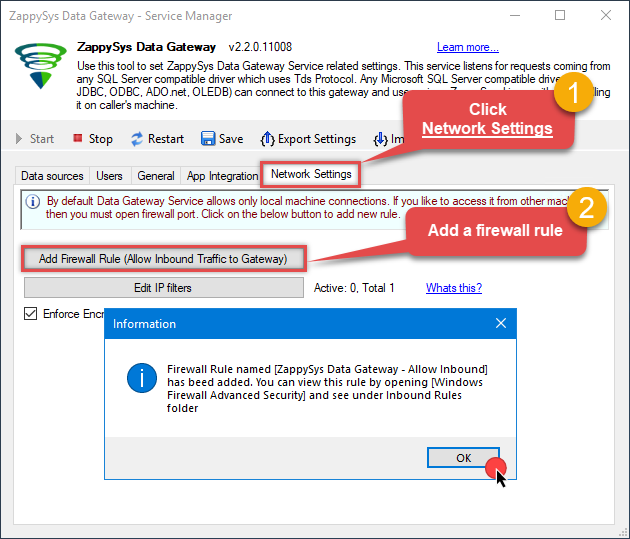
- This will initially allow all inbound traffic.
- Click Edit IP filters to restrict access to specific IP addresses or ranges.
-
Crucial Step: After creating or modifying the data source, you must:
- Click the Save button to persist your changes.
- Hit Yes when prompted to restart the Data Gateway service.
This ensures all changes are properly applied:
 Skipping this step may cause the new settings to fail, preventing you from connecting to the data source.
Read Outlook Mail (Office 365) data in SSAS cube
With the data source created in the Data Gateway (previous step), we're now ready to read Outlook Mail (Office 365) data in an SSAS cube. Before we dive in, open Visual Studio and create a new Analysis Services project. Then, you're all set!
Create data source based on ZappySys Data Gateway
Let's start by creating a data source for a cube, based on the Data Gateway's data source we created earlier. So, what are we waiting for? Let's do it!
-
Create a new data source:

-
Once a window opens,
select Create a data source based on an existing or new connection option and
click New...:

-
Here things become a little complicated, but do not despair, it's only for a little while.
Just perform these little steps:
- Select Native OLE DB\SQL Server Native Client 11.0 as provider.
- Enter your Server name (or IP address) and Port, separated by a comma.
- Select SQL Server Authentication option for authentication.
- Input User name which has admin permissions in the ZappySys Data Gateway.
- In Database name field enter the same data source name you use in the ZappySys Data Gateway.
- Hopefully, our hard work is done, when we Test Connection.
OutlookMailOffice365DSNOutlookMailOffice365DSN If SQL Server Native Client 11.0 is not listed as Native OLE DB provider, try using these:
- Microsoft OLE DB Driver for SQL Server
- Microsoft OLE DB Provider for SQL Server
-
Indeed, life is easy again:

Add data source view
We have data source in place, it's now time to add a data source view. Let's not waste a single second and get on to it!
-
Start by right-clicking on Data Source Views and then choosing New Data Source View...:

-
Select the previously created data source and click Next:

-
Ignore the Name Matching window and click Next.
-
Add the tables you will use in your SSAS cube:
 For cube dimensions, consider creating a Virtual Table in the Data Gateway's data source. Use the
DISTINCTkeyword in theSELECTstatement to get unique values from the facts table, like this:SELECT DISTINCT Country FROM CustomersFor demonstration purposes we are using sample tables which may not be available in Outlook Mail (Office 365). -
Review your data source view and click Finish:

-
Add the missing table relationships and you're done!

Create cube
We have a data source view ready to be used by our cube. Let's create one!
-
Start by right-clicking on Cubes and selecting New Cube... menu item:

-
Select tables you will use for the measures:

-
And then select the measures themselves:

-
Don't stop and select the dimensions too:

-
Move along and click Finish before the final steps:

-
Review your cube before processing it:

-
It's time for the grand finale! Hit Process... to create the cube:

-
A splendid success!

Execute MDX query
The cube is created and processed. It's time to reap what we sow! Just execute an MDX query and get Outlook Mail (Office 365) data in your SSAS cube:

Explore supported Outlook Mail (Office 365) Connector actions
Got a specific use case in mind? We've mapped out exactly how to perform a variety of essential Outlook Mail (Office 365) operations directly in SSAS, so you don't have to figure out the setup from scratch. Check out the step-by-step guides below:
- Delete Message by Id (Single)
- Delete Messages - Using Search Condition (Bulk Delete)
- Download Message Attachment (Single File)
- Download Message Attachments (Multiple Files) - Using Search Condition
- Download Message by Id (Single *.EML File RFC 822 / MIME)
- Download Messages by Search Condition (Multiple *.EML Files RFC 822 / MIME)
- Get Group by Id
- Get Groups
- Get Mail Folder by Id [only works with User Credentials]
- Get Mail Folders
- Get Message Attachment
- Get Message Attachments
- Get Message by Id (Single) - Output binary data (EML RFC 822 / MIME)
- Get Messages
- Get Messages by Search Filters - Output binary data (EML RFC 822 / MIME)
- Get My Information
- Get My Mail Folders [only works with User Credentials]
- Get My Message by Id [only works with User Credentials]
- Get My Messages [only works with User Credentials]
- Get Table Columns
- Get Tables
- Get User by Id
- Get Users
- Send Mail
- Make Generic REST API Request
- Make Generic REST API Request (Bulk Write)
Conclusion
In this article we showed you how to connect to Outlook Mail (Office 365) in SSAS and integrate data without writing complex code — all of this was powered by Outlook Mail (Office 365) ODBC Driver.
Download ODBC PowerPack now or ping us via chat if you have any questions or are looking for a specific feature (you can also reach out to us by submitting a ticket):


 Connector")


 Connector")


 Connector")


