Introduction
 Zendesk is one of the most popular customer service platforms available today. Zendesk offers a REST API to interact with its cloud-based service programmatically (to manage or read data). The problem is that not everyone is a programmer, and not everyone has time to learn how to write C# or JAVA code to access a REST API.
In this article, you will learn how to get Zendesk data using the SSIS JSON Source (REST API Connector). This connector allows you to read Zendesk data in SSIS using REST API Calls without any scripting/programming. Techniques mentioned in this article can also be used to consume data from other services (e.g., read data from Twitter). In this article, you will see step-by-step instructions to read Zendesk ticket information and load it into on-premises SQL Server.
Also, check our other article on how to call the Zendesk REST API to create a new ticket.
Different methods for Zendesk REST API Access
Zendesk allows you to access its data in three different ways.
- REST API access using OAuth Access Token
- REST API access using API Token
- REST API access using Basic Authentication (Use userid (e.g., email) and Password)
Each method has pros and cons. The simplest method is the third, which is easy to use but requires passing your account password with each call. The second method is also easy to use but requires an additional step to create an access token. The first method is the most secure, but it has a few extra steps compared to the other methods.
Prerequisite
Before you can finish the tasks explained in this article, you have to finish the following steps. This article assumes you have basic knowledge of SSIS (SQL Server Integration Services)
- Make sure you have the SSIS designer installed. Sometimes it’s referred to as BIDS or SSDT (Get from here)
- Download SSIS PowerPack (FREE Trial – 30 days).
- Optional – Another very useful Free tool is Fiddler. You can use it to see raw request/response (Check this article)
Method-1: Zendesk API Access using OAuth in SSIS
To read about the OAuth Method, click here
Method-2: Zendesk API Access using Token in SSIS
Now let’s look at the second method for accessing Zendesk data using SSIS.
Create Token in Zendesk Portal for REST API Access
- Log in to your account https://{{your-subdomain}}.zendesk.com/login and then click on the settings icon
- On the next page, click on the API link
- On the API page, scroll to the API Access Tokens section. Make sure the Token Access method is checked.
- Click on the ” add new token hyperlink. Once prompted, give a name to the Token token (this is just a label)
- Once the above steps are done, a token should be created and listed under your API Access page. The token will be used as your Password to access the REST API (will be shown in the next section). For more information, check this link >>> How to generate a token for ZenDesk API Call.

Create a new Zendesk REST API Access Token
Configure SSIS HTTP Connection
Perform the following steps to extract data from Zendesk and load it into SQL Server. The steps below assume that you are using the API Token method (#2 from the supported methods to call the Zendesk API). This is better than using Userid and Password.
- Open a new SSIS Project.
- First of all, drag and drop the Data Flow Task from the SSIS Toolbox and double-click it to edit.
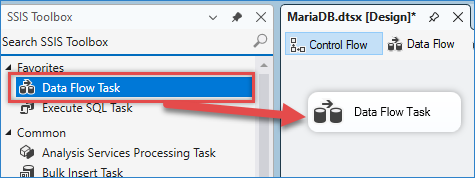
Drag and drop Data flow.w
- From the SSIS toolbox, drag and drop the ZS JSON Source onto the data flow designer surface, then double-click it to edit.
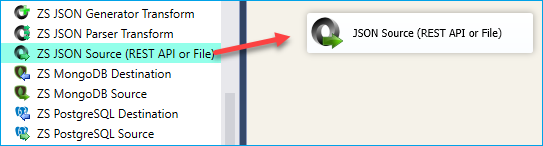
SSIS JSON Source – Drag and Drop
- From the AccessMode dropdown [Url From Connection]
- Assume you want to extract all tickets from Zendesk, then enter the following URL (in the screenshot, we appended?page=1, which is optional)
1https://YOUR_SUB_DOMAIN.zendesk.com/api/v2/tickets.json - Check the Use Credentials option and select New ZS-HTTP connection. When prompted
For Credential Type: select Basic Authentication (Use of UserID and Token ).
For Web URL: Enter any URL (This will be ignored anyway because the URL entered on the JSON Source UI will be used)
For user name : enter YOUR_EMAIL/token (e.g. bob@mycompany.com/token)
For Password: enteToken token obtained from the Admin console > API section. For more information, check this link >>> How to generate a token for ZenDesk API Call.
NOTE: Appending /token command in Userid will allow us to pass the token rather than the Password of that account. This approach is more secure because you can disable the Token at any time without deactivating the user account. If you want to access data using your userid and Password rather than a token, then do not use /token after your email. By default, uToken Token and the use of Password are not allowed unless you enable these methods from the Admin console (See above section)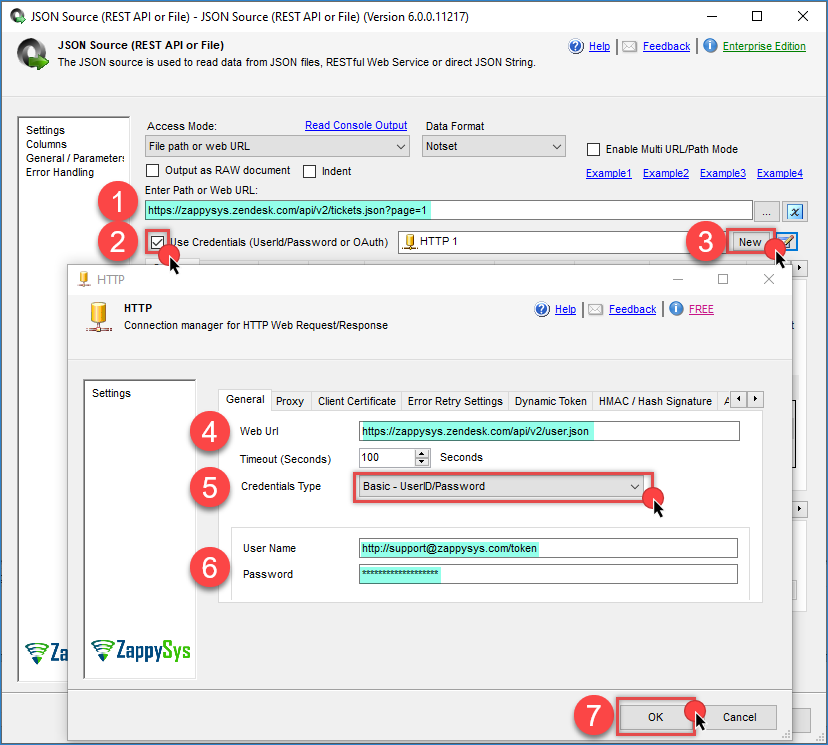
Configure SSIS HTTP Connection – Use Zendesk Token to Call REST API
Adding Retry Settings for HTTP or OAuth connection
Zendesk enforces an API rate limit, which means you cannot issue too many API calls within a given time frame. Check this document for exact information.
ZappySys provides API retry settings on both the OAuth Connection and the HTTP Connection. For Zendesk, you can retry on a specific status code 429
- Open connection manager UI
- Go to the Retry-Settings page
- Select Retry web error on matching response status code.
- Enter 429 for the status code
- Check multiple wait times
- In the wait time, enter 5000 (wait 5 seconds or multiple of 5 seconds)
- Set the max retry count to 6. See the example (It’s not for Zendesk, but will give you an idea)
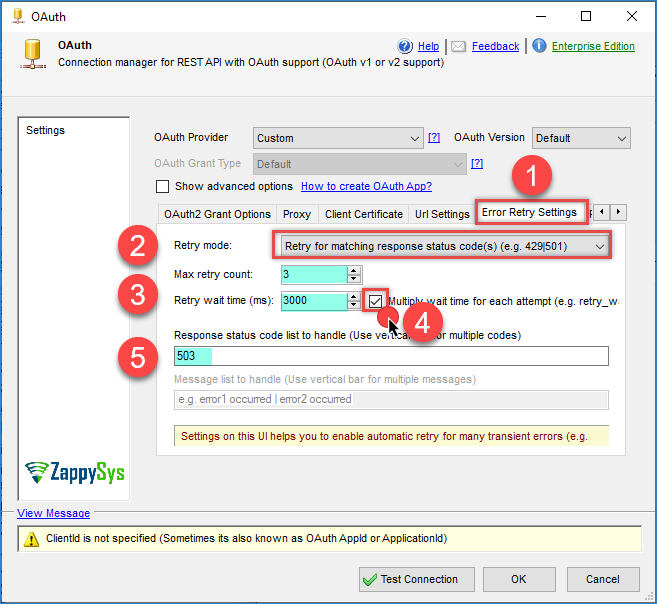
OAuth connection – Retry Options
Configure Zendesk API Pagination and Filter for SSIS JSON Source
- Now click [Select Filter], select the tickets node (see the array icon), and click OK. It will generate the following Filter Expression to extract all records found under the tickets array node (e.g., tickets : [ {…} , {…} … ] )
1$.tickets[*]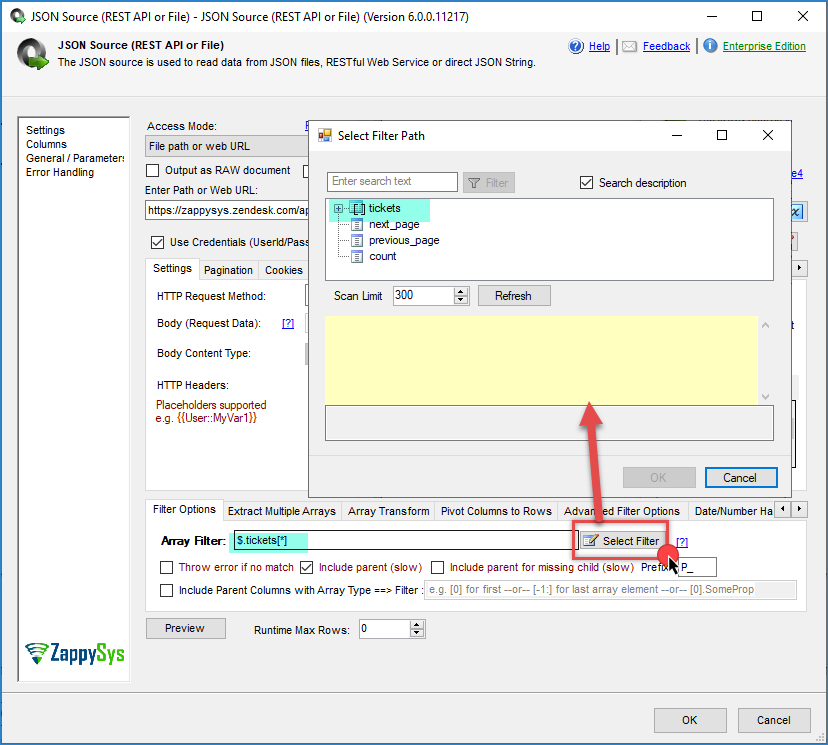
Select Filter – Extract Data from Zendesk API Response (Read Ticket)
- N, let’sts configure pagination. By default, Zendesk API doesn’t return all records, so you have to specify pagination as below. Click on the Pagination Tab. Enter $.next_page for Next URL attribute as below (you can also Browse Path)
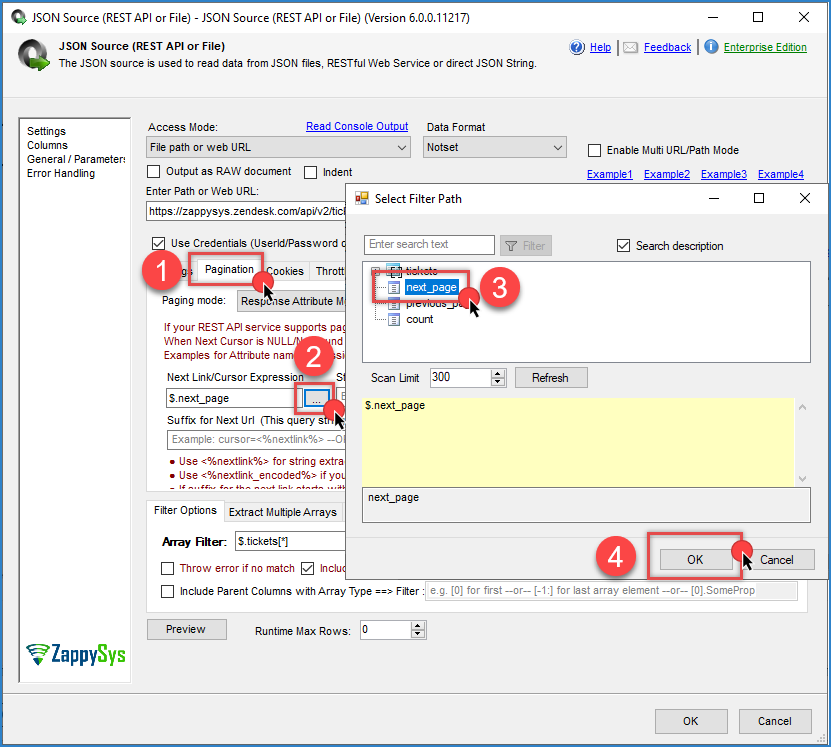
SSIS JSON Source Zendesk Pagination
- Now time to click Preview. If you followed everything correctly, then when you click the Preview Button, you should see some data in the preview (assuming you have at least one ticket).
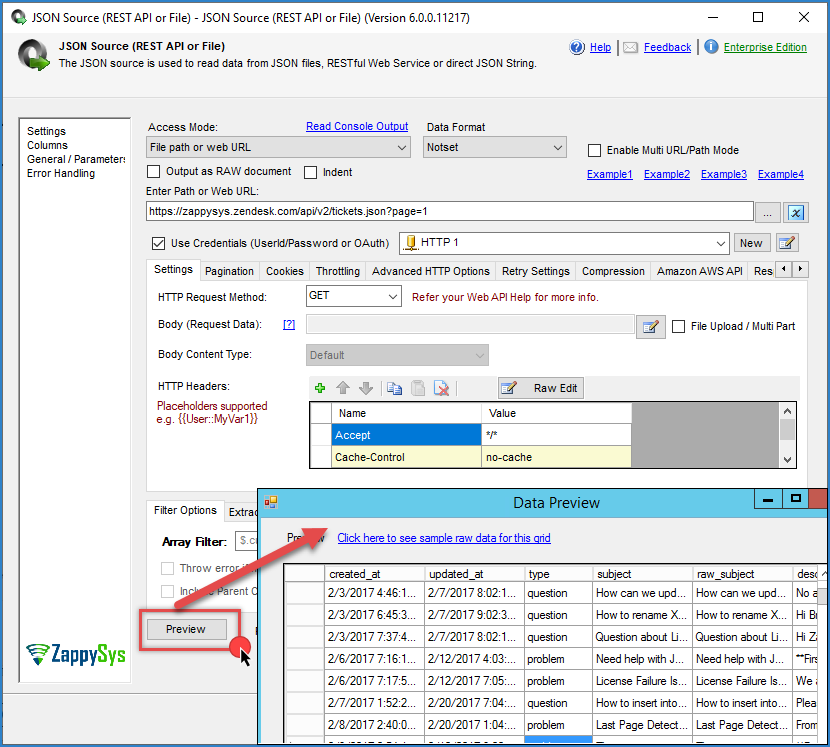
SSIS JSON Source – Data Preview – Zendesk REST API Call to extract tickets
- Now click the Columns tab to review data types (you can change the default length and check the Lock option on the right side). This change is needed because the datatype guess happens based on the design-time setting (only 300 rows scanned by default). At runtime, if you get a truncation-related error, then copy the error message into Notepad to get the exact steps and column name that caused the error. If you need a length greater than 4000 chars, use the DT_NTEXT data type instead (change the datatype and click the column name cell on the right to save the change).
- Click OK to save UI
How to extract Zendesk data using Incremental API
There will be a time when you need to extract data incrementally (i.e., Extract only the changed data since the last load). Zendesk API supports many Incremental API endpoints. If you are using this endpoint, you have to make sure of a few things.
- For the OAuth connection method, make sure the read scope is included ( tickets:read won’t work, so just use read )
- Your URL must include /incremental path before the API type, and you must include start_time for the extract in Unix Epoch Format. The following example will pull records modified after
1https://zappysys.zendesk.com/api/v2/incremental/tickets.json?start_time=1514764800 - On the pagination tab, you have to configure the following settings
- Set Next Link as $.next_link
- Set the Stop Indicator attribute as $.count
- Set the Stop Indicator Value as regex=^\d{1,3}$ Notice that using regex= prefix treats your end indicator value as a pattern check.—OR—
- Set the Stop Indicator attribute as
$.end_of_stream and the Stop indicator value as
<span class="lang:default decode:true crayon-inline ">true
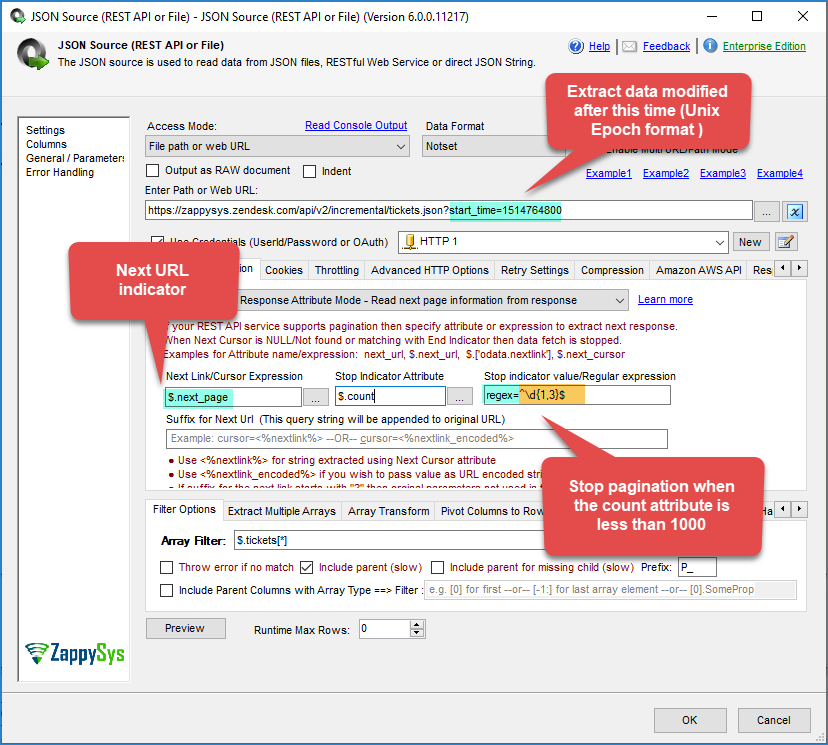
Pagination for Zendesk Incremental API – Next Link and Last Page detection using Stop Indicator Regular Expression
Here is a simple SQL query to convert date/time to Unix time
|
1 2 3 |
select DATEDIFF(SECOND,'1970-01-01', GETUTCDATE() ) select DATEDIFF(SECOND,'1970-01-01', LastExtractDate ) as LastExtractDateAsUnix From dbo.ExtractStatus Where ExtractName='ZendeskExtract' |
For C# code in the SSIS Script Task, you can use something like the following:
|
1 |
Int32 unixTimestamp = (Int32)(DateTime.UtcNow.Subtract(new DateTime(1970, 1, 1))).TotalSeconds; |
Assuming you extracted Date/Time from the database and saved it to some SSIS Variable called User::varLastExtract. Now we like to convert that to Unix format using C#.
We assume you have created the following variables in the SSIS Package. Also, you have set varLastExtract to a date/time value you want to convert.
|
1 2 |
User::varLastExtractTimeUnix (Int32) User::varLastExtractTime (DateTime) |
Use the steps below. to convert date time to Unix format in C#
- Drag and drop Script Task in SSIS designer
- Add both variable names in Read/Write Variable List (e.g., User::varLastExtractTimeUnix, User::varLastTimeExtract ).
- Edit Script
- Enter something like below
12DateTime dtUtc= Convert.ToDateTime( Dts.Variables["User::varLastExtractTime"].Value ).ToUniversalTime();Dts.Variables["User::varLastExtractTimeUnix"].Value = (Int32)(dtUtc.Subtract(new DateTime(1970, 1, 1))).TotalSeconds;
Now you can use this variable in your JSON Source URL to make things dynamic.
|
1 |
https://zappysys.zendesk.com/api/v2/incremental/tickets.json?start_time={{User::varLastExtractTimeUnix}} |
Handling duplicate data during incremental load (DISTINCT)
As per this Zendesk document, they may include the last row of the previous page on the next page if the update timestamp. It is possible to have duplicate rows in your staging table. You can easily avoid this by using the DISTINCT keyword or another SQL query to remove duplicates. Make sure not to include P_next_page and P_count, as they can differ when duplicate rows are detected at page boundaries.
|
1 2 3 4 5 6 7 8 9 10 11 12 13 14 15 16 |
SELECT DISTINCT --[P_next_page] --- Do NOT include this... [P_previous_page] --,[P_count] --- Do NOT include this... ,[url] ,[id] ,[external_id] ,[via.channel] ,[via.source.rel] ,[assignee_id] ...... ...... ...... ,[allow_attachments] FROM [dbo]._stgZendeskTickets |
Loading data from Zendesk to SQL Server using SSIS
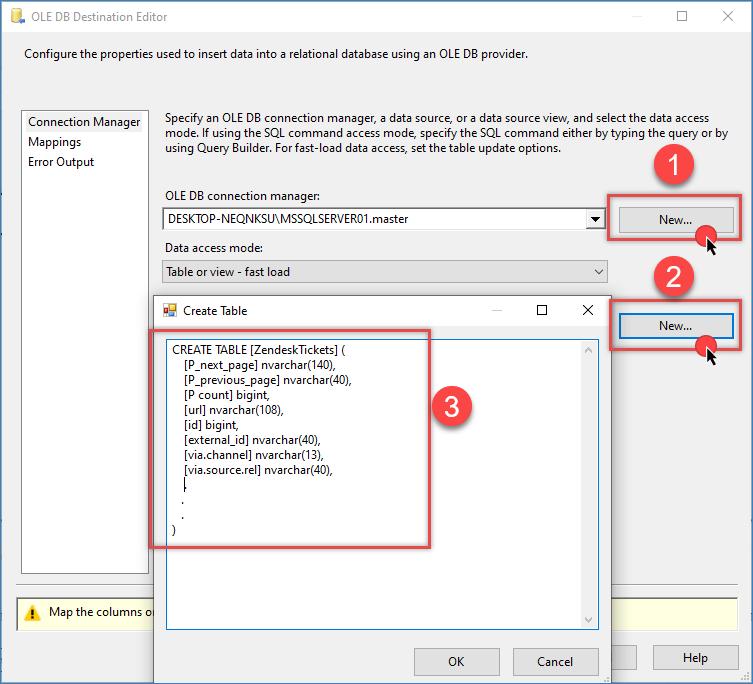
- Now, drag a new OLE DB Destination into the Data Flow Designer. Connect the JSON source with the destination. Now double-click Destination. At the destination, select connection manager (or create one), then click [New] next to the Table name dropdown. You will see default metadata for the table based on upstream columns. Notice how P_previous_link is 40 chars rather than 140. This can be edited in the source metadata under the Columns tab, as described in the previous step, so that Table datatypes are set correctly. Once you change the table name and datatypes, click OK to create the new table. Click on the Mapping Tab to map source columns to target columns. Once that’s done, click OK to save.
Load Zendesk Data into SQL Server Using SSIS JSON Connector (REST API)
- Now execute the package. If you have multiple pages in response, you will notice several requests in the log (e.g., &page=1 … &page=2 …).
NOTE: In below screenshot we used per_page=2 for example purpose only. In reality, make it bigger, e.g., per_page=100 or per_page=200, so you don’t hit the server too often. If you’re not sure, then exclude the per_page parameter from the URL to use the default setting.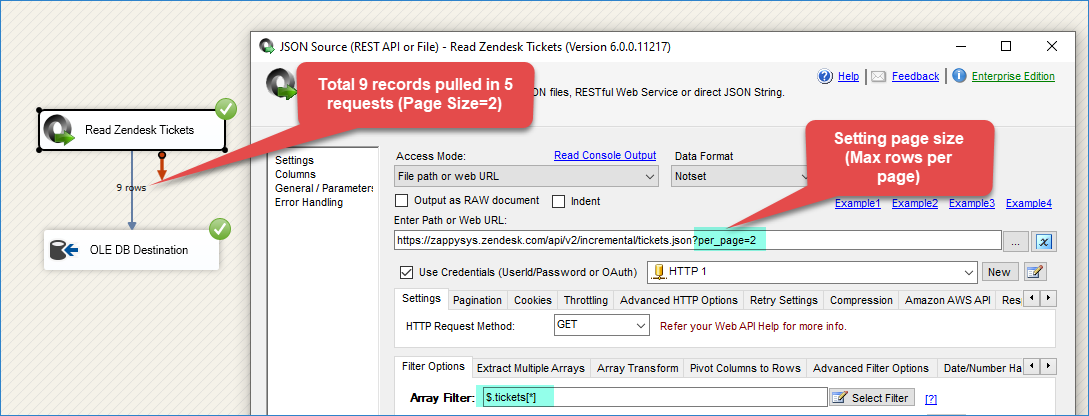
Execute SSIS Package – Extract data from Zendesk and load into SQL Server
Method-3: Zendesk API Access using Username and Password in SSIS (Basic Authentication)
This method is the same as the second method outlined in the previous section. Except for a few changes. When you create an HTTP Connection, use your Username (without appenTokentoken ). For the Password, use your account password (the same one you use to log in to the Zendesk portal)
Zendesk API Rate Limit (Throttling)
Zendesk may limit how many calls you can make per second, so make sure to slow down if you get errors about api rate limit. You can slow down by entering Wait time on the Throttling tab of JSON Source (100 means wait 100 ms after each Request … only useful if pagination is enabled)
Making things Dynamic (e.g., URL)
You can use SSIS variables in your URL to make it dynamic. See below
|
1 |
https://mycompany.zendesk.com/api/v2/items/{{User::TicketNumber}}.json |
Dealing with common errors
For detailed instructions to fix common metadata-related errors, read this article.

SSIS PowerPack – Column Metadata Editor (i.e., Change DataType, Column Length)
The most common error you may face when you run an SSIS package is truncation error. During the design time only 300 rows are scanned from a source (a file or a REST API call response) to detect datatypes but at runtime, it is likely you will retrieve far more records. So it is possible that you will get longer strings than initially expected. For detailed instructions on how to fix common metadata related errors read an article "How to handle SSIS errors (truncation, metadata issues)".
Another frequent error you may get is an authentication error, which happens when you deploy/copy a package to another machine and run it there. Check the paragraph below to see why it happens and how to solve this problem.
Deploy to production
In SSIS package sensitive data such as tokens and passwords are by default encrypted by SSIS with your Windows account which you use to create a package. So SSIS will fail to decrypt tokens/passwords when you run it from another machine using another Windows account. To circumvent this when you are creating an SSIS package which uses authentication components (e.g. an OAuth Connection Manager or an HTTP Connection Manager with credentials, etc.), consider using parameters/variables to pass tokens/passwords. In this way, you won’t face authentication related errors when a package is deployed to a production server.
Check our article on how to configure packages with sensitive data on your production or development server.
Things have gone bad: Error handling & debugging
Incidentally, bad things can happen. A remote server may go offline or your server may go out of memory. In any case, you may want to know when that happens and take actions accordingly. For that purpose, you have to redirect bad rows to some other destination. For this example, we will take and use Web API Destination, but basically, you can use any SSIS component:
Handling errors
- Add a Derived Column above Web API Destination with expression "(DT_WSTR,4000)ZS_JSON_OUT" and name it "JsonAsString". This will let you see what JSON you are actually passing.
- Then add a database or file destination or use another Trash Destination for debugging purposes and redirect the bad rows (red arrow) from Web API Destination into it. Don't forget to set Redirect row option for both, Error and Truncation columns:
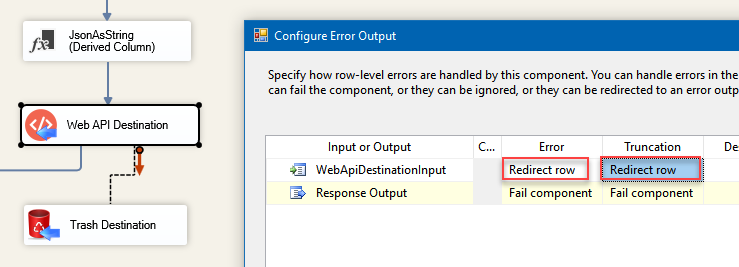
Redirected failed requests from Web API Destination to a desired destination when loading from SQL Server to REST API Service is failing. Derived Column JsonAsString added to be able to read JSON which was passed to Elasticsearch
- Finally, add a Data Viewer for the red path, if you want to debug the flow. You will be able to see URL, JSON and the error message for each record. You may want to copy-paste ErrorMessage to Notepad if you want it to be more readable:
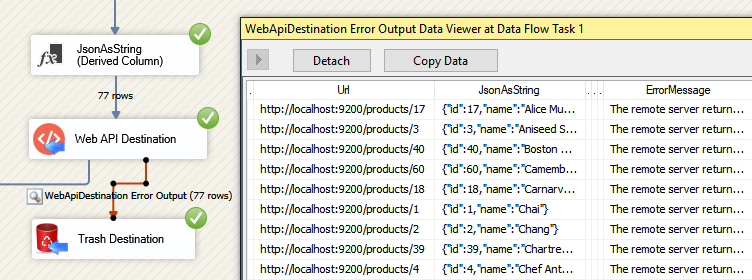
Use Data Viewer to view HTTP requests that failed to be fulfilled.
Debugging HTTP requests
A common thing you have to do when working with HTTP requests is to debug those requests; e.g. to check what headers, body or URL was passed. To test how things look behind the scenes we strongly suggest to use Fiddler - a popular web debugging tool.
Inside it, you can double-click the URL entry (Right side) to see Request and Response Panels. The top panel is Request (URL, Headers, Body) and Bottom Panel is Response. For https:// (secure URL) make sure you enable HTTPS option in Fiddler (Tools > Options > HTTPS > Check Decrypt https request):

Debugging Web API call using Fiddler in SSIS
Conclusion
In this post, you saw how easy it is to read data from Zendesk using the SSIS JSON Source (REST API Connector). Click here to download and try it yourself.
Keywords
Loading Zendesk data into SQL Server
How to read Zendesk tickets in SSIS
Calling Zendesk REST API in SSIS
Fetch Zendesk data using a REST API call in SSIS
Extract Zendesk data using a REST API call in SSIS
Reading data from Zendesk using rest api call
Pulling Zendesk tickets using rest api call