
Video tutorial
Watch this quick video to see the integration in action. It walks you through the end-to-end setup, including:
- Installing the SSIS PowerPack
- Configuring a secure connection to Zoho CRM
- Working with Zoho CRM data directly inside SSIS
- Exploring advanced API Source features
Ready to dive in? Download the product to jump right in, or follow the step-by-step guide below to see how it works.
Prerequisites
Before we begin, make sure the following prerequisites are met:
- SQL Server Data Tools (SSDT) designer installed for Visual Studio.
- SQL Server Integration Services Projects 2022+ Visual Studio extension installed.
- SSIS PowerPack is installed.
Read [dynamic endpoint] in SSIS
-
Open Visual Studio and click Create a new project.
-
Select Integration Services Project. Enter a name and location for your project, then click OK.
-
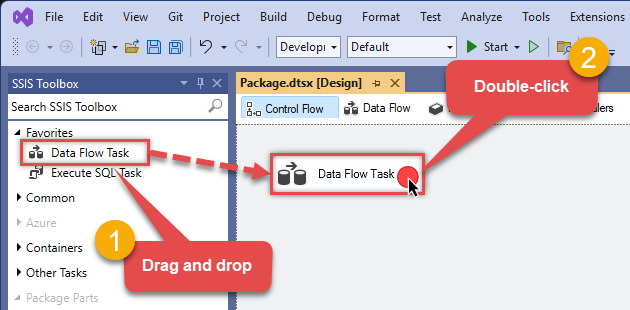
From the SSIS Toolbox, drag and drop a Data Flow Task onto the Control Flow surface, and double-click it:
-
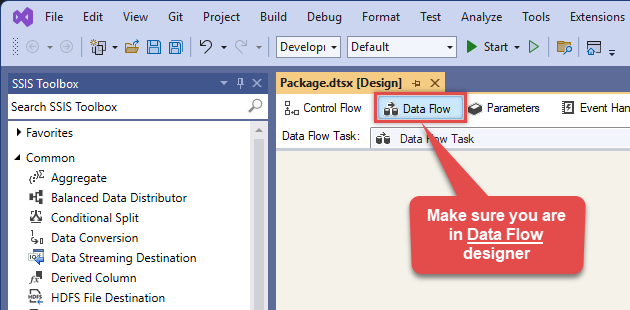
Make sure you are in the Data Flow Task designer:
-
From the SSIS toolbox drag and API Source (Predefined Templates) on the data flow designer surface, and double click on it to edit it:
 - Drag and Drop")
-
Select New Connection to create a new connection:

-
Use a preinstalled Zoho CRM Connector from Popular Connector List or press Search Online radio button to download Zoho CRM Connector. Once downloaded simply use it in the configuration:
Zoho CRM
-
Select your authentication scenario below to expand connection configuration steps to:
- Configure the authentication in Zoho CRM.
- Enter those details into the API Connection Manager configuration.
OAuth
Zoho CRM authentication
OAuth Connection for Zoho CRM API [API reference]
To register custom App, perform the following steps (Detailed steps found in the help link at the end)- Go to Zoho API Console
- Click Add Client link
- Select Server-based Applications option
- Enter desired client name (Display purpose only)
- Enter some URL for Company homepage
- For Authorized Redirect URI enter https://zappysys.com/oauth (Or enter your own but we recommend using ZappySys one if possible). This URL must match on Zoho Connector UI.
- Click CREATE.
- Copy Client ID and Secret and paste on Zoho Connector UI.
API Connection Manager configuration
Just perform these simple steps to finish authentication configuration:
-
Set Authentication Type to
OAuth [OAuth] - Optional step. Modify API Base URL if needed (in most cases default will work).
- Fill in all the required parameters and set optional parameters if needed.
- Press Generate Token button to generate the tokens.
- Finally, hit OK button:
Zoho CRMOAuth [OAuth]https://www.zohoapis.com/crm/[$Version$]Optional Parameters ClientId ClientSecret Permissions ZohoCRM.settings.all ZohoCRM.modules.all ZohoCRM.coql.READ AccountUrl https://accounts.zoho.com RedirectUrl https://zappysys.com/oauth API Version v2 RetryMode RetryWhenStatusCodeMatch RetryStatusCodeList 429 RetryCountMax 5 RetryMultiplyWaitTime True  Find full details in the Zoho CRM Connector authentication reference.
 -
Select [Dynamic Table] table from the dropdown and hit Preview Data:
 API Source - Zoho CRMRead and write Zoho CRM data effortlessly. Integrate, manage, and automate accounts, leads, contacts, and deals — almost no coding required.Zoho CRM[Dynamic Table]
Optional Parameters Module [$parent.api_name$] Fetch records modified after (local time format: yyyy-MM-ddTHH:mm:ss) 1900-12-31T00:00:00 Custom View ID DisableChildEndPoint True FieldsValue id Fields (Only for V2 API) sort_by sort_order territory_id include_child converted PagingMode ByUrlParameter NextUrlAttributeOrExpr $.info.next_page_token NextUrlSuffix page_token=<%nextlink%> 
-
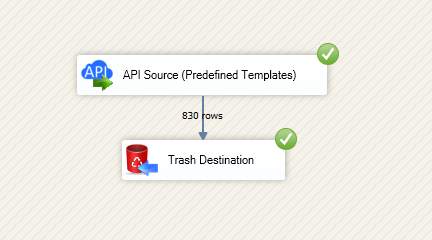
That's it! We are done! Just in a few clicks we configured the call to Zoho CRM using Zoho CRM Connector.
You can load the source data into your desired destination using the Upsert Destination , which supports SQL Server, PostgreSQL, and Amazon Redshift. We also offer other destinations such as CSV , Excel , Azure Table , Salesforce , and more . You can check out our SSIS PowerPack Tasks and components for more options. (*loaded in Trash Destination)
Zoho CRM Connector actions
Need another use case? Pick the next Zoho CRM action in SSIS below.
- Add / Update Tags for records
- Delete [Dynamic Endpoint]
- Gets record count for specific tag for module
- Insert [Dynamic Endpoint]
- List Module Fields
- List Module Settings
- List Modules
- List Tags
- List Territories
- List Views
- Read [Dynamic Endpoint] (Use this for fewer than 50 Fields in v3+)
- Read Data (Query Mode - Max 200 Rows Only)
- Search [Dynamic Endpoint]
- Update [Dynamic Endpoint]
- Upsert [Dynamic Endpoint] (Update or Insert)
- Make Generic REST API Request
- Make Generic REST API Request (Bulk Write)
Conclusion
You now know how to read [dynamic endpoint] in SSIS without writing complex code. Zoho CRM SSIS Connector handled pagination and authentication automatically.
Ready to get started? Download the trial or ping us via chat if you need help:


 Connector")


 Connector")


 Connector")


 Connector")


