Create data source using ServiceNow ODBC Driver
Video instructions
Watch this quick walkthrough to see how to configure your ServiceNow ODBC data source, or scroll down for the step-by-step written guide.
Step-by-step instructions
-
Download and install ODBC PowerPack (if you haven't already).
-
Search for
odbcand open the ODBC Data Sources (64-bit):
-
Create a User data source (User DSN) based on the ZappySys API Driver driver:
ZappySys API Driver
- Create and use a User DSN if the client application runs under a User Account. This is the ideal option at design time (e.g., when developing in Visual Studio). Use it for both types of applications (64-bit and 32-bit).
- Create and use a System DSN if the client application runs under a System Account (e.g., as a Windows Service). This is usually the required option in a production environment. If your Windows Service is a 32-bit application, you must use the 32-bit ODBC Data Source Administrator to configure this
-
When the Configuration window appears give your data source a name if you haven't done that already, then select "ServiceNow" from the list of Popular Connectors. If "ServiceNow" is not present in the list, then click "Search Online" and download it. Then set the path to the location where you downloaded it. Finally, click Continue >> to proceed with configuring the DSN:
ServicenowDSNServiceNow
-
Select your authentication scenario below to expand connection configuration steps to:
- Configure the authentication in ServiceNow.
- Enter those details into the ZappySys API Driver data source configuration.
Basic Auth (UserName and Password)
ServiceNow authentication
Authenticate using ServiceNow instance username and password.
Locate your ServiceNow instance credentials and use them for HTTP authentication:
- Go to https://developer.servicenow.com/dev.do and log in.
- Click on your profile picture.
-
When a menu appears, click on Manage instance password or a similar option:

-
In a new window you will see your HTTP Basic Authentication credentials:

-
Done! Use this username and password when configuring HTTP Authentication parameters.
API Connection Manager configuration
Just perform these simple steps to finish authentication configuration:
-
Set Authentication Type to
Basic Auth (UserName and Password) [Http] - Optional step. Modify API Base URL if needed (in most cases default will work).
- Fill in all the required parameters and set optional parameters if needed.
- Finally, hit OK button:
ServicenowDSNServiceNowBasic Auth (UserName and Password) [Http]https://[$InstanceName$].service-now.com/api/nowRequired Parameters InstanceName (e.g. mycompany) Fill-in the parameter... User name Fill-in the parameter... Password Fill-in the parameter... Optional Parameters ApiVersion v2 RetryMode RetryWhenStatusCodeMatch RetryStatusCodeList 429 RetryCountMax 5 RetryMultiplyWaitTime True Date Time Value Handling  Find full details in the ServiceNow Connector authentication reference.
OAuth Authorization Code Grant (User Creds)
ServiceNow authentication
Authenticate using OAuth 2.0 Authorization Code Flow (3-legged)
Create OAuth application and use it for authentication:
- Login to your instance at https://your-instance-id.service-now.com.
-
Start by clicking on menu item All, then search for oauth, and click Application Registry option:

-
Then click button New:

-
Continue by clicking Create an OAuth API endpoint for external clients option:

-
Move on by naming your OAuth application and entering a Client Secret (or let it be generated automatically).
- Click on the lock icon next to the Redirect URL. Enter
https://zappysys.com/oauth. This is not needed if you use Client Credentials Grant or Password Grant -
Finally give it a final touch by increasing the Refresh Token Lifespan value to
315,360,000(it should last for 10 years):
- Change Default Grant Type as per your need. NOTE: If you prefer to use Client Credentials grant (Service account style access without using real userid-password) then your admin must enable it. Client Credentials is only supported on instances where it is explicitly enabled by the ServiceNow administrator. Its not supported in Dev / Free instance.
-
Done! Now you can use Client ID and Client Secret when configuring OAuth Authentication parameters.
Enable Client Credentials Grant Type
-
Enable the Client Credentials Grant Type:
Go to System Properties > All Properties, create a new property named
glide.oauth.inbound.client.credential.grant_type.enabled, and set it to true. - Configure the OAuth Application: Navigate to System OAuth > Application Registry, click New, and select Create an OAuth API endpoint for external clients. Set the name and save the record. In the Default Grant Type field, select Client Credentials and associate it with the integration user.
API Connection Manager configuration
Just perform these simple steps to finish authentication configuration:
-
Set Authentication Type to
OAuth Authorization Code Grant (User Creds) [OAuth] - Optional step. Modify API Base URL if needed (in most cases default will work).
- Fill in all the required parameters and set optional parameters if needed.
- Press Generate Token button to generate the tokens.
- Finally, hit OK button:
ServicenowDSNServiceNowOAuth Authorization Code Grant (User Creds) [OAuth]https://[$InstanceName$].service-now.com/api/nowRequired Parameters Redirect URI (***Must match as App Registry Page***) Fill-in the parameter...  Find full details in the ServiceNow Connector authentication reference.
OAuth Client Credentials Grant (Must be enabled by Admin)
ServiceNow authentication
Authenticate using OAuth Client Credentials Grant (Client ID and Client Secret). [API reference]
Create OAuth application and use it for authentication:
- Login to your instance at https://your-instance-id.service-now.com.
-
Start by clicking on menu item All, then search for oauth, and click Application Registry option:
-
Then click button New:
-
Continue by clicking Create an OAuth API endpoint for external clients option:
-
Move on by naming your OAuth application and entering a Client Secret (or let it be generated automatically).
- Click on the lock icon next to the Redirect URL. Enter
https://zappysys.com/oauth. This is not needed if you use Client Credentials Grant or Password Grant -
Finally give it a final touch by increasing the Refresh Token Lifespan value to
315,360,000(it should last for 10 years):
- Change Default Grant Type as per your need. NOTE: If you prefer to use Client Credentials grant (Service account style access without using real userid-password) then your admin must enable it. Client Credentials is only supported on instances where it is explicitly enabled by the ServiceNow administrator. Its not supported in Dev / Free instance.
-
Done! Now you can use Client ID and Client Secret when configuring OAuth Authentication parameters.
Enable Client Credentials Grant Type
-
Enable the Client Credentials Grant Type:
Go to System Properties > All Properties, create a new property named
glide.oauth.inbound.client.credential.grant_type.enabled, and set it to true. - Configure the OAuth Application: Navigate to System OAuth > Application Registry, click New, and select Create an OAuth API endpoint for external clients. Set the name and save the record. In the Default Grant Type field, select Client Credentials and associate it with the integration user.
API Connection Manager configuration
Just perform these simple steps to finish authentication configuration:
-
Set Authentication Type to
OAuth Client Credentials Grant (Must be enabled by Admin) [OAuth] - Optional step. Modify API Base URL if needed (in most cases default will work).
- Fill in all the required parameters and set optional parameters if needed.
- Finally, hit OK button:
ServicenowDSNServiceNowOAuth Client Credentials Grant (Must be enabled by Admin) [OAuth]https://[$InstanceName$].service-now.com/api/nowThere are no parameters to configure.  Find full details in the ServiceNow Connector authentication reference.
OAuth Password Grant
ServiceNow authentication
Authenticate using OAuth Password Grant (ServiceNow instance username, password, OAuth Client ID, and Client Secret). [API reference]
Create OAuth application and use it for authentication:
- Login to your instance at https://your-instance-id.service-now.com.
-
Start by clicking on menu item All, then search for oauth, and click Application Registry option:
-
Then click button New:
-
Continue by clicking Create an OAuth API endpoint for external clients option:
-
Move on by naming your OAuth application and entering a Client Secret (or let it be generated automatically).
- Click on the lock icon next to the Redirect URL. Enter
https://zappysys.com/oauth. This is not needed if you use Client Credentials Grant or Password Grant -
Finally give it a final touch by increasing the Refresh Token Lifespan value to
315,360,000(it should last for 10 years):
- Change Default Grant Type as per your need. NOTE: If you prefer to use Client Credentials grant (Service account style access without using real userid-password) then your admin must enable it. Client Credentials is only supported on instances where it is explicitly enabled by the ServiceNow administrator. Its not supported in Dev / Free instance.
-
Done! Now you can use Client ID and Client Secret when configuring OAuth Authentication parameters.
Enable Client Credentials Grant Type
-
Enable the Client Credentials Grant Type:
Go to System Properties > All Properties, create a new property named
glide.oauth.inbound.client.credential.grant_type.enabled, and set it to true. - Configure the OAuth Application: Navigate to System OAuth > Application Registry, click New, and select Create an OAuth API endpoint for external clients. Set the name and save the record. In the Default Grant Type field, select Client Credentials and associate it with the integration user.
API Connection Manager configuration
Just perform these simple steps to finish authentication configuration:
-
Set Authentication Type to
OAuth Password Grant [OAuth] - Optional step. Modify API Base URL if needed (in most cases default will work).
- Fill in all the required parameters and set optional parameters if needed.
- Finally, hit OK button:
ServicenowDSNServiceNowOAuth Password Grant [OAuth]https://[$InstanceName$].service-now.com/api/nowRequired Parameters User name Fill-in the parameter... Password Fill-in the parameter...
Find full details in the ServiceNow Connector authentication reference. -
Then go to Preview tab to start building a SQL query.
-
Once you do that, proceed by opening Query Builder:
 ZappySys API Driver - ServiceNowRead and write ServiceNow data effortlessly. Integrate, manage, and automate incidents, tasks, attachments, and records — almost no coding required.ServicenowDSN
-
Then simply select the Get Table Rows endpoint (action).
-
Continue by configuring the Required parameters. You can also set optional parameters too.
-
Move on by hitting Preview Data button to preview the results.
-
If you see the results you need, simply copy the generated query:

-
Click OK to use built SQL query and close the Query Builder.
-
Now hit Preview Data button to preview the data using the generated SQL query. If you are satisfied with the result, use this query in Microsoft Fabric:
 ZappySys API Driver - ServiceNowRead and write ServiceNow data effortlessly. Integrate, manage, and automate incidents, tasks, attachments, and records — almost no coding required.ServicenowDSN
SELECT * FROM incident --Using Primary Key --SELECT * FROM any_table_here WHERE sys_id='109562a3c611227500a7b7ff98cc0dc7' --Primary Key in WHERE clause --OR-- --Use below to query system / hidden tables (faster response - No Table name lookup needed in below) SELECT * FROM get_table_rows WITH(TableName='incident', Query='number=INC0000001') --================================= --Examples: Using Filter Expression --================================= -- Incremental Load Pattern: Load only incidents updated in the last 24 hours (see FUN_TO_DATETIME function help for more information, you can use +/- d, m, y, min,h,s along with now, today, yesterday, weekstart, weekend, monthstart, monthend, yearstart, yearend functions) --SELECT * FROM incident WITH(Query='sys_updated_on>=<<today-1d,FUN_TO_DATETIME>>') --SELECT * FROM incident WITH(Query='number=INC0000001') --Equal condition --SELECT * FROM incident WITH(Query='number!=INC0000001') --Not equal condition --SELECT * FROM incident WITH(Query='numberININC0000001,INC0000002,INC0000003') --IN condition --SELECT * FROM incident WITH(Query='number=INC0000001^state=7') --AND condition --SELECT * FROM incident WITH(Query='number=INC0000001^ORnumber=INC0000002') --OR condition --SELECT * FROM incident WITH(Query='numberLIKE0001') --LIKE condition --SELECT * FROM incident WITH(Query='numberSTARTSWITHINC00') --StartWith condition --SELECT * FROM incident WITH(Query='numberENDSWITH0001') --StartWith condition --SELECT * FROM incident WITH(Query='number=INC0000001^state=7^NQORnumber=INC0000002') --AND / OR MIXED using NQ (NewQuery Operator) -- (number=INC0000001 and state=7) OR (number=INC0000002) --more information about filter here https://docs.servicenow.com/bundle/utah-platform-user-interface/page/use/common-ui-elements/reference/r_OpAvailableFiltersQueries.html -- To read all available tables execute this query: -- SELECT * FROM Tables -- Other common tables: ----------------------- -- SELECT * FROM sys_db_object -- SELECT * FROM sys_dictionary -- SELECT * FROM sys_user -- SELECT * FROM sys_user_has_role -- SELECT * FROM sys_user_grmember -- SELECT * FROM task -- SELECT * FROM task_sla -- SELECT * FROM incident -- SELECT * FROM incident_sla -- SELECT * FROM change_request -- SELECT * FROM cmdb_ci_computer -- SELECT * FROM cmdb_ci_outage -- SELECT * FROM cmdb_ci -- SELECT * FROM sn_customerservice_case -- SELECT * FROM kb_knowledge -- SELECT * FROM kb_use -- SELECT * FROM sc_req_item -- SELECT * FROM sc_request -- SELECT * FROM sc_task You can also access data quickly from the tables dropdown by selecting <Select table>.A
WHEREclause,LIMITkeyword will be performed on the client side, meaning that thewhole result set will be retrieved from the ServiceNow API first, and only then the filtering will be applied to the data. If possible, it is recommended to use parameters in Query Builder to filter the data on the server side (in ServiceNow servers).
Let's not stop here and explore SQL query examples, including how to use them in Stored Procedures and Views (virtual tables) in the next steps.
ServiceNow SQL query examples
Use these SQL queries in your Microsoft Fabric data source:
Read incidents
Gets a list of incidents from the incident table. You can use this pattern to read from any other table by changing the table name.
SELECT * FROM incident

--Using Primary Key
--SELECT * FROM any_table_here WHERE sys_id='109562a3c611227500a7b7ff98cc0dc7' --Primary Key in WHERE clause

--OR--

--Use below to query system / hidden tables (faster response - No Table name lookup needed in below)
SELECT * FROM get_table_rows WITH(TableName='incident', Query='number=INC0000001')

--=================================
--Examples: Using Filter Expression
--=================================
-- Incremental Load Pattern: Load only incidents updated in the last 24 hours (see FUN_TO_DATETIME function help for more information, you can use +/- d, m, y, min,h,s along with now, today, yesterday, weekstart, weekend, monthstart, monthend, yearstart, yearend functions)
--SELECT * FROM incident WITH(Query='sys_updated_on>=<<today-1d,FUN_TO_DATETIME>>')

--SELECT * FROM incident WITH(Query='number=INC0000001') --Equal condition
--SELECT * FROM incident WITH(Query='number!=INC0000001') --Not equal condition
--SELECT * FROM incident WITH(Query='numberININC0000001,INC0000002,INC0000003') --IN condition
--SELECT * FROM incident WITH(Query='number=INC0000001^state=7') --AND condition
--SELECT * FROM incident WITH(Query='number=INC0000001^ORnumber=INC0000002') --OR condition
--SELECT * FROM incident WITH(Query='numberLIKE0001') --LIKE condition
--SELECT * FROM incident WITH(Query='numberSTARTSWITHINC00') --StartWith condition
--SELECT * FROM incident WITH(Query='numberENDSWITH0001') --StartWith condition
--SELECT * FROM incident WITH(Query='number=INC0000001^state=7^NQORnumber=INC0000002') --AND / OR MIXED using NQ (NewQuery Operator)  -- (number=INC0000001 and state=7) OR (number=INC0000002)

--more information about filter here https://docs.servicenow.com/bundle/utah-platform-user-interface/page/use/common-ui-elements/reference/r_OpAvailableFiltersQueries.html


-- To read all available tables execute this query:
-- SELECT * FROM Tables

-- Other common tables:
-----------------------
-- SELECT * FROM sys_db_object
-- SELECT * FROM sys_dictionary
-- SELECT * FROM sys_user
-- SELECT * FROM sys_user_has_role
-- SELECT * FROM sys_user_grmember
-- SELECT * FROM task
-- SELECT * FROM task_sla
-- SELECT * FROM incident
-- SELECT * FROM incident_sla
-- SELECT * FROM change_request
-- SELECT * FROM cmdb_ci_computer
-- SELECT * FROM cmdb_ci_outage
-- SELECT * FROM cmdb_ci
-- SELECT * FROM sn_customerservice_case
-- SELECT * FROM kb_knowledge
-- SELECT * FROM kb_use
-- SELECT * FROM sc_req_item
-- SELECT * FROM sc_request
-- SELECT * FROM sc_taskRead incidents incrementally (by updated date)
Fetch incidents updated after a specific date. This pattern is recommended for incremental loads and scheduled sync jobs.
Use this approach to avoid full table scans, reduce API calls, and improve overall performance.
The date filter can be specified using either a static date value or a dynamic date expression. Dynamic date expressions allow relative date calculations and are useful for automated jobs.
Examples of dynamic date expressions:
yesterday– incidents updated yesterdaytoday– incidents updated todaytoday-1d– incidents updated in the last 24 hoursmonthstart– incidents updated since the beginning of the monthmonthend-1d– incidents updated up to the last day of the previous month
-- Incrementally fetch incidents updated after a given date
SELECT *
FROM get_table_rows
WITH(
TableName='incident',

-- Load only incidents updated in the last 24 hours
Query='sys_updated_on>=<<today-1d,FUN_TO_DATETIME>>'

--OR Updated after static date time
--Query='sys_updated_on>=2025-01-01T23:23:59'
--Query='sys_updated_on>=2025-01-01'

--Other examples of placeholder function usage
--Query='sys_updated_on>=<<monthstart-7d,FUN_TO_DATETIME>>'
--Query='sys_updated_on>=<<monthstart-5d+1y,FUN_TO_DATETIME>>'

)
Read data from system tables
Gets data from system tables (e.g. sys_choice, sys_journal_field). Many tables are not listed in the get_tables endpoint and are hidden from UI selection. Use the get_table_rows endpoint to query them directly.
SELECT * FROM get_table_rows WITH(TableName='sys_choice', Query='name=incident^element=close_code')
--SELECT * FROM get_table_rows WITH(TableName='sys_journal_field', Query='name=incident^element=close_code')
Read an incident by number
Fetch a specific incident using its human-readable number (for example INC0012345).
This is the most common lookup used in integrations and support workflows.
The query filters the incident table using sysparm_query semantics.
-- Query a single incident by incident number
SELECT *
FROM get_table_rows
WITH(
  TableName='incident',
  Query='number=INC0012345'
)
Read incident work notes
Retrieve Work Notes added to incidents. Work notes are stored as journal entries
in the sys_journal_field table, not directly on the incident record.
This example returns all internal notes entered by agents.
-- Get work notes for all incidents
SELECT *
FROM get_table_rows
WITH(
	TableName='sys_journal_field',
	Query='name=incident^element=work_notes'
)
Read incident additional comments
Fetch Additional Comments (customer-visible notes) for incidents. These comments are typically shared with end users and customers.
Data is sourced from the ServiceNow journal table.
-- Get customer-facing comments for incidents
SELECT *
FROM get_table_rows
WITH(
TableName='sys_journal_field',
Query='name=incident^element=comments'
)
Read incident tasks
Retrieve all tasks associated with a specific incident.
Incident tasks are stored in the incident_task table and linked
using the parent incident reference.
You can use static date or function as above. This function expression can be in the form of [function_name][+/-][interval][interval][+/-][interval]... For example to get Last date of previous month you can do "monthend-1d". To get yesterday's date you can just type "yesterday". Valid date function names for this expression are [ now | today | yesterday | weekstart | weekend | monthstart | monthend | yearstart | yearend ]. Valid interval names are [ms (for milliseconds) | s OR sec | min | h OR hour | y OR year | d OR day |m OR month | y OR year]
-- Get all tasks for a specific incident
SELECT *
FROM get_table_rows
WITH(
    TableName='incident_task',
    Query='incident.number=INC0012345'
)
Read attachments for an incident
Retrieve all file attachments linked to a specific incident.
Attachments are stored in the sys_attachment table.
This example is commonly used before downloading or deleting attachments.
-- List attachments linked to an incident
SELECT *
FROM get_table_rows
WITH(
	TableName='sys_attachment',
	Query='table_name=incident^table_sys_id=<<INCIDENT_SYS_ID>>'
)
Read dropdown labels and values
Resolve and list dropdown (choice) field labels and values for any ServiceNow table or form screen.
ServiceNow stores dropdown fields as internal values
(for example 4) while displaying user-friendly labels
(such as 4 - Low) in the UI. These mappings are defined
in the sys_choice system table.
Use this example to discover and resolve dropdown options for fields like Priority, State, Category, Close Code, and any custom choice field across all ServiceNow tables.
-- Resolve and list dropdown (choice) labels and values for any table and field
-- Replace <TABLE_NAME> and <FIELD_NAME> with your target form field (e.g. name=incident^element=priority)

SELECT *
FROM get_table_rows
WITH(
  TableName='sys_choice',
  Query='name=<TABLE_NAME>^element=<FIELD_NAME>'
)
Read incidents using reference fields
Demonstrates how to query the incident table using
reference (foreign key) fields in ServiceNow.
ServiceNow allows filtering on fields from related tables using
dot-walking syntax (reference_field.some_field),
without requiring explicit joins.
Use these patterns to filter incidents by Caller, Assigned User, Assignment Group, Configuration Item, or other referenced records.
-- 1. Query incidents by caller's username (caller_id → sys_user)
SELECT *
FROM get_table_rows
WITH(
	TableName='incident',
	Query='caller_id.user_name=john.doe'
)

-- 2. Query incidents by assigned user's display name (assigned_to → sys_user)
SELECT *
FROM get_table_rows
WITH(
	TableName='incident',
	Query='assigned_to.name=Jane Smith'
)

-- 3. Query incidents by assignment group name (assignment_group → sys_user_group)
SELECT *
FROM get_table_rows
WITH(
	TableName='incident',
	Query='assignment_group.name=Network'
)

-- 4. Query incidents by configuration item name (cmdb_ci → CMDB record)
SELECT *
FROM get_table_rows
WITH(
	TableName='incident',
	Query='cmdb_ci.name=SRV-APP-01'
)

-- 5. Combine reference field and local field filters
--    (Network group + High priority incidents)
SELECT *
FROM get_table_rows
WITH(
	TableName='incident',
	Query='assignment_group.name=Network^priority=1'
)
Read selected columns (performance optimization)
By default, all column values are returned in the result set. You can instruct the ServiceNow API to send only specific columns by setting the Fields parameter in the WITH clause. This significantly speeds up the response.
SELECT number,name FROM incident WITH (Fields='number,name') --Setting Fields parameter will speed up the queryRead table using server-side filter
Server-side filtering using ServiceNow native query language
This example demonstrates how to filter ServiceNow table data using the native
server-side filter expression (sysparm_query) via the
WITH(Query='...') clause.
Why this matters:
Server-side filtering is executed inside ServiceNow before data is returned.
This dramatically improves performance, reduces network traffic, and avoids unnecessary
client-side processing.
Using a SQL WHERE clause without WITH(Query=...) forces the
driver to retrieve more data first and then filter locally, which is slower.
Always prefer server-side filters first. Use client-side filtering
only when a condition cannot be expressed using ServiceNow query syntax.
ServiceNow query operators (mapped to SQL)
| Operator | Meaning | SQL Equivalent |
|---|---|---|
= | Equals | = |
!= | Not equals | <> |
IN | In list | IN (...) |
LIKE | Contains | LIKE '%x%' |
STARTSWITH | Starts with | LIKE 'x%' |
ENDSWITH | Ends with | LIKE '%x' |
^ | AND | AND |
^OR | OR (same group) | OR |
NQ | New Query (OR group) | OR (grouped) |
Important:
^always means AND^ORapplies OR within the same query groupNQstarts a new OR group (similar to adding parentheses in SQL)
Example:
priority=1^state=2^NQpriority=2^state=3Is equivalent to SQL:
(priority = 1 AND state = 2) OR (priority = 2 AND state = 3)
Date and time filtering using ZappySys Placeholder Engine
You can dynamically generate date values using placeholders. These are evaluated at runtime before the query is sent to ServiceNow.
<<today,FUN_TO_DATE>>– today<<yesterday,FUN_TO_DATE>>– yesterday<<today-1d,FUN_TO_DATE>>– today minus 1 day<<today-1m,FUN_TO_DATE>>– today minus 1 month<<monthstart,FUN_TO_DATE>>– current month start<<monthend,FUN_TO_DATE>>– current month end<<yearstart,FUN_TO_DATE>>– year start<<yearend,FUN_TO_DATE>>– year end
See full placeholder documentation here:
ZappySys Placeholder Engine – FUN_TO_DATETIME
Reference documentation
-- Basic server-side filter
SELECT * FROM incident WITH(Query='state=2')

-- Primary key lookup (fastest)
SELECT * FROM incident WHERE sys_id='109562a3c611227500a7b7ff98cc0dc7'

-- Not equal
SELECT * FROM incident WITH(Query='state!=6')

-- IN condition
SELECT * FROM incident WITH(Query='priorityIN1,2,3')

-- AND condition
SELECT * FROM incident WITH(Query='priority=1^state=2')
-- SQL: WHERE priority = 1 AND state = 2

-- OR condition (same group)
SELECT * FROM incident WITH(Query='priority=1^ORstate=2')
-- SQL: WHERE priority = 1 OR state = 2

-- AND / OR mixed using NQ
SELECT * FROM incident WITH(Query='priority=1^state=2^NQpriority=2^state=3')
-- SQL: (priority = 1 AND state = 2) OR (priority = 2 AND state = 3)

-- LIKE / StartsWith / EndsWith
SELECT * FROM incident WITH(Query='short_descriptionLIKEemail')
SELECT * FROM incident WITH(Query='numberSTARTSWITHINC')
SELECT * FROM incident WITH(Query='numberENDSWITH001')

-- Date filter using placeholders (last 1 month)
SELECT * FROM incident WITH(Query='opened_at>=<<today-1m,FUN_TO_DATE>>')

-- From month start
SELECT * FROM incident WITH(Query='opened_at>=<<monthstart,FUN_TO_DATE>>')

-- Between dates
SELECT * FROM incident WITH(Query='opened_at>=<<monthstart,FUN_TO_DATE>>^opened_at<=<<monthend,FUN_TO_DATE>>')
Read an incident by ID
Gets a single incident by its sys_id (primary key).
SELECT * FROM incident
WHERE sys_id = 'SYS_ID_GOES_HERE'
Read table using server-side filter
Server-side filtering using ServiceNow native query language
This example demonstrates how to filter ServiceNow table data using the native
server-side filter expression (sysparm_query) via the
WITH(Query='...') clause.
Why this matters:
Server-side filtering is executed inside ServiceNow before data is returned.
This dramatically improves performance, reduces network traffic, and avoids unnecessary
client-side processing.
Using a SQL WHERE clause without WITH(Query=...) forces the
driver to retrieve more data first and then filter locally, which is slower.
Always prefer server-side filters first. Use client-side filtering
only when a condition cannot be expressed using ServiceNow query syntax.
ServiceNow query operators (mapped to SQL)
| Operator | Meaning | SQL Equivalent |
|---|---|---|
= | Equals | = |
!= | Not equals | <> |
IN | In list | IN (...) |
LIKE | Contains | LIKE '%x%' |
STARTSWITH | Starts with | LIKE 'x%' |
ENDSWITH | Ends with | LIKE '%x' |
^ | AND | AND |
^OR | OR (same group) | OR |
NQ | New Query (OR group) | OR (grouped) |
Important:
^always means AND^ORapplies OR within the same query groupNQstarts a new OR group (similar to adding parentheses in SQL)
Example:
priority=1^state=2^NQpriority=2^state=3Is equivalent to SQL:
(priority = 1 AND state = 2) OR (priority = 2 AND state = 3)
Date and time filtering using ZappySys Placeholder Engine
You can dynamically generate date values using placeholders. These are evaluated at runtime before the query is sent to ServiceNow.
<<today,FUN_TO_DATE>>– today<<yesterday,FUN_TO_DATE>>– yesterday<<today-1d,FUN_TO_DATE>>– today minus 1 day<<today-1m,FUN_TO_DATE>>– today minus 1 month<<monthstart,FUN_TO_DATE>>– current month start<<monthend,FUN_TO_DATE>>– current month end<<yearstart,FUN_TO_DATE>>– year start<<yearend,FUN_TO_DATE>>– year end
See full placeholder documentation here:
ZappySys Placeholder Engine – FUN_TO_DATETIME
Reference documentation
-- Basic server-side filter
SELECT * FROM incident WITH(Query='state=2')

-- Primary key lookup (fastest)
SELECT * FROM incident WHERE sys_id='109562a3c611227500a7b7ff98cc0dc7'

-- Not equal
SELECT * FROM incident WITH(Query='state!=6')

-- IN condition
SELECT * FROM incident WITH(Query='priorityIN1,2,3')

-- AND condition
SELECT * FROM incident WITH(Query='priority=1^state=2')
-- SQL: WHERE priority = 1 AND state = 2

-- OR condition (same group)
SELECT * FROM incident WITH(Query='priority=1^ORstate=2')
-- SQL: WHERE priority = 1 OR state = 2

-- AND / OR mixed using NQ
SELECT * FROM incident WITH(Query='priority=1^state=2^NQpriority=2^state=3')
-- SQL: (priority = 1 AND state = 2) OR (priority = 2 AND state = 3)

-- LIKE / StartsWith / EndsWith
SELECT * FROM incident WITH(Query='short_descriptionLIKEemail')
SELECT * FROM incident WITH(Query='numberSTARTSWITHINC')
SELECT * FROM incident WITH(Query='numberENDSWITH001')

-- Date filter using placeholders (last 1 month)
SELECT * FROM incident WITH(Query='opened_at>=<<today-1m,FUN_TO_DATE>>')

-- From month start
SELECT * FROM incident WITH(Query='opened_at>=<<monthstart,FUN_TO_DATE>>')

-- Between dates
SELECT * FROM incident WITH(Query='opened_at>=<<monthstart,FUN_TO_DATE>>^opened_at<=<<monthend,FUN_TO_DATE>>')
get_table_rows endpoint belongs to
[Dynamic Table]
table(s), and can therefore be used via those table(s).
Create SQL view in ODBC data source
ZappySys API Drivers support flexible Query language so you can override Default Properties you configured on Data Source such as URL, Body. This way you don't have to create multiple Data Sources if you like to read data from multiple EndPoints. However not every application support supplying custom SQL to driver so you can only select Table from list returned from driver.
If you're dealing with Microsoft Access and need to import data from an SQL query, it's important to note that Access doesn't allow direct import of SQL queries. Instead, you can create custom objects (Virtual Tables) to handle the import process.
Many applications like MS Access, Informatica Designer wont give you option to specify custom SQL when you import Objects. In such case Virtual Table is very useful. You can create many Virtual Tables on the same Data Source (e.g. If you have 50 URLs with slight variations you can create virtual tables with just URL as Parameter setting.
-
Go to Custom Objects Tab and Click on Add button and Select Add Table:

-
Enter the desired Table name and click on OK:

-
And it will open the New Query Window Click on Cancel to close that window and go to Custom Objects Tab.
-
Select the created table, Select Text Type AS SQL and write the your desired SQL Query and Save it and it will create the custom table in the ZappySys Driver:
Here is an example SQL query for ZappySys Driver. You can insert Placeholders also. Read more about placeholders here
SELECT
  "ShipCountry",
  "OrderID",
  "CustomerID",
  "EmployeeID",
  "OrderDate",
  "RequiredDate",
  "ShippedDate",
  "ShipVia",
  "Freight",
  "ShipName",
  "ShipAddress",
  "ShipCity",
  "ShipRegion",
  "ShipPostalCode"
FROM "Orders"
Where "ShipCountry"='USA'

-
That's it now go to Preview Tab and Execute your custom virtual table query. In this example it will extract the orders for the USA Shipping Country only:
SELECT * FROM "vt__usa_orders_only"
Get table rows in Microsoft Fabric via SQL view
-
Select the table(s) and preview the data you wish to copy from ServiceNow. Once done, click Next:
DSN=ServicenowDSN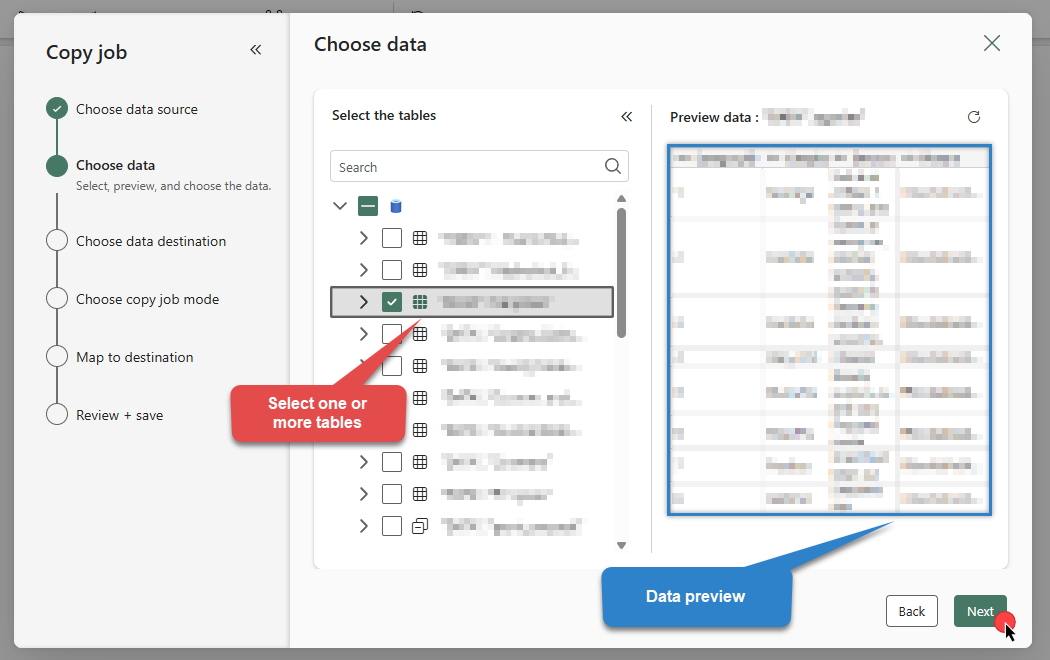
Advanced topics
Creating SQL stored procedures
You can create procedures to encapsulate custom logic and then only pass handful parameters rather than long SQL to execute your API call.
Steps to create Custom Stored Procedure in ZappySys Driver. You can insert Placeholders anywhere inside Procedure Body. Read more about placeholders here
-
Go to Custom Objects Tab and Click on Add button and Select Add Procedure:

-
Enter the desired Procedure name and click on OK:

-
Select the created Stored Procedure and write the your desired stored procedure and Save it and it will create the custom stored procedure in the ZappySys Driver. Here is an example stored procedure for ZappySys Driver. You can insert Placeholders anywhere inside Procedure Body. Read more about placeholders here
CREATE PROCEDURE [usp_get_orders]
    @fromdate = '<<yyyy-MM-dd,FUN_TODAY>>'
 AS
    SELECT * FROM Orders where OrderDate >= '<@fromdate>';
-
That's it now go to Preview Tab and Execute your Stored Procedure using Exec Command. In this example it will extract the orders from the date 1996-01-01:
Exec usp_get_orders '1996-01-01';
ServiceNow Connector actions
Need another use case? Pick the next ServiceNow action in Microsoft Fabric below.
- Delete a Table Row
- Delete Attachment
- Delete table row
- Download Table Attachment (Single - Using Id)
- Download Table Attachments (Multiple - Using Query)
- Download Table Attachments By Parent Row Search
- Get Attachments
- Get Attachments By Parent Row Search
- Get List Of System Tables Admin Use Sys Db Object
- Get List of Tables
- Get List Of Tables Admin Use Sys Db Object
- Get List Of User Tables Admin Use Sys Db Object
- Get Record Labels (Tags)
- Get Table Columns
- Get Table Columns Admin Use Sys Dictionary
- Get Table Row Count
- Test Connection
- Update a Table Row
- Upload Attachment
- Make Generic REST API Request
- Make Generic REST API Request (Bulk Write)
Conclusion
You now know how to get table rows in Microsoft Fabric without writing complex code. ServiceNow ODBC Driver handled pagination and authentication automatically.
Ready to get started? Download the trial or ping us via chat if you need help:


 Connector")


 Connector")


 Connector")


 Connector")


