Introduction
![]() Tripletex is a cloud-based accounting and enterprise resource planning (ERP) platform used by small and medium-sized businesses in Norway and other Scandinavian countries. It provides financial management, invoicing, project accounting, and inventory features through a REST API.
Tripletex is a cloud-based accounting and enterprise resource planning (ERP) platform used by small and medium-sized businesses in Norway and other Scandinavian countries. It provides financial management, invoicing, project accounting, and inventory features through a REST API.
Integrating Tripletex with SQL Server Integration Services (SSIS) lets you synchronize accounting data with databases, reporting systems, and other business applications. ZappySys SSIS PowerPack simplifies this process by providing components that handle HTTP requests, authentication, and data extraction without requiring custom code.
This tutorial walks you through the complete process of creating Tripletex API credentials, generating a session token, and building an SSIS package that extracts data from Tripletex.
Prerequisites
- SQL Server Integration Services (SSIS) is installed.
- Visual Studio with SSIS extension or SQL Server Data Tools (SSDT).
- Tripletex account with API access enabled.
- Install ZappySys SSIS PowerPack.
Steps
Generate Tripletex API credentials
- Create or log in to your Tripletex account using your administrator credentials.
- Navigate to the Settings section by clicking on your user profile icon in the top-right corner of the screen.
- Select API Access from the dropdown menu.
- Click the Generate New Token button to generate a new API token.

Tripletex – Generate Token
- Provide a descriptive name for your token.
- Set the appropriate permissions scope. For this tutorial, select Read and Write access to ensure the integration can both retrieve and push data.
- Click Generate Token, then immediately copy the Consumer Token and Employee Token values. Store them securely in a password manager or Azure Key Vault, as Tripletex will not display them again.
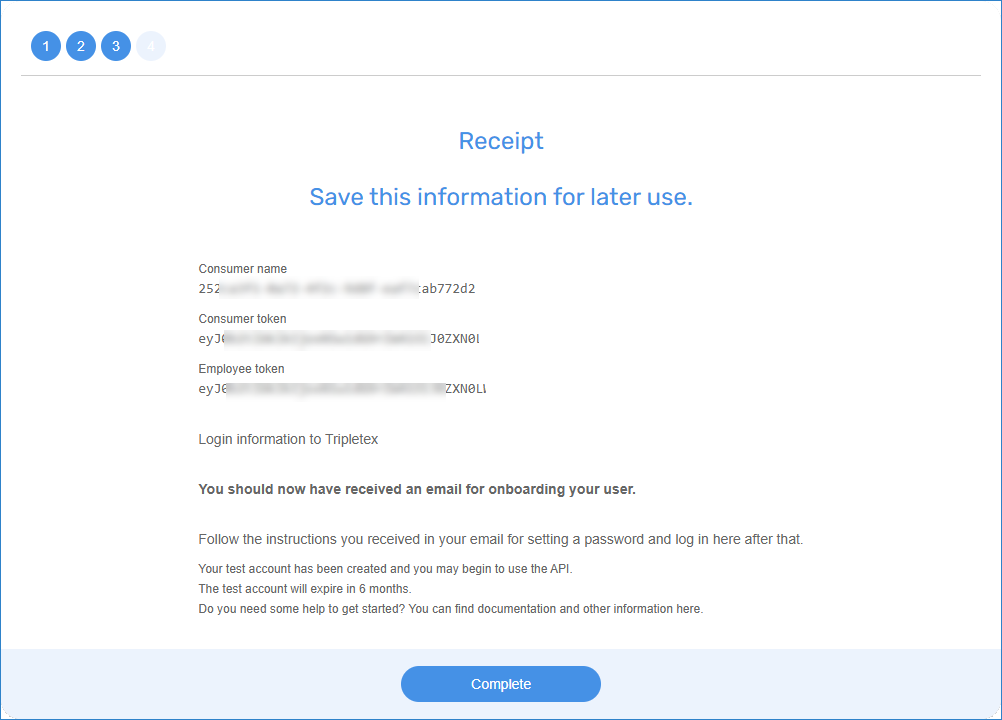
Tripletex – Getting Tokens
Generate a Tripletex session token
Tripletex requires a session token for API authentication. The session token is generated from the Consumer Token and Employee Token obtained in the previous step.
- In your SSIS package, navigate to the Variables section and create the following variables:
- ConsumerToken (String) — Enter the Consumer Token from the previous step.
- EmployeeToken (String) — Enter the Employee Token from the previous step.
- SessionToken (String) — Stores the generated session token.
- CompanyID (String) — Enter your Tripletex company ID, or use 0 if it is unknown.
- Drag and drop the REST API Task component onto your SSIS package canvas and double-click to open it.
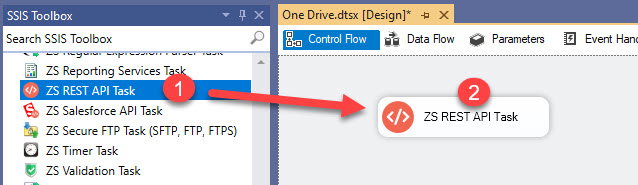
Add a REST API Task in SSIS
- Navigate to the Response Settings tab and set Response Content Type to JSON.
- In the JSONPath field, enter:
$.value.Tokento extract the session token from the API response. - Enable Save Response Content, select the Variable option, and choose your SessionToken variable.
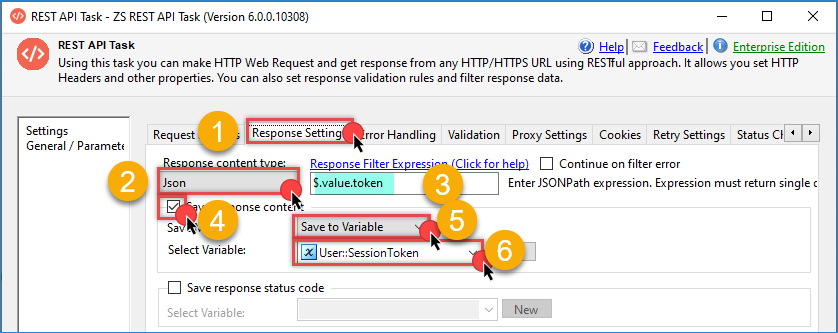
Tripletex – Save Session Token in Variable
- Go back to the Request tab and enter the following URL. For testing, use:
1https://api-test.tripletex.tech/v2/token/session/:create?consumerToken={{User::ConsumerToken}}&employeeToken={{User::EmployeeToken}}&expirationDate=2026-12-31 - For production environments, use:
1https://tripletex.no/v2/token/session/:create?consumerToken={{User::ConsumerToken}}&employeeToken={{User::EmployeeToken}}&expirationDate=2026-12-31 - Use a future expiration date when you generate the token. If you copy these examples later, replace the sample date before testing.
- Set the HTTP Request Method to PUT.
- Test the connection. If successful, you will see the generated session token in the response.
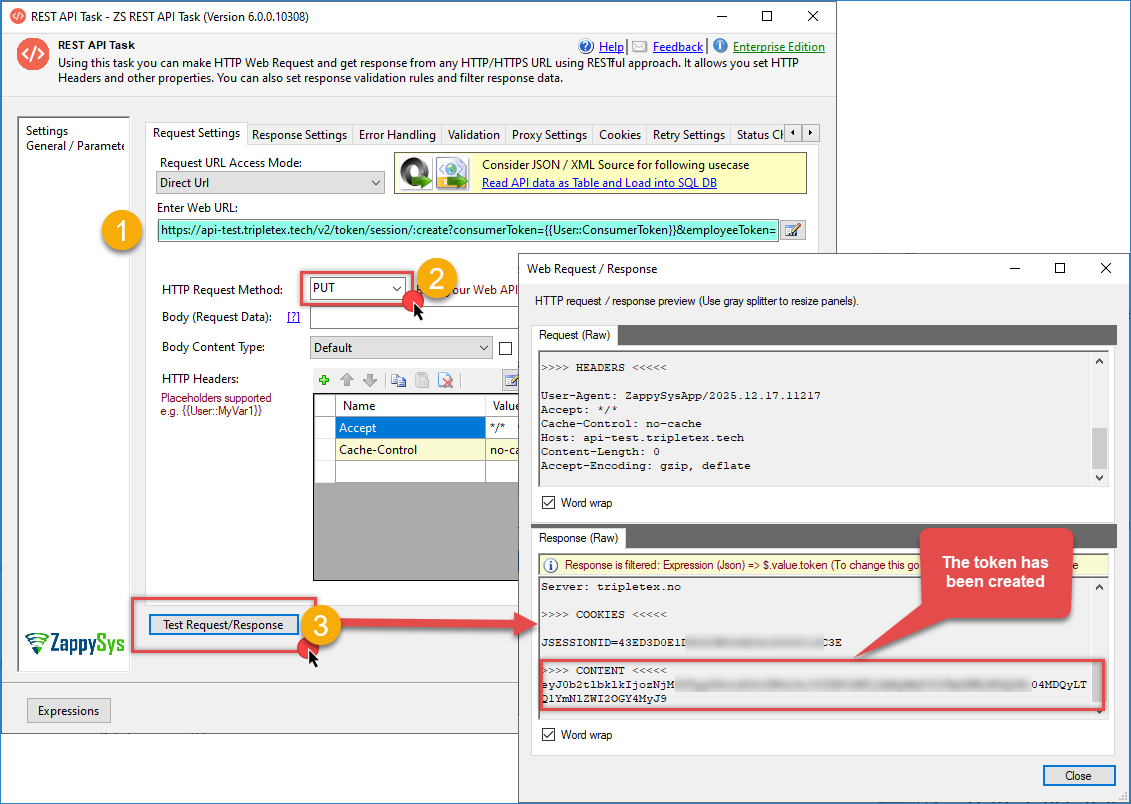
Tripletex – Generate Session Token
Use an HTTP dynamic token connection (recommended)
You can also generate and reuse the session token through an HTTP connection with a dynamic token configuration.
- Right-click in the Connection Managers pane and select New Connection…
- Select ZS-HTTP from the SSIS connectors list
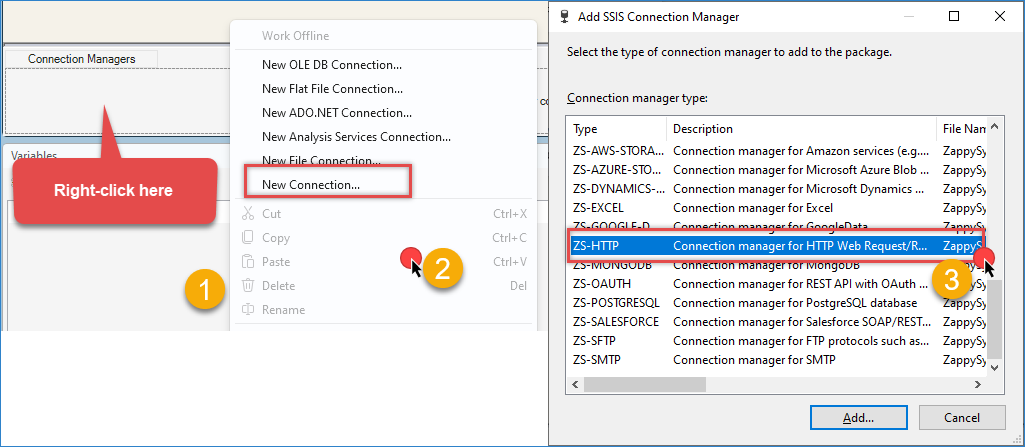
Create a new HTTP connection
- Enter the following URL with the consumer and employee token:
1https://api-test.tripletex.tech/v2/token/session/:create?consumerToken={ConsumerToken}&employeeToken={EmployeeToken}&expirationDate=2026-12-31 - In Credentials Type, select Dynamic Token.
- In the Auth header name, use Authorization.
- For the Auth Scheme, select Basic.
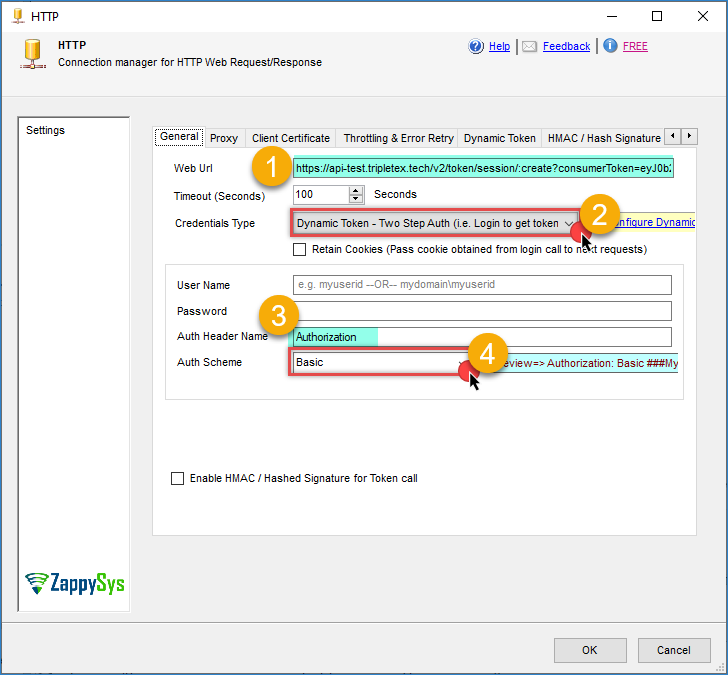
Tripletex – SSIS HTTP connection
- Go to the Dynamic Token tab.
- Enter the previous URL.
- Set the HTTP Request Method to PUT.
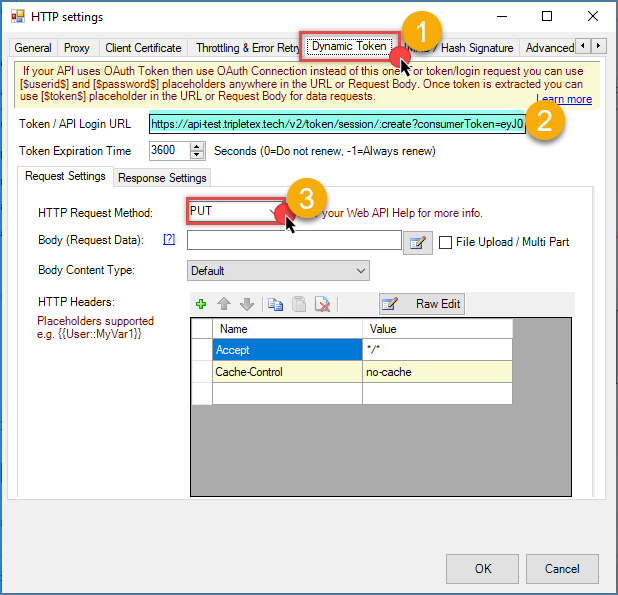
Tripletex – ODBC dynamic token
- Go to the Response Settings tab.
- Select Expression Type as JSON and use this JSONPath to get the Session Token: $.value.token
- In Token Function, use the following function. The Authorization header must contain the Company ID (enter your Tripletex company ID, or use 0 if it is unknown) and Session Token in Base64-encoded format: <<0:[$token$],FUN_BASE64ENC>>
- Click OK to save the connection configuration.
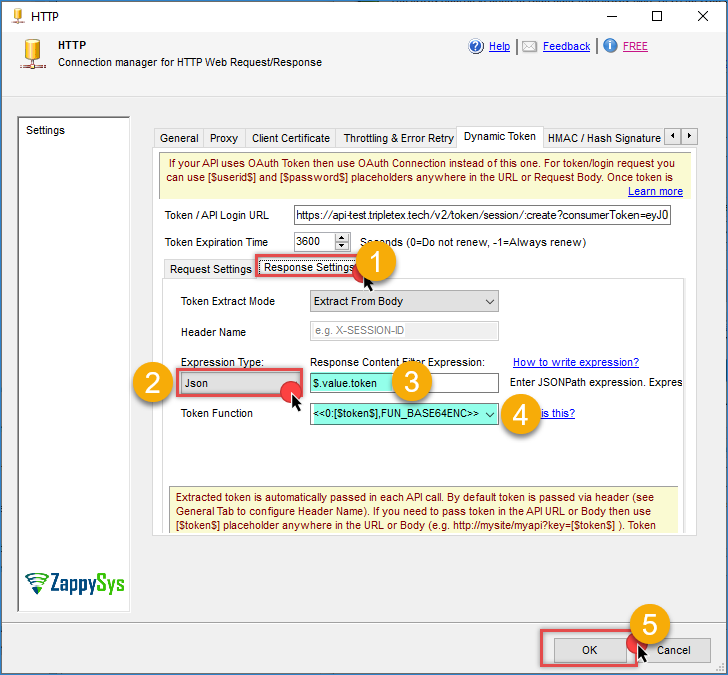
Tripletex – SSIS save Session Token
Create and configure the JSON Source
- Add a new Data Flow Task to your SSIS package. Connect it downstream from the REST API task you created before.
- Double-click the Data Flow Task to enter the Data Flow design surface.
- Drag a ZappySys JSON Source component from the toolbox onto the canvas.
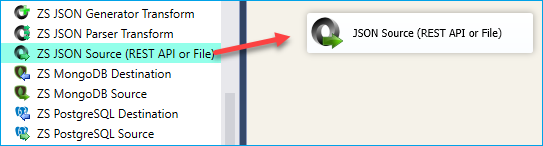
SSIS JSON Source – Drag and Drop
- Double-click the ZappySys JSON Source to open its editor.
- For testing purposes, enter the following URL:
1https://api-test.tripletex.tech/v2/currency - Set the HTTP Request Method to GET.
- Click the Headers tab and add the required Tripletex authentication headers. The Authorization header must contain the Company ID and Session Token in Base64-encoded format:
12Accept: application/jsonAuthorization: Basic <<{{User::CompanyID}}:{{User::SessionToken}},FUN_BASE64ENC}}>> - If you want to use the connection option (recommended), select Use credentials and choose the connection you created earlier.
- In the Array Filter field, specify the JSON path to extract the data array from the Tripletex response:
$.value - Click Preview Data to test the connection and verify that data is being retrieved correctly from Tripletex.
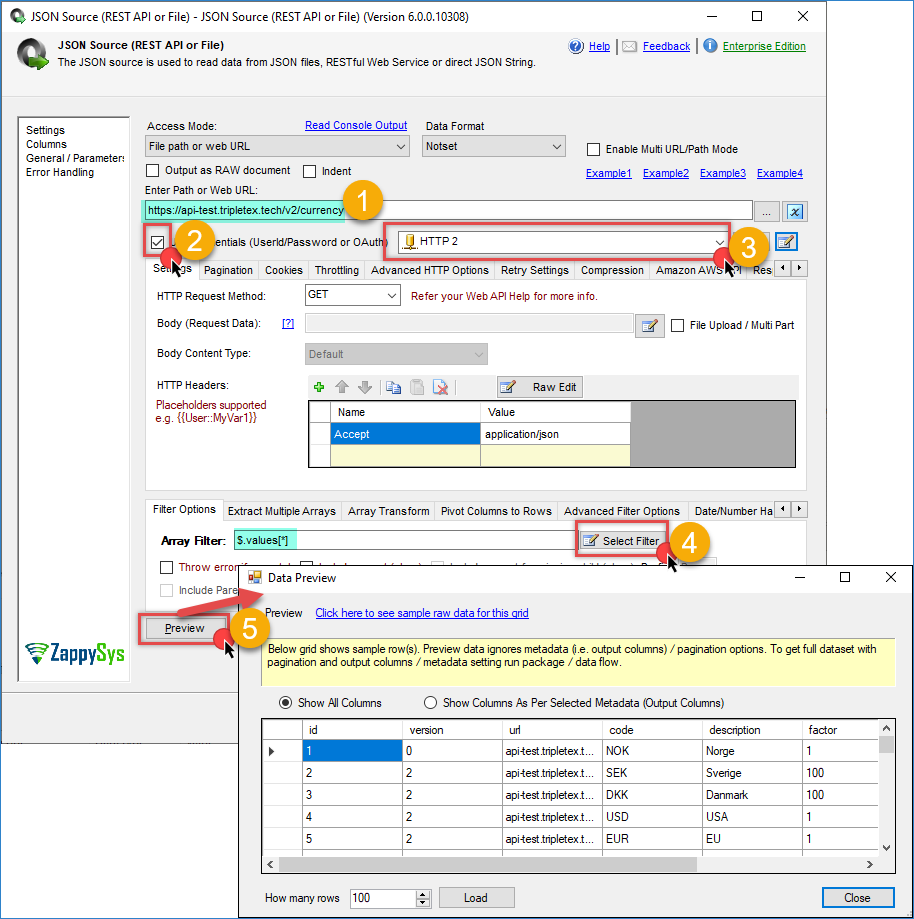
Tripletex – JSON Source result
- Click OK to save the configuration.
Configure Destination Component
- Add an Upsert destination (or another destination of your choice, such as a Trash destination or a JSON/CSV/XML destination).
- Connect the output arrow from JSON Source to the destination component.
- Configure your SQL Server connection and target table.
- Check the options you want to use: Insert or/and Update
- Map the source columns to destination columns in the Mappings section.
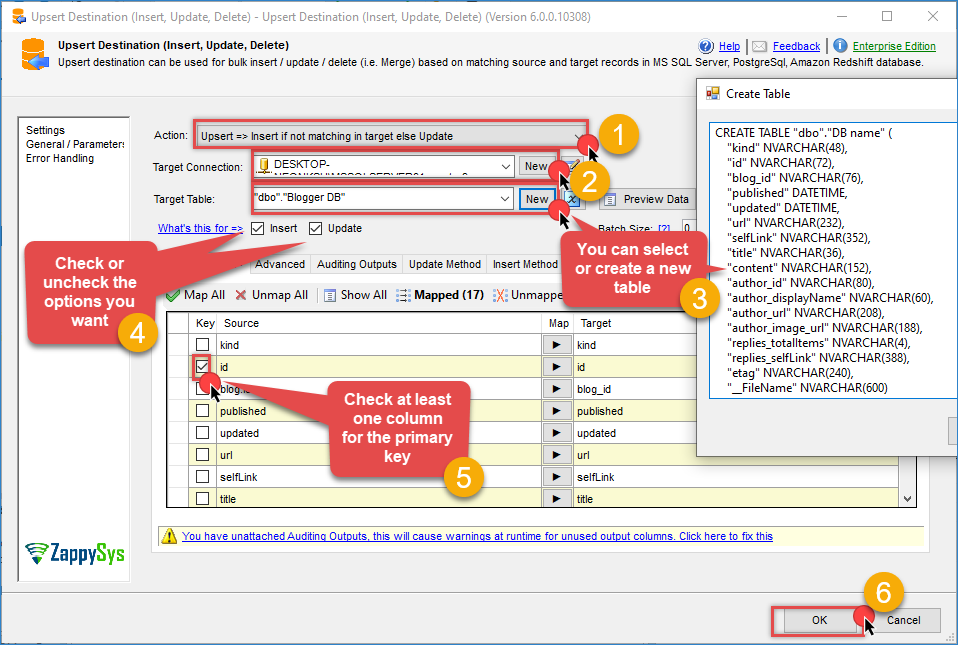
Tripletex – Upsert destination
- Click OK and execute the package.
- Validate that Tripletex rows have been loaded into your SQL Server table.
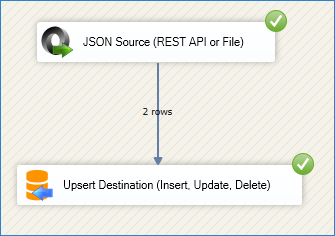
Tripletex – Upsert Destination example
Conclusion
You have now set up a complete integration between Tripletex and SSIS using ZappySys components. This tutorial covered creating API credentials, configuring session token authentication, retrieving data from the Tripletex API, and loading it into SQL Server or another destination.
This pattern can help automate business processes such as invoice tracking, customer synchronization, project reporting, and financial analysis. By using ZappySys SSIS PowerPack, you can build the workflow with less custom code while keeping the package easier to maintain.
Explore the full capabilities of ZappySys SSIS PowerPack to extend this solution with additional transformations, data validation, error handling, and scheduling through SQL Server Agent.
Frequently Asked Questions
Why does Tripletex require a session token?
Tripletex uses a session token for API authentication. In this workflow, the session token is generated from the Consumer Token and Employee Token before SSIS sends requests to the API.
Should I use the REST API Task or a dynamic token connection?
Both approaches can work. A dynamic token connection is often easier to reuse across multiple components because the token generation logic is stored in the connection instead of being repeated in each task.
What should I check if authentication fails?
Confirm that the Consumer Token and Employee Token are correct, the expiration date is still in the future, and the Authorization header contains the expected Company ID and session token values.
Next step
If you want to build similar API integrations in SSIS, download SSIS PowerPack and use the same pattern for other REST API workflows.
Need Help?
If you encounter any issues, our support team is here to help:
- Live Chat — Use the chat widget in the bottom-right corner of this page.
- Email — support@zappysys.com
- Support Center — Visit the ZappySys Support Portal.