How to integrate Salesforce using SSIS
Learn how to quickly and efficiently connect Salesforce with SSIS for smooth data access.
Read and write Salesforce data effortlessly. Query, sync, and manage objects and records with SOQL for analytics, reporting, and data pipelines — almost no coding required. You can do it all using the high-performance Salesforce Connector for SSIS. We'll walk you through the entire setup.
Ready to dive in? Download the product to jump right in, or follow the step-by-step guide below to see how it works.
Video Tutorial
This video covers the following topics and more, so please watch carefully. After watching the video, follow the steps outlined in this article:
- How to download and install the required PowerPack for Salesforce integration in SSIS
- How to configure the connection for Salesforce
- Features of the ZappySys Salesforce Source (Authentication / Query Language / Examples / Driver UI)
- How to use the Salesforce in SSIS

Prerequisites
Before we begin, make sure the following prerequisites are met:
- SSIS designer installed. Sometimes it is referred as BIDS or SSDT (download it from Microsoft).
- Basic knowledge of SSIS package development using Microsoft SQL Server Integration Services.
- SSIS PowerPack is installed (if you are new to SSIS PowerPack, then get started!).
Read data from Salesforce in SSIS (Export data)
In this section we will learn how to configure and use Salesforce Connector in the SalesForce source to extract data from the Salesforce.
-
Begin with opening Visual Studio and Create a New Project.
-
Select Integration Service Project and in new project window set the appropriate name and location for project. And click OK.
In the new SSIS project screen you will find the following:
- SSIS ToolBox on left side bar
- Solution Explorer and Property Window on right bar
- Control flow, data flow, event Handlers, Package Explorer in tab windows
- Connection Manager Window in the bottom
 Note: If you don't see ZappySys SSIS PowerPack Task or Components in SSIS Toolbox, please refer to this help link.
 -
Now, Drag and Drop SSIS Data Flow Task from SSIS Toolbox. Double click on the Data Flow Task to see Data Flow designer.

-
From the SSIS toolbox drag and drop ZS SalesForce Source on the data flow designer surface, and double click on it to edit it:

-
Select New Connection to create a new connection:

-
Now in Connection Manager UI, Enter your SalesForce Credentials (User Name, Password and Security Token), and leave all other properties as it is.

In the Error Retry Settings, you can use more settings.

Click on Test Connection to check configure correct or not. Upon Test Connection Successful, Click on OK button to save Salesforce Connection Manager configure setting UI.
-
Read data from SalesForce table using SalesForce Source(Query Mode & Table Mode).
-
How to read data from SalesForce table using SalesForce Source(Query Mode).
Here, we are getting data using Query Mode with Dynamic expression value.
Lets, create a Variable with correct DataType and Value, use following image.

Double click on SalesForce Source component to configure it.
Select connection we have created before, set AccessMode to Query, Enter Following Query and Replace Variables if differ name. Click here for more SOQL Query Examples
SELECT Id, Name, BillingCountry, NumberOfEmployees FROM Account WHERE Name LIKE '{{User::Name}}' and BillingCountry = '{{User::BillingCountry}}' and NumberOfEmployees >= {{User::NumberOfEmployees}}Click on Preview button to see Data Preview
")
Click on OK button to save configure setting UI
-
How to read data from SalesForce table using SalesForce Source(Table Mode).
Select connection we have created before, set AccessMode to Table and Select Tables from table dropdown list.
")
Click on OK button to save configure setting UI
-
-
That's it; we are done. In a few clicks we configured the call to SalesForce using ZappySys Salesforce Connector
Write to Salesforce in SSIS (Import data)
In upper section we learned how to read data, now in this section we will learn how to configure Salesforce in the Salesforce Destination to Post data to the Salesforce.
-
Read the data from the source, being any desired source component. In example we will use ZappySys Dummy Data Source component.
-
From the SSIS Toolbox drag and drop ZS Salesforce Destination on the Data Flow Designer surface and connect source component with it, and double click to edit it.

-
Select New Connection to create a new connection:

-
Now, In the Component Properties, Set Operation to UpdateOrInsert, select TableName and UpsertKeyField.
")
-
In the Columns Mappings Tab, Map Primary Column and other you want to update or insert records.

-
Now, Click on OK button to save SalesForce Destination configure setting UI.
That's it; We successfully configured the SalesForce Call. In a few clicks we configured the Salesforce call using ZappySys Salesforce Connector.
Load Salesforce data into SQL Server using Upsert Destination (Insert or Update)
Once you configured the data source, you can load Salesforce data into SQL Server using Upsert Destination.
Upsert Destination can merge or synchronize source data with the target table.
It supports Microsoft SQL Server, PostgreSQL, and Redshift databases as targets.
Upsert Destination also supports very fast bulk upsert operation along with bulk delete.
Upsert operation
- a database operation which performs INSERT or UPDATE SQL commands
based on record's existence condition in the target table.
It
Upsert Destination supports INSERT, UPDATE, and DELETE operations,
so it is similar to SQL Server's MERGE command, except it can be used directly in SSIS package.
-
From the SSIS Toolbox drag-and-drop Upsert Destination component onto the Data Flow designer background.
-
Connect your SSIS source component to Upsert Destination.
-
Double-click on Upsert Destination component to open configuration window.
-
Start by selecting the Action from the list.
-
Next, select the desired target connection or create one by clicking <New [provider] Connection> menu item from the Target Connection dropdown.
-
Then select a table from the Target Table list or click New button to create a new table based on the source columns.
-
Continue by checking Insert and Update options according to your scenario (e.g. if Update option is unchecked, no updates will be made).
-
Finally, click Map All button to map all columns and then select the Key columns to match the columns on:
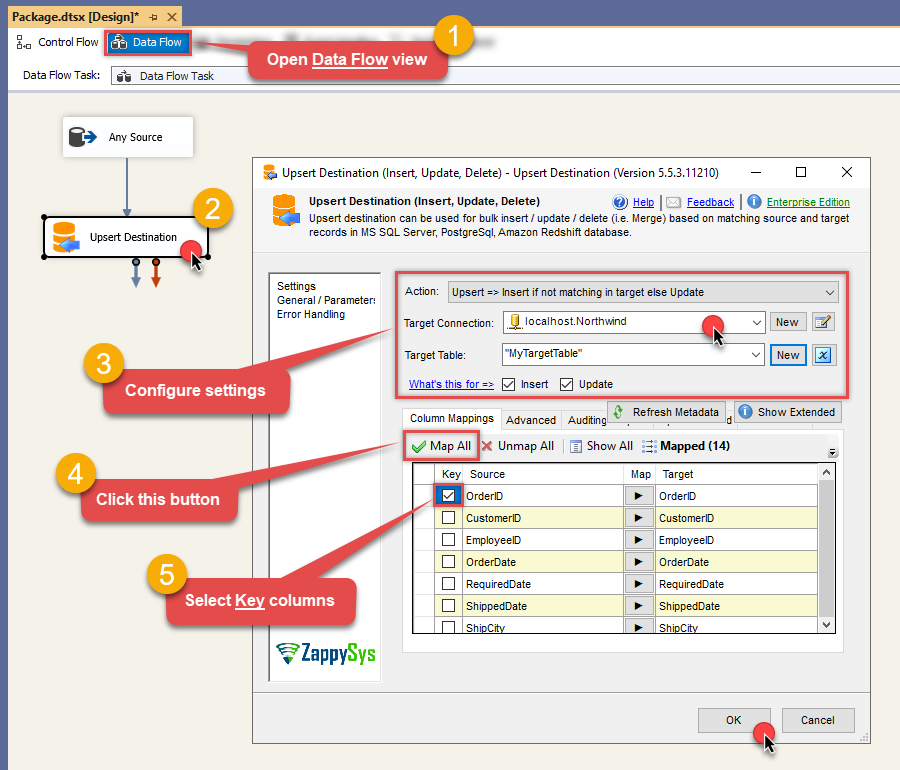
-
Click OK to save the configuration.
-
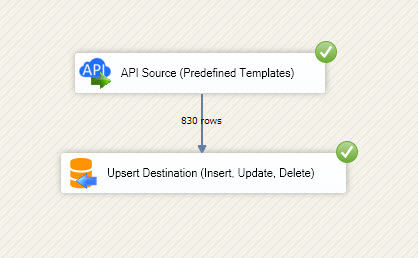
Run the package and Salesforce data will be merged with the target table in SQL Server, PostgreSQL, or Redshift:
-
Done!
Deploy and schedule SSIS package
After you are done creating SSIS package, most likely, you want to deploy it to SQL Server Catalog and run it periodically. Just follow the instructions in this article:
Running SSIS package in Azure Data Factory (ADF)
To use SSIS PowerPack in ADF, you must first prepare Azure-SSIS Integration Runtime. Follow this link for detailed instructions:
Conclusion
In this article we showed you how to connect to Salesforce in SSIS and integrate data without writing complex code — all of this was powered by Salesforce Connector.
Download SSIS PowerPack now or ping us via chat if you have any questions or are looking for a specific feature (you can also reach out to us by submitting a ticket):


 Connector")


 Connector")


 Connector")


 Connector")


