
Introduction
You can connect to your Amazon Selling Partner (SP-API) data from SSIS via the high-performance Amazon Selling Partner (SP-API) SSIS Connector. We'll walk you through the entire setup.
Let's not waste time and get started!
Video tutorial
Watch this quick video to see the integration in action. It walks you through the end-to-end setup, including:
- Installing the SSIS PowerPack
- Configuring a secure connection to Amazon Selling Partner (SP-API)
- Working with Amazon Selling Partner (SP-API) data directly inside SSIS
- Exploring advanced API Source features
Ready to dive in? Download the product to jump right in, or follow the step-by-step guide below to see how it works.
Prerequisites
Before we begin, make sure the following prerequisites are met:
- SQL Server Data Tools (SSDT) designer installed for Visual Studio.
- SQL Server Integration Services Projects 2022+ Visual Studio extension installed.
- SSIS PowerPack is installed.
Read data from Amazon Selling Partner (SP-API) in SSIS (Export data)
In this section we will learn how to configure and use Amazon Selling Partner (SP-API) Connector in API Source to extract data from Amazon Selling Partner (SP-API).
-
Open Visual Studio and click Create a new project.
-
Select Integration Services Project. Enter a name and location for your project, then click OK.
-
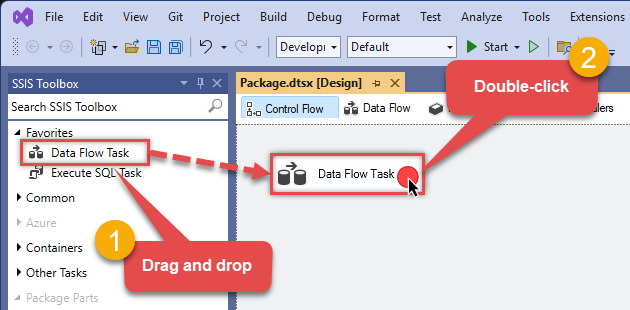
From the SSIS Toolbox, drag and drop a Data Flow Task onto the Control Flow surface, and double-click it:
-
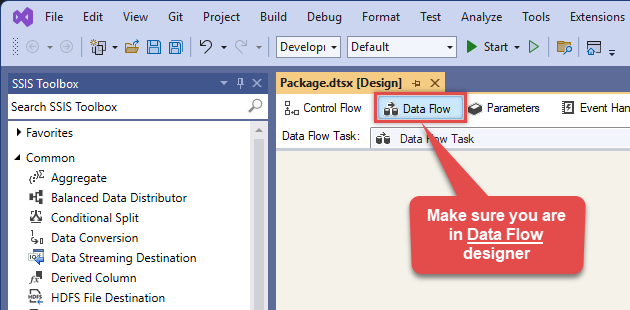
Make sure you are in the Data Flow Task designer:
-
From the SSIS toolbox drag and API Source (Predefined Templates) on the data flow designer surface, and double click on it to edit it:
 - Drag and Drop")
-
Select New Connection to create a new connection:

-
Use a preinstalled Amazon Selling Partner (SP-API) Connector from Popular Connector List or press Search Online radio button to download Amazon Selling Partner (SP-API) Connector. Once downloaded simply use it in the configuration:
Amazon Selling Partner (SP-API) Connector Selection")
-
Select your authentication scenario below to expand connection configuration steps to:
- Configure the authentication in Amazon Selling Partner (SP-API).
- Enter those details into the API Connection Manager configuration.
Private app
Amazon Selling Partner (SP-API) authentication
Amazon Sellers can use SP-API to set up private integrations and build solutions exclusively for their Amazon store. Private app is available only to your organization and is self-authorized. A private developer builds application(s) that integrate their own company with Amazon APIs. [API reference]
Perform the following steps to authenticate calls using Amazon SP-API Private app:
- Register as an Amazon Private SP-API Developer. You may need to wait for a day or two to get approved (check approval status).
-
Once your developer account is approved,
login to your account, visit developer console
and click Add new app client button to create a Private app:

-
Continue by naming your application in the App name field,
choose
SP APIas API Type, and select the Roles for your app (i.e. permissions):
-
Once you do that, click View link in LWA credentials column to
copy Client identifier and Client secret (we will use them later):

-
Now it's time to Authorize your app:

-
Finish authorizing it by presing Authorize app button:

-
Finally, copy the Refresh Token (we will use it in the next step):

-
Now go to SSIS package or ODBC data source and use Private app authentication configuration:
- In the ClientId field paste the Client identifier value you copied in the previous step.
- In the ClientSecret field paste the Client secret value you copied in the previous step.
- Leave the default value in the TokenUrl field.
- In the Refresh Token field paste the Refresh Token value you copied in the previous step.
- Click Test Connection to confirm the connection is working.
- Done! Now you are ready to use Amazon Selling Partner (SP-API) Connector!
API Connection Manager configuration
Just perform these simple steps to finish authentication configuration:
-
Set Authentication Type to
Private app [OAuth] - Optional step. Modify API Base URL if needed (in most cases default will work).
- Fill in all the required parameters and set optional parameters if needed.
- Press Generate Token button to generate the tokens.
- Finally, hit OK button:
Amazon Selling Partner (SP-API)Private app [OAuth]https://sellingpartnerapi-na.amazon.comRequired Parameters ClientId Fill-in the parameter... ClientSecret Fill-in the parameter... TokenUrl Fill-in the parameter... Optional Parameters TokenUIMode OnlyRefreshToken AuthUrl (Do not Use for Private app - Self Authorization) https://sellercentral.amazon.com/apps/authorize/consent?application_id=[YOUR-APPLICATION-ID]&version=beta OrdersApiVersion v0 SellerApiVersion v1 ShippingApiVersion v1 ServicesApiVersion v1 FbaApiVersion v1 SalesApiVersion v1 ReportsApiVersion 2021-06-30 ProductsFeesApiVersion v0 ProductPricingApiVersion v0 CatalogItemsApiVersion 2022-04-01 VendorOrdersApiVersion v1 RetryMode RetryWhenStatusCodeMatch RetryStatusCodeList 429 RetryCountMax 5 RetryMultiplyWaitTime True  Find full details in the Amazon Selling Partner (SP-API) Connector authentication reference.
 -
Select the desired endpoint, change/pass the properties values, and click on Preview Data button to make the API call.
API Source - Amazon Selling Partner (SP-API)Read and write Amazon Selling Partner (SP-API) data effortlessly. Integrate, manage, and automate listings, orders, payments, and reports — almost no coding required.

-
That's it! We are done! Just in a few clicks we configured the call to Amazon Selling Partner (SP-API) using Amazon Selling Partner (SP-API) Connector.
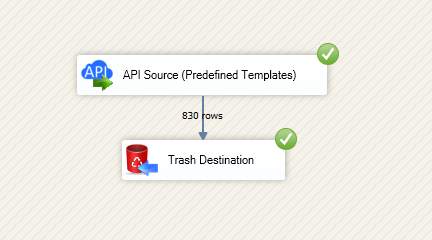
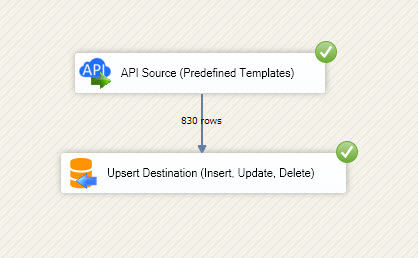
You can load the source data into your desired destination using the Upsert Destination , which supports SQL Server, PostgreSQL, and Amazon Redshift. We also offer other destinations such as CSV , Excel , Azure Table , Salesforce , and more . You can check out our SSIS PowerPack Tasks and components for more options. (*loaded in Trash Destination)
Write data to Amazon Selling Partner (SP-API) using SSIS (Import data)
In this section we will learn how to configure and use Amazon Selling Partner (SP-API) Connector in the API Destination to write data to Amazon Selling Partner (SP-API).
Video tutorial
This video covers following and more so watch carefully. After watching this video follow the steps described in this article.
- How to download SSIS PowerPack for Amazon Selling Partner (SP-API) integration in SSIS
- How to configure connection for Amazon Selling Partner (SP-API)
- How to write or lookup data to Amazon Selling Partner (SP-API)
- Features about SSIS API Destination
- Using Amazon Selling Partner (SP-API) Connector in SSIS
Step-by-step instructions
In upper section we learned how to read data, now in this section we will learn how to configure Amazon Selling Partner (SP-API) in the API Source to POST data to the Amazon Selling Partner (SP-API).
-
Open Visual Studio and click Create a new project.
-
Select Integration Services Project. Enter a name and location for your project, then click OK.
-
From the SSIS Toolbox, drag and drop a Data Flow Task onto the Control Flow surface, and double-click it:
-
Make sure you are in the Data Flow Task designer:
-
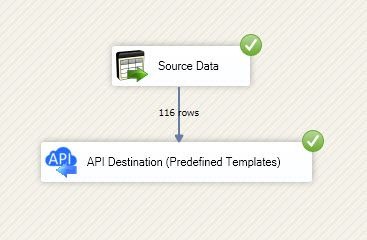
Read the data from the source, using any desired source component. You can even make an API call using the ZappySys JSON/XML/API Source and read data from there. In this example, we will use an OLE DB Source component to read real-time data from a SQL Server database.
-
From the SSIS Toolbox drag and drop API Destination (Predefined Templates) on the Data Flow Designer surface and connect source component with it, and double click to edit it.
 - Drag and Drop")
-
Select New Connection to create a new connection:
API Destination - Amazon Selling Partner (SP-API)Read and write Amazon Selling Partner (SP-API) data effortlessly. Integrate, manage, and automate listings, orders, payments, and reports — almost no coding required.
")
-
To configure the Amazon Selling Partner (SP-API) connector, choose one of the following methods:
- Choose from Popular Connector List: Select a pre-installed service directly from the dropdown menu.
- Search Online: Use this to find and download a new connector file to your computer.
- Use Saved/Downloaded File: Once the file is downloaded, browse your local drive to load it into the configuration.
After that, just click Continue >>:
Amazon Selling Partner (SP-API)
-
Proceed with selecting the desired Authentication Type. Then select API Base URL (in most cases default one is the right one). Finally, fill in all the required parameters and set optional parameters if needed. You may press a link Steps to Configure which will help set certain parameters. More info is available in Authentication section.
Private app
Amazon Selling Partner (SP-API) authentication
Amazon Sellers can use SP-API to set up private integrations and build solutions exclusively for their Amazon store. Private app is available only to your organization and is self-authorized. A private developer builds application(s) that integrate their own company with Amazon APIs. [API reference]
Perform the following steps to authenticate calls using Amazon SP-API Private app:
- Register as an Amazon Private SP-API Developer. You may need to wait for a day or two to get approved (check approval status).
-
Once your developer account is approved,
login to your account, visit developer console
and click Add new app client button to create a Private app:
-
Continue by naming your application in the App name field,
choose
SP APIas API Type, and select the Roles for your app (i.e. permissions):
-
Once you do that, click View link in LWA credentials column to
copy Client identifier and Client secret (we will use them later):
-
Now it's time to Authorize your app:
-
Finish authorizing it by presing Authorize app button:
-
Finally, copy the Refresh Token (we will use it in the next step):
-
Now go to SSIS package or ODBC data source and use Private app authentication configuration:
- In the ClientId field paste the Client identifier value you copied in the previous step.
- In the ClientSecret field paste the Client secret value you copied in the previous step.
- Leave the default value in the TokenUrl field.
- In the Refresh Token field paste the Refresh Token value you copied in the previous step.
- Click Test Connection to confirm the connection is working.
- Done! Now you are ready to use Amazon Selling Partner (SP-API) Connector!
API Connection Manager configuration
Just perform these simple steps to finish authentication configuration:
-
Set Authentication Type to
Private app [OAuth] - Optional step. Modify API Base URL if needed (in most cases default will work).
- Fill in all the required parameters and set optional parameters if needed.
- Press Generate Token button to generate the tokens.
- Finally, hit OK button:
Amazon Selling Partner (SP-API)Private app [OAuth]https://sellingpartnerapi-na.amazon.comRequired Parameters ClientId Fill-in the parameter... ClientSecret Fill-in the parameter... TokenUrl Fill-in the parameter... Optional Parameters TokenUIMode OnlyRefreshToken AuthUrl (Do not Use for Private app - Self Authorization) https://sellercentral.amazon.com/apps/authorize/consent?application_id=[YOUR-APPLICATION-ID]&version=beta OrdersApiVersion v0 SellerApiVersion v1 ShippingApiVersion v1 ServicesApiVersion v1 FbaApiVersion v1 SalesApiVersion v1 ReportsApiVersion 2021-06-30 ProductsFeesApiVersion v0 ProductPricingApiVersion v0 CatalogItemsApiVersion 2022-04-01 VendorOrdersApiVersion v1 RetryMode RetryWhenStatusCodeMatch RetryStatusCodeList 429 RetryCountMax 5 RetryMultiplyWaitTime True
Find full details in the Amazon Selling Partner (SP-API) Connector authentication reference. -
Select the desired endpoint, change/pass the properties values, and go to the Mappings tab to map the columns.
API Destination - Amazon Selling Partner (SP-API)Read and write Amazon Selling Partner (SP-API) data effortlessly. Integrate, manage, and automate listings, orders, payments, and reports — almost no coding required.
")
-
Finally, map the desired columns:
API Destination - Amazon Selling Partner (SP-API)Read and write Amazon Selling Partner (SP-API) data effortlessly. Integrate, manage, and automate listings, orders, payments, and reports — almost no coding required.
")
-
That's it; we successfully configured the POST API Call. In a few clicks we configured the Amazon Selling Partner (SP-API) API call using ZappySys Amazon Selling Partner (SP-API) Connector
Load Amazon Selling Partner (SP-API) data into SQL Server using Upsert Destination (Insert or Update)
Once you configured the data source, you can load Amazon Selling Partner (SP-API) data into SQL Server using Upsert Destination.
Upsert Destination can merge or synchronize source data with the target table.
It supports Microsoft SQL Server, PostgreSQL, and Redshift databases as targets.
Upsert Destination also supports very fast bulk upsert operation along with bulk delete.
Upsert operation
- a database operation which performs INSERT or UPDATE SQL commands
based on record's existence condition in the target table.
It
Upsert Destination supports INSERT, UPDATE, and DELETE operations,
so it is similar to SQL Server's MERGE command, except it can be used directly in SSIS package.
-
From the SSIS Toolbox drag-and-drop Upsert Destination component onto the Data Flow designer background.
-
Connect your SSIS source component to Upsert Destination.
-
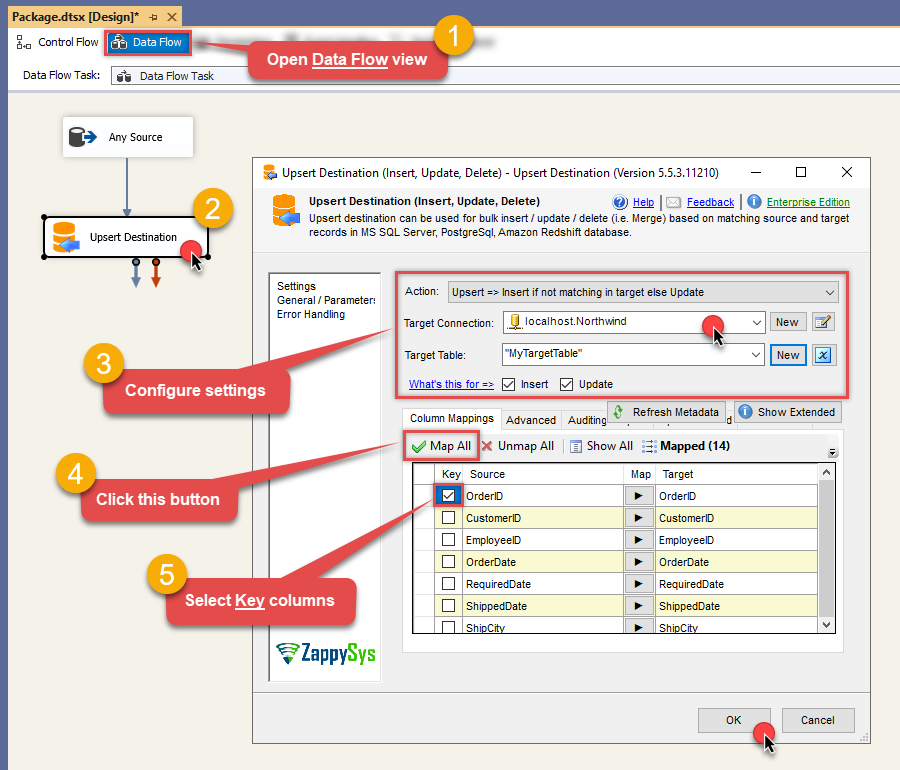
Double-click on Upsert Destination component to open configuration window.
-
Start by selecting the Action from the list.
-
Next, select the desired target connection or create one by clicking <New [provider] Connection> menu item from the Target Connection dropdown.
-
Then select a table from the Target Table list or click New button to create a new table based on the source columns.
-
Continue by checking Insert and Update options according to your scenario (e.g. if Update option is unchecked, no updates will be made).
-
Finally, click Map All button to map all columns and then select the Key columns to match the columns on:
-
Click OK to save the configuration.
-
Run the package and Amazon Selling Partner (SP-API) data will be merged with the target table in SQL Server, PostgreSQL, or Redshift:
-
Done!
Deploy and schedule SSIS package
After you are done creating SSIS package, most likely, you want to deploy it to SQL Server Catalog and run it periodically. Just follow the instructions in this article:
Running SSIS package in Azure Data Factory (ADF)
To use SSIS PowerPack in ADF, you must first prepare Azure-SSIS Integration Runtime. Follow this link for detailed instructions:
Amazon Selling Partner (SP-API) Connector actions
Got a specific use case in mind? We've mapped out exactly how to perform a variety of essential Amazon Selling Partner (SP-API) operations directly in SSIS, so you don't have to figure out the setup from scratch. Check out the step-by-step guides below:
- Download Report File to Local Disk
- Get Report Data - Tab Separated File (TSV)
- Get Report Data - Comma Separated File (CSV)
- Get Report Data - XML File
- Get Report Data - JSON File
- Get Report Options
- Get Report Filters
- Get FBA Inventory Summaries (Fulfilled By Amazon)
- Search Catalog Items
- Get Report Types
- Get Market Place Participations
- Get Vendor PurchaseOrders
- Get Vendor PurchaseOrder Items
- Get Orders
- Get Order (Single)
- Get Order Items (For Single Order)
- Get Orders Items (For All Orders **Slow**)
- Make Generic REST API Request
- Make Generic REST API Request (Bulk Write)
Conclusion
In this guide, we demonstrated how to connect to Amazon Selling Partner (SP-API) in SSIS and integrate your data — all without writing complex code.
Ready to get started? Download SSIS PowerPack now or ping us via chat if you still need help:


 Connector")


 Connector")


 Connector")


