
Introduction
You can connect to your SOAP data from SSIS via the high-performance SOAP SSIS Connector. We'll walk you through the entire setup.
Let's not waste time and get started!
Video tutorial
Watch this quick video to see the integration in action. It walks you through the end-to-end setup, including:
- Installing the SSIS PowerPack
- Configuring a secure connection to SOAP
- Working with SOAP data directly inside SSIS
- Exploring advanced XML Source features
Ready to dive in? Download the product to jump right in, or follow the step-by-step guide below to see how it works.
Prerequisites
Before we begin, make sure the following prerequisites are met:
- SQL Server Data Tools (SSDT) designer installed for Visual Studio.
- SQL Server Integration Services Projects 2022+ Visual Studio extension installed.
- SSIS PowerPack is installed.
What is SOAP Web Service?
If you are new to SOAP Web Service sometimes referred as XML Web Service then please read some concept about SOAP Web service standard from this link
There are two important aspects in SOAP Web service.
- Getting WSDL file or URL
- Knowing exact Web Service URL
What is WSDL
In very simple term WSDL (often pronounced as whiz-dull) is nothing but a document which describes Service metadata (e.g. Functions you can call, Request parameters, response structure etc). Some service simply give you WSDL as xml file you can download on local machine and then analyze or sometimes you may get direct URL (e.g. http://api.mycompany.com/hr-soap-service/?wsdl )
What is Service URL
Service URL is actual API URL you can call to get data. When you make a request to SOAP service url make sure following things.
- Use correct service URL (Its not same as WSDL url). If you are not sure about service URL contact API vendor or refer API documentation.
-
Each service call you have to supply function you want to call. This can be done in 3 different ways.
- Pass via SOAPAction HTTP Header
- Pass via Url parameter or Url Path (http://myserver/service/function1 — http://myserver/service/?method=function1 )
- Pass via Request BODY
- Find out how to pass credentials. It can be done via Basic Authorization or WSS Security Header in the Request body. Check this link to learn more
Using SoapUI to test SOAP API call / Create Request Body XML
If you do not have WSDL file or URL handy then contact your API provider (sometimes you just have to add ?wsdl at the end of your Service URL to get WSDL so try that. Example: http://mycompany/myservice?wsdl ). If you don't know what is WSDL then in short, WSDL is Web service Description Language (i.e. XML file which describes your SOAP Service). WSDL helps to craft SOAP API request Body for ZappySys XML Driver. So Let's get started.
- Download and Install SoapUI (It’s a Free tool to test SOAP / REST Services)
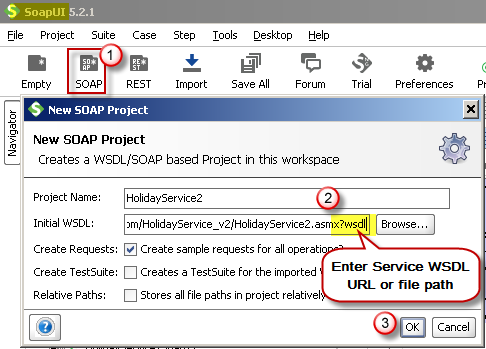
- Open SoapUI and click SOAP button to create new SOAP Project
-
Enter WSDL URL or File Path of WSDLFor example WSDL for our sample service can be accessed via this URL
http://www.holidaywebservice.com/HolidayService_v2/HolidayService2.asmx?wsdl
 Create new SOAP API Project in SoapUI tool for SOAP API Testing
 - Once WSDL is loaded you will see possible operations you can call for your SOAP Web Service.
-
If your web service requires credentials then you have to configure it. There are two common credential types for public services (SOAP WSS or BASIC )
-
To use SOAP WSS Credentials select request node and enter UserId, Password, and WSS-PasswordType (PasswordText or PasswordHash)
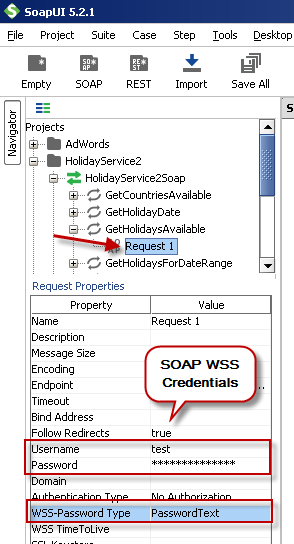 Configure SOAP WSS Credentials for SoapUI (SOAP API Testing Tool)
 -
To use BASIC Auth Credentials select request node and double-click it. At the bottom click on Auth (Basic) and From Authorization dropdown click Add New and Select Basic.
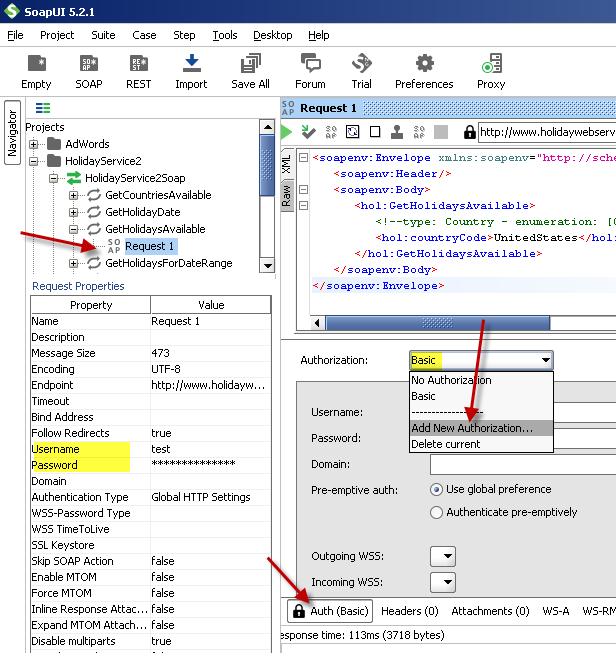 Configure Basic Authorization for SoapUI (SOAP API Testing Tool)
-
- Now you can test your request first Double-click on the request node to open request editor.
-
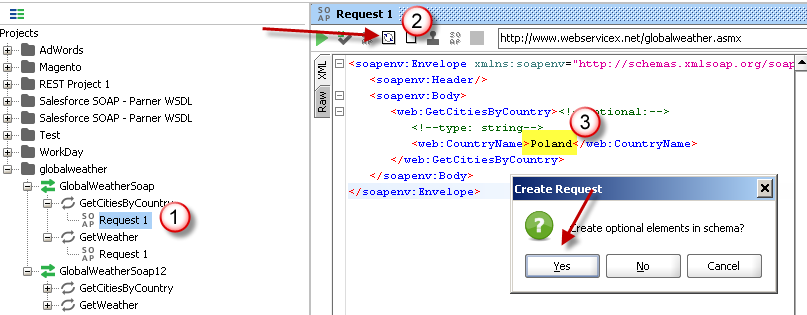
Change necessary parameters, remove optional or unwanted parameters. If you want to regenerate request you can click on Recreate default request toolbar icon.
 Create SOAP Request XML (With Optional Parameters)
 -
Once your SOAP Request XML is ready, Click the Play button in the toolbar to execute SOAP API Request and Response will appear in Right side panel.
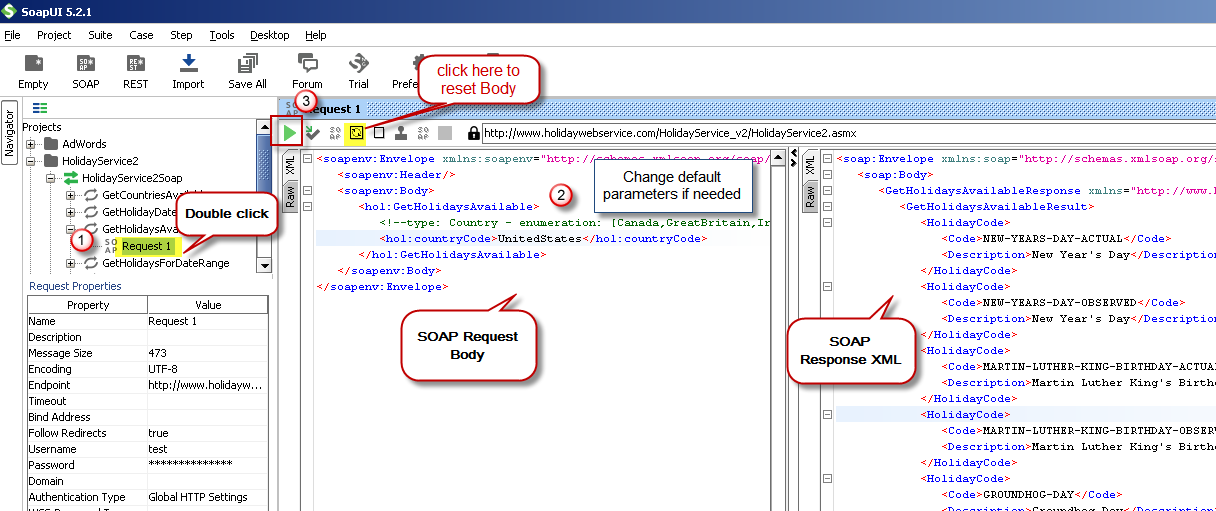 Test SOAP API using SoapUI Tool (Change Default XML Body / Parameters, Execute and See Response)


Once you have tested your SOAP API in SoapUI tool, we are ready to use ZappySys SSIS Tasks/Components or ODBC Drivers to call SOAP API in SSIS or your preferred BI tool or Programming language.
Read data from SOAP in SSIS (Export data)
In this section we will learn how to configure and use SOAP Connector in the API Source to extract data from the SOAP.
- Now Download SoapUI (Its popular free third-party tool by other vendor). SoapUI can help you to generate XML Request BODY easily by using WSDL file. You can also test your service by supplying parameters.
-
Now find out your SOAP Service WSDL URL. It can be URL or locally stored XML file. WSDL is standard to describes SOAP Service (e.g. Available functions, request/response format). For SSRS WSDL is located usually at below location. Sometime WSDL URL is not correctly downloaded in SoapUI in that case use web browser to download WSDL and save to local disk.
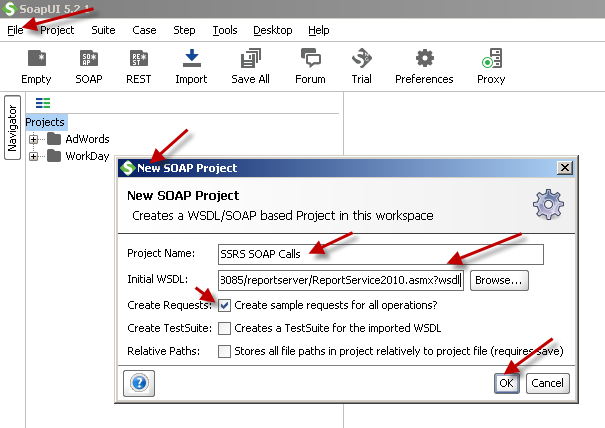
- Now launch SoapUI. Click on File menu and Select New SOAP Project
- Enter your WSDL file path or URL
-
Click OK to create Project. This will create some dummy requests for you. If you want to see all available parameter in your Request you can create New Request by right click on Method node and select New Request. When prompted to create optional parameters then click yes.
Create new SoapUI project to generate / test Soap Requests
-
Click on Request node as below and it will show you XML code for your SOAP request. You can edit parameters as needed. We will use this code in our XML Source to build SOAP Request. Some time your SOAP Service may require UserID/Password in SOAP Body or via Authorization Header like this one. If you passing credentials Authorization header then you can use HTTP Connection Manager (on XML Source UI check Use Credentials option and create new connection)
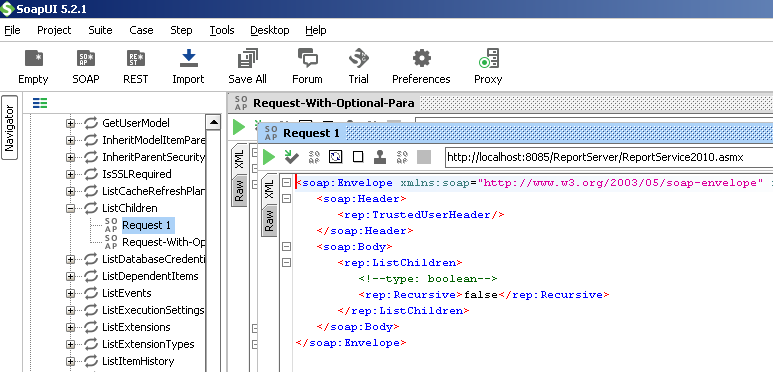
SOAP Request XML
-
Open Visual Studio and click Create a new project.
-
Select Integration Services Project. Enter a name and location for your project, then click OK.
-
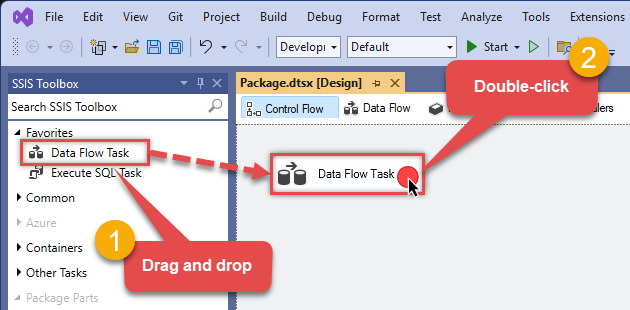
From the SSIS Toolbox, drag and drop a Data Flow Task onto the Control Flow surface, and double-click it:
-
Make sure you are in the Data Flow Task designer:
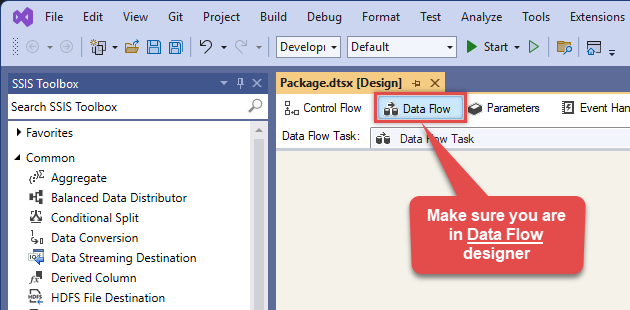
-
From the SSIS toolbox drag and drop XML Source on the dataflow designer surface

-
Double click on XML Source component to configure it.
-
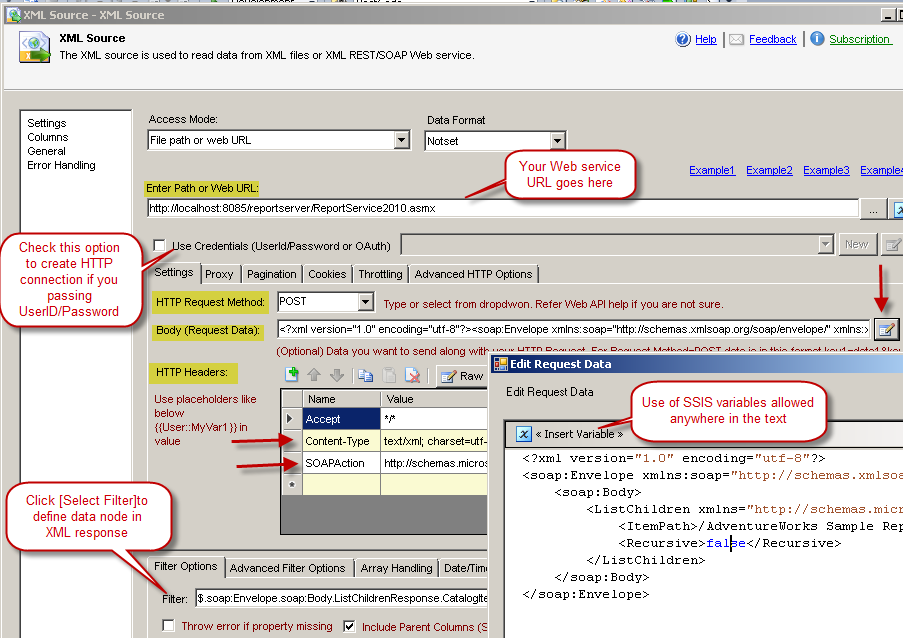
From the Access Mode dropdown select [File path or web Url] and paste the following Url for this example.
Now find out your SOAP Service WSDL URL. It can be URL or locally stored XML file. WSDL is standard to describes SOAP Service (e.g. Available functions, request/response format). For SSRS WSDL is located usually at below location. Sometime WSDL URL is not correctly downloaded in SoapUI in that case use web browser to download WSDL and save to local disk.
NOTE: Here for demo, We are using odata API, but you need to refer your own API documentation and based on that you need to use your own API URL and need to configure connection based on API Authentication type. -
While making SOAP Request you have to configure following items in your XML Source.
- URL
- Request Method (e.g. POST)
- Headers
- Request Body (for request SOAP XML)
-
Double click XML Source to configure it.
- Set webservice URL
- Set request method to POST
-
In the headers grid click Raw Edit to add 2 more headers as below.
If you not sure about SOAP Action then find out from SoapUI > Raw Tab of Request Panel. Headers are only generated if you click the green Play button in SoapUI. Copy following two headers from SoapUI Raw tab and paste under SSIS XML Source > Headers Grid > Raw Edit.Content-Type: text/xml;charset=UTF-8 SOAPAction: "http://some-url-of-your-api-call"
SOAPAction URL is also listed under the following place in SoapUI.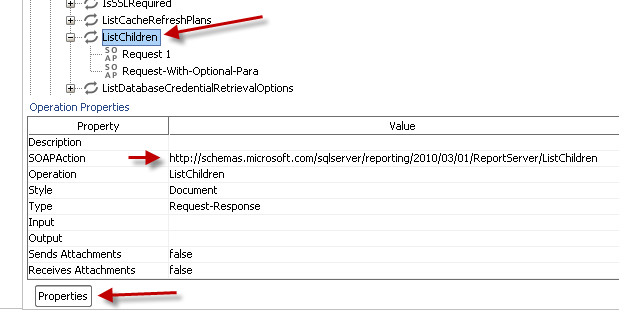
How to find SOAPAction Header value using SoapUI tool
- Now click on Edit option next to Body Textbox. You can Copy sample Request XML generated in SoapUI and paste in Request Data (See below screenshot). You have to make sure to include all required fields in your XML Request (You may create new XML request in SoapUI with include Optional fields Turned ON to see all parameters).
- XML Source supports using Placeholders in request URL, body and headers so its great way to make things dynamic. If you have need to use placeholders then you can use {Insert Variable} option like below screenshot and add variable anywhere in the text.
-
You can also edit Filter to control how data is returned. If you have Nested nodes in XML response you can select data node which you care about. Click select Filter button to navigate through hierarchy.
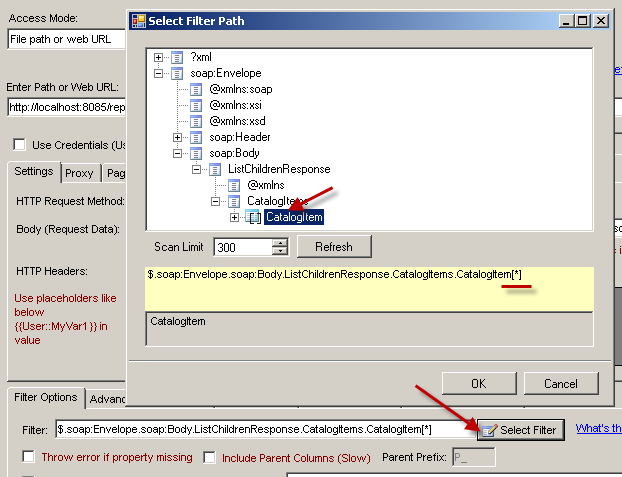
Filter SOAP Web Service – XML response data
- Un-check include parent option if you don’t care about getting parent attributes.
-
Your final UI may look like below after setting Url, Method, Body and Headers.
Calling SOAP Web Service in SSIS using XML Source Connector
-
On Array handling tab you can type all the element names you know for sure that going to have one or more records. For example if your response looks like below you can enter a:row in the possible array fields on Array Handling tab. That way if you have just one record rather than multiple records Filter expression like this wont fail ( $.a:response.a:data.a:row[*] ) .
<a:response>
	<a:data>
		<a:row>....</a:row>
		<a:row>....</a:row>
	</a:data>
</a:response>
-
Now once all settings entered. Click Preview.

Set Filter and Preview SOAP Web Service Response in Table Format
-
That's it; we are done. In a few clicks we configured the call to SOAP using ZappySys SOAP Connector


Configuring pagination in the XML Source
ZappySys XML Source equips users with powerful tools for seamless data extraction and management from REST APIs, leveraging advanced pagination methods for enhanced efficiency. These options are designed to handle various types of pagination structures commonly used in APIs. Below are the detailed descriptions of these options:
Page-based Pagination: This method works by retrieving data in fixed-size pages from the Rest API. It allows you to specify the page size and navigate through the results by requesting different page numbers, ensuring that you can access all the data in a structured manner.
Offset-based Pagination: With this approach, you can extract data by specifying the starting point or offset from which to begin retrieving data. It allows you to define the number of records to skip and fetch subsequent data accordingly, providing precise control over the data extraction process.
Cursor-based Pagination: This technique involves using a cursor or a marker that points to a specific position in the dataset. It enables you to retrieve data starting from the position indicated by the cursor and proceed to subsequent segments, ensuring that you capture all the relevant information without missing any records.
Token-based Pagination: In this method, a token serves as a unique identifier for a specific data segment. It allows you to access the next set of data by using the token provided in the response from the previous request. This ensures that you can systematically retrieve all the data segments without duplication or omission.
Utilizing these comprehensive pagination features in the ZappySys XML Source facilitates efficient data management and extraction from REST APIs, optimizing the integration and analysis of extensive datasets.
For more detailed steps, please refer to this link: How to do REST API Pagination in SSIS / ODBC Drivers
Reading large XML string in SSIS (3 million rows in 3 mins)
Using ZappySys SSIS XML Source you can read large XML String data (Process 3 Million rows in 3 minutes – 1.2 GB file). Using --FAST Expression and other options.
If you use default settings to read data then it may result into OutOfMemory Exception so we will outline few techniques which will enable high performance Streaming Mode rather than In-memory load of entire data.
Please refer to this article for the same: How to read large XML / JSON file in SSIS
Load SOAP data into SQL Server using Upsert Destination (Insert or Update)
Once you configured the data source, you can load SOAP data into SQL Server using Upsert Destination.
Upsert Destination can merge or synchronize source data with the target table.
It supports Microsoft SQL Server, PostgreSQL, and Redshift databases as targets.
Upsert Destination also supports very fast bulk upsert operation along with bulk delete.
Upsert operation
- a database operation which performs INSERT or UPDATE SQL commands
based on record's existence condition in the target table.
It
Upsert Destination supports INSERT, UPDATE, and DELETE operations,
so it is similar to SQL Server's MERGE command, except it can be used directly in SSIS package.
-
From the SSIS Toolbox drag-and-drop Upsert Destination component onto the Data Flow designer background.
-
Connect your SSIS source component to Upsert Destination.
-
Double-click on Upsert Destination component to open configuration window.
-
Start by selecting the Action from the list.
-
Next, select the desired target connection or create one by clicking <New [provider] Connection> menu item from the Target Connection dropdown.
-
Then select a table from the Target Table list or click New button to create a new table based on the source columns.
-
Continue by checking Insert and Update options according to your scenario (e.g. if Update option is unchecked, no updates will be made).
-
Finally, click Map All button to map all columns and then select the Key columns to match the columns on:
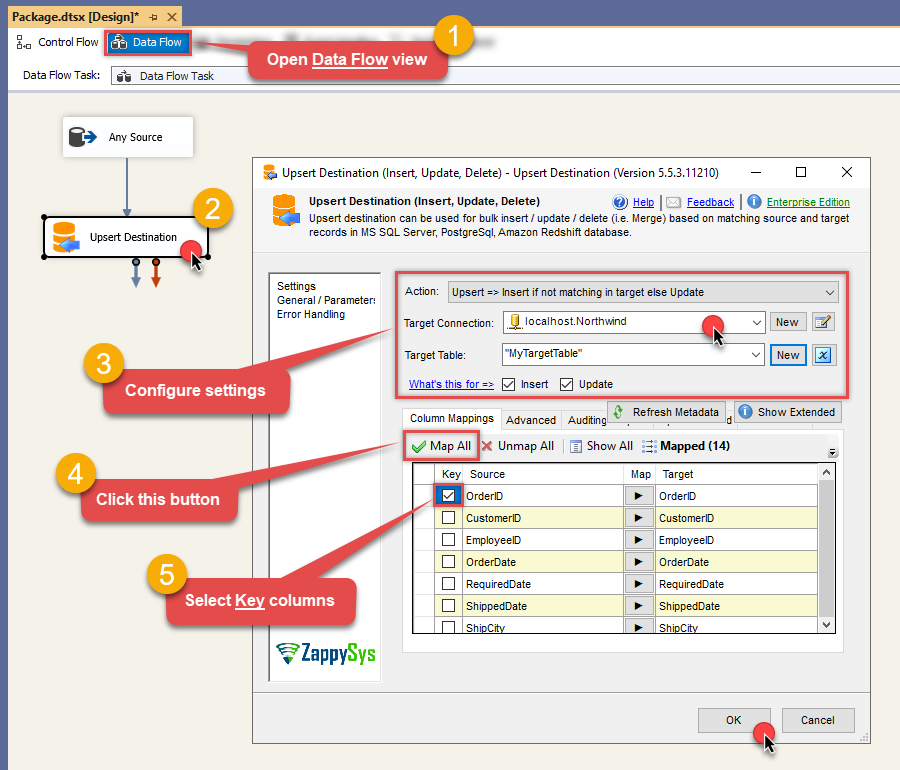
-
Click OK to save the configuration.
-
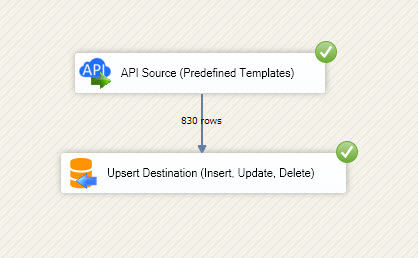
Run the package and SOAP data will be merged with the target table in SQL Server, PostgreSQL, or Redshift:
-
Done!
Deploy and schedule SSIS package
After you are done creating SSIS package, most likely, you want to deploy it to SQL Server Catalog and run it periodically. Just follow the instructions in this article:
Running SSIS package in Azure Data Factory (ADF)
To use SSIS PowerPack in ADF, you must first prepare Azure-SSIS Integration Runtime. Follow this link for detailed instructions:
Conclusion
In this guide, we demonstrated how to connect to SOAP in SSIS and integrate your data — all without writing complex code.
Ready to get started? Download SSIS PowerPack now or ping us via chat if you still need help:


 Connector")


 Connector")


 Connector")


 Connector")


