Salesforce Connector for MS Access
Salesforce Connector can be used to extract/load large amount of data from/in Salesforce.com without any programming. You can use simple Table mode or Query mode with full SOQL query language support (SOQL=Salesforce.com Object Query Language).
In this article you will learn how to quickly and efficiently integrate Salesforce data in MS Access without coding. We will use high-performance Salesforce Connector to easily connect to Salesforce and then access the data inside MS Access.
Let's follow the steps below to see how we can accomplish that!
Salesforce Connector for MS Access is based on ZappySys Salesforce Driver which is part of ODBC PowerPack. It is a collection of high-performance ODBC drivers that enable you to integrate data in SQL Server, SSIS, a programming language, or any other ODBC-compatible application. ODBC PowerPack supports various file formats, sources and destinations, including REST/SOAP API, SFTP/FTP, storage services, and plain files, to mention a few.
Create ODBC Data Source (DSN) based on ZappySys Salesforce Driver
Step-by-step instructions
To get data from Salesforce using MS Access we first need to create a DSN (Data Source) which will access data from Salesforce. We will later be able to read data using MS Access. Perform these steps:
-
Download and install ODBC PowerPack.
-
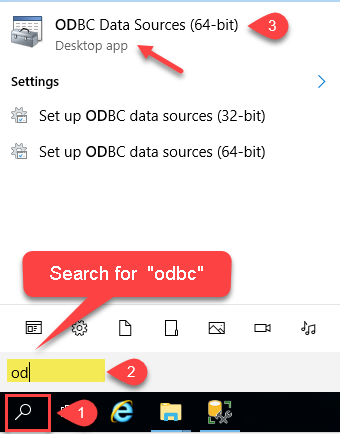
Open ODBC Data Sources (x64):
-
Create a User data source (User DSN) based on ZappySys Salesforce Driver:
ZappySys Salesforce Driver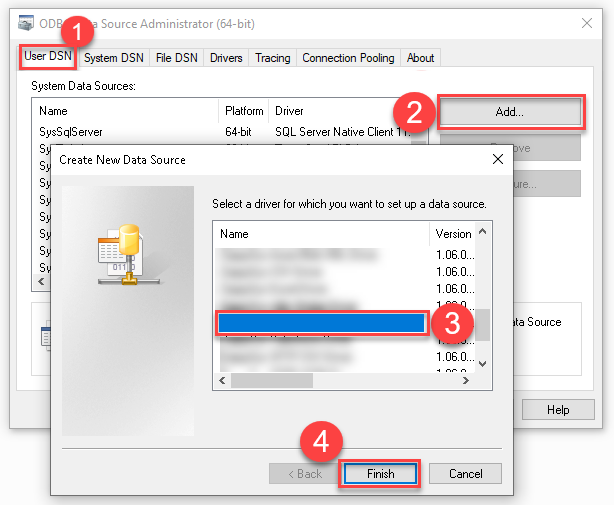
-
Create and use User DSN
if the client application is run under a User Account.
This is an ideal option
in design-time , when developing a solution, e.g. in Visual Studio 2019. Use it for both type of applications - 64-bit and 32-bit. -
Create and use System DSN
if the client application is launched under a System Account, e.g. as a Windows Service.
Usually, this is an ideal option to use
in a production environment . Use ODBC Data Source Administrator (32-bit), instead of 64-bit version, if Windows Service is a 32-bit application.
-
Create and use User DSN
if the client application is run under a User Account.
This is an ideal option
-
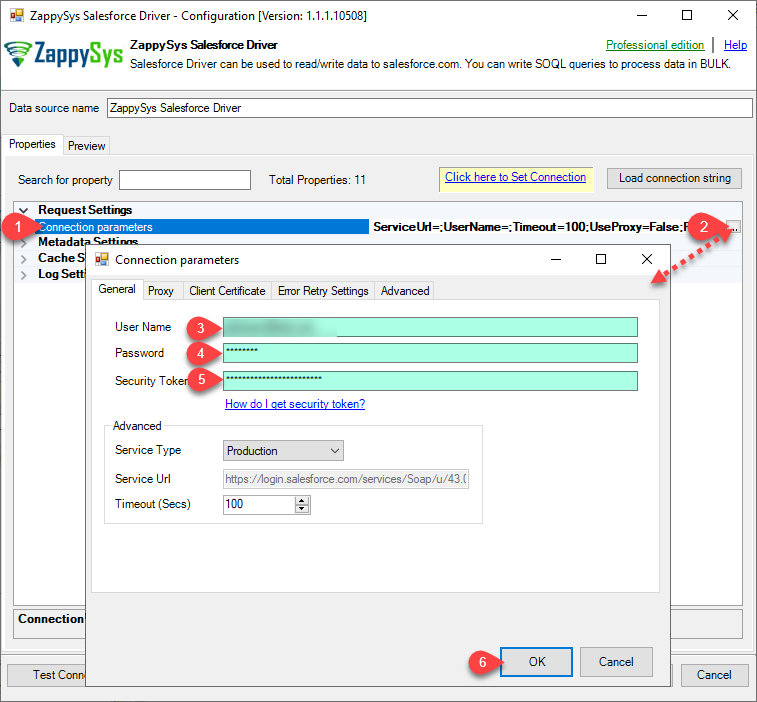
Now, we need SalesForce Connection. Lets create it.
-
Now, When you see DSN Config Editor with zappysys logo first thing you need to do is change default DSN Name at the top and Click on Preview Tab, Select Table from Tables Dropdown or you can enter or modify a SOQL query and click on Preview Data.
This example shows how to write simple SOQL query (Salesforce Object Query Language). It uses WHERE clause. For more SOQL Queries click here.
SOQL is similar to database SQL query language but much simpler and many features you use in database query may not be supported in SOQL (Such as JOIN clause not supported). But you can use following Queries for Insert, Update, Delete and Upsert(Update or Insert record if not found).SELECT * FROM Account WHERE Name like '%Oil%'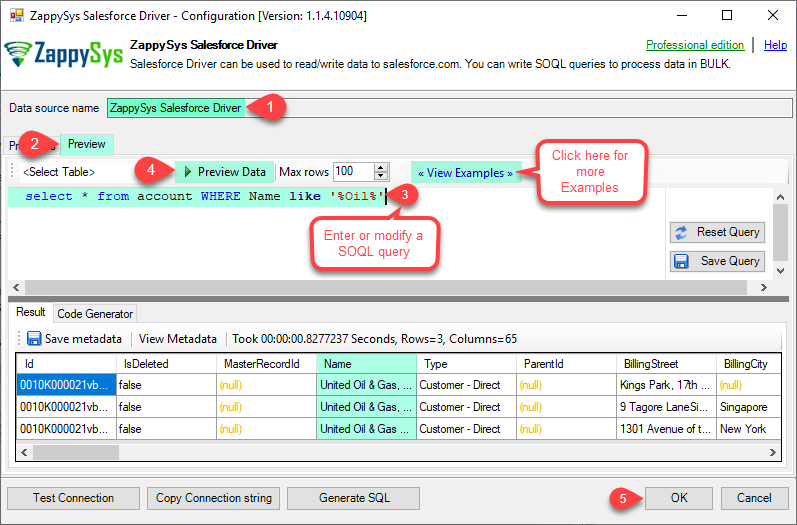
-
Click OK to finish creating the data source
Video Tutorial
Read data in Microsoft Access from the ODBC data source
-
First of all, open MS Access and create a new MS Access database.
-
In the next step, start loading ODBC data source we created:
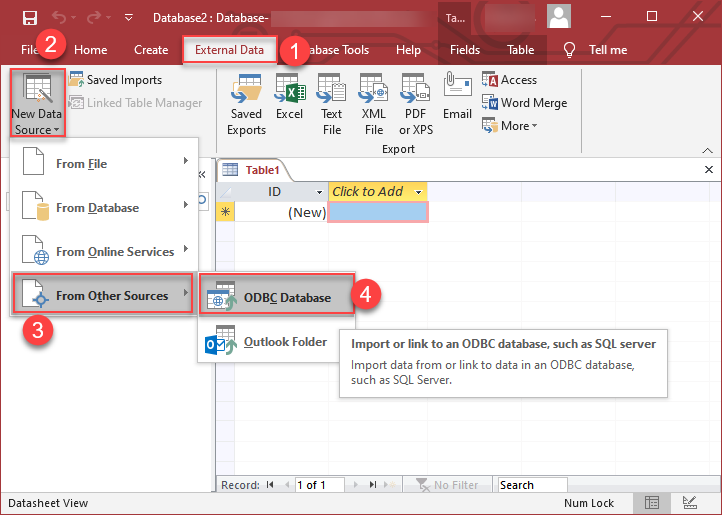
-
Then click next until data source selection window appears. Select the data source we created in one of the previous steps and hit OK:
SalesforceDSN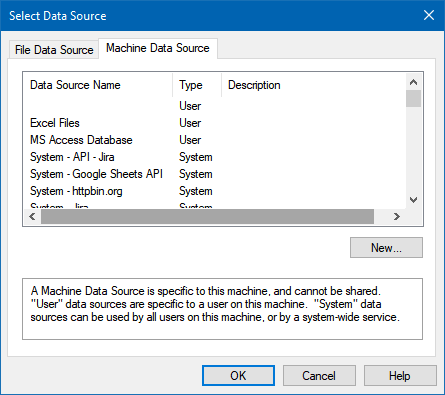
-
Continue with tables and views selection. You can extract multiple tables or views:
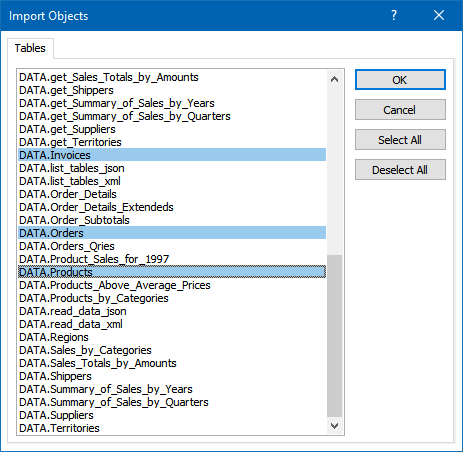
-
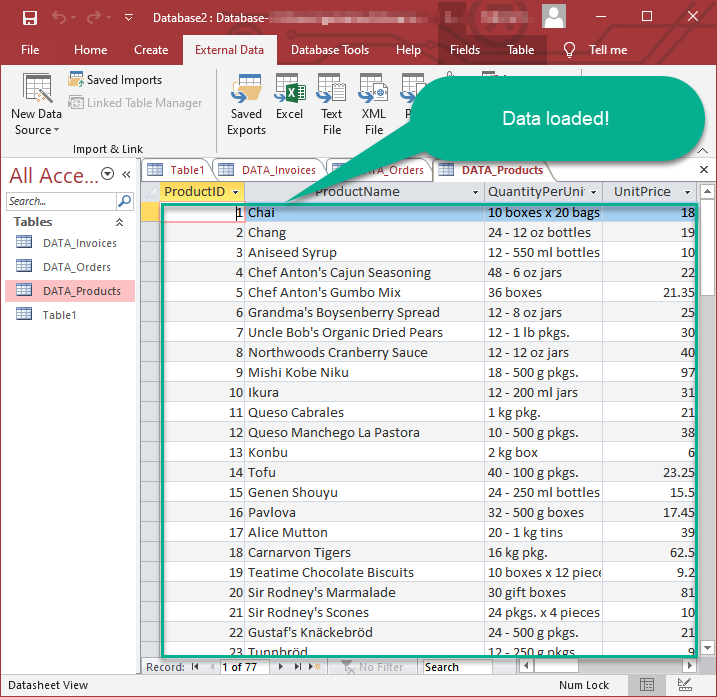
Finally, wait while data is being loaded and once done you should see a similar view:
Using Linked Table for Live Data (Slow)
Linked tables in Microsoft Access are crucial for online databases because they enable real-time access to centralized data, support scalability, facilitate collaboration, enhance data security, ease maintenance tasks, and allow integration with external systems. They provide a flexible and efficient way to work with data stored in online databases, promoting cross-platform compatibility and reducing the need for data duplication.
-
Real-Time Data Access:
Access can interact directly with live data in online databases, ensuring that users always work with the most up-to-date information. -
Centralized Data Management:
Online databases serve as a centralized repository, enabling efficient management of data from various locations. -
Ease of Maintenance:
Updates or modifications to the online database structure are automatically reflected in Access, streamlining maintenance tasks. -
Adaptability to Changing Requirements:
Linked tables provide flexibility, allowing easy adaptation to changing data storage needs or migration to different online database systems.
Let's create the linked table.
-
Launch Microsoft Access and open the database where you want to create the linked table.
-
Go to the "External Data" tab on the Ribbon. >> "New Data Source" >> "From Other Sources" >> "ODBC Database"

-
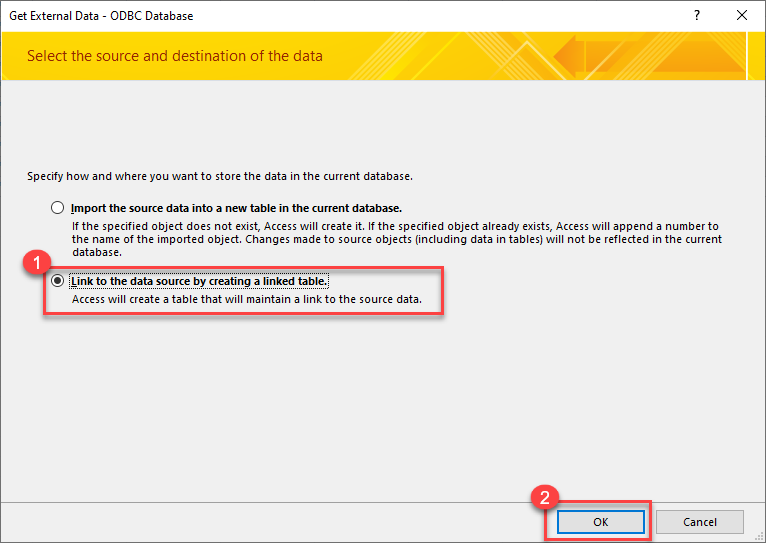
Select the option "Link to Data Source by creating a linked table:
-
Continue by clicking 'Next' until the Data Source Selection window appears. Navigate to the Machine Data Source tab and select the desired data source established in one of the earlier steps. Click 'OK' to confirm your selection.
SalesforceDSN
-
Proceed to the selection of Tables and Views. You have the option to extract multiple tables or views:

-
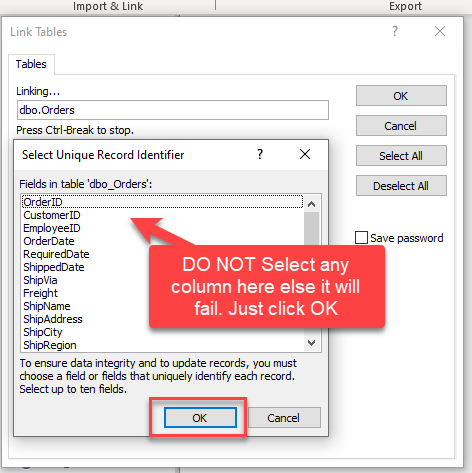
When prompted to select Unique Key column DO NOT select any column(s) and just click OK:
-
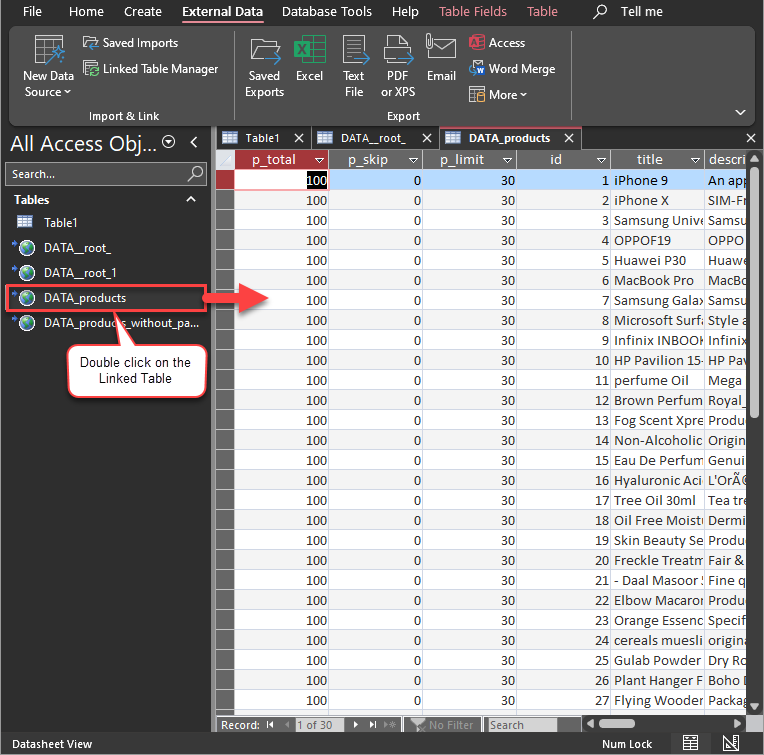
Finally, Simply double-click the newly created Linked Table to load the data:
Guide to Effectively Addressing Known Issues
Discover effective strategies to address known issues efficiently in this guide. Get solutions and practical tips to streamline troubleshooting and enhance system performance, ensuring a smoother user experience.
Fewer Rows Imported
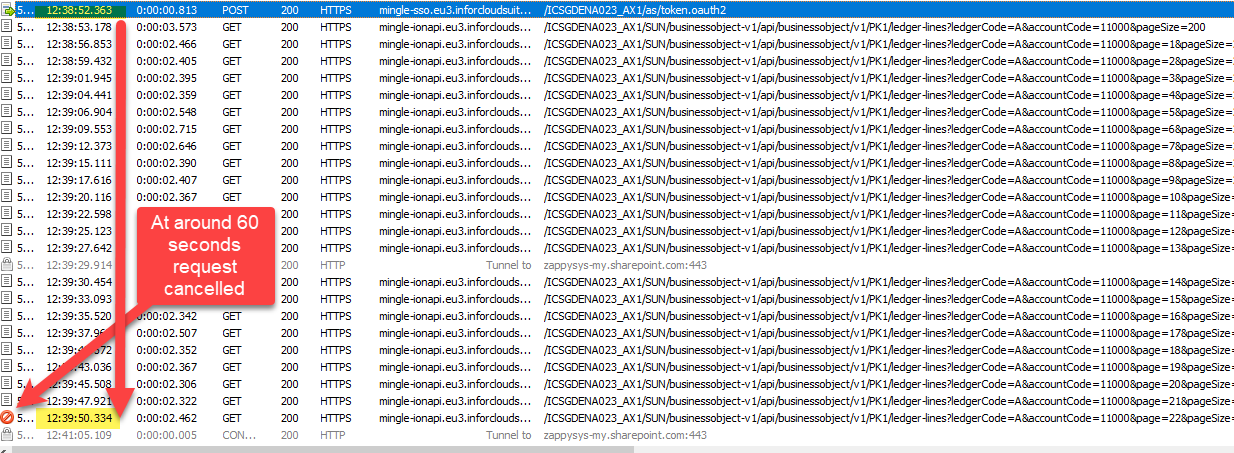
The reason for this is that MS Access has a default query timeout of 60 seconds, which means it stops fetching data if the query takes longer than that. As a result, only a limited number of rows are fetched within this time frame.
To address this, we can adjust the Query Timeout by following the steps below.
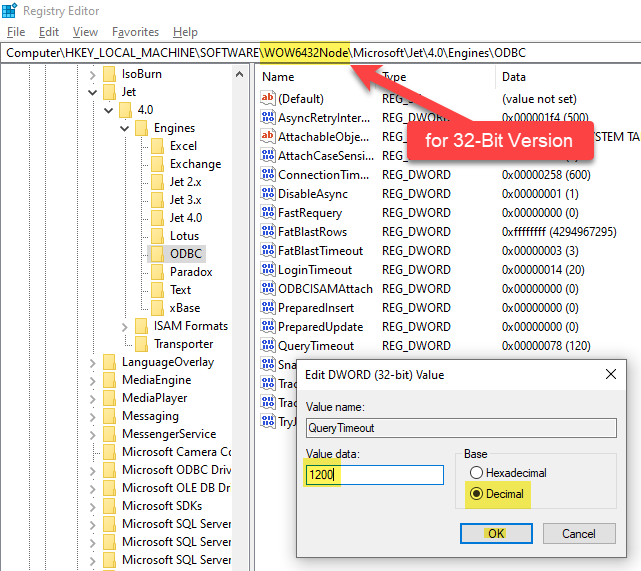
The path may vary depending on the MS Access bitness, such as 32-bit versus 64-bit.
\HKEY_LOCAL_MACHINE\SOFTWARE\Microsoft\Jet\4.0\Engines\ODBC
\HKEY_LOCAL_MACHINE\SOFTWARE\WOW6432Node\Microsoft\Jet\4.0\Engines\ODBC
\HKEY_LOCAL_MACHINE\SOFTWARE\Microsoft\Office\ClickToRun\REGISTRY\MACHINE\Software\Microsoft\Office\16.0\Access Connectivity Engine\Engines\ODBC
We can identify this issue by examining the Fiddler Log, as MS Access doesn't display any error regarding partial import, which is quite unusual
Please refer to this link : How to use Fiddler to analyze HTTP web requests
#Deleted word appears for column value in MS Access for Linked Table mode
If you used Linked Table mode to get external data and it shows #deleted word rather than actual value for column after you open then most likely its following issue.
Make sure to re-create Linked Table and DO NOT select any key column when prompted (Just click OK)

How to Fix

Table Selection UI Opening Delays
The Table selection UI takes a significant amount of time to open after clicking the 'New Data Source' -> 'Other Data Sources' -> 'ODBC'
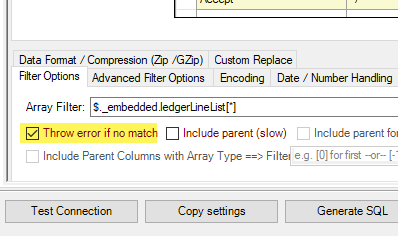
The reason for this issue is that MS Access sends a dummy query, leading to several unnecessary pagination cycles before an error is thrown. To mitigate this, we can prevent wasted cycles by configuring the 'Throw error if no match' setting on the Filter Options Tab.
Enhancing Performance through Metadata Addition (Reduces Query Time)
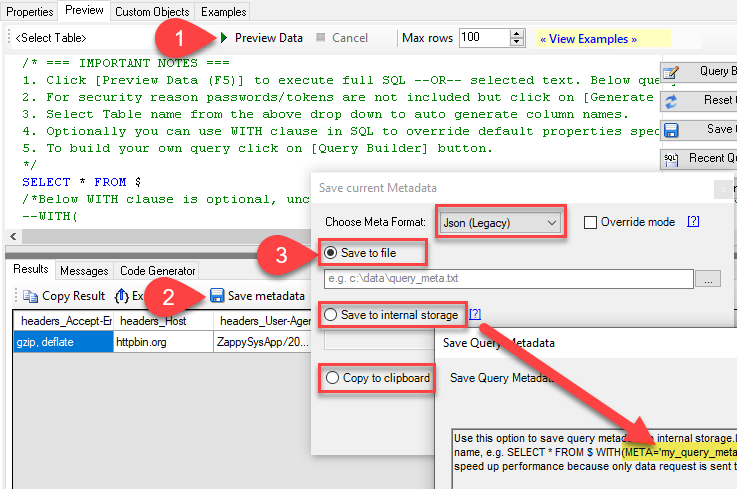
We can optimize query performance by creating Virtual Tables (i.e. views with custom SQL) on Datasource and incorporating META=static columns. Learn how to capture static metadata in this guide.
Performance Options - Generate Metadata Manually
Execute the query initially, save the metadata by selecting 'Save to Meta' (choose Compact Format), and then click 'Save to Clipboard.' Utilize the resulting list by pasting it into the META attribute as follows: 'META=paste here.'
SELECT * FROM products
    WITH(
        META='id:String(20); title:String(100);  description:String(500);'
    )
Optimize Workflow with Automated Import
Employ Automated Import when Linked Tables are not feasible, and we need to depend on Imported Tables with static data.
While using Linked Tables sometime it encounter errors, and we are left with no alternative but to utilize Imported Tables, Automatic Refresh becomes crucial in such scenarios.
Here's a guide on automating refreshes. We can set up automatic refresh on different events, such as when the database opens, a form is opened, or a button is clicked.
To initiate the import process, follow these steps:
- Perform the data import using the standard manual steps.
- In the final step, we'll encounter a checkbox labeled 'Save Import Steps.' Ensure to check this option.
- After saving the steps, we can locate their name in the Save Imports UI. Identify the name associated with the saved steps.
- "Now, we can execute the code as shown below:"
Private Sub cmdYes_Click()
    Label0.Visible = True
    DoCmd.RunSavedImportExport "Import-DATA.products"
    Label0.Visible = False
End Sub
Centralized data access via Data Gateway
In some situations, you may need to provide Salesforce data access to multiple users or services. Configuring the data source on a Data Gateway creates a single, centralized connection point for this purpose.
This configuration provides two primary advantages:
-
Centralized data access
The data source is configured once on the gateway, eliminating the need to set it up individually on each user's machine or application. This significantly simplifies the management process.
-
Centralized access control
Since all connections route through the gateway, access can be governed or revoked from a single location for all users.
| Data Gateway |
Local ODBC
data source
|
|
|---|---|---|
| Simple configuration | ||
| Installation | Single machine | Per machine |
| Connectivity | Local and remote | Local only |
| Connections limit | Limited by License | Unlimited |
| Central data access | ||
| Central access control | ||
| More flexible cost |
If you need any of these requirements, you will have to create a data source in Data Gateway to connect to Salesforce, and to create an ODBC data source to connect to Data Gateway in MS Access.
Let's not wait and get going!
Creating Salesforce data source in Gateway
In this section we will create a data source for Salesforce in Data Gateway. Let's follow these steps to accomplish that:
-
Search for
gatewayin Windows Start Menu and open ZappySys Data Gateway Configuration: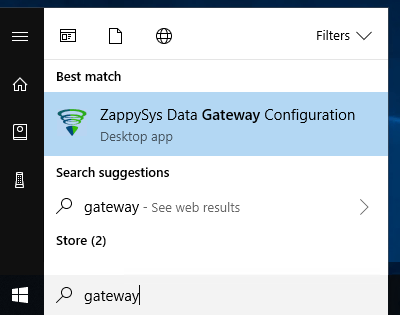
-
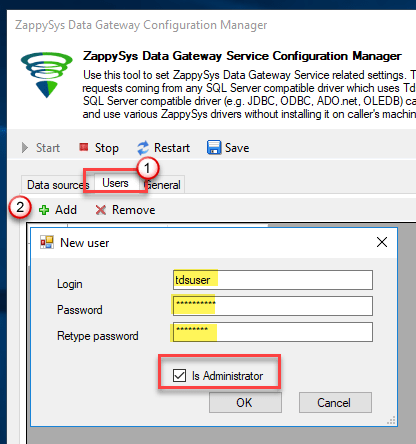
Go to Users tab and follow these steps to add a Data Gateway user:
- Click Add button
-
In Login field enter username, e.g.,
john - Then enter a Password
- Check Is Administrator checkbox
- Click OK to save
-
Now we are ready to add a data source:
- Click Add button
- Give Datasource a name (have it handy for later)
- Then select Native - ZappySys Salesforce Driver
- Finally, click OK
SalesforceDSNZappySys Salesforce Driver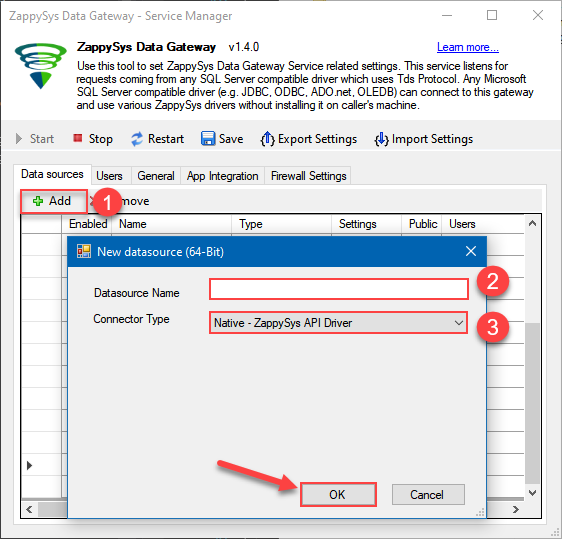
-
When the ZappySys Salesforce Driver configuration window opens, configure the Data Source the same way you configured it in ODBC Data Sources (64-bit), in the beginning of this article.
-
Very important step. Now, after creating or modifying the data source make sure you:
- Click the Save button to persist your changes.
- Hit Yes, once asked if you want to restart the Data Gateway service.
This will ensure all changes are properly applied:
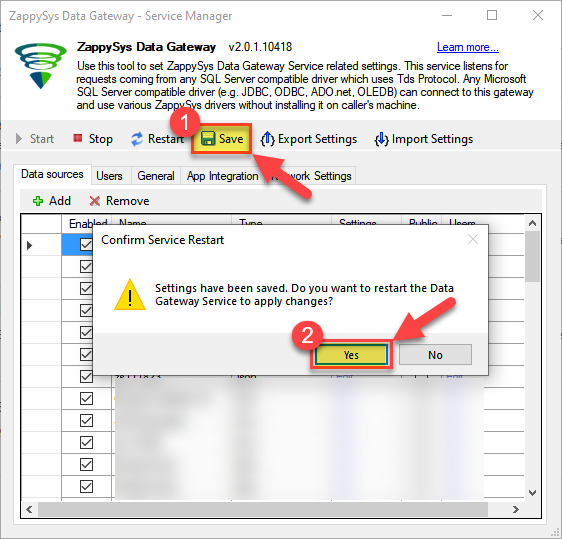 Skipping this step may result in the new settings not taking effect and, therefore you will not be able to connect to the data source.
Creating ODBC data source for Data Gateway
In this part we will create ODBC data source to connect to Data Gateway from MS Access. To achieve that, let's perform these steps:
-
Open ODBC Data Sources (x64):

-
Create a User data source (User DSN) based on ODBC Driver 17 for SQL Server:
ODBC Driver 17 for SQL Server If you don't see ODBC Driver 17 for SQL Server driver in the list, choose a similar version driver.
 -
Then set a Name of the data source (e.g.
Gateway) and the address of the Data Gateway:GatewayDSNlocalhost,5000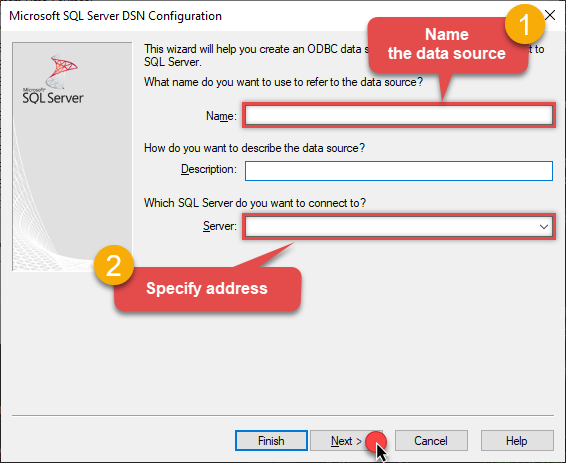 Make sure you separate the hostname and port with a comma, e.g.
localhost,5000. -
Proceed with authentication part:
- Select SQL Server authentication
-
In Login ID field enter the user name you used in Data Gateway, e.g.,
john - Set Password to the one you configured in Data Gateway
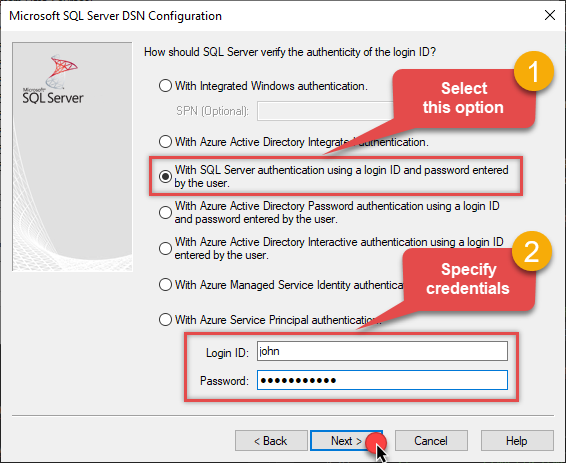
-
Then set the default database property to
SalesforceDSN(the one we used in Data Gateway):SalesforceDSN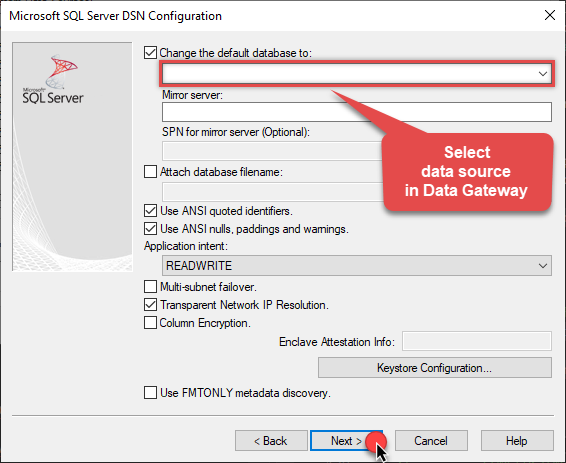
-
Continue by checking Trust server certificate option:
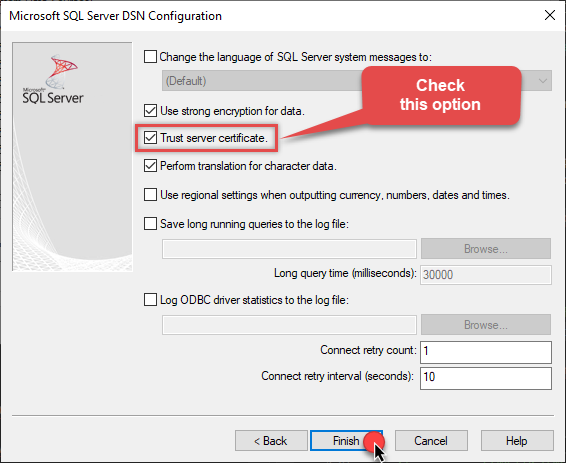
-
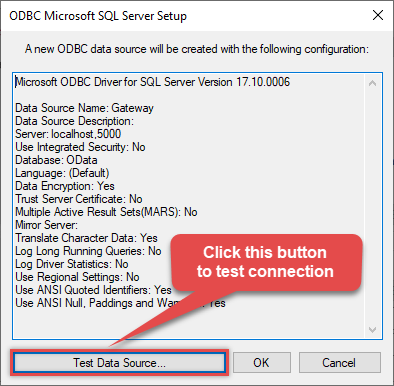
Once you do that, test the connection:
-
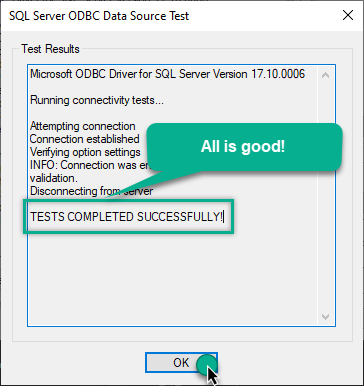
If connection is successful, everything is good:
-
Done!
We are ready to move to the final step. Let's do it!
Accessing data in MS Access via Data Gateway
Finally, we are ready to read data from Salesforce in MS Access via Data Gateway. Follow these final steps:
-
Go back to MS Access.
-
First of all, open MS Access and create a new MS Access database.
-
In the next step, start loading ODBC data source we created:

-
Then click next until data source selection window appears. Select the data source we created in one of the previous steps and hit OK:
GatewayDSN
-
Read the data the same way we discussed at the beginning of this article.
-
That's it!
Now you can connect to Salesforce data in MS Access via the Data Gateway.
john and your password.
Query Examples
This guide provides examples for using the ZappySys Salesforce ODBC Driver to perform bulk API operations and DML (Data Manipulation Language) actions on Salesforce. You’ll learn how to leverage the Bulk API to insert, update, upsert, and delete large datasets from external sources such as MSSQL, CSV, Oracle, and other ODBC-compatible systems. By using external IDs and lookup fields, you can easily map data from your source systems to Salesforce. These examples will help you execute high-performance operations efficiently using EnableBulkMode, EXTERNAL options, and more.
Bulk Mode - Insert Large Volume of Data from External Source (e.g., MSSQL) into Salesforce
This example demonstrates how to use the EnableBulkMode option to insert a large volume of records into Salesforce using the Bulk API (Job-based mode). By default, the standard mode writes data in batches of 200 rows. However, when Bulk API mode is enabled, it can send up to 10,000 rows per batch, offering better performance for large datasets. Note that using Bulk API mode may not provide performance benefits for small datasets (e.g., a few hundred rows).
In this example, the driver type is set to MSSQL. For other data sources such as CSV, REST API, or Oracle, update the driver type to ODBC and modify the connection string and query accordingly.
Ensure that your source query returns column names that match the target Salesforce object fields. The EXTERNAL option is used to map Salesforce target fields based on the output of the source query.
Important: If you’re using Windows authentication, the service account running the ZappySys Data Gateway must have the appropriate permissions on the source system.
INSERT INTO Account
SOURCE (
    'MSSQL',
    'Data Source=localhost;Initial Catalog=tempdb;Integrated Security=true',
    'SELECT TOP 1000000
         C_NAME AS Name,
         C_CITY AS BillingCity,
         C_LOC AS NumberofLocations__c
     FROM very_large_staging_table'
)
WITH (
    Output = 1,
    EnableBulkMode = 1
)

-- Notes:
-- 'MSSQL': External driver type (MSSQL, ODBC, OLEDB)
-- Output: Enables capturing __RowStatus and __ErrorMessage
-- EnableBulkMode: Improves performance with bulk batches (uses 10000 rows per batch rather than 200)
Bulk Mode - Insert Records with Lookup Field (Read from External Source)
This example demonstrates how to use the EnableBulkMode option to insert a large number of records into Salesforce using the Bulk API (Job-based mode). Additionally, it shows how to set a lookup field—specifically the Owner field—by referencing an external ID from the User object instead of using the internal Salesforce ID.
If you are performing an Update operation, you must include the Id field in the source data. If your source field has a different name, alias it to Id in the SQL query. For Upsert operations, you can specify a custom external ID field using the Key='ExternalId_Field_Name' option. However, for standard Update operations, the Id field is mandatory.
By default, data is written in batches of 200 rows. When Bulk API mode is enabled, up to 10,000 rows can be sent per batch. This improves performance for large datasets, but offers little advantage for smaller volumes.
In this example, the driver type is set to MSSQL. For other sources such as CSV, REST API, or Oracle, change the driver type to ODBC and adjust the connection string and query accordingly.
Make sure the query outputs column names that match the target fields in the Salesforce object. The EXTERNAL option is used to map input columns to Salesforce fields dynamically.
Important: If you’re using Windows authentication, ensure that the service account running the ZappySys Data Gateway has the appropriate access permissions on the source system.
INSERT INTO Account
SOURCE (
    'MSSQL',
    'Data Source=localhost;Initial Catalog=tempdb;Integrated Security=true',
    'SELECT TOP 1000000
         Account_Name as Name,
         AccountOwnerId as [Owner.ExternalId]
     FROM very_large_staging_table'
)
WITH (
    Output = 1,
    EnableBulkMode = 1
)

-- Notes:
-- 'MSSQL': External driver type (MSSQL, ODBC, OLEDB)
-- Output: Enables capturing __RowStatus and __ErrorMessage
-- EnableBulkMode: Improves performance with bulk batches (uses 10000 rows per batch rather than 200)
Bulk Mode - Delete Large Volume of Data (Read IDs from External Source)
This example demonstrates how to use the EnableBulkMode option to delete a large number of records from Salesforce using the Bulk API (Job-based mode). To perform a delete operation, the source query must return the Id column. If your source column has a different name, make sure to alias it as Id in the SQL query.
By default, data is processed in batches of 200 rows. When Bulk API mode is enabled, batches can include up to 10,000 rows, which significantly improves performance when working with large datasets. However, for small volumes (a few hundred records), Bulk API mode may not offer a noticeable performance benefit.
In this example, the driver type is set to MSSQL. For other data sources such as CSV, REST API, or Oracle, set the driver type to ODBC and update the connection string and query as needed.
Ensure that the query output includes column names that match the target Salesforce object fields. The EXTERNAL option allows dynamic mapping of input columns to Salesforce fields based on the source query.
Important: If you’re using Windows authentication, make sure the service account running the ZappySys Data Gateway has the necessary permissions to access the data source.
DELETE FROM Account
SOURCE (
    'MSSQL',
    'Data Source=localhost;Initial Catalog=tempdb;Integrated Security=true',
    'SELECT TOP 1000000
         Account_ID as Id
     FROM very_large_staging_table'
)
WITH (
    Output = 1,
    EnableBulkMode = 1
)

-- Notes:
-- 'MSSQL': External driver type (MSSQL, ODBC, OLEDB)
-- Output: Enables capturing __RowStatus and __ErrorMessage
-- EnableBulkMode: Improves performance with bulk batches (uses 10000 rows per batch rather than 200)
Bulk Mode - Update Large Volume of Data (Read from External Source)
This example illustrates how to use the EnableBulkMode option to update a large number of records in Salesforce via the Bulk API (Job-based mode). When performing an Update operation, the source query must include the Id column. If the source column is named differently, be sure to alias it as Id in your SQL query.
By default, records are processed in batches of 200 rows. When Bulk API mode is enabled, batches can handle up to 10,000 rows, which greatly improves performance for large datasets. However, for smaller datasets (e.g., a few hundred records), Bulk API may not offer a significant performance boost.
In this example, the driver type is set to MSSQL. For other sources such as CSV, REST API, or Oracle, change the driver type to ODBC and modify the connection string and query accordingly.
Ensure that your query returns column names matching the fields in the Salesforce target object. The EXTERNAL option is used to dynamically map input columns to Salesforce fields based on the query output.
Important: When using Windows authentication, the service account running the ZappySys Data Gateway must have the necessary permissions on the source system.
UPDATE Account
SOURCE (
    'MSSQL',
    'Data Source=localhost;Initial Catalog=tempdb;Integrated Security=true',
    'SELECT TOP 1000000
         Account_ID as Id,
         Account_Name as Name,
         City as BillingCity
     FROM very_large_staging_table'
)
WITH (
    Output = 1,
    EnableBulkMode = 1
)

-- Notes:
-- 'MSSQL': External driver type (MSSQL, ODBC, OLEDB)
-- Output: Enables capturing __RowStatus and __ErrorMessage
-- EnableBulkMode: Improves performance with bulk batches (uses 10000 rows per batch rather than 200)
Bulk Mode - Update Lookup Field (Read from External Source)
This example shows how to use the EnableBulkMode option to update a large number of Salesforce records using the Bulk API (Job-based mode). In this scenario, we update a lookup field—specifically the Owner field—by referencing the external ID from the User object instead of using the internal Salesforce ID.
When performing an Update, the Id field must be included in the source data. If your source column has a different name, alias it as Id in the SQL query. For Upsert operations, you can specify a custom external ID using the Key='ExternalId_Field_Name' option. However, for standard Update operations, the Id field is required.
By default, the system processes 200 rows per batch. When EnableBulkMode is enabled, it can process up to 10,000 rows per batch, offering improved performance for large datasets. This mode is less effective for smaller data volumes.
In this example, the driver type is set to MSSQL. For other data sources (e.g., CSV, REST API, Oracle), change the driver type to ODBC and update the connection string and query as needed.
Ensure the query returns column names that match the fields in the target Salesforce object. The EXTERNAL option dynamically maps input columns to Salesforce fields based on the query output.
Important: If using Windows authentication, ensure the service account running the ZappySys Data Gateway has appropriate permissions on the source system.
UPDATE Account
SOURCE (
    'MSSQL',
    'Data Source=localhost;Initial Catalog=tempdb;Integrated Security=true',
    'SELECT TOP 1000000
         Account_ID as Id,
         Account_Name as Name,
         AccountOwnerId as [Owner.ExternalId]
     FROM very_large_staging_table'
)
WITH (
    Output = 1,
    EnableBulkMode = 1
)

-- Notes:
-- 'MSSQL': External driver type (MSSQL, ODBC, OLEDB)
-- Output: Enables capturing __RowStatus and __ErrorMessage
-- EnableBulkMode: Improves performance with bulk batches (uses 10000 rows per batch rather than 200)
External Input from ODBC - Insert Multiple Rows from ODBC Source (e.g., CSV) into Salesforce
This example demonstrates how to perform an INSERT operation in Salesforce using multiple input rows from an external data source such as MSSQL, ODBC, or OLEDB. The operation reads records via an external query and inserts them directly into Salesforce.
In this example, the driver type is set to MSSQL. For other systems like CSV, REST API, or Oracle, set the driver type to ODBC and update the connection string and query accordingly.
Ensure that the query returns column names that match the fields in the Salesforce target object. The EXTERNAL option is used to map these input columns to the corresponding Salesforce fields based on the source query output.
INSERT INTO Account
SOURCE (
    'ODBC',  -- External driver type: MSSQL, ODBC, or OLEDB
    'Driver={ZappySys CSV Driver};DataPath=c:\somefile.csv',  -- ODBC connection string
    '
    SELECT
        Acct_Name AS Name,
        Billing_City AS BillingCity,
        Locations AS NumberofLocations__c
    FROM $
    WITH (
        -- Either use SRC to point to a file or use inline DATA. Comment out one as needed.

        -- Examples:
        -- SRC = ''c:\file_1.csv''
        -- SRC = ''c:\some*.csv''
        -- SRC = ''https://abc.com/api/somedata-in-csv''

        DATA = ''Acct_Name,Billing_City,Locations
        Account001,City001,1
        Account002,City002,2
        Account003,City003,3''
    )'
)
-- Notes:
-- Column aliases in SELECT must match Salesforce target fields.
-- Preview the Account object to verify available fields.

WITH (
    Output = 1,                -- Capture __RowStatus and __ErrorMessage for each record
    -- EnableBulkMode = 1,     -- Use Bulk API (recommended for 5,000+ rows)
    EnableParallelThreads = 1, -- Use multiple threads for real-time inserts
    MaxParallelThreads = 6     -- Set maximum number of threads
)
DML - Upsert Lookup Field Value Using External ID Instead of Salesforce ID
This example demonstrates how to set a lookup field value in Salesforce using an external ID rather than the internal Salesforce ID during DML operations such as INSERT, UPDATE, or UPSERT.
Typically, updating a lookup field requires the Salesforce ID of the related record. However, Salesforce also allows referencing a related record using an external ID field. To do this, use the following field name syntax:
[relationship_name.external_id_field_name(child_object_name)]
relationship_name: The API name of the relationship (e.g.,OwnerorYourObject__r).external_id_field_name: A custom field on the related object, marked as External ID.child_object_name(optional): The API name of the related object. If omitted, Salesforce derives it from the relationship name (without the__rsuffix).
Example:
To assign a record owner using a custom external ID on the User object:
Owner.SomeExternalId__c(User)
Owner: The relationship name for the user record.SomeExternalId__c: A custom external ID field in the User object.User: The related (child) object name.
If you’re using the SOURCE(...) clause to read input data and enabling BulkApiMode=1 in the WITH(...) clause, you can omit the child object name. In that case, use the format:
relationship_name.external_id_field_name
Setting a Field to NULL:
To set a lookup or standard field to null, use:
FieldName = null
For example:
AccountId = null
Avoid using:
relation_name.external_id_name(target_table) = null
More Information:
For full details and examples, visit the official guide: ZappySys Docs - External ID in Lookup Fields
-- Upsert record into Salesforce Account object
UPSERT INTO Account (
    Name,
    BillingCity,
    [Owner.SomeExternalId__c(User)]  -- Use external ID field on related Owner (User) object
)
VALUES (
    'mycompany name',
    'New York',
    'K100'  -- External ID value of the User (Owner)
)
WITH (
    KEY = 'SupplierId__c',  -- External ID field used for UPSERT on Account object
    Output = 1              -- Return __RowStatus and __ErrorMessage for result diagnostics
)
Supported WITH Properties in BULK Mode
When using the ZappySys Salesforce ODBC Driver with BULK mode, you can pass additional options using the WITH clause to customize behavior.
Here are other supported properties commonly used BULK mode:
INSERT INTO Account/UPDATE Account/DELETE FROM Account
SOURCE(...)
WITH(
Output=1 /*Other values can be Output='*' , Output=1 , Output=0 , Output='Col1,Col2...ColN'.  When Output option is supplied then error is not thrown but you can capture status and message in __RowStatus and __ErrorMessage output columns*/
,EnableBulkMode=1 --use Job Style Bulk API (uses 10000 rows per batch rather than 200)
--,MaxRowsPerJob=500000 --useful to control memory footprint in driver
--,ConcurrencyMode='Default' /* or 'Parallel' or 'Serial' - Must set BulkApiVersion=2 to use this, Bulk API V1 doesnt support this yet. If you get locking errors then change to Serial*/
--,BulkApiVersion=2 --default is V1
--,IgnoreFieldsIfInputNull=1 --Set this option to True if you wish to ignore fields if input value is NULL. By default target field is set to NULL if input value is NULL.
--,FieldsToSetNullIfInputNull='SomeColum1,SomeColumn5,SomeColumn7' --Comma separated CRM entity field names which you like to set as NULL when input value is NULL. This option is ignored if IgnoreFieldsIfInputNull is not set to True.
--,AssignmentRuleId='xxxxx' --rule id to invoke on value assignment
--,UseDefaultAssignmentRule=1 --sets whether you like to use default rule
--,AllOrNone=1 --If true, any failed records in a call cause all changes for the call to be rolled back. Record changes aren't committed unless all records are processed successfully. The default is false. Some records can be processed successfully while others are marked as failed in the call results.
--,OwnerChangeOptions='option1,option2...optionN' -- use one or more options from below. Use '-n' suffix to disable option execution e.g. TransferOpenActivities-n
-->>> Available owner change options: EnforceNewOwnerHasReadAccess,TransferOpenActivities,TransferNotesAndAttachments,TransferOthersOpenOpportunities,TransferOwnedOpenOpportunities,TransferOwnedClosedOpportunities,TransferOwnedOpenCases,TransferAllOwnedCases,TransferContracts,TransferOrders,TransferContacts,TransferArticleOwnedPublishedVersion,TransferArticleOwnedArchivedVersions,TransferArticleAllVersions,KeepAccountTeam,KeepSalesTeam,KeepSalesTeamGrantCurrentOwnerReadWriteAccess,SendEmail
-->>> For more information visit https://zappysys.com/link/?id=10141
--,AllowFieldTruncation=1 --If true, truncate field values that are too long, which is the behavior in API versions 14.0 and earlier.
--,AllowSaveOnDuplicates=1 --Set to true to save the duplicate record. Set to false to prevent the duplicate record from being saved.
--,EnableParallelThreads=1 --Enables sending Data in multiple threads to speedup. This option is ignored when bulk mode enabled (i.e. EnableBulkMode=1)
--,MaxParallelThreads=6 --Maximum threads to spin off to speedup write operation. This option is ignored when bulk mode enabled (i.e. EnableBulkMode=1)
--,TempStorageMode='Disk' --or 'Memory'. Use this option to overcome OutOfMemory Error if you processing many rows. This option enables how Temp Storage is used for query processing. Available options 'Disk' or 'Memory' (Default is Memory)
)
More Examples and Documentation
For additional examples and detailed guidance on using the ZappySys Salesforce ODBC Driver, visit the official documentation:
Conclusion
In this article we showed you how to connect to Salesforce in MS Access and integrate data without any coding, saving you time and effort.
We encourage you to download Salesforce Connector for MS Access and see how easy it is to use it for yourself or your team.
If you have any questions, feel free to contact ZappySys support team. You can also open a live chat immediately by clicking on the chat icon below.
Download Salesforce Connector for MS Access Documentation


