Introduction
You can connect to your FTP/SFTP XML File data from SSIS via the high-performance FTP/SFTP XML File SSIS Connector. We'll walk you through the entire setup.
Let's not waste time and get started!
Prerequisites
Before we begin, make sure the following prerequisites are met:
- SQL Server Data Tools (SSDT) designer installed for Visual Studio.
- SQL Server Integration Services Projects 2022+ Visual Studio extension installed.
- SSIS PowerPack is installed.
Read data from FTP/SFTP XML File in SSIS using Secure FTP XML File Source (Export data)
In this section we will learn how to configure and use FTP/SFTP XML File Connector in the API Source to extract data from the FTP/SFTP XML File using Secure FTP Source for XML Files.
-
Open Visual Studio and click Create a new project.
-
Select Integration Services Project. Enter a name and location for your project, then click OK.
-
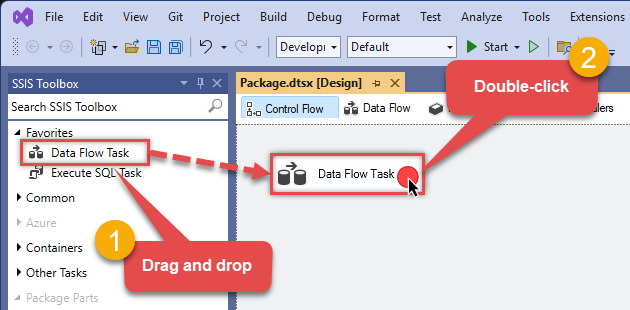
From the SSIS Toolbox, drag and drop a Data Flow Task onto the Control Flow surface, and double-click it:
-
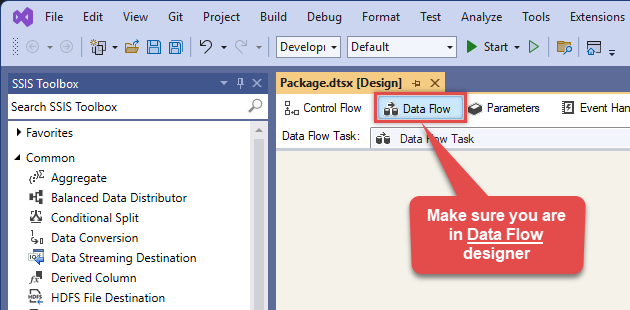
Make sure you are in the Data Flow Task designer:
-
From the SSIS toolbox drag and drop Secure FTP XML File Source on the dataflow designer surface

-
Double click on Secure FTP XML File Source component to configure it.
-
Create and configure a connection for the Secure FTP storage account.

-
You can use select your desired single file by clicking [...] path button.
mybucket/dbo.tblNames.xmldbo.tblNames.xml
----------OR----------You can also read the multiple files stored in Secure FTP Storage using wildcard pattern supported e.g. dbo.tblNames*.xml.
Note: If you want to operation with multiple files then use wild card pattern as below
(when you use wild card pattern in source path then system will treat target path as folder regardless you end with slash)

mybucket/dbo.tblNames.xml (will read only single .XML file)
mybucket/dbo.tbl*.xml (all files starting with file name)
mybucket/*.xml (all files with .xml Extension and located under folder subfolder)
mybucket/dbo.tblNames*.xml
----------OR----------You can also read the zip and gzip compressed files also without extracting it in using Secure FTP XML File Source.
")
-
Now select/enter Path expression in Path textbox to extract only specific part of XML string as below ($.value[*] will get content of value attribute from XML document. Value attribute is array of XML documents so we have to use [*] to indicate we want all records of that array)
NOTE: Here, We are using our desired filter, but you need to select your desired filter based on your requirement.Click on Preview button to view the parsed XML string response data and click OK.
-
That's it; we are done. In a few clicks we configured the to Read the FTP/SFTP XML File data using ZappySys FTP/SFTP XML File Connector
Load FTP/SFTP XML File data into SQL Server using Upsert Destination (Insert or Update)
Once you configured the data source, you can load FTP/SFTP XML File data into SQL Server using Upsert Destination.
Upsert Destination can merge or synchronize source data with the target table.
It supports Microsoft SQL Server, PostgreSQL, and Redshift databases as targets.
Upsert Destination also supports very fast bulk upsert operation along with bulk delete.
Upsert operation
- a database operation which performs INSERT or UPDATE SQL commands
based on record's existence condition in the target table.
It
Upsert Destination supports INSERT, UPDATE, and DELETE operations,
so it is similar to SQL Server's MERGE command, except it can be used directly in SSIS package.
-
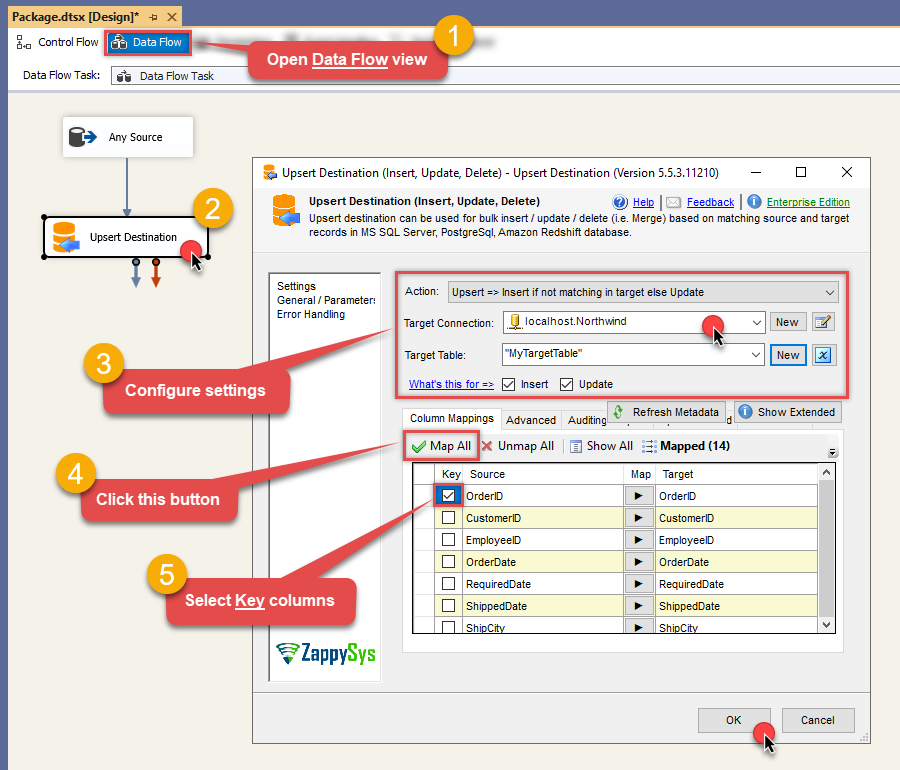
From the SSIS Toolbox drag-and-drop Upsert Destination component onto the Data Flow designer background.
-
Connect your SSIS source component to Upsert Destination.
-
Double-click on Upsert Destination component to open configuration window.
-
Start by selecting the Action from the list.
-
Next, select the desired target connection or create one by clicking <New [provider] Connection> menu item from the Target Connection dropdown.
-
Then select a table from the Target Table list or click New button to create a new table based on the source columns.
-
Continue by checking Insert and Update options according to your scenario (e.g. if Update option is unchecked, no updates will be made).
-
Finally, click Map All button to map all columns and then select the Key columns to match the columns on:
-
Click OK to save the configuration.
-
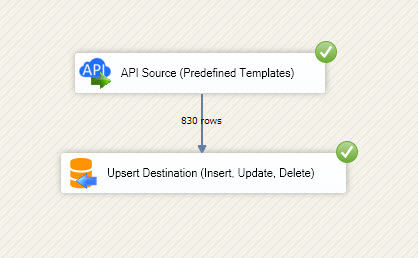
Run the package and FTP/SFTP XML File data will be merged with the target table in SQL Server, PostgreSQL, or Redshift:
-
Done!
Deploy and schedule SSIS package
After you are done creating SSIS package, most likely, you want to deploy it to SQL Server Catalog and run it periodically. Just follow the instructions in this article:
Running SSIS package in Azure Data Factory (ADF)
To use SSIS PowerPack in ADF, you must first prepare Azure-SSIS Integration Runtime. Follow this link for detailed instructions:
Conclusion
In this guide, we demonstrated how to connect to FTP/SFTP XML File in SSIS and integrate your data — all without writing complex code.
Ready to get started? Download SSIS PowerPack now or ping us via chat if you still need help:


 Connector")


 Connector")


 Connector")


 Connector")


