Salesforce Connector for Azure Data Factory (SSIS)Salesforce Connector can be used to extract/load large amount of data from/in Salesforce.com without any programming. You can use simple Table mode or Query mode with full SOQL query language support (SOQL=Salesforce.com Object Query Language). In this article you will learn how to quickly and efficiently integrate Salesforce data in Azure Data Factory (SSIS) without coding. We will use high-performance Salesforce Connector to easily connect to Salesforce and then access the data inside Azure Data Factory (SSIS). Let's follow the steps below to see how we can accomplish that! Salesforce Connector for Azure Data Factory (SSIS) is based on ZappySys Native SSIS Connector Framework which is a part of SSIS PowerPack. It is a collection of high-performance SSIS connectors that enable you to integrate data with virtually any data provider supported by SSIS, including SQL Server. SSIS PowerPack supports various file formats, sources and destinations, including REST/SOAP API, SFTP/FTP, storage services, and plain files, to mention a few (if you are new to SSIS and SSIS PowerPack, find out more on how to use them). |
Connect to Salesforce in other apps
|
Create SSIS package
First of all, create an SSIS package, which will connect to Salesforce in SSIS. Once you do that, you are one step closer to deploying and running it in Azure-SSIS integration runtime in Azure Data Factory (ADF). Then simply proceed to the next step - creating and configuring Azure Blob Storage Container.
Prepare custom setup files for Azure-SSIS runtime
Now it's time to start preparing custom setup files for Azure-SSIS runtime. During Azure-SSIS runtime creation you can instruct ADF to perform a custom setup on a VM (Azure-SSIS node); i.e. to run the custom installer, copy files, execute PowerShell scripts, etc. In that case, your custom setup files are downloaded and run in the Azure-SSIS node (a VM) when you start the runtime. In this section we will prepare custom setup files so that you can run SSIS packages with SSIS PowerPack connectors inside in Azure-SSIS runtime.
Trial Users
Use the step below if you are a Trial User, when you did not purchase a license key. Proceed with these steps:
-
Download ~/Views/IntegrationHub/ContentBlocks/Links/SSIS-PowerPack/DownloadTrial.cshtmlSSIS PowerPack trial installer.
Make sure you don't rename the installer and keep it named as SSISPowerPackSetup_64bit_Trial.msi.
- Create a text file and name it main.cmd (make it all lowercase, very important).
-
Copy and paste this script into it and save it:
set DIR=%CUSTOM_SETUP_SCRIPT_LOG_DIR% echo Calling Step 1 : %TIME% >> "%DIR%\steps_log.txt" dir /s /b > "%DIR%\file_list.txt" echo Calling Step 2 : %TIME% >> "%DIR%\steps_log.txt" ::Install SSIS PowerPack msiexec /i "SSISPowerPackSetup_64bit_Trial.msi" ADDLOCAL=ALL /q /L*V "%DIR%\powerpack_trial_install_log.txt" echo Calling Step 3 : %TIME% >> "%DIR%\steps_log.txt" dir "C:\Program Files\Microsoft SQL Server\*Zappy*.*" /s /b >> "%DIR%\installed_files.txt" dir "C:\Program Files (x86)\Microsoft SQL Server\*Zappy*.*" /s /b >> "%DIR%\installed_files.txt" echo DONE : %TIME% >> "%DIR%\steps_log.txt" echo complete
This is the entry-point script that is executed when Azure-SSIS runtime is started. - At last! You are ready to upload these two files — main.cmd & SSISPowerPackSetup_64bit_Trial.msi — into your Azure Blob Storage container's folder, which we will do in the Upload custom setup files to Azure Blob Storage container step.
Paid Customers
Use the steps below if you are a Paid Customer, when you purchased a license. Proceed with these steps:
-
Download SSIS PowerPack paid installer.
Make sure you don't rename the installer and keep it named as SSISPowerPackSetup_64bit.msi.
- Have your SSIS PowerPack license key handy, we will need it in the below script.
- Create a text file and name it main.cmd (make it all lowercase, very important).
- Copy and paste the below script into it.
- Paste your license key by replacing parameter's
--register
argument with your real license key. -
Finally, save main.cmd:
set DIR=%CUSTOM_SETUP_SCRIPT_LOG_DIR% echo Calling Step 1 : %TIME% >> "%DIR%\steps_log.txt" dir /s /b > "%DIR%\file_list.txt" echo Calling Step 2 : %TIME% >> "%DIR%\steps_log.txt" ::Install SSIS PowerPack msiexec /i "SSISPowerPackSetup_64bit.msi" ADDLOCAL=ALL /q /L*V "%DIR%\powerpack_install_log.txt" echo Calling Step 3 : %TIME% >> "%DIR%\steps_log.txt" ::Activate PowerPack license (Optional) "C:\Program Files (x86)\ZappySys\SSIS PowerPack (64 bit)\LicenseManager.exe" -p SSISPowerPack --register "lgGAAO0-----REPLACE-WITH-YOUR-LICENSE-KEY-----czM=" --logfile "%DIR%\powerpack_register_log.txt" ::Show System Info echo Calling Step 4 : %TIME% >> "%DIR%\steps_log.txt" "C:\Program Files (x86)\ZappySys\SSIS PowerPack (64 bit)\LicenseManager.exe" -i -l "%DIR%\sysinfo_log.txt" echo Calling Step 5 : %TIME% >> "%DIR%\steps_log.txt" dir "C:\Program Files\Microsoft SQL Server\*Zappy*.*" /s /b >> "%DIR%\installed_files.txt" dir "C:\Program Files (x86)\Microsoft SQL Server\*Zappy*.*" /s /b >> "%DIR%\installed_files.txt" echo DONE : %TIME% >> "%DIR%\steps_log.txt" echo complete
This is the entry-point script that is executed when Azure-SSIS runtime is started. - At last! You are ready to upload these two files — main.cmd & SSISPowerPackSetup_64bit.msi — into your Azure Blob Storage container's folder, which we will do in the Upload custom setup files to Azure Blob Storage container step.
Upload custom setup files to Azure Blob Storage container
Within Azure Blob Storage container we will store custom setup files we prepared in the previous step so that Azure-SSIS can use them in custom setup process. Just perform these very simple, but very important steps:
-
Create Azure Blob Storage container, if you haven't done it already
Make sure you create and use Azure Blob Storage container instead of Azure Data Lake Storage folder. Azure Data Lake Storage won't allow creating an SAS URI for the container, which is a crucial step in the process.
-
Find Blob Containers node, right-click on it and hit Create Blob Container option:
-
Upload the two custom setup files — main.cmd & the MSI installer — into your Azure Blob Storage container's folder:
- It was easy, wasn't it? It's time we create an SAS URI in the next step.
Create SAS URI for Azure Blob Container
Once you have custom setup files prepared, it's time we generate an SAS URI. This SAS URI will be used by a new Azure-SSIS runtime to install SSIS PowerPack inside the runtime's node, a VM. Let's proceed together by performing the steps below:
- Install and launch Azure Storage Explorer.
-
Right-click on the Storage Accounts node and then hit Connect to Azure storage... menu item:
- Proceed by right-clicking on that container node and select Get Shared Access Signature... option.
-
Next, set the Expiry time field to a date far in the future.
If you restart Azure-SSIS runtime and your SAS URI is expired by that time, it will not start.
-
Select Read, Create, Write, and List permissions:
We also recommend to add Delete permission too to support future functionality.
-
Copy SAS URL to the clipboard and save it for the next step:
You can also generate and copy SAS URL from within Azure Portal itself:
Create Azure-SSIS integration runtime
Once you have the SAS URL we obtained in the previous step, we are ready to move on to create an Azure-SSIS runtime in Azure Data Factory:
- Firstly, perform the steps described in Create an Azure-SSIS integration runtime article in Azure Data Factory reference.
-
In Advanced settings page section, configure Custom setup container SAS URI you obtained in the previous step:
-
And you are done! That was quick! You can see your Azure-SSIS runtime up and running:
The custom setup script is executed only once — at the time an Azure-SSIS runtime is started.
It is also executed if you stop and start Azure-SSIS runtime again.
Deploy SSIS package in Visual Studio
We are ready to deploy the SSIS package to Azure-SSIS runtime. Once you do that, proceed to the next step for the grand finale!
Execute SSIS package in SQL Server Management Studio (SSMS)
After all hard work, we are ready to execute SSIS package in SQL Server Management Studio (SSMS):
- Connect to the SQL Server which is linked to your Azure-SSIS runtime and contains SSISDB database.
-
Navigate to Integration Services Catalog » Your Folder » Your Project » Your Package, right-click on it, and hit Execute...:
-
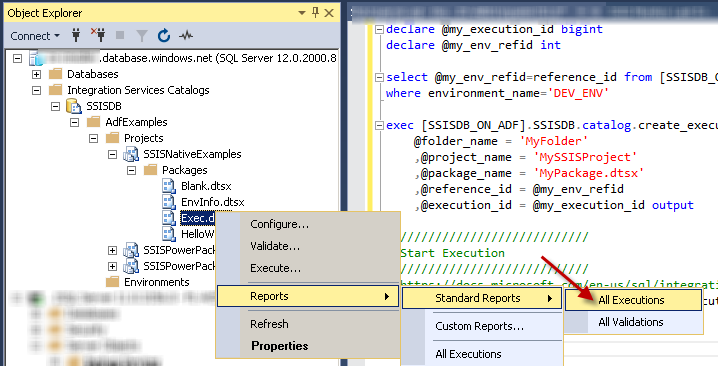
To view the status of the past execution, navigate to
Integration Services Catalog » Your Folder » Your Project » Your Package, right-click on it, and select Reports » Standard Reports » All Executions menu item:
Scenarios
Moving SSIS PowerPack license to another Azure-SSIS runtime
If you are a Paid Customer, there will be a time when you no longer use Azure-SSIS runtime or you need to use your license on a different ADF instance. To transfer a license from one Azure-SSIS runtime to another, perform these steps:
-
Copy & paste this script into main.cmd we used in the previous step:
set DIR=%CUSTOM_SETUP_SCRIPT_LOG_DIR% echo Calling Step 1 : %TIME% >> "%DIR%\steps_log.txt" dir /s /b > "%DIR%\file_list.txt" echo Calling Step 2 : %TIME% >> "%DIR%\steps_log.txt" ::Install SSIS PowerPack msiexec /i "SSISPowerPackSetup_64bit.msi" ADDLOCAL=ALL /q /L*V "%DIR%\powerpack_install_log.txt" echo Calling Step 3 : %TIME% >> "%DIR%\steps_log.txt" ::De-Activate same license "C:\Program Files (x86)\ZappySys\SSIS PowerPack (64 bit)\LicenseManager.exe" -p SSISPowerPack --unregister --logfile "%DIR%\powerpack_un_register_log.txt" ::Show System Info echo Calling Step 4 : %TIME% >> "%DIR%\steps_log.txt" "C:\Program Files (x86)\ZappySys\SSIS PowerPack (64 bit)\LicenseManager.exe" -i -l "%DIR%\sysinfo_log.txt" echo Calling Step 5 : %TIME% >> "%DIR%\steps_log.txt" dir "C:\Program Files\Microsoft SQL Server\*Zappy*.*" /s /b >> "%DIR%\installed_files.txt" dir "C:\Program Files (x86)\Microsoft SQL Server\*Zappy*.*" /s /b >> "%DIR%\installed_files.txt" echo DONE : %TIME% >> "%DIR%\steps_log.txt" echo complete
- Start Azure-SSIS runtime.
This will unregister your license on the original Azure-SSIS runtime.
- Stop Azure-SSIS runtime to deallocate resources in Azure.
- Now you are free to activate it on another Azure-SSIS runtime.
Query Examples
This guide provides examples for using the ZappySys Salesforce ODBC Driver to perform bulk API operations and DML (Data Manipulation Language) actions on Salesforce. You’ll learn how to leverage the Bulk API to insert, update, upsert, and delete large datasets from external sources such as MSSQL, CSV, Oracle, and other ODBC-compatible systems. By using external IDs and lookup fields, you can easily map data from your source systems to Salesforce. These examples will help you execute high-performance operations efficiently using EnableBulkMode
, EXTERNAL
options, and more.
Bulk Mode - Insert Large Volume of Data from External Source (e.g., MSSQL) into Salesforce
This example demonstrates how to use the EnableBulkMode
option to insert a large volume of records into Salesforce using the Bulk API (Job-based mode). By default, the standard mode writes data in batches of 200 rows. However, when Bulk API mode is enabled, it can send up to 10,000 rows per batch, offering better performance for large datasets. Note that using Bulk API mode may not provide performance benefits for small datasets (e.g., a few hundred rows).
In this example, the driver type is set to MSSQL
. For other data sources such as CSV, REST API, or Oracle, update the driver type to ODBC
and modify the connection string and query accordingly.
Ensure that your source query returns column names that match the target Salesforce object fields. The EXTERNAL
option is used to map Salesforce target fields based on the output of the source query.
Important: If you’re using Windows authentication, the service account running the ZappySys Data Gateway must have the appropriate permissions on the source system.
INSERT INTO Account
SOURCE (
'MSSQL',
'Data Source=localhost;Initial Catalog=tempdb;Integrated Security=true',
'SELECT TOP 1000000
C_NAME AS Name,
C_CITY AS BillingCity,
C_LOC AS NumberofLocations__c
FROM very_large_staging_table'
)
WITH (
Output = 1,
EnableBulkMode = 1
)
-- Notes:
-- 'MSSQL': External driver type (MSSQL, ODBC, OLEDB)
-- Output: Enables capturing __RowStatus and __ErrorMessage
-- EnableBulkMode: Improves performance with bulk batches (uses 10000 rows per batch rather than 200)
Bulk Mode - Insert Records with Lookup Field (Read from External Source)
This example demonstrates how to use the EnableBulkMode
option to insert a large number of records into Salesforce using the Bulk API (Job-based mode). Additionally, it shows how to set a lookup field—specifically the Owner
field—by referencing an external ID from the User
object instead of using the internal Salesforce ID.
If you are performing an Update operation, you must include the Id
field in the source data. If your source field has a different name, alias it to Id
in the SQL query. For Upsert operations, you can specify a custom external ID field using the Key='ExternalId_Field_Name'
option. However, for standard Update operations, the Id
field is mandatory.
By default, data is written in batches of 200 rows. When Bulk API mode is enabled, up to 10,000 rows can be sent per batch. This improves performance for large datasets, but offers little advantage for smaller volumes.
In this example, the driver type is set to MSSQL
. For other sources such as CSV, REST API, or Oracle, change the driver type to ODBC
and adjust the connection string and query accordingly.
Make sure the query outputs column names that match the target fields in the Salesforce object. The EXTERNAL
option is used to map input columns to Salesforce fields dynamically.
Important: If you’re using Windows authentication, ensure that the service account running the ZappySys Data Gateway has the appropriate access permissions on the source system.
INSERT INTO Account
SOURCE (
'MSSQL',
'Data Source=localhost;Initial Catalog=tempdb;Integrated Security=true',
'SELECT TOP 1000000
Account_Name as Name,
AccountOwnerId as [Owner.ExternalId]
FROM very_large_staging_table'
)
WITH (
Output = 1,
EnableBulkMode = 1
)
-- Notes:
-- 'MSSQL': External driver type (MSSQL, ODBC, OLEDB)
-- Output: Enables capturing __RowStatus and __ErrorMessage
-- EnableBulkMode: Improves performance with bulk batches (uses 10000 rows per batch rather than 200)
Bulk Mode - Delete Large Volume of Data (Read IDs from External Source)
This example demonstrates how to use the EnableBulkMode
option to delete a large number of records from Salesforce using the Bulk API (Job-based mode). To perform a delete operation, the source query must return the Id
column. If your source column has a different name, make sure to alias it as Id
in the SQL query.
By default, data is processed in batches of 200 rows. When Bulk API mode is enabled, batches can include up to 10,000 rows, which significantly improves performance when working with large datasets. However, for small volumes (a few hundred records), Bulk API mode may not offer a noticeable performance benefit.
In this example, the driver type is set to MSSQL
. For other data sources such as CSV, REST API, or Oracle, set the driver type to ODBC
and update the connection string and query as needed.
Ensure that the query output includes column names that match the target Salesforce object fields. The EXTERNAL
option allows dynamic mapping of input columns to Salesforce fields based on the source query.
Important: If you’re using Windows authentication, make sure the service account running the ZappySys Data Gateway has the necessary permissions to access the data source.
DELETE FROM Account
SOURCE (
'MSSQL',
'Data Source=localhost;Initial Catalog=tempdb;Integrated Security=true',
'SELECT TOP 1000000
Account_ID as Id
FROM very_large_staging_table'
)
WITH (
Output = 1,
EnableBulkMode = 1
)
-- Notes:
-- 'MSSQL': External driver type (MSSQL, ODBC, OLEDB)
-- Output: Enables capturing __RowStatus and __ErrorMessage
-- EnableBulkMode: Improves performance with bulk batches (uses 10000 rows per batch rather than 200)
Bulk Mode - Update Large Volume of Data (Read from External Source)
This example illustrates how to use the EnableBulkMode
option to update a large number of records in Salesforce via the Bulk API (Job-based mode). When performing an Update operation, the source query must include the Id
column. If the source column is named differently, be sure to alias it as Id
in your SQL query.
By default, records are processed in batches of 200 rows. When Bulk API mode is enabled, batches can handle up to 10,000 rows, which greatly improves performance for large datasets. However, for smaller datasets (e.g., a few hundred records), Bulk API may not offer a significant performance boost.
In this example, the driver type is set to MSSQL
. For other sources such as CSV, REST API, or Oracle, change the driver type to ODBC
and modify the connection string and query accordingly.
Ensure that your query returns column names matching the fields in the Salesforce target object. The EXTERNAL
option is used to dynamically map input columns to Salesforce fields based on the query output.
Important: When using Windows authentication, the service account running the ZappySys Data Gateway must have the necessary permissions on the source system.
UPDATE Account
SOURCE (
'MSSQL',
'Data Source=localhost;Initial Catalog=tempdb;Integrated Security=true',
'SELECT TOP 1000000
Account_ID as Id,
Account_Name as Name,
City as BillingCity
FROM very_large_staging_table'
)
WITH (
Output = 1,
EnableBulkMode = 1
)
-- Notes:
-- 'MSSQL': External driver type (MSSQL, ODBC, OLEDB)
-- Output: Enables capturing __RowStatus and __ErrorMessage
-- EnableBulkMode: Improves performance with bulk batches (uses 10000 rows per batch rather than 200)
Bulk Mode - Update Lookup Field (Read from External Source)
This example shows how to use the EnableBulkMode
option to update a large number of Salesforce records using the Bulk API (Job-based mode). In this scenario, we update a lookup field—specifically the Owner
field—by referencing the external ID from the User
object instead of using the internal Salesforce ID.
When performing an Update, the Id
field must be included in the source data. If your source column has a different name, alias it as Id
in the SQL query. For Upsert operations, you can specify a custom external ID using the Key='ExternalId_Field_Name'
option. However, for standard Update operations, the Id
field is required.
By default, the system processes 200 rows per batch. When EnableBulkMode
is enabled, it can process up to 10,000 rows per batch, offering improved performance for large datasets. This mode is less effective for smaller data volumes.
In this example, the driver type is set to MSSQL
. For other data sources (e.g., CSV, REST API, Oracle), change the driver type to ODBC
and update the connection string and query as needed.
Ensure the query returns column names that match the fields in the target Salesforce object. The EXTERNAL
option dynamically maps input columns to Salesforce fields based on the query output.
Important: If using Windows authentication, ensure the service account running the ZappySys Data Gateway has appropriate permissions on the source system.
UPDATE Account
SOURCE (
'MSSQL',
'Data Source=localhost;Initial Catalog=tempdb;Integrated Security=true',
'SELECT TOP 1000000
Account_ID as Id,
Account_Name as Name,
AccountOwnerId as [Owner.ExternalId]
FROM very_large_staging_table'
)
WITH (
Output = 1,
EnableBulkMode = 1
)
-- Notes:
-- 'MSSQL': External driver type (MSSQL, ODBC, OLEDB)
-- Output: Enables capturing __RowStatus and __ErrorMessage
-- EnableBulkMode: Improves performance with bulk batches (uses 10000 rows per batch rather than 200)
External Input from ODBC - Insert Multiple Rows from ODBC Source (e.g., CSV) into Salesforce
This example demonstrates how to perform an INSERT operation in Salesforce using multiple input rows from an external data source such as MSSQL, ODBC, or OLEDB. The operation reads records via an external query and inserts them directly into Salesforce.
In this example, the driver type is set to MSSQL
. For other systems like CSV, REST API, or Oracle, set the driver type to ODBC
and update the connection string and query accordingly.
Ensure that the query returns column names that match the fields in the Salesforce target object. The EXTERNAL
option is used to map these input columns to the corresponding Salesforce fields based on the source query output.
INSERT INTO Account
SOURCE (
'ODBC', -- External driver type: MSSQL, ODBC, or OLEDB
'Driver={ZappySys CSV Driver};DataPath=c:\somefile.csv', -- ODBC connection string
'
SELECT
Acct_Name AS Name,
Billing_City AS BillingCity,
Locations AS NumberofLocations__c
FROM $
WITH (
-- Either use SRC to point to a file or use inline DATA. Comment out one as needed.
-- Examples:
-- SRC = ''c:\file_1.csv''
-- SRC = ''c:\some*.csv''
-- SRC = ''https://abc.com/api/somedata-in-csv''
DATA = ''Acct_Name,Billing_City,Locations
Account001,City001,1
Account002,City002,2
Account003,City003,3''
)'
)
-- Notes:
-- Column aliases in SELECT must match Salesforce target fields.
-- Preview the Account object to verify available fields.
WITH (
Output = 1, -- Capture __RowStatus and __ErrorMessage for each record
-- EnableBulkMode = 1, -- Use Bulk API (recommended for 5,000+ rows)
EnableParallelThreads = 1, -- Use multiple threads for real-time inserts
MaxParallelThreads = 6 -- Set maximum number of threads
)
DML - Upsert Lookup Field Value Using External ID Instead of Salesforce ID
This example demonstrates how to set a lookup field value in Salesforce using an external ID rather than the internal Salesforce ID during DML operations such as INSERT, UPDATE, or UPSERT.
Typically, updating a lookup field requires the Salesforce ID of the related record. However, Salesforce also allows referencing a related record using an external ID field. To do this, use the following field name syntax:
[relationship_name.external_id_field_name(child_object_name)]
relationship_name
: The API name of the relationship (e.g.,Owner
orYourObject__r
).external_id_field_name
: A custom field on the related object, marked as External ID.child_object_name
(optional): The API name of the related object. If omitted, Salesforce derives it from the relationship name (without the__r
suffix).
Example:
To assign a record owner using a custom external ID on the User object:
Owner.SomeExternalId__c(User)
Owner
: The relationship name for the user record.SomeExternalId__c
: A custom external ID field in the User object.User
: The related (child) object name.
If you’re using the SOURCE(...)
clause to read input data and enabling BulkApiMode=1
in the WITH(...)
clause, you can omit the child object name. In that case, use the format:
relationship_name.external_id_field_name
Setting a Field to NULL:
To set a lookup or standard field to null, use:
FieldName = null
For example:
AccountId = null
Avoid using:
relation_name.external_id_name(target_table) = null
More Information:
For full details and examples, visit the official guide: ZappySys Docs - External ID in Lookup Fields
-- Upsert record into Salesforce Account object
UPSERT INTO Account (
Name,
BillingCity,
[Owner.SomeExternalId__c(User)] -- Use external ID field on related Owner (User) object
)
VALUES (
'mycompany name',
'New York',
'K100' -- External ID value of the User (Owner)
)
WITH (
KEY = 'SupplierId__c', -- External ID field used for UPSERT on Account object
Output = 1 -- Return __RowStatus and __ErrorMessage for result diagnostics
)
Supported WITH Properties in BULK Mode
When using the ZappySys Salesforce ODBC Driver with BULK mode, you can pass additional options using the WITH clause to customize behavior.
Here are other supported properties commonly used BULK mode:
INSERT INTO Account/UPDATE Account/DELETE FROM Account
SOURCE(...)
WITH(
Output=1 /*Other values can be Output='*' , Output=1 , Output=0 , Output='Col1,Col2...ColN'. When Output option is supplied then error is not thrown but you can capture status and message in __RowStatus and __ErrorMessage output columns*/
,EnableBulkMode=1 --use Job Style Bulk API (uses 10000 rows per batch rather than 200)
--,MaxRowsPerJob=500000 --useful to control memory footprint in driver
--,ConcurrencyMode='Default' /* or 'Parallel' or 'Serial' - Must set BulkApiVersion=2 to use this, Bulk API V1 doesnt support this yet. If you get locking errors then change to Serial*/
--,BulkApiVersion=2 --default is V1
--,IgnoreFieldsIfInputNull=1 --Set this option to True if you wish to ignore fields if input value is NULL. By default target field is set to NULL if input value is NULL.
--,FieldsToSetNullIfInputNull='SomeColum1,SomeColumn5,SomeColumn7' --Comma separated CRM entity field names which you like to set as NULL when input value is NULL. This option is ignored if IgnoreFieldsIfInputNull is not set to True.
--,AssignmentRuleId='xxxxx' --rule id to invoke on value assignment
--,UseDefaultAssignmentRule=1 --sets whether you like to use default rule
--,AllOrNone=1 --If true, any failed records in a call cause all changes for the call to be rolled back. Record changes aren't committed unless all records are processed successfully. The default is false. Some records can be processed successfully while others are marked as failed in the call results.
--,OwnerChangeOptions='option1,option2...optionN' -- use one or more options from below. Use '-n' suffix to disable option execution e.g. TransferOpenActivities-n
-->>> Available owner change options: EnforceNewOwnerHasReadAccess,TransferOpenActivities,TransferNotesAndAttachments,TransferOthersOpenOpportunities,TransferOwnedOpenOpportunities,TransferOwnedClosedOpportunities,TransferOwnedOpenCases,TransferAllOwnedCases,TransferContracts,TransferOrders,TransferContacts,TransferArticleOwnedPublishedVersion,TransferArticleOwnedArchivedVersions,TransferArticleAllVersions,KeepAccountTeam,KeepSalesTeam,KeepSalesTeamGrantCurrentOwnerReadWriteAccess,SendEmail
-->>> For more information visit https://zappysys.com/link/?id=10141
--,AllowFieldTruncation=1 --If true, truncate field values that are too long, which is the behavior in API versions 14.0 and earlier.
--,AllowSaveOnDuplicates=1 --Set to true to save the duplicate record. Set to false to prevent the duplicate record from being saved.
--,EnableParallelThreads=1 --Enables sending Data in multiple threads to speedup. This option is ignored when bulk mode enabled (i.e. EnableBulkMode=1)
--,MaxParallelThreads=6 --Maximum threads to spin off to speedup write operation. This option is ignored when bulk mode enabled (i.e. EnableBulkMode=1)
--,TempStorageMode='Disk' --or 'Memory'. Use this option to overcome OutOfMemory Error if you processing many rows. This option enables how Temp Storage is used for query processing. Available options 'Disk' or 'Memory' (Default is Memory)
)
More Examples and Documentation
For additional examples and detailed guidance on using the ZappySys Salesforce ODBC Driver, visit the official documentation:
Conclusion
In this article we showed you how to connect to Salesforce in Azure Data Factory (SSIS) and integrate data without any coding, saving you time and effort. It's worth noting that ZappySys Salesforce Driver allows you to connect not only to Salesforce, but to any Java application that supports JDBC (just use a different JDBC driver and configure it appropriately).
We encourage you to download Salesforce Connector for Azure Data Factory (SSIS) and see how easy it is to use it for yourself or your team.
If you have any questions, feel free to contact ZappySys support team. You can also open a live chat immediately by clicking on the chat icon below.
Download Salesforce Connector for Azure Data Factory (SSIS) Documentation
More integrations
Other connectors for Azure Data Factory (SSIS)
Other application integration scenarios for Salesforce
How to connect Salesforce in Azure Data Factory (SSIS)?
How to get Salesforce data in Azure Data Factory (SSIS)?
How to read Salesforce data in Azure Data Factory (SSIS)?
How to load Salesforce data in Azure Data Factory (SSIS)?
How to import Salesforce data in Azure Data Factory (SSIS)?
How to pull Salesforce data in Azure Data Factory (SSIS)?
How to push data to Salesforce in Azure Data Factory (SSIS)?
How to write data to Salesforce in Azure Data Factory (SSIS)?
How to POST data to Salesforce in Azure Data Factory (SSIS)?
Call Salesforce API in Azure Data Factory (SSIS)
Consume Salesforce API in Azure Data Factory (SSIS)
Salesforce Azure Data Factory (SSIS) Automate
Salesforce Azure Data Factory (SSIS) Integration
Integration Salesforce in Azure Data Factory (SSIS)
Consume real-time Salesforce data in Azure Data Factory (SSIS)
Consume real-time Salesforce API data in Azure Data Factory (SSIS)
Salesforce ODBC Driver | ODBC Driver for Salesforce | ODBC Salesforce Driver | SSIS Salesforce Source | SSIS Salesforce Destination
Connect Salesforce in Azure Data Factory (SSIS)
Load Salesforce in Azure Data Factory (SSIS)
Load Salesforce data in Azure Data Factory (SSIS)
Read Salesforce data in Azure Data Factory (SSIS)
Salesforce API Call in Azure Data Factory (SSIS)