

Introduction
You can connect to your Zendesk data from Tableau via the high-performance Zendesk ODBC Driver. We'll walk you through the entire setup.
Let's not waste time and get started!
Create data source in ZappySys Data Gateway
In this section we will create a data source for Zendesk in the Data Gateway. Let's follow these steps to accomplish that:
-
Download and install ODBC PowerPack (if you haven't already).
-
Search for
gatewayin the Windows Start Menu and open ZappySys Data Gateway Configuration: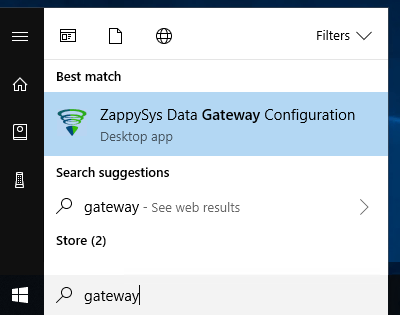
-
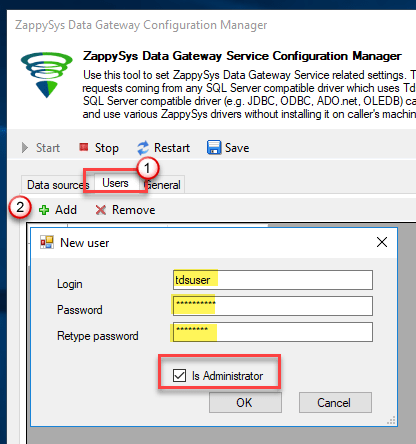
Go to the Users tab and follow these steps to add a Data Gateway user:
- Click the Add button
-
In the Login field enter a username, e.g.,
john - Then enter a Password
- Check the Is Administrator checkbox
- Click OK to save
-
Now we are ready to add a data source:
- Click the Add button
- Give the Data source a name (have it handy for later)
- Then select Native - ZappySys API Driver
- Finally, click OK
ZendeskDSNZappySys API Driver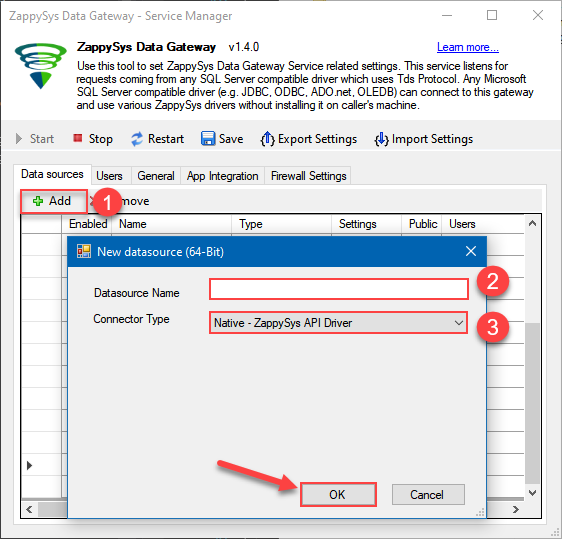
-
When the Configuration window appears give your data source a name if you haven't done that already, then select "Zendesk" from the list of Popular Connectors. If "Zendesk" is not present in the list, then click "Search Online" and download it. Then set the path to the location where you downloaded it. Finally, click Continue >> to proceed with configuring the DSN:
ZendeskDSNZendesk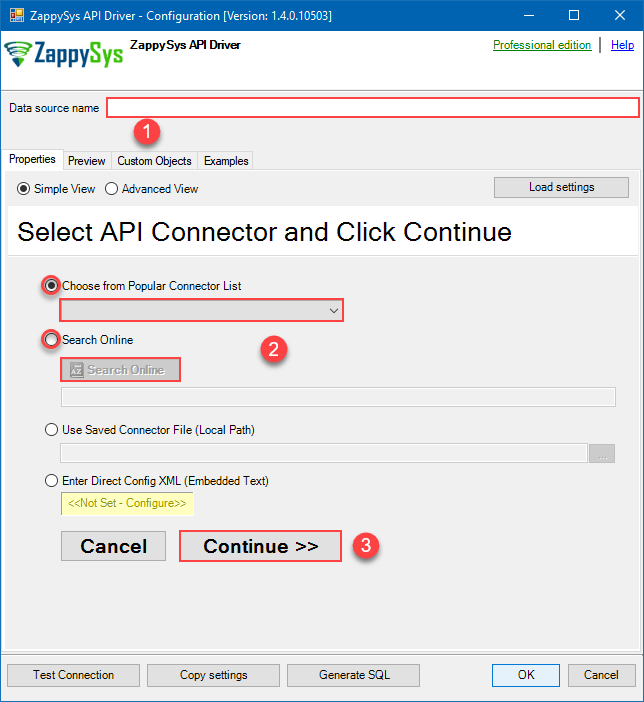
-
Select your authentication scenario below to expand connection configuration steps to:
- Configure the authentication in Zendesk.
- Enter those details into the ZappySys API Driver data source configuration.
OAuth - Client Credentials (Server-to-Server)
Zendesk authentication
Recommended for unattended server-to-server automation. No interactive user login or refresh token is required. The OAuth client must be configured as a Confidential client in Zendesk. [API reference]
Use OAuth - Client Credentials (Server-to-Server) for unattended applications such as ETL packages, scheduled jobs, services, data pipelines, and other server-side integrations.
Recommended for unattended automation: This authentication method does not require an interactive user login and does not use a refresh token. When the access token expires, ZappySys automatically requests a new access token using the same Client ID and Client Secret.- Sign in to Zendesk as an administrator.
- Go to Admin Center > Apps and integrations > APIs > Zendesk API.
- Open the OAuth Clients section and create an OAuth client.
- Configure the OAuth client as a Confidential client.
- Enter a unique Client ID.
- Copy the generated Client Secret and store it securely.
- Configure the permissions/scopes required by your integration.
- In the ZappySys connection, enter your Zendesk Sub Domain, Client ID, Client Secret, and desired Permissions.
- Click Test Connection.
Security: Client Credentials should only be used in trusted server-side environments where the Client Secret can be stored securely. Do not expose the Client Secret in browser-side or client-side applications.The access token is associated with the Zendesk user linked to the OAuth client and inherits that user's permissions. For automated integrations, consider using a dedicated Zendesk service account with only the permissions required by the integration.No Redirect URL, browser login, authorization code, or refresh token is required for this authentication method.
API Connection Manager configuration
Just perform these simple steps to finish authentication configuration:
-
Set Authentication Type to
OAuth - Client Credentials (Server-to-Server) [OAuth] - Optional step. Modify API Base URL if needed (in most cases default will work).
- Fill in all the required parameters and set optional parameters if needed.
- Finally, hit OK button:
ZendeskDSNZendeskOAuth - Client Credentials (Server-to-Server) [OAuth]https://[$Domain$].zendesk.com/api/v2Required Parameters Sub Domain (e.g. mycompany) Fill-in the parameter... OAuth Client ID Fill-in the parameter... OAuth Client Secret Fill-in the parameter... Permissions Fill-in the parameter... Optional Parameters RetryMode RetryWhenStatusCodeMatch RetryStatusCodeList 429 RetryCountMax 5 RetryMultiplyWaitTime True 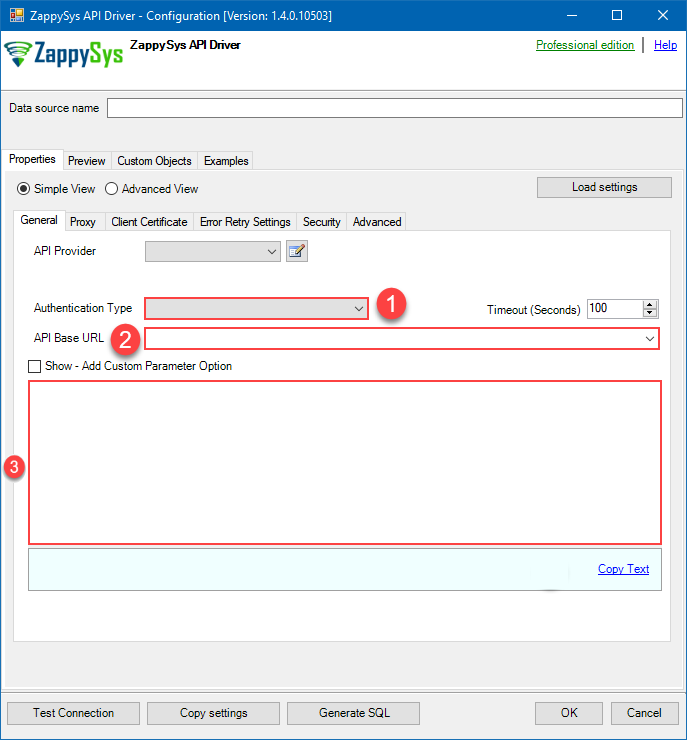 Find full details in the Zendesk Connector authentication reference.
OAuth - User Login (Interactive)
Zendesk authentication
Authenticate through an interactive Zendesk login. Create an OAuth client in Zendesk Admin Center under Apps and integrations > APIs > Zendesk API > OAuth Clients. [API reference]
Use OAuth - User Login (Interactive) when the integration should access Zendesk on behalf of a specific user.
During initial setup, a browser window opens and the user signs in to Zendesk and authorizes the application. No Zendesk password is stored in the connection.
- Sign in to Zendesk as an administrator.
- Go to Admin Center > Apps and integrations > APIs > Zendesk API.
- Open the OAuth Clients section and create an OAuth client.
- Enter a unique Client ID.
- Copy the generated Client Secret and store it securely.
-
Configure the following Redirect URL for the OAuth client:
https://zappysys.com/oauth - In the ZappySys connection, enter your Zendesk Sub Domain, Client ID, Client Secret, and desired Permissions.
- Start the authorization process and sign in to Zendesk when the browser opens.
- Approve access when prompted.
- Click Test Connection.
Token renewal: Zendesk access tokens expire. ZappySys uses the OAuth refresh token to obtain new access tokens without requiring the user to sign in again. The latest refresh token must be stored securely because Zendesk rotates refresh tokens during renewal.If the refresh token expires, is revoked, or cannot be restored from the saved connection, the interactive Zendesk login process must be performed again.For unattended server-side integrations where you do not want to maintain a refresh token, consider OAuth - Client Credentials (Server-to-Server).
API Connection Manager configuration
Just perform these simple steps to finish authentication configuration:
-
Set Authentication Type to
OAuth - User Login (Interactive) [OAuth] - Optional step. Modify API Base URL if needed (in most cases default will work).
- Fill in all the required parameters and set optional parameters if needed.
- Press Generate Token button to generate the tokens.
- Finally, hit OK button:
ZendeskDSNZendeskOAuth - User Login (Interactive) [OAuth]https://[$Domain$].zendesk.com/api/v2Required Parameters Sub Domain (e.g. mycompany) Fill-in the parameter... ClientId Fill-in the parameter... ClientSecret Fill-in the parameter... Permissions Fill-in the parameter... RedirectUrl Fill-in the parameter... Optional Parameters RetryMode RetryWhenStatusCodeMatch RetryStatusCodeList 429 RetryCountMax 5 RetryMultiplyWaitTime True 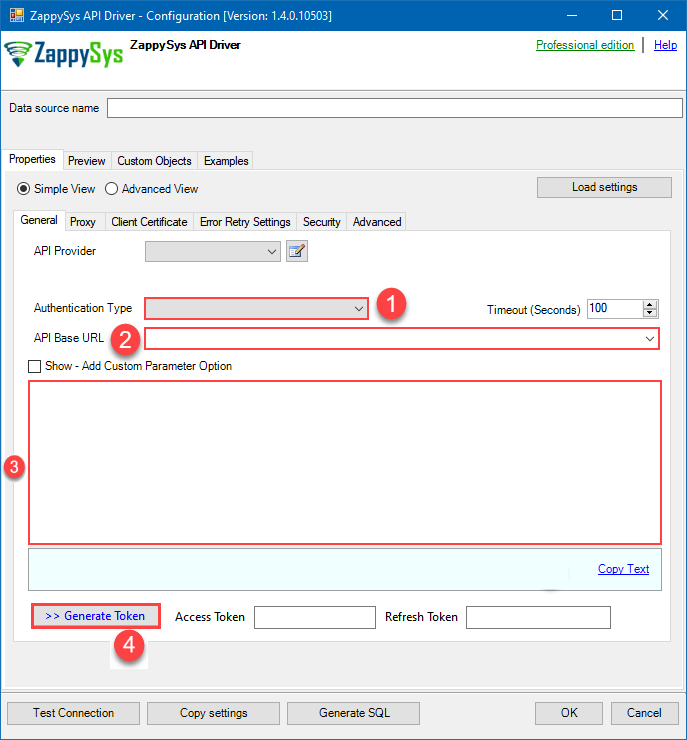 Find full details in the Zendesk Connector authentication reference.
Token Authentication (Legacy)
Zendesk authentication
Authenticate using Static Token instead of userid / password ([Token Access] option must be enabled under Admin Console > Channel > API > Settings and then Click [ADD API Token] to generate new token. These settings typically found here https://YOUR-SUB-DOMAIN.zendesk.com/agent/admin/api/settings [API reference]
Use API Token authentication to authenticate with your Zendesk user email and a Zendesk API token instead of your password.
Deprecated by Zendesk: Zendesk is removing API token authentication. Existing API tokens are scheduled to stop working on April 30, 2027. For new integrations, use OAuth instead.- Sign in to Zendesk as an administrator.
- Go to Admin Center > Apps and integrations > APIs > Zendesk API.
- Make sure Token access is enabled.
- Create or select an existing API token.
- Copy the generated token and store it securely.
- Enter your Zendesk Sub Domain.
- Enter your Zendesk User ID / Email.
- Paste the API token into the Token field.
- Click Test Connection.
Migration: For unattended ETL, scheduled jobs, and server-side integrations, use OAuth - Client Credentials (Server-to-Server).API Connection Manager configuration
Just perform these simple steps to finish authentication configuration:
-
Set Authentication Type to
Token Authentication (Legacy) [Http] - Optional step. Modify API Base URL if needed (in most cases default will work).
- Fill in all the required parameters and set optional parameters if needed.
- Finally, hit OK button:
ZendeskDSNZendeskToken Authentication (Legacy) [Http]https://[$Domain$].zendesk.com/api/v2Required Parameters Sub Domain (e.g. mycompany) Fill-in the parameter... UserId Fill-in the parameter... Token Fill-in the parameter... Optional Parameters RetryMode RetryWhenStatusCodeMatch RetryStatusCodeList 429 RetryCountMax 5 RetryMultiplyWaitTime True 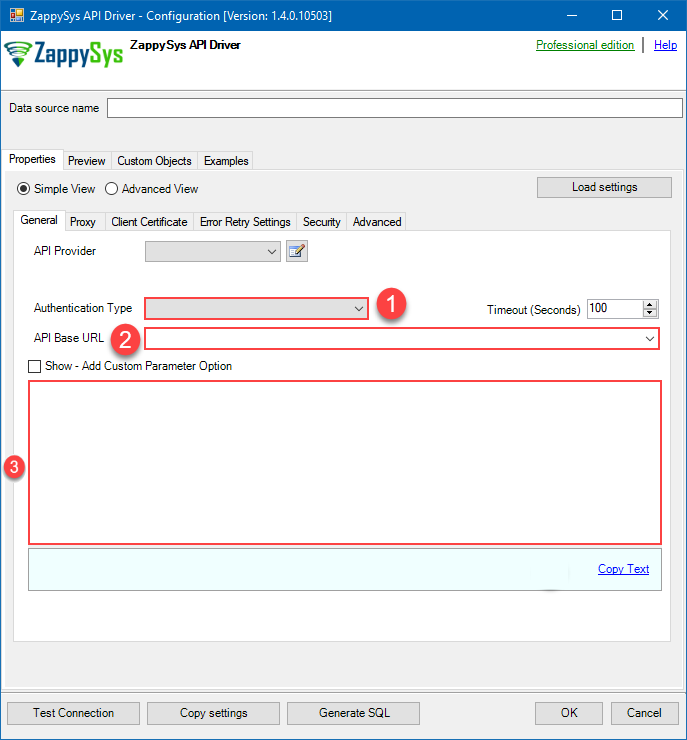 Find full details in the Zendesk Connector authentication reference.
Basic Authentication (User ID + Password)
Zendesk authentication
Authenticate using your Zendesk user ID and password. Two-factor authentication (2FA) must be disabled, and Password Access must be enabled under Admin Console > Channels > API > Settings. [API reference]
Use Basic Authentication to authenticate with your Zendesk user email and password.
Important: This method cannot be used when two-factor authentication (2FA) is enabled for the Zendesk user. Password access to the API must also be enabled in Zendesk.- Sign in to Zendesk as an administrator.
- Go to Admin Center > Apps and integrations > APIs > Zendesk API.
- Make sure Password access is enabled.
-
Enter your Zendesk Sub Domain.
For example, if your Zendesk URL is:
https://mycompany.zendesk.com, entermycompany. - Enter your Zendesk User ID / Email and Password.
- Click Test Connection.
Recommendation: For new integrations, OAuth is preferred over storing a user's password. For unattended server-side integrations, consider OAuth - Client Credentials (Server-to-Server).API Connection Manager configuration
Just perform these simple steps to finish authentication configuration:
-
Set Authentication Type to
Basic Authentication (User ID + Password) [Http] - Optional step. Modify API Base URL if needed (in most cases default will work).
- Fill in all the required parameters and set optional parameters if needed.
- Finally, hit OK button:
ZendeskDSNZendeskBasic Authentication (User ID + Password) [Http]https://[$Domain$].zendesk.com/api/v2Required Parameters Sub Domain (e.g. mycompany) Fill-in the parameter... UserName (2FA Must be OFF) Fill-in the parameter... Password Fill-in the parameter... Optional Parameters RetryMode RetryWhenStatusCodeMatch RetryStatusCodeList 429 RetryCountMax 5 RetryMultiplyWaitTime True
Find full details in the Zendesk Connector authentication reference. -
Once the data source connection has been configured, it's time to configure the SQL query. Select the Preview tab and then click Query Builder button to configure the SQL query:
 ZappySys API Driver - ZendeskRead and write Zendesk data effortlessly. Manage tickets, users, and organizations — almost no coding required.ZendeskDSN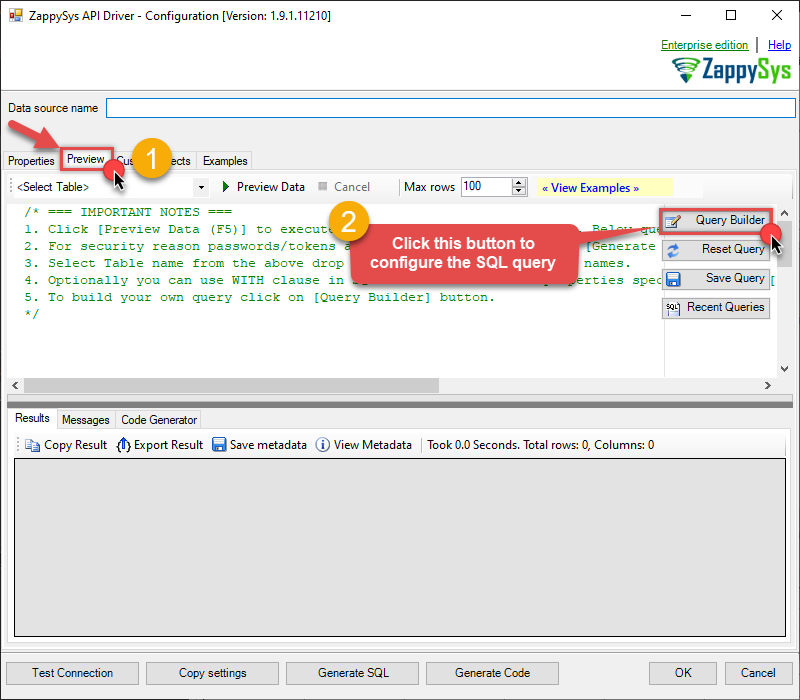
-
Start by selecting the Table or Endpoint you are interested in and then configure the parameters. This will generate a query that we will use in Tableau to retrieve data from Zendesk. Hit OK button to use this query in the next step.
SELECT * FROM Tickets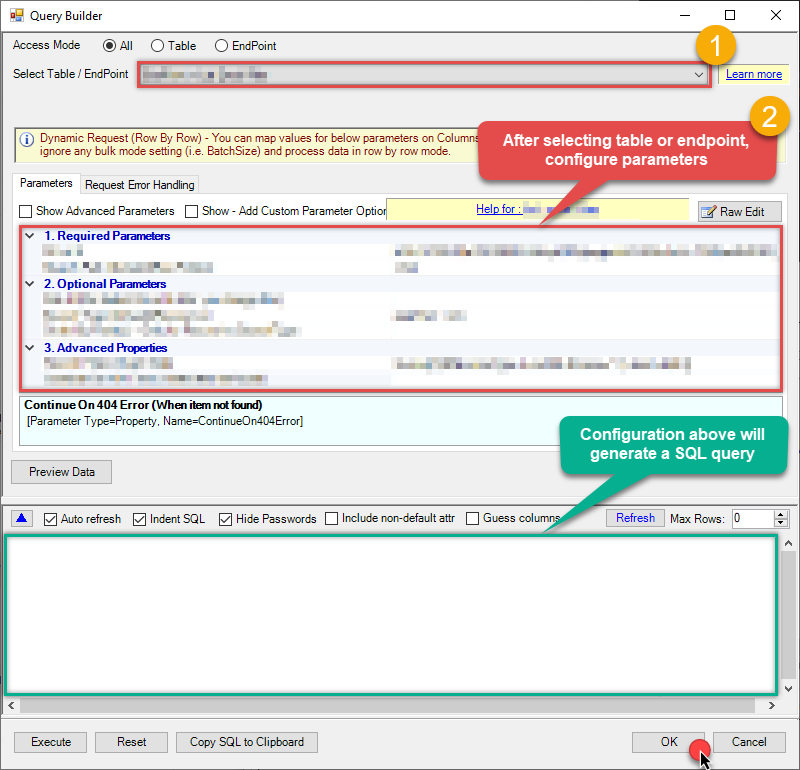 Some parameters configured in this window will be passed to the Zendesk API, e.g. filtering parameters. It means that filtering will be done on the server side (instead of the client side), enabling you to get only the meaningful data
much faster . -
Now hit Preview Data button to preview the data using the generated SQL query. If you are satisfied with the result, use this query in Tableau:
ZappySys API Driver - ZendeskRead and write Zendesk data effortlessly. Manage tickets, users, and organizations — almost no coding required.ZendeskDSNSELECT * FROM Tickets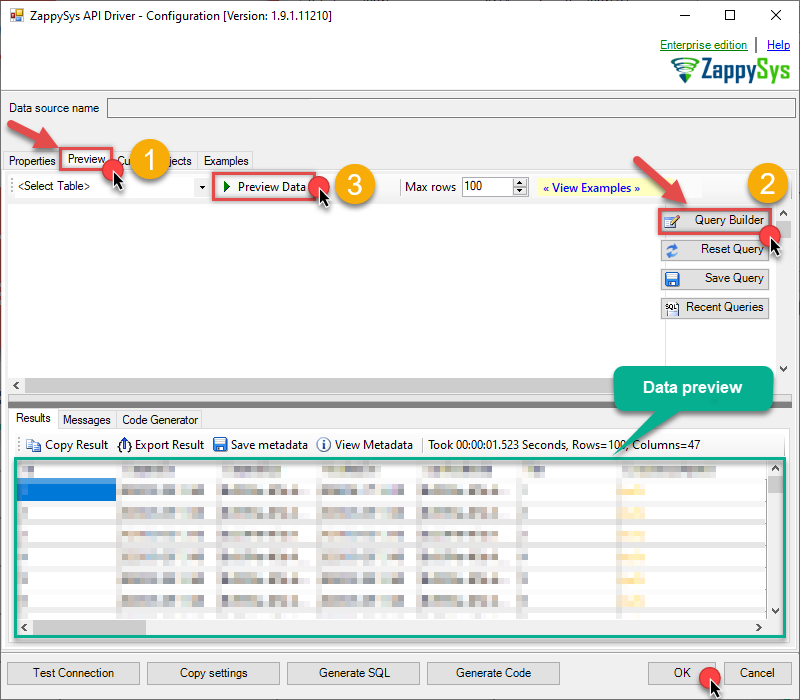 You can also access data quickly from the tables dropdown by selecting <Select table>.A
WHEREclause,LIMITkeyword will be performed on the client side, meaning that thewhole result set will be retrieved from the Zendesk API first, and only then the filtering will be applied to the data. If possible, it is recommended to use parameters in Query Builder to filter the data on the server side (in Zendesk servers). -
Click OK to finish creating the data source.
-
Once done, go to the Network Settings tab and Add a firewall rule for inbound traffic:
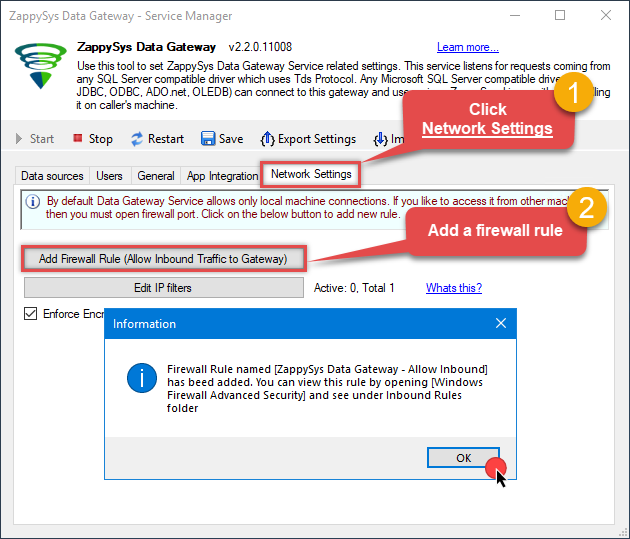
- This will initially allow all inbound traffic.
- Click Edit IP filters to restrict access to specific IP addresses or ranges.
-
Crucial Step: After creating or modifying the data source, you must:
- Click the Save button to persist your changes.
- Hit Yes when prompted to restart the Data Gateway service.
This ensures all changes are properly applied:
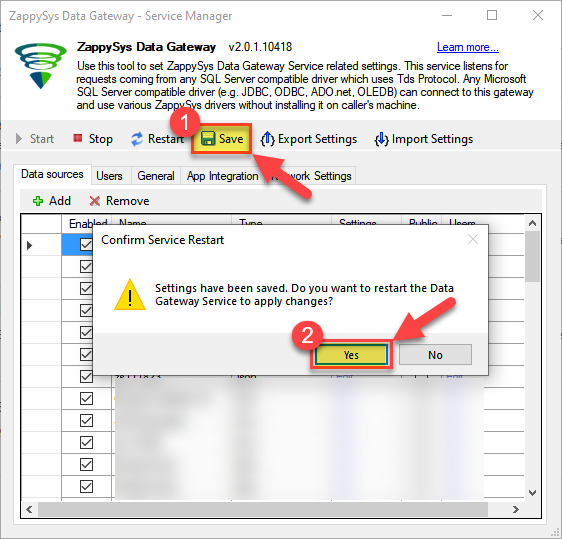 Skipping this step may cause the new settings to fail, preventing you from connecting to the data source.
Read data in SQL Server via Data Gateway
After configuring your data source using the ZappySys ODBC Driver, the next mandatory step to read that data in SQL Server is to create a Linked Server. SQL Server requires a Linked Server definition to access any ODBC-based source through the ZappySys Data Gateway, allowing the source driver data to be queried using standard T-SQL.
There are two ways to create the Linked Server:- Method 1: Using a SQL Script automatically generated by the Data Gateway
- Method 2: Using SQL Server UI (SSMS) to manually configure the Linked Server
Method 1: Using a SQL Script automatically generated by the Data Gateway
The fastest and most reliable way to create the Linked Server is to use the SQL Script generated by the Data Gateway. This ensures all settings are applied correctly with minimal manual steps.
In the Data Gateway, open the App Integration tab.
Update the prefilled Linked Server Name if you want to use a custom name.
Select the ZendeskDSN data source which we created earlier as the Database.
-
Choose the correct SQL Server version for your environment.
- SQL 2019 or Lower (
@provider='SQLNCLI11') - SQL 2022 or Higher (
@provider='MSOLEDBSQL')
- SQL 2019 or Lower (
Click Generate Code.
-
In the generated script scroll down to 4. Attach Gateway login with linked server step, enter your Data Gateway admin username and password.
'LS_TO_ZENDESK_IN_GATEWAY'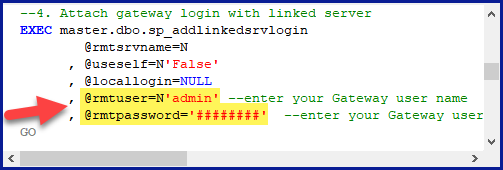
-
Press Ctrl + A and Ctrl + C to copy the entire script.
LS_TO_ZENDESK_IN_GATEWAYZendeskDSN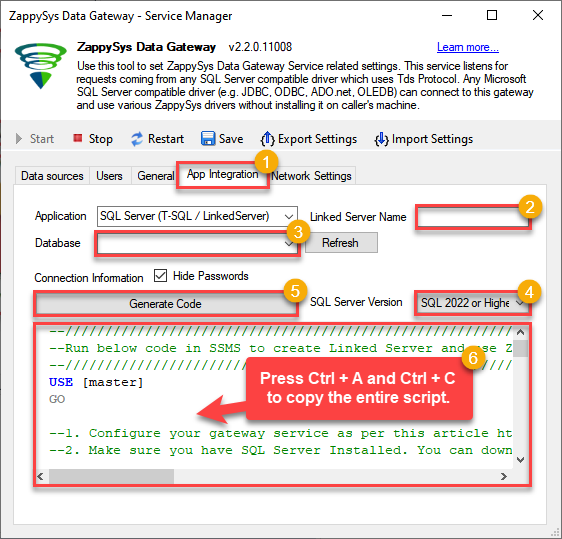
-
Paste the script into SQL Server Management Studio (SSMS) and run it.
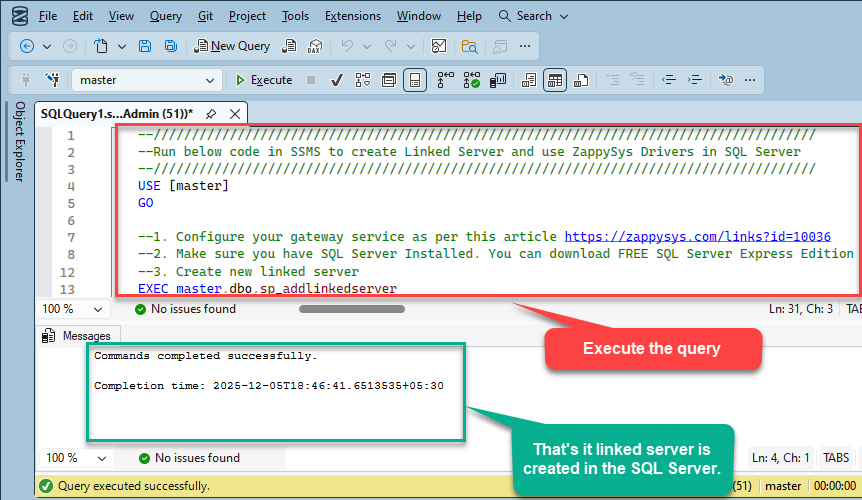
That's it linked server is created in the SQL Server.
-
Finally, open a new query and execute a query we saved in one of the previous steps:
SELECT * FROM OPENQUERY([LS_TO_ZENDESK_IN_GATEWAY], 'SELECT * FROM Tickets')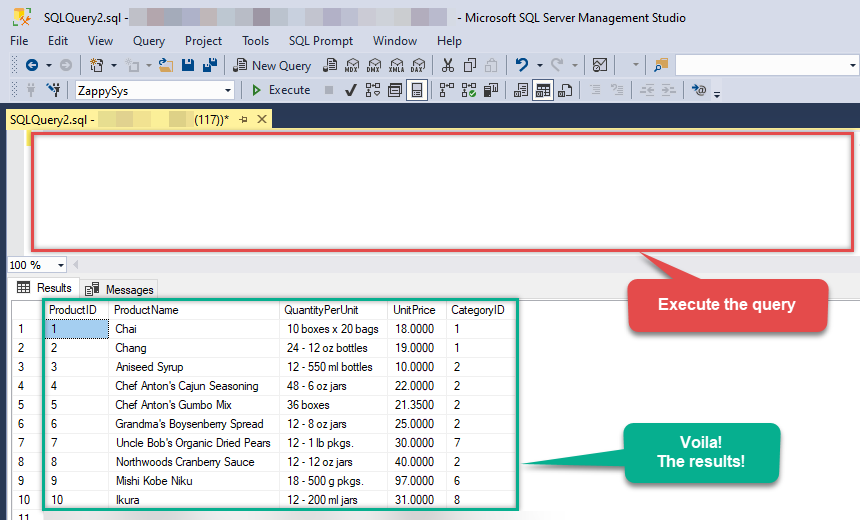
SELECT * FROM OPENQUERY([LS_TO_ZENDESK_IN_GATEWAY], 'SELECT * FROM Tickets')
Sample SQL Script for Creating a Linked Server in SQL Server
USE [master]
GO
--///////////////////////////////////////////////////////////////////////////////////////
--Run below code in SSMS to create Linked Server and use ZappySys Drivers in SQL Server
--///////////////////////////////////////////////////////////////////////////////////////

-- Replace YOUR_GATEWAY_USER, YOUR_GATEWAY_PASSWORD
-- Replace localhost with IP/Machine name if ZappySys Gateway Running on different machine other than SQL Server
-- Replace Port 5000 if you configured gateway on a different port


--1. Configure your gateway service as per this article https://zappysys.com/links?id=10036

--2. Make sure you have SQL Server Installed. You can download FREE SQL Server Express Edition from here if you dont want to buy Paid version https://www.microsoft.com/en-us/sql-server/sql-server-editions-express

--Uncomment below if you like to drop linked server if it already exists
--EXEC master.dbo.sp_dropserver @server=N'LS_TO_ZENDESK_IN_GATEWAY', @droplogins='droplogins'

--3. Create new linked server

EXEC master.dbo.sp_addlinkedserver
    @server = N'LS_TO_ZENDESK_IN_GATEWAY'  --Linked server name (this will be used in OPENQUERY sql
, @srvproduct=N''
---- For MSSQL 2012, 2014, 2016, 2017, and 2019 use below (SQL Server Native Client 11.0)---
, @provider=N'SQLNCLI11'
---- For MSSQL 2022 or higher use below (Microsoft OLE DB Driver for SQL Server)---
--, @provider=N'MSOLEDBSQL'
, @datasrc=N'localhost,5000' --//Machine / Port where Gateway service is running
, @provstr=N'Network Library=DBMSSOCN;'
, @catalog=N'ZendeskDSN' --Data source name you gave on Gateway service settings

--4. Attach gateway login with linked server

EXEC master.dbo.sp_addlinkedsrvlogin
@rmtsrvname=N'LS_TO_ZENDESK_IN_GATEWAY'  --linked server name
, @useself=N'False'
, @locallogin=NULL
, @rmtuser=N'YOUR_GATEWAY_USER' --enter your Gateway user name
, @rmtpassword='YOUR_GATEWAY_PASSWORD'  --enter your Gateway user's password
GO

--5. Enable RPC OUT (This is Optional - Only needed if you plan to use EXEC(...) AT YourLinkedServerName rather than OPENQUERY
EXEC sp_serveroption 'LS_TO_ZENDESK_IN_GATEWAY', 'rpc', true;
EXEC sp_serveroption 'LS_TO_ZENDESK_IN_GATEWAY', 'rpc out', true;

--Disable MSDTC - Below needed to support INSERT INTO from EXEC AT statement
EXEC sp_serveroption 'LS_TO_ZENDESK_IN_GATEWAY', 'remote proc transaction promotion', false;

--Increase query timeout if query is going to take longer than 10 mins (Default timeout is 600 seconds)
--EXEC sp_serveroption 'LS_TO_ZENDESK_IN_GATEWAY', 'query timeout', 1200;
GO
Method 2: Using SQL Server UI (SSMS) to manually configure the Linked Server
You can also create the Linked Server manually through SSMS if you prefer a visual setup. This method lets you configure the provider, data source, and security interactively.
-
First, let's open SQL Server Management Studio, create a new Linked Server, and start configuring it:
LS_TO_ZENDESK_IN_GATEWAYMicrosoft OLE DB Driver for SQL Serverlocalhost,5000ZendeskDSNZendeskDSN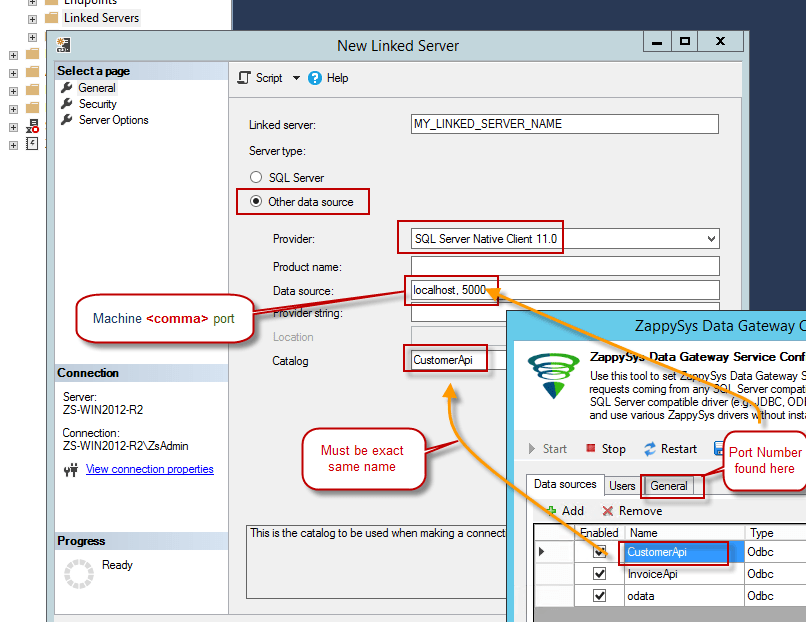
- For SQL Server 2012, 2014, 2016, 2017, and 2019, choose SQL Server Native Client 11.0 as the provider.
- For SQL Server 2022 or higher, choose Microsoft OLE DB Driver for SQL Server as the provider.
-
Then click on Security option and configure username we created in ZappySys Data Gateway in one of the previous steps, e.g.
john: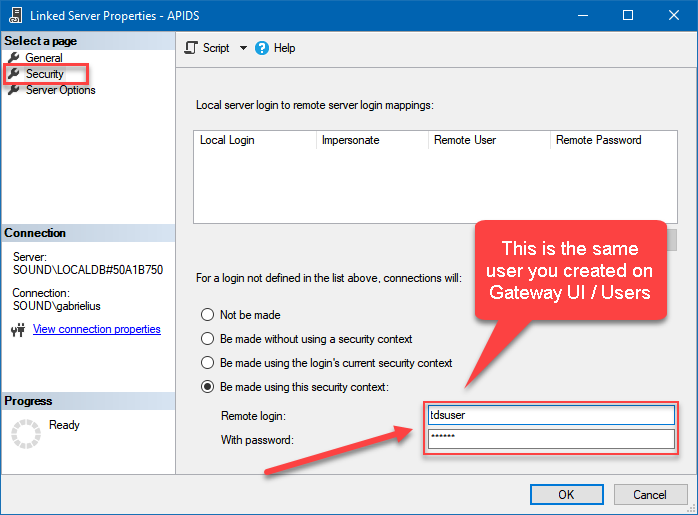
-
Optional step. Under the Server Options, Enable RPC and RPC Out and Disable Promotion of Distributed Transactions(MSDTC).
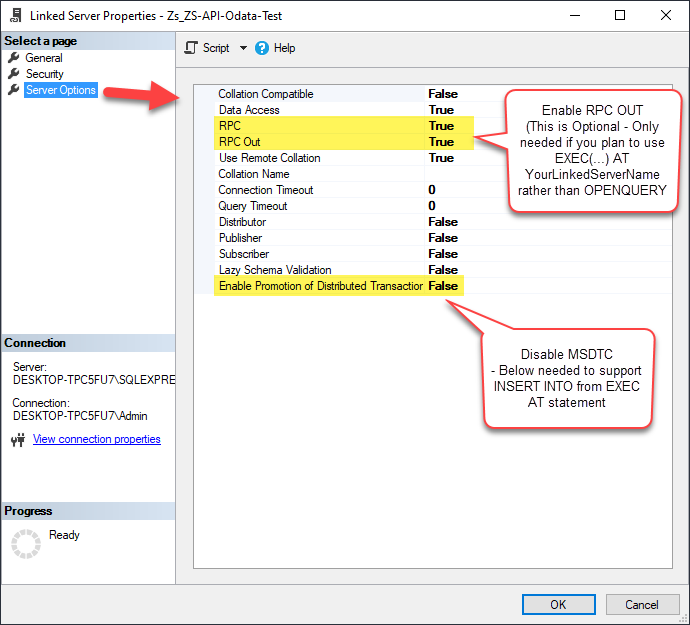
You need to enable RPC Out if you plan to use
EXEC(...) AT [LS_TO_ZENDESK_IN_GATEWAY]rather than OPENQUERY.
If don't enabled it, you will encounter theServer 'LS_TO_ZENDESK_IN_GATEWAY' is not configured for RPCerror.Query Example:
DECLARE @MyQuery NVARCHAR(MAX) = 'SELECT * FROM Tickets';

EXEC (@MyQuery) AT [LS_TO_ZENDESK_IN_GATEWAY];
If you plan to use
'INSERT INTO <TABLE> EXEC(...) AT [LS_TO_ZENDESK_IN_GATEWAY]'in that case you need to Disable Promotion of Distributed Transactions(MSDTC).
If don't disabled it, you will encounter theThe operation could not be performed because OLE DB provider "SQLNCLI11" for linked server "MY_LINKED_SERVER_NAME" was unable to begin a distributed transaction.error.Query Example:
INSERT INTO dbo.Products DECLARE @MyQuery NVARCHAR(MAX) = 'SELECT * FROM Tickets'; EXEC (@MyQuery) AT [LS_TO_ZENDESK_IN_GATEWAY]; -
Finally, open a new query and execute a query we saved in one of the previous steps:
SELECT * FROM OPENQUERY([LS_TO_ZENDESK_IN_GATEWAY], 'SELECT * FROM Tickets')
SELECT * FROM OPENQUERY([LS_TO_ZENDESK_IN_GATEWAY], 'SELECT * FROM Tickets')
Create View in SQL Server
Finally, use this or similar query in a view or stored procedure, which you will be able to use in Tableau. We will create a view to return invoices:
-
CREATE VIEW vwApiInvoices AS
 SELECT * FROM OPENQUERY([LS_TO_ZENDESK_IN_GATEWAY], 'SELECT * FROM Invoices')
Read data in Tableau from SQL Server
Actually, we will be getting data from SQL Server which in turn will be getting data from ZappySys Data Gateway data source. Let's begin and see how to accomplish that:
-
Open Tableau Desktop and click File > New.
-
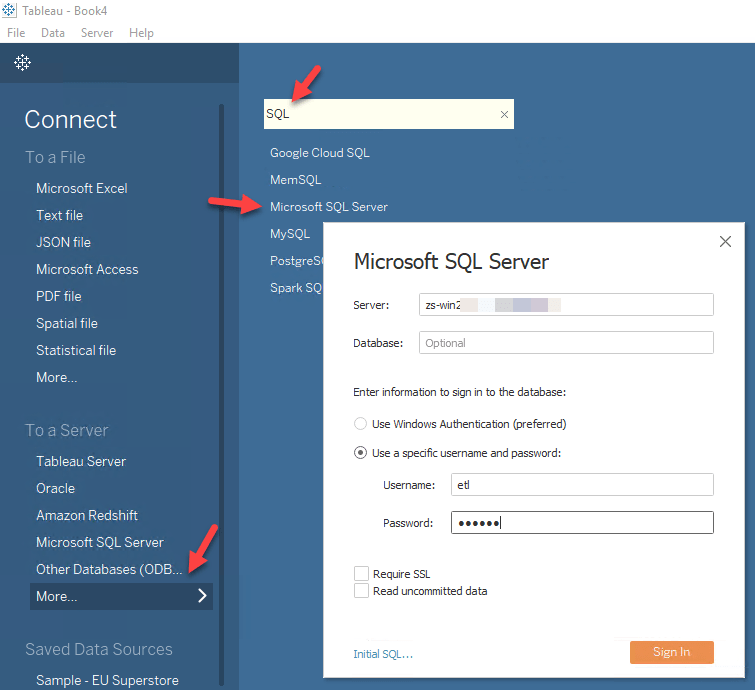
To create new Connection click More > Microsoft SQL Server > Enter your credentials to connect to SQL Server (in our example before we used john):
-
Once connection is created for SQL Server we can read Zendesk data 3 different ways:
- Query View which contains OPENQUERY to Linked Server for Zendesk data
- Use direct SQL Query using OPENQUERY
- Use Stored Procedure (Mostly useful to parameterize calls
-
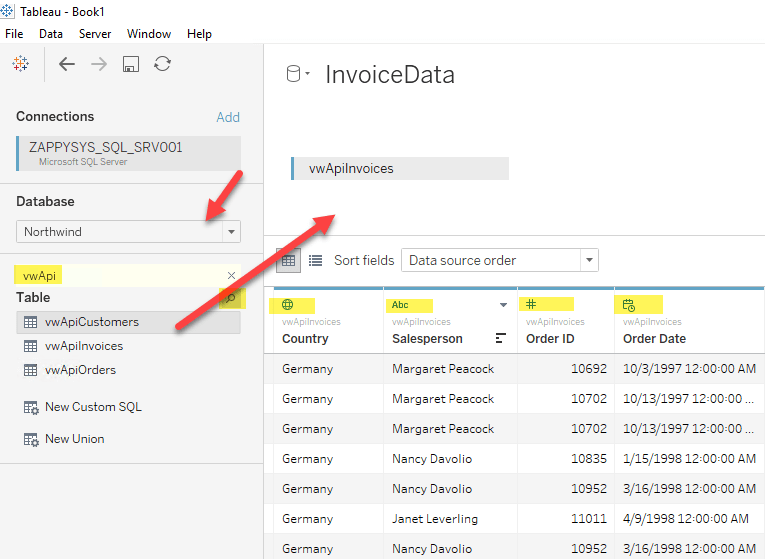
See below example to pull data from Zendesk in Tableau using SQL View approach:
-
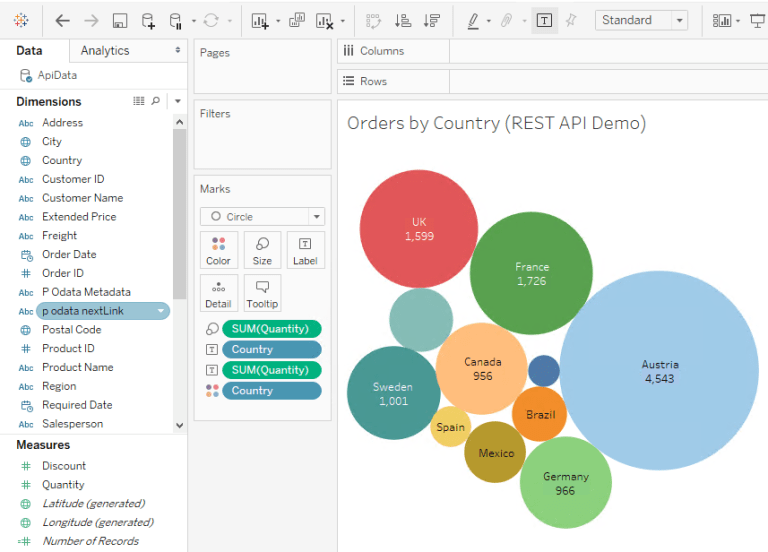
Once your data sources are created you can click on Sheet1 and drag fields to create visualizations for Tableau Dashboard:
Passing Parameters to Zendesk calls in Tableau (Dynamic SQL)
Now let's look at scenario where you have to pass parameters to build Dynamic Dashboard. You can try to insert Parameters in your Direct SQL when you build Dynamic SQL but we found some issues with that so we are going to suggest Stored Procedure approach. For more information on Known issue on Dynamic Metadata Check this post.-
First lets create a stored procedure in SQL Server for Parameter Example. Notice how we added WITH RESULT SETS in the code to describe metadata.
--DROP PROC dbo.usp_GetInvoicesByCountry --GO /* Purpose: Parameterize Zendesk call via SQL. Call ZappySys Drivers inside SQL Server. */ CREATE PROC dbo.usp_GetInvoicesByCountry @country varchar(100) AS DECLARE @sql varchar(max) --//Escape single ticks carefully SET @sql = 'SELECT OrderID,CustomerID,Country,Quantity FROM $ WITH (Src=''https://services.odata.org/V3/Northwind/Northwind.svc/Invoices?$format=json@filter=Country eq '+ @country +''' ,Filter=''$.value[*]'' ,DataFormat=''OData'' )' DECLARE @sqlFull varchar(max) SET @sqlFull='SELECT * FROM OPENQUERY([LS_TO_ZENDESK_IN_GATEWAY], ''' + REPLACE( @sql, '''', '''''' ) + ''' )' PRINT @sqlFull --//For DEBUG purpose EXECUTE (@sqlFull) WITH RESULT SETS ( (OrderID int,CustomerID varchar(100),Country varchar(100),Quantity int) --//describe first result. If you don't do this then wont work in Tableau ) GO -- Example call EXEC dbo.usp_GetInvoicesByCountry @country='Germany' - Once you create a stored procedure go to Tableau datasource and select Database which contains the stored procedure we just created.
-
Now find your stored proc and drag it on the datasource pane. You will see parameters UI as below. You can create new parameter - Select New Parameter under Value Column.
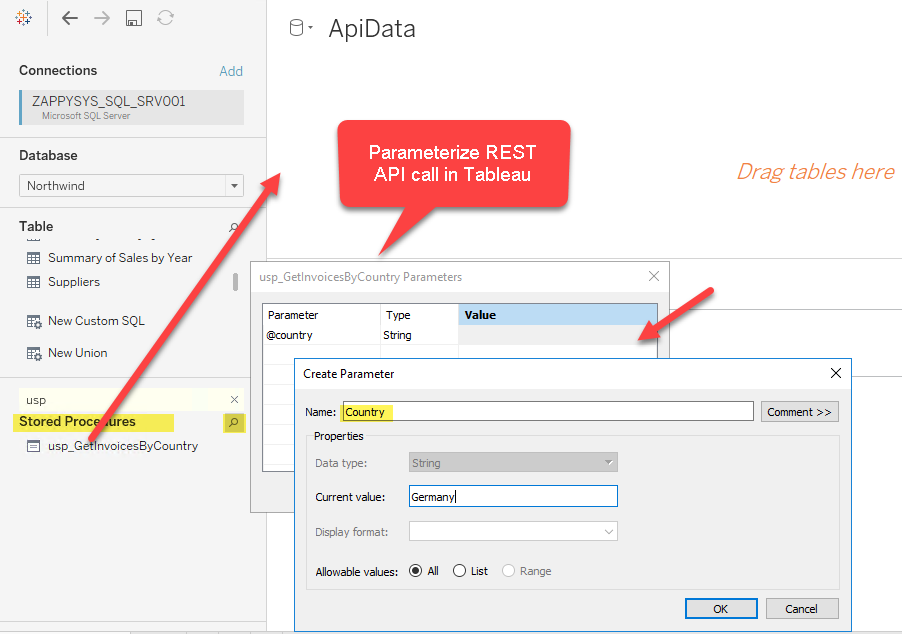
- Thats it now you can reuse your parameterized datasource anywhere in Dashboard.
-
If you have need to select Parameters from predefined values rather than free text then edit your parameter and select List option. Define values you like to select from as below.
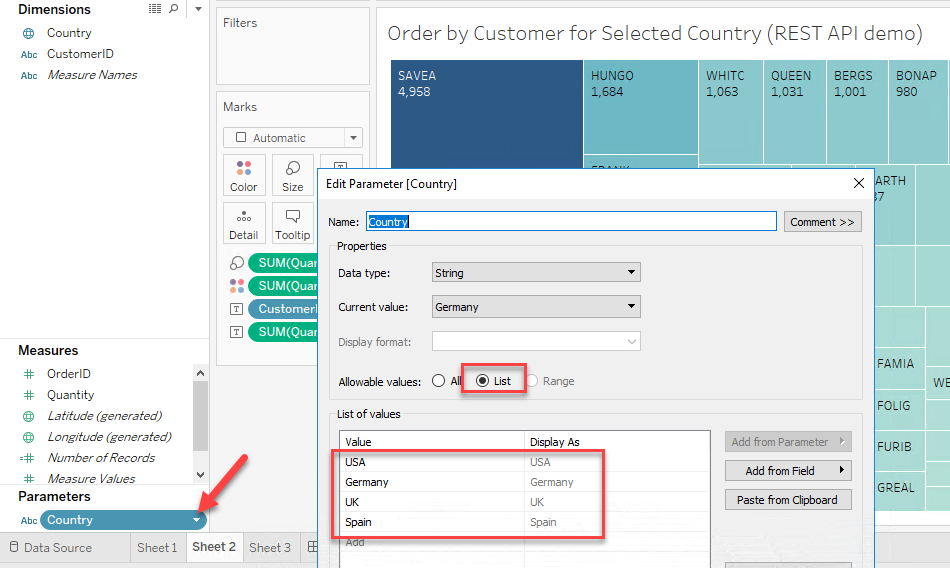
-
When you create Tableau Dashboard you will see Parameter dropdown (If you selected List) elase you may see Textbox to enter custom value.

Firewall settings
So far we have assumed that Gateway is running on the same machine as SQL Server. However there will be a case when ZappySys ODBC PowerPack is installed on a different machine than SQL Server. In such case you may have to perform additional Firewall configurations. On most computers firewall settings wont allow outside traffic to ZappySys Data Gateway. In such case perform following steps to allow other machines to connect to Gateway.
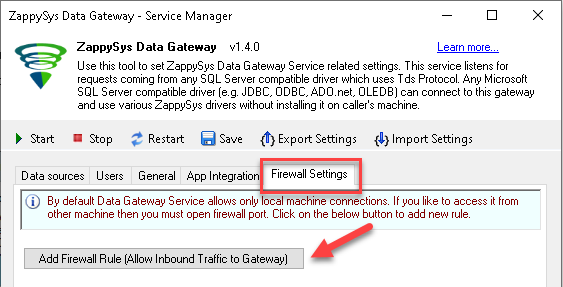
Method-1 (Preferred)If you are using newer version of ZappySys Data Gateway then adding firewall rule is just a single click.
- Search for gateway in start menu and open ZappySys Data Gateway.
-
Go to Firewall Tab and click Add Firewall Rule button like below. This will create Firewall rule to all Inbound Traffic on Port 5000 (Unless you changed it).
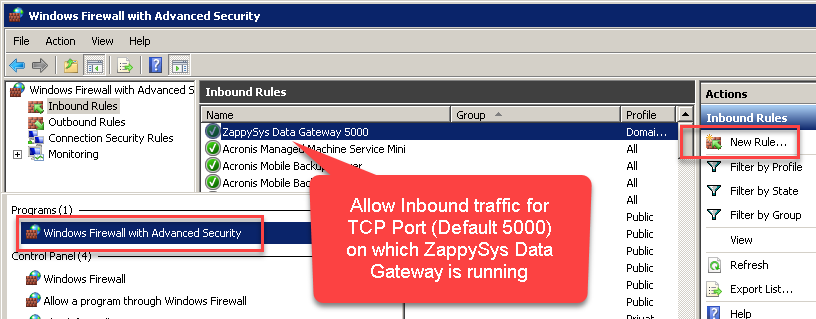
Here is another way to add / edit Inbound Traffic rule in windows firewall. Use below method if you choose to customize your rule (for advanced users).
- Search for Windows Firewall Advanced Security in start menu.
- Under Inbound Rules > Right click and click [New Rule] >> Click Next
- Select Port on Rule Type >> Click Next
- Click on TCP and enter port number under specified local port as 5000 (use different one if you changed Default port) >> Click Next
- Select Profile (i.e. Private, Public) >> Click Next
- Enter Rule name [i.e. ZappySys Data Gateway – Allow Inbound ] >> Click Next
- Click OK to save the rule
Zendesk Connector actions
Got a specific use case in mind? We've mapped out exactly how to perform a variety of essential Zendesk operations directly in Tableau, so you don't have to figure out the setup from scratch. Check out the step-by-step guides below:
- Read Tickets (All)
- Read Tickets (Incremental) changed after a specified date
- Read Users (Incremental) changed after a specified date
- Read Organizations (Incremental) changed after a specified date
- Read Ticket Events (Incremental) changed after a specified date
- Read Ticket Metric Events (Incremental) changed after a specified date
- Read Ticket(s) by ID
- Read User(s) by ID
- Read Organization(s) by ID
- Read Tickets for Organization
- Read Tickets for User (Requested)
- Read Tickets for User (CCed)
- Read Tickets for User (Assigned)
- Read Tickets (Recent)
- Read Tickets Count (All)
- Read Tickets Count (for Organization)
- Read Ticket Metrics
- Read Ticket Fields
- Read Ticket Forms
- Read Ticket Comments
- Read Ticket Attachments
- Read Ticket ActivityStream
- Read Ticket ActivityStream Details
- Search Records - WITH Sorting and Extra Columns (Max 1000 rows)
- Search Records - NO Sorting (Allows more than 1000 rows)
- Read Organization Count
- Read Organization Fields
- Read Tags
- Read Groups
- Read User Fields
- Read Current User Info
- Read Brands
- Read Views
- Read Macros
- Read Sessions
- Read User Sessions
- Read Requests
- Read Requests Search
- Read Attachment
- Delete Attachment
- Upload Attachment (Single file)
- Delete Upload Session
- Create Ticket (Single)
- Create Tickets (Bulk)
- Delete Tickets (Bulk)
- Update Tickets (Bulk)
- Update Ticket (Single)
- Delete Ticket
- Read Users (All)
- Read Organizations (All)
- Upsert Users (Bulk) - Create or Update
- Delete User
- Update User
- Create User
- Upsert User - Create or Update
- Delete Organization
- Update Organization
- Create Organization
- Upsert Organization - Create or Update
- Make Generic REST API Request
- Make Generic REST API Request (Bulk Write)
Conclusion
In this guide, we demonstrated how to connect to Zendesk in Tableau and integrate your data — all without writing complex code.
Ready to get started? Download ODBC PowerPack now or ping us via chat if you still need help: