XML Connector for Tableau
XML Connector can be used to extract and output XML data coming from REST API web service calls (Web URL) or direct XML String (variables or DB columns) or local XML files data. XML Connector also supports Path expression to extract data from any level. This Connector is optimized to work with very large XML string.
In this article you will learn how to quickly and efficiently integrate XML data in Tableau without coding. We will use high-performance XML Connector to easily connect to XML and then access the data inside Tableau.
Let's follow the steps below to see how we can accomplish that!
XML Connector for Tableau is based on ZappySys XML Driver which is part of ODBC PowerPack. It is a collection of high-performance ODBC drivers that enable you to integrate data in SQL Server, SSIS, a programming language, or any other ODBC-compatible application. ODBC PowerPack supports various file formats, sources and destinations, including REST/SOAP API, SFTP/FTP, storage services, and plain files, to mention a few.
Create Data Source in Data Gateway based on ZappySys XML Driver
In this section we will create a data source for XML in Data Gateway. Let's follow these steps to accomplish that:
-
Download and install ODBC PowerPack.
-
Search for
gatewayin Windows Start Menu and open ZappySys Data Gateway Configuration: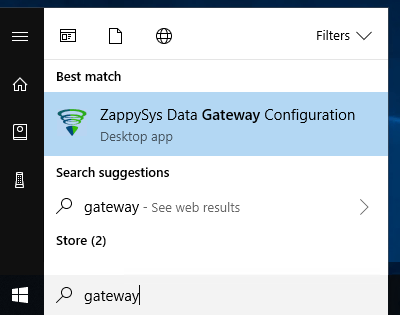
-
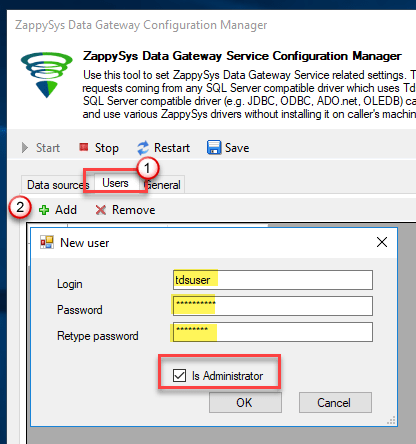
Go to Users tab and follow these steps to add a Data Gateway user:
- Click Add button
-
In Login field enter username, e.g.,
john - Then enter a Password
- Check Is Administrator checkbox
- Click OK to save
-
Now we are ready to add a data source:
- Click Add button
- Give Datasource a name (have it handy for later)
- Then select Native - ZappySys XML Driver
- Finally, click OK
XmlDSNZappySys XML Driver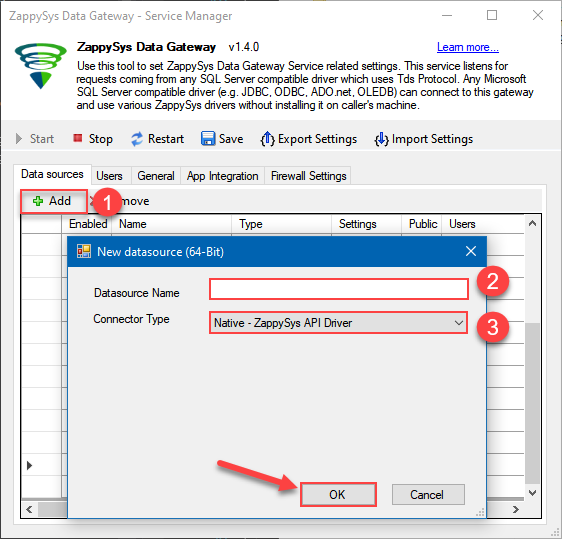
-
Select Url or File and paste the following Url for this example OR you can load existing connection string as per this article.
NOTE: Here for demo, We are using odata API, but you need to refer your own API documentation and based on that you need to use your own API URL and need to configure connection based on API Authentication type
-
Now enter Path expression in Array Filter textbox to extract only specific part of XML file as below ($.feed.entry[*] will get content of entry attribute from XML document. Entry attribute is array of XML documents so we have to use [*] to indicate we want all records of that array)
NOTE: Here, We are using our desired filter, but you need to select your desired filter based on your requirement.
Click on Test Connection button to view whether the Test Connection is SUCCESSFUL or Not.$.feed.entry[*]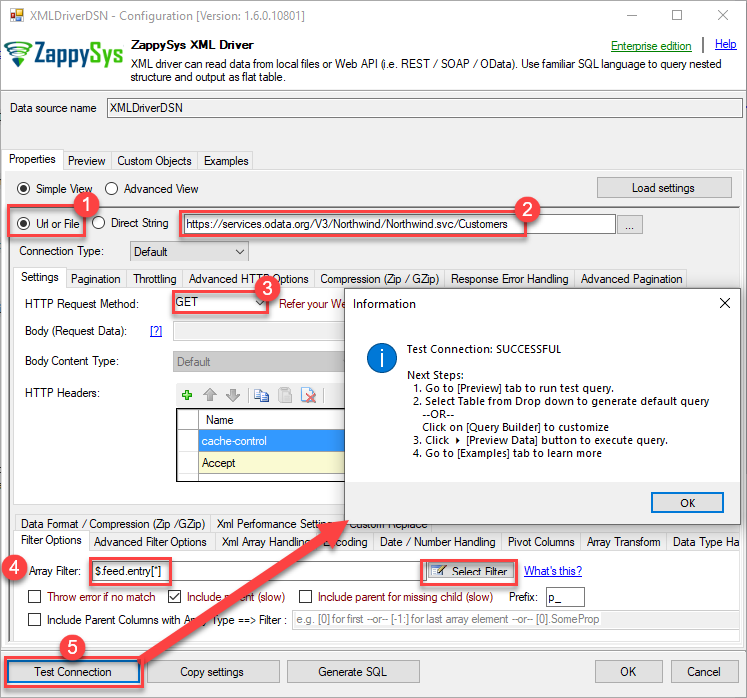
-
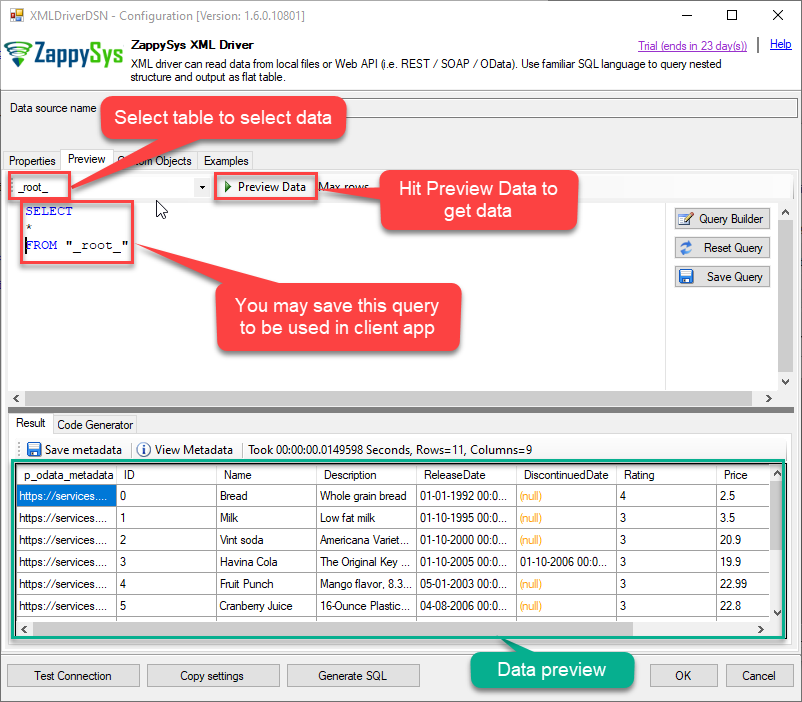
Once you configured a data source, you can preview data. Hit Preview tab, and use similar settings to preview data:
-
Click OK to finish creating the data source.
-
That's it; we are done. In a few clicks we configured the call to XML API using ZappySys XML Connector.
-
Very important step. Now, after creating or modifying the data source make sure you:
- Click the Save button to persist your changes.
- Hit Yes, once asked if you want to restart the Data Gateway service.
This will ensure all changes are properly applied:
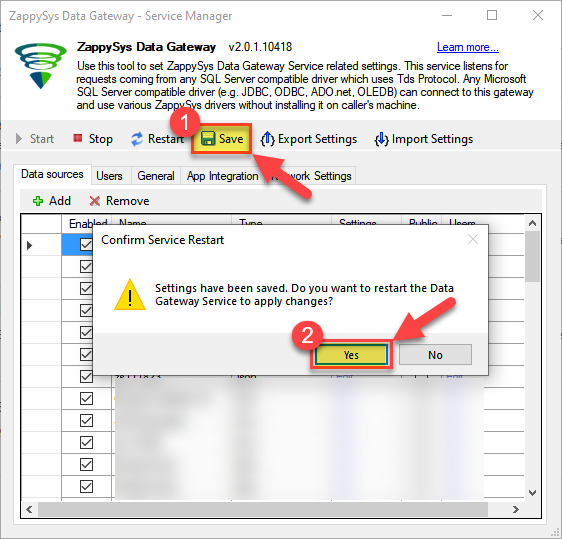 Skipping this step may result in the new settings not taking effect and, therefore you will not be able to connect to the data source.
Read data in SQL Server via Data Gateway
After configuring your data source using the ZappySys ODBC Driver, the next mandatory step to read that data in SQL Server is to create a Linked Server. SQL Server requires a Linked Server definition to access any ODBC-based source through the ZappySys Data Gateway, allowing the source driver data to be queried using standard T-SQL.
There are two ways to create the Linked Server:- Method 1: Using a SQL Script automatically generated by the Data Gateway
- Method 2: Using SQL Server UI (SSMS) to manually configure the Linked Server
Method 1: Using a SQL Script automatically generated by the Data Gateway
The fastest and most reliable way to create the Linked Server is to use the SQL Script generated by the Data Gateway. This ensures all settings are applied correctly with minimal manual steps.
In the Data Gateway, open the App Integration tab.
Update the prefilled Linked Server Name if you want to use a custom name.
Select the XmlDSN data source which we created earlier as the Database.
-
Choose the correct SQL Server version for your environment.
- SQL 2019 or Lower (
@provider='SQLNCLI11') - SQL 2022 or Higher (
@provider='MSOLEDBSQL')
- SQL 2019 or Lower (
Click Generate Code.
-
In the generated script scroll down to 4. Attach Gateway login with linked server step, enter your Data Gateway admin username and password.
'LS_TO_XML_IN_GATEWAY'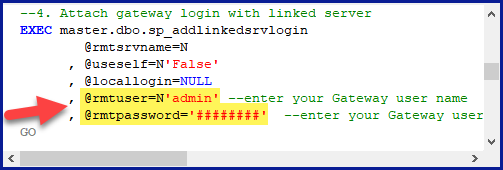
-
Press Ctrl + A and Ctrl + C to copy the entire script.
LS_TO_XML_IN_GATEWAYXmlDSN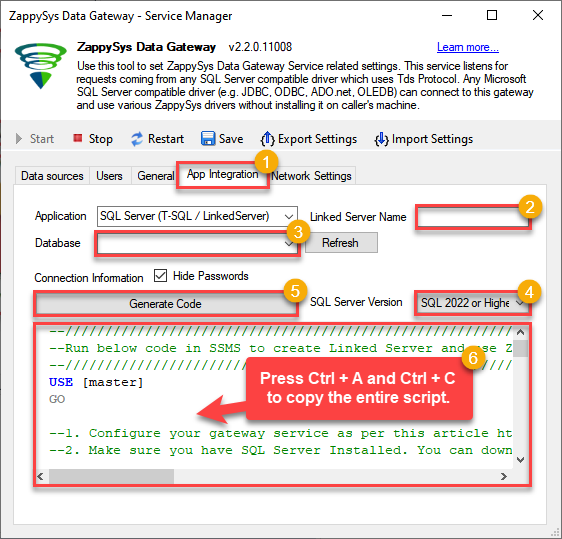
-
Paste the script into SQL Server Management Studio (SSMS) and run it.
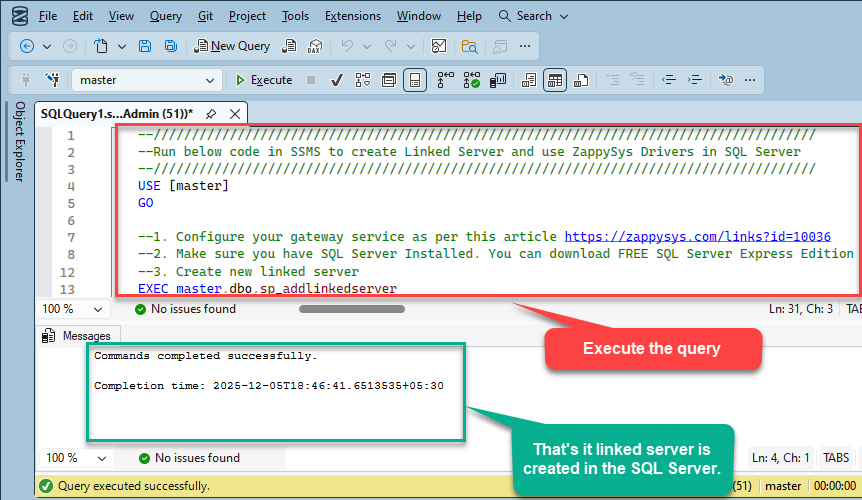
That's it linked server is created in the SQL Server.
-
Finally, open a new query and execute a query we saved in one of the previous steps:
SELECT * FROM OPENQUERY([LS_TO_XML_IN_GATEWAY], 'SELECT * FROM Orders')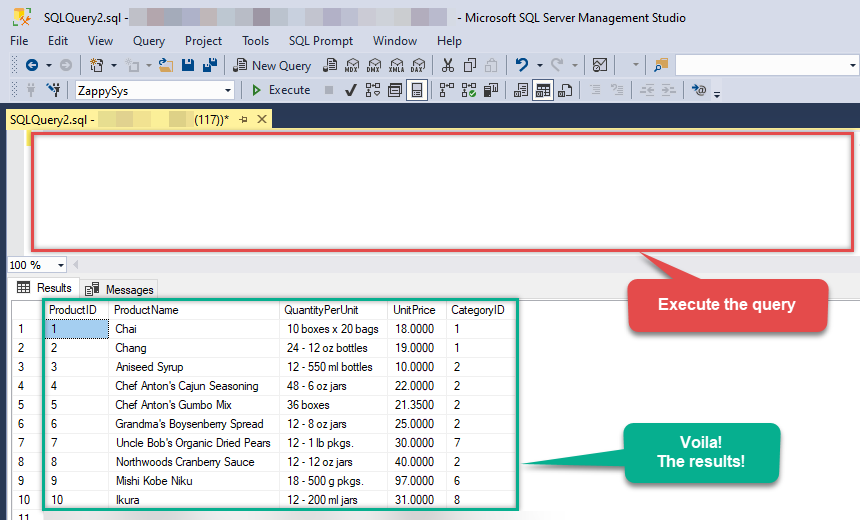
SELECT * FROM OPENQUERY([LS_TO_XML_IN_GATEWAY], 'SELECT * FROM Orders')
Sample SQL Script for Creating a Linked Server in SQL Server
USE [master]
GO
--///////////////////////////////////////////////////////////////////////////////////////
--Run below code in SSMS to create Linked Server and use ZappySys Drivers in SQL Server
--///////////////////////////////////////////////////////////////////////////////////////

-- Replace YOUR_GATEWAY_USER, YOUR_GATEWAY_PASSWORD
-- Replace localhost with IP/Machine name if ZappySys Gateway Running on different machine other than SQL Server
-- Replace Port 5000 if you configured gateway on a different port


--1. Configure your gateway service as per this article https://zappysys.com/links?id=10036

--2. Make sure you have SQL Server Installed. You can download FREE SQL Server Express Edition from here if you dont want to buy Paid version https://www.microsoft.com/en-us/sql-server/sql-server-editions-express

--Uncomment below if you like to drop linked server if it already exists
--EXEC master.dbo.sp_dropserver @server=N'LS_TO_XML_IN_GATEWAY', @droplogins='droplogins'

--3. Create new linked server

EXEC master.dbo.sp_addlinkedserver
    @server = N'LS_TO_XML_IN_GATEWAY'  --Linked server name (this will be used in OPENQUERY sql
, @srvproduct=N''
---- For MSSQL 2012, 2014, 2016, 2017, and 2019 use below (SQL Server Native Client 11.0)---
, @provider=N'SQLNCLI11'
---- For MSSQL 2022 or higher use below (Microsoft OLE DB Driver for SQL Server)---
--, @provider=N'MSOLEDBSQL'
, @datasrc=N'localhost,5000' --//Machine / Port where Gateway service is running
, @provstr=N'Network Library=DBMSSOCN;'
, @catalog=N'XmlDSN' --Data source name you gave on Gateway service settings

--4. Attach gateway login with linked server

EXEC master.dbo.sp_addlinkedsrvlogin
@rmtsrvname=N'LS_TO_XML_IN_GATEWAY'  --linked server name
, @useself=N'False'
, @locallogin=NULL
, @rmtuser=N'YOUR_GATEWAY_USER' --enter your Gateway user name
, @rmtpassword='YOUR_GATEWAY_PASSWORD'  --enter your Gateway user's password
GO

--5. Enable RPC OUT (This is Optional - Only needed if you plan to use EXEC(...) AT YourLinkedServerName rather than OPENQUERY
EXEC sp_serveroption 'LS_TO_XML_IN_GATEWAY', 'rpc', true;
EXEC sp_serveroption 'LS_TO_XML_IN_GATEWAY', 'rpc out', true;

--Disable MSDTC - Below needed to support INSERT INTO from EXEC AT statement
EXEC sp_serveroption 'LS_TO_XML_IN_GATEWAY', 'remote proc transaction promotion', false;

--Increase query timeout if query is going to take longer than 10 mins (Default timeout is 600 seconds)
--EXEC sp_serveroption 'LS_TO_XML_IN_GATEWAY', 'query timeout', 1200;
GO
Method 2: Using SQL Server UI (SSMS) to manually configure the Linked Server
You can also create the Linked Server manually through SSMS if you prefer a visual setup. This method lets you configure the provider, data source, and security interactively.
-
First, let's open SQL Server Management Studio, create a new Linked Server, and start configuring it:
LS_TO_XML_IN_GATEWAYMicrosoft OLE DB Driver for SQL Serverlocalhost,5000XmlDSNXmlDSN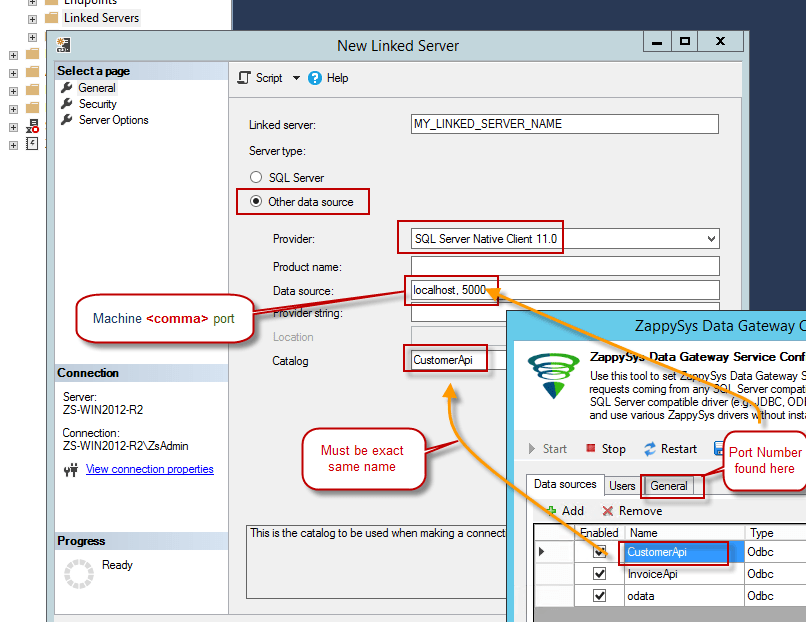
- For SQL Server 2012, 2014, 2016, 2017, and 2019, choose SQL Server Native Client 11.0 as the provider.
- For SQL Server 2022 or higher, choose Microsoft OLE DB Driver for SQL Server as the provider.
-
Then click on Security option and configure username we created in ZappySys Data Gateway in one of the previous steps, e.g.
john: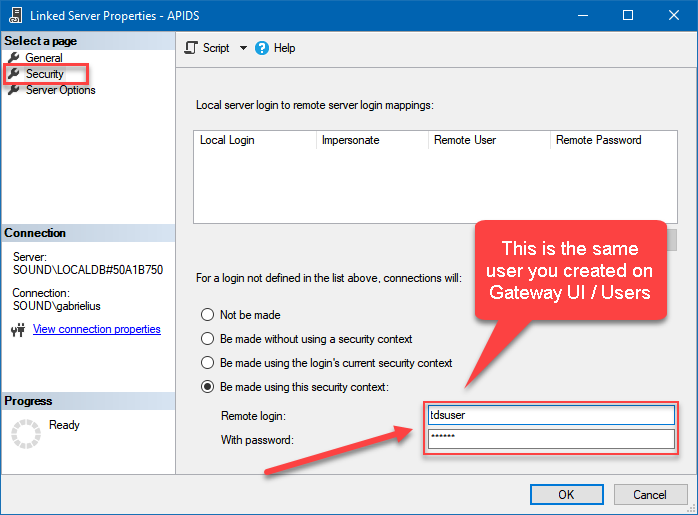
-
Optional step. Under the Server Options, Enable RPC and RPC Out and Disable Promotion of Distributed Transactions(MSDTC).
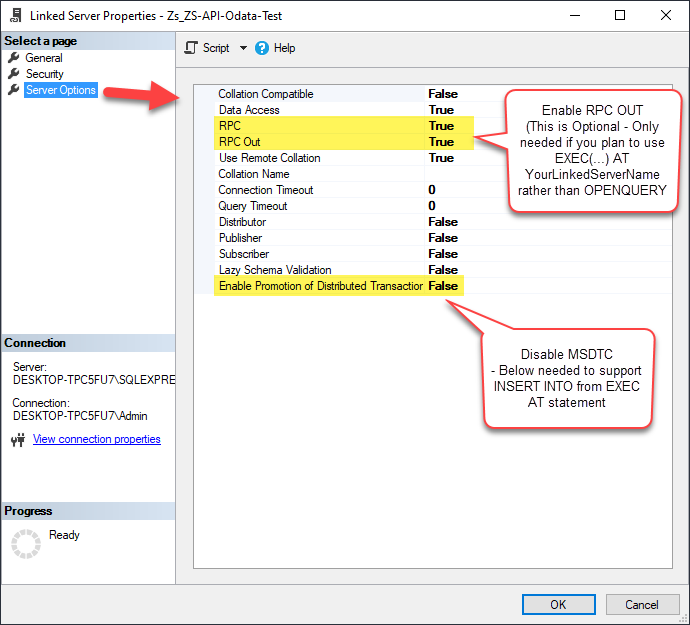
You need to enable RPC Out if you plan to use
EXEC(...) AT [LS_TO_XML_IN_GATEWAY]rather than OPENQUERY.
If don't enabled it, you will encounter theServer 'LS_TO_XML_IN_GATEWAY' is not configured for RPCerror.Query Example:
DECLARE @MyQuery NVARCHAR(MAX) = 'SELECT * FROM Orders';

EXEC (@MyQuery) AT [LS_TO_XML_IN_GATEWAY];
If you plan to use
'INSERT INTO <TABLE> EXEC(...) AT [LS_TO_XML_IN_GATEWAY]'in that case you need to Disable Promotion of Distributed Transactions(MSDTC).
If don't disabled it, you will encounter theThe operation could not be performed because OLE DB provider "SQLNCLI11" for linked server "MY_LINKED_SERVER_NAME" was unable to begin a distributed transaction.error.Query Example:
INSERT INTO dbo.Products DECLARE @MyQuery NVARCHAR(MAX) = 'SELECT * FROM Orders'; EXEC (@MyQuery) AT [LS_TO_XML_IN_GATEWAY]; -
Finally, open a new query and execute a query we saved in one of the previous steps:
SELECT * FROM OPENQUERY([LS_TO_XML_IN_GATEWAY], 'SELECT * FROM Orders')
SELECT * FROM OPENQUERY([LS_TO_XML_IN_GATEWAY], 'SELECT * FROM Orders')
Create View in SQL Server
Finally, use this or similar query in a view or stored procedure, which you will be able to use in Tableau. We will create a view to return invoices:
-
CREATE VIEW vwApiInvoices AS
 SELECT * FROM OPENQUERY([LS_TO_XML_IN_GATEWAY], 'SELECT * FROM Invoices')
Read data in Tableau from SQL Server
Actually, we will be getting data from SQL Server which in turn will be getting data from ZappySys Data Gateway data source. Let's begin and see how to accomplish that:
-
Open Tableau Desktop and click File > New.
-
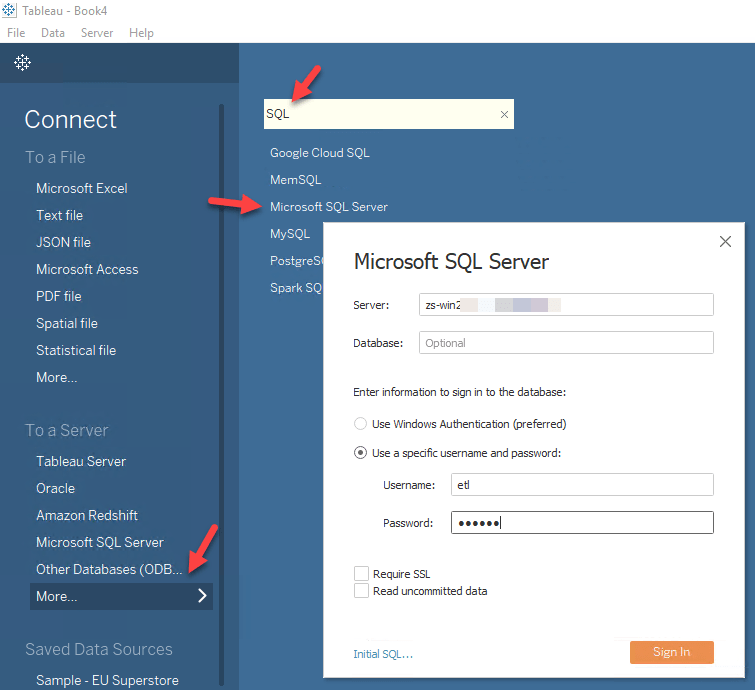
To create new Connection click More > Microsoft SQL Server > Enter your credentials to connect to SQL Server (in our example before we used john):
-
Once connection is created for SQL Server we can read XML data 3 different ways:
- Query View which contains OPENQUERY to Linked Server for XML data
- Use direct SQL Query using OPENQUERY
- Use Stored Procedure (Mostly useful to parameterize calls
-
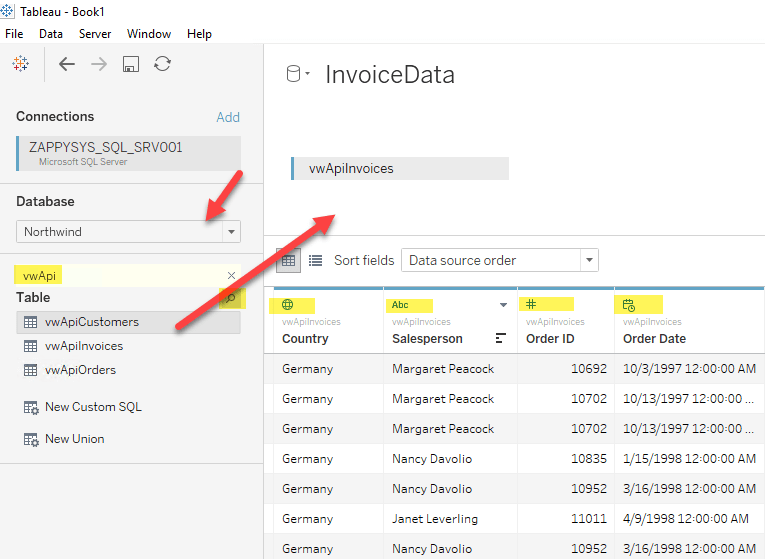
See below example to pull data from XML in Tableau using SQL View approach:
-
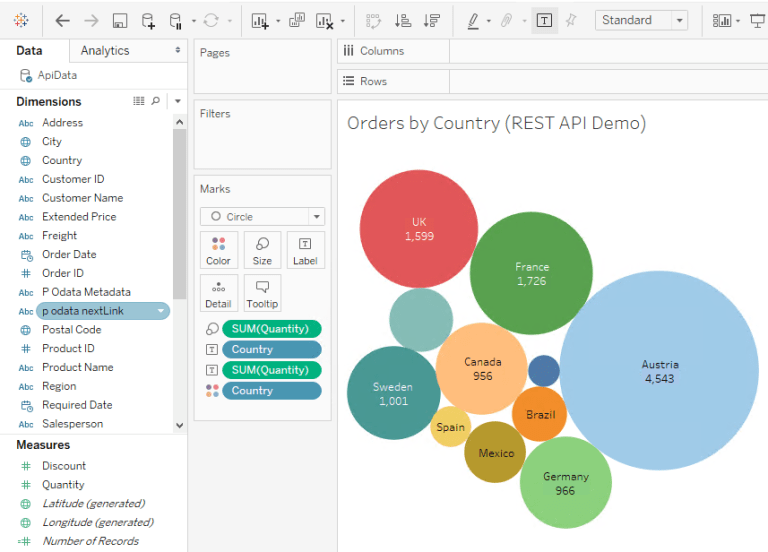
Once your data sources are created you can click on Sheet1 and drag fields to create visualizations for Tableau Dashboard:
Passing Parameters to XML calls in Tableau (Dynamic SQL)
Now let's look at scenario where you have to pass parameters to build Dynamic Dashboard. You can try to insert Parameters in your Direct SQL when you build Dynamic SQL but we found some issues with that so we are going to suggest Stored Procedure approach. For more information on Known issue on Dynamic Metadata Check this post.-
First lets create a stored procedure in SQL Server for Parameter Example. Notice how we added WITH RESULT SETS in the code to describe metadata.
--DROP PROC dbo.usp_GetInvoicesByCountry --GO /* Purpose: Parameterize XML call via SQL. Call ZappySys Drivers inside SQL Server. */ CREATE PROC dbo.usp_GetInvoicesByCountry @country varchar(100) AS DECLARE @sql varchar(max) --//Escape single ticks carefully SET @sql = 'SELECT OrderID,CustomerID,Country,Quantity FROM $ WITH (Src=''https://services.odata.org/V3/Northwind/Northwind.svc/Invoices?$format=json@filter=Country eq '+ @country +''' ,Filter=''$.value[*]'' ,DataFormat=''OData'' )' DECLARE @sqlFull varchar(max) SET @sqlFull='SELECT * FROM OPENQUERY([LS_TO_XML_IN_GATEWAY], ''' + REPLACE( @sql, '''', '''''' ) + ''' )' PRINT @sqlFull --//For DEBUG purpose EXECUTE (@sqlFull) WITH RESULT SETS ( (OrderID int,CustomerID varchar(100),Country varchar(100),Quantity int) --//describe first result. If you don't do this then wont work in Tableau ) GO -- Example call EXEC dbo.usp_GetInvoicesByCountry @country='Germany' - Once you create a stored procedure go to Tableau datasource and select Database which contains the stored procedure we just created.
-
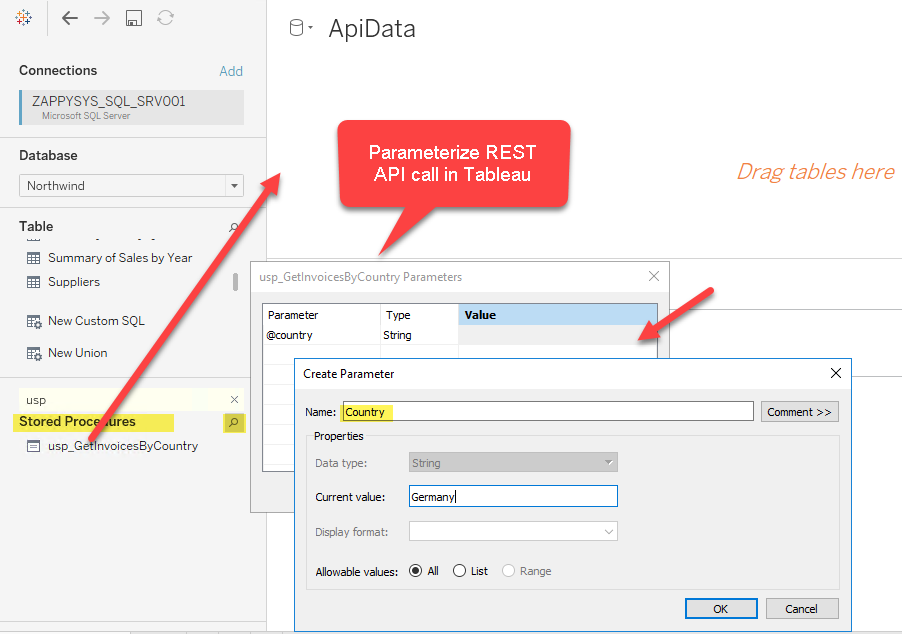
Now find your stored proc and drag it on the datasource pane. You will see parameters UI as below. You can create new parameter - Select New Parameter under Value Column.
- Thats it now you can reuse your parameterized datasource anywhere in Dashboard.
-
If you have need to select Parameters from predefined values rather than free text then edit your parameter and select List option. Define values you like to select from as below.
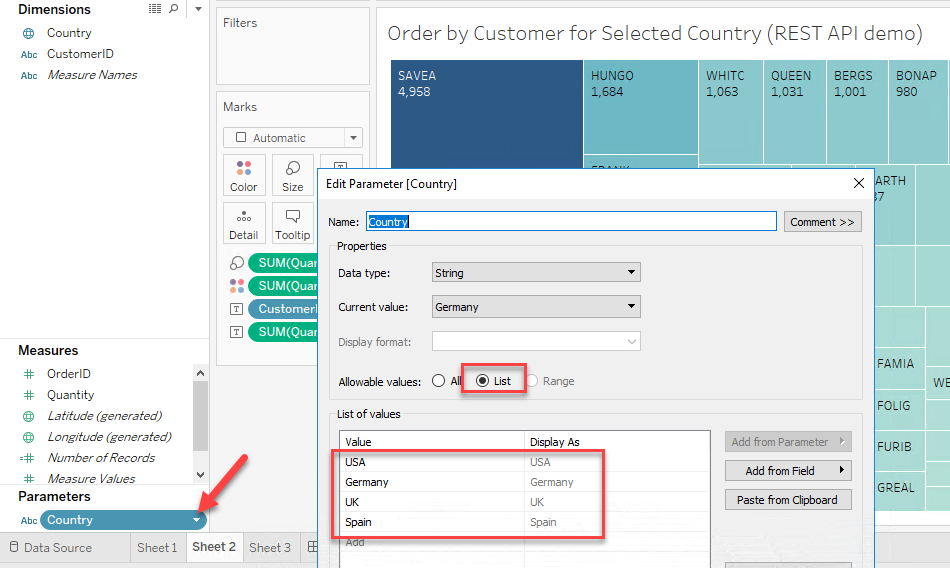
-
When you create Tableau Dashboard you will see Parameter dropdown (If you selected List) elase you may see Textbox to enter custom value.

Firewall settings
So far we have assumed that Gateway is running on the same machine as SQL Server. However there will be a case when ZappySys ODBC PowerPack is installed on a different machine than SQL Server. In such case you may have to perform additional Firewall configurations. On most computers firewall settings wont allow outside traffic to ZappySys Data Gateway. In such case perform following steps to allow other machines to connect to Gateway.
Method-1 (Preferred)If you are using newer version of ZappySys Data Gateway then adding firewall rule is just a single click.
- Search for gateway in start menu and open ZappySys Data Gateway.
-
Go to Firewall Tab and click Add Firewall Rule button like below. This will create Firewall rule to all Inbound Traffic on Port 5000 (Unless you changed it).
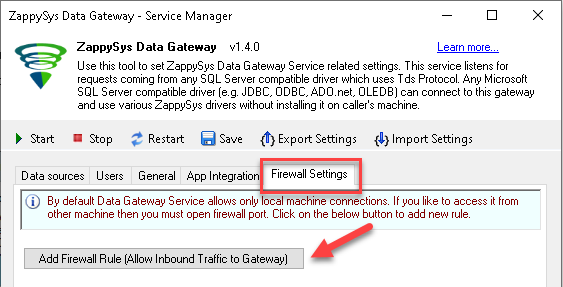
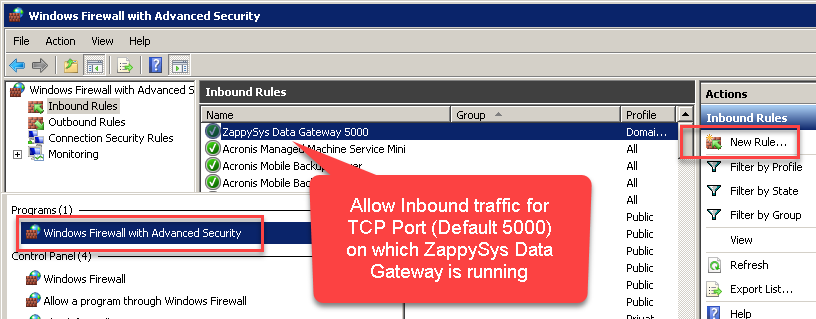
Here is another way to add / edit Inbound Traffic rule in windows firewall. Use below method if you choose to customize your rule (for advanced users).
- Search for Windows Firewall Advanced Security in start menu.
- Under Inbound Rules > Right click and click [New Rule] >> Click Next
- Select Port on Rule Type >> Click Next
- Click on TCP and enter port number under specified local port as 5000 (use different one if you changed Default port) >> Click Next
- Select Profile (i.e. Private, Public) >> Click Next
- Enter Rule name [i.e. ZappySys Data Gateway – Allow Inbound ] >> Click Next
- Click OK to save the rule
Configuring pagination in the XML Driver
ZappySys XML Driver equips users with powerful tools for seamless data extraction and management from REST APIs, leveraging advanced pagination methods for enhanced efficiency. These options are designed to handle various types of pagination structures commonly used in APIs. Below are the detailed descriptions of these options:
Page-based Pagination: This method works by retrieving data in fixed-size pages from the Rest API. It allows you to specify the page size and navigate through the results by requesting different page numbers, ensuring that you can access all the data in a structured manner.
Offset-based Pagination: With this approach, you can extract data by specifying the starting point or offset from which to begin retrieving data. It allows you to define the number of records to skip and fetch subsequent data accordingly, providing precise control over the data extraction process.
Cursor-based Pagination: This technique involves using a cursor or a marker that points to a specific position in the dataset. It enables you to retrieve data starting from the position indicated by the cursor and proceed to subsequent segments, ensuring that you capture all the relevant information without missing any records.
Token-based Pagination: In this method, a token serves as a unique identifier for a specific data segment. It allows you to access the next set of data by using the token provided in the response from the previous request. This ensures that you can systematically retrieve all the data segments without duplication or omission.
Utilizing these comprehensive pagination features in the ZappySys XML Driver facilitates efficient data management and extraction from REST APIs, optimizing the integration and analysis of extensive datasets.
For more detailed steps, please refer to this link: How to do REST API Pagination in SSIS / ODBC Drivers
Authentication
ZappySys offers various authentication methods to securely access data from various sources. These authentication methods include OAuth, Basic Authentication, Token-based Authentication, and more, allowing users to connect to a wide range of data sources securely.
ZappySys Authentication is a robust system that facilitates secure access to data from a diverse range of sources. It includes a variety of authentication methods tailored to meet the specific requirements of different data platforms and services. These authentication methods may involve:
OAuth: ZappySys supports OAuth for authentication, which allows users to grant limited access to their data without revealing their credentials. It's commonly used for applications that require access to user account information.
Basic Authentication: This method involves sending a username and password with every request. ZappySys allows users to securely access data using this traditional authentication approach.
Token-based Authentication: ZappySys enables users to utilize tokens for authentication. This method involves exchanging a unique token with each request to authenticate the user's identity without revealing sensitive information.
By implementing these authentication methods, ZappySys ensures the secure and reliable retrieval of data from various sources, providing users with the necessary tools to access and integrate data securely and efficiently. For more comprehensive details on the authentication process, please refer to the official ZappySys documentation or reach out to their support team for further assistance.
For more details, please refer to this link: ZappySys Connections
Conclusion
In this article we showed you how to connect to XML in Tableau and integrate data without any coding, saving you time and effort.
We encourage you to download XML Connector for Tableau and see how easy it is to use it for yourself or your team.
If you have any questions, feel free to contact ZappySys support team. You can also open a live chat immediately by clicking on the chat icon below.
Download XML Connector for Tableau Documentation


