How to integrate Jira using ODBC driver

Learn how to quickly and efficiently connect Jira with ODBC for smooth data access.
Read and write Jira data effortlessly. Track, manage, and automate issues, projects, worklogs, and comments — almost no coding required. You can do it all using the high-performance Jira ODBC Driver (powered by Jira Connector for ZappySys API Driver). We'll walk you through the entire setup.
Ready to dive in? Download the product to jump right in, or follow the step-by-step guide below to see how it works.
Create data source using Jira ODBC Driver
Video instructions
Watch this quick walkthrough to see how to configure your Jira ODBC data source, or scroll down for the step-by-step written guide.

Step-by-step instructions
To get data from Jira using ODBC, we first need to create an ODBC data source. We will later read this data in ODBC. Perform these steps:
-
Download and install ODBC PowerPack (if you haven't already).
-
Search for
odbcand open the ODBC Data Sources (64-bit):
-
Create a User data source (User DSN) based on the ZappySys API Driver driver:
ZappySys API Driver
- Create and use a User DSN if the client application runs under a User Account. This is the ideal option at design time (e.g., when developing in Visual Studio). Use it for both types of applications (64-bit and 32-bit).
- Create and use a System DSN if the client application runs under a System Account (e.g., as a Windows Service). This is usually the required option in a production environment. If your Windows Service is a 32-bit application, you must use the 32-bit ODBC Data Source Administrator to configure this
-
When the Configuration window appears give your data source a name if you haven't done that already, then select "Jira" from the list of Popular Connectors. If "Jira" is not present in the list, then click "Search Online" and download it. Then set the path to the location where you downloaded it. Finally, click Continue >> to proceed with configuring the DSN:
JiraDSNJira
-
Select your authentication scenario below to expand connection configuration steps to:
- Configure the authentication in Jira.
- Enter those details into the ZappySys API Driver data source configuration.
Jira authentication
Firstly, login into your Atlassian account and then go to your Jira profile:- Go to Profile > Security.
- Click Create and manage API tokens.
- Then click Create API token button and give your token a label.
- When window appears with new API token, copy and use it in this connection manager.
- That's it!
API Connection Manager configuration
Just perform these simple steps to finish authentication configuration:
-
Set Authentication Type to
API Key based Authentication [Http] - Optional step. Modify API Base URL if needed (in most cases default will work).
- Fill in all the required parameters and set optional parameters if needed.
- Finally, hit OK button:
JiraDSNJiraAPI Key based Authentication [Http]https://[$Subdomain$].atlassian.net/rest/api/3Required Parameters Subdomain Fill-in the parameter... Atlassian User Name (email) Fill-in the parameter... API Key Fill-in the parameter... Optional Parameters CustomColumnsRegex RetryMode RetryWhenStatusCodeMatch RetryStatusCodeList 429 RetryCountMax 5 RetryMultiplyWaitTime True  Find full details in the Jira Connector authentication reference.
Jira authentication
Follow official Atlassian instructions on how to create a PAT (Personal Access Token) for JIRAAPI Connection Manager configuration
Just perform these simple steps to finish authentication configuration:
-
Set Authentication Type to
Personal Access Token (PAT) Authentication [Http] - Optional step. Modify API Base URL if needed (in most cases default will work).
- Fill in all the required parameters and set optional parameters if needed.
- Finally, hit OK button:
JiraDSNJiraPersonal Access Token (PAT) Authentication [Http]https://[$Subdomain$].atlassian.net/rest/api/3Required Parameters Subdomain Fill-in the parameter... Token (PAT Bearer Token) Fill-in the parameter... Optional Parameters CustomColumnsRegex RetryMode RetryWhenStatusCodeMatch RetryStatusCodeList 429 RetryCountMax 5 RetryMultiplyWaitTime True
Find full details in the Jira Connector authentication reference.Jira authentication
OAuth App must be created in Atlassian Developer Console. It is found at https://developer.atlassian.com/console/myapps/ [API reference]
Firstly, login into your Atlassian account and then create Jira application:- Go to Atlassian Developer area.
-
Click Create and select OAuth 2.0 integration item to create an OAuth app:

-
Give your app a name, accept the terms and hit Create:

-
To enable permissions/scopes for your application, click Permissions tab, then hit Add button, and click Configure button, once it appears:

-
Continue by hitting Edit Scopes button to assign scopes for the application:

-
Select these scopes or all of them:

-
Then click Authorization option on the left and click Add button:

-
Enter your own Callback URL (Redirect URL) or simply enter
https://zappysys.com/oauth, if you don't have one:
-
Then hit Settings option and copy Client ID and Secret into your favorite text editor (we will need them in the next step):

-
Now go to SSIS package or ODBC data source and in OAuth authentication set these parameters:
- For ClientId parameter use Client ID value from the previous steps.
- For ClientSecret parameter use Secret value from the previous steps.
- For Scope parameter use the Scopes you set previously (specify them all here):
- offline_access (a must)
- read:jira-user
- read:jira-work
- write:jira-work
- manage:jira-project
- manage:jira-configuration
NOTE: A full list of available scopes is available in Atlassian documentation. -
For Subdomain parameter use your Atlassian subdomain value
(e.g.
mycompany, if full host name ismycompany.atlassian.net).
- Click Generate Token to generate tokens.
- Finally, select Organization Id from the drop down.
- That's it! You can now use Jira Connector!
API Connection Manager configuration
Just perform these simple steps to finish authentication configuration:
-
Set Authentication Type to
OAuth (**Must change API Base URL to V3 OAuth**) [OAuth] - Optional step. Modify API Base URL if needed (in most cases default will work).
- Fill in all the required parameters and set optional parameters if needed.
- Press Generate Token button to generate the tokens.
- Finally, hit OK button:
JiraDSNJiraOAuth (**Must change API Base URL to V3 OAuth**) [OAuth]https://[$Subdomain$].atlassian.net/rest/api/3Required Parameters ClientId Fill-in the parameter... ClientSecret Fill-in the parameter... Scope Fill-in the parameter... ReturnUrl Fill-in the parameter... Organization Id (Select after clicking [Generate Token]) Fill-in the parameter... Optional Parameters Custom Columns for output (Select after clicking [Generate Token]) RetryMode RetryWhenStatusCodeMatch RetryStatusCodeList 429 RetryCountMax 5 RetryMultiplyWaitTime True  Find full details in the Jira Connector authentication reference.
 -
Once the data source connection has been configured, it's time to configure the SQL query. Select the Preview tab and then click Query Builder button to configure the SQL query:
ZappySys API Driver - JiraRead and write Jira data effortlessly. Track, manage, and automate issues, projects, worklogs, and comments — almost no coding required.JiraDSN
-
Start by selecting the Table or Endpoint you are interested in and then configure the parameters. This will generate a query that we will use in ODBC to retrieve data from Jira. Hit OK button to use this query in the next step.
SELECT * FROM Issues

--//Query single issue by numeric Issue Id
--SELECT * FROM Issues Where Id=101234

--//Query issue by numeric Issue Ids (multiple)
--SELECT * FROM Issues WITH(SearchBy='Key', Key='101234,101235,101236')

--//Query issue by Issue Key(s) (alpha-numeric)
--SELECT * FROM Issues WITH(SearchBy='Key', Key='PROJ-11')
--SELECT * FROM Issues WITH(SearchBy='Key', Key='PROJ-11,PROJ-12,PROJ-13')

--//Query issue by project(s)
--SELECT * FROM Issues WITH(SearchBy='Project', Project='PROJ')
--SELECT * FROM Issues WITH(SearchBy='Project', Project='PROJ,KAN,CS')

--//Query issue by JQL expression
--SELECT * FROM Issues WITH(SearchBy='Jql', Jql='status IN (Done, Closed) AND created > -5d' )
Some parameters configured in this window will be passed to the Jira API, e.g. filtering parameters. It means that filtering will be done on the server side (instead of the client side), enabling you to get only the meaningful data
much faster . -
Now hit Preview Data button to preview the data using the generated SQL query. If you are satisfied with the result, use this query in ODBC:
ZappySys API Driver - JiraRead and write Jira data effortlessly. Track, manage, and automate issues, projects, worklogs, and comments — almost no coding required.JiraDSNSELECT * FROM Issues --//Query single issue by numeric Issue Id --SELECT * FROM Issues Where Id=101234 --//Query issue by numeric Issue Ids (multiple) --SELECT * FROM Issues WITH(SearchBy='Key', Key='101234,101235,101236') --//Query issue by Issue Key(s) (alpha-numeric) --SELECT * FROM Issues WITH(SearchBy='Key', Key='PROJ-11') --SELECT * FROM Issues WITH(SearchBy='Key', Key='PROJ-11,PROJ-12,PROJ-13') --//Query issue by project(s) --SELECT * FROM Issues WITH(SearchBy='Project', Project='PROJ') --SELECT * FROM Issues WITH(SearchBy='Project', Project='PROJ,KAN,CS') --//Query issue by JQL expression --SELECT * FROM Issues WITH(SearchBy='Jql', Jql='status IN (Done, Closed) AND created > -5d' ) You can also access data quickly from the tables dropdown by selecting <Select table>.A
WHEREclause,LIMITkeyword will be performed on the client side, meaning that thewhole result set will be retrieved from the Jira API first, and only then the filtering will be applied to the data. If possible, it is recommended to use parameters in Query Builder to filter the data on the server side (in Jira servers). -
Click OK to finish creating the data source.
Connect Jira to ODBC application
To read or write Jira data in your ODBC application, just use these steps:
-
Open your ODBC client application and use
JiraDSNto connect to Jira. -
Use a SQL query to read or write data to Jira in your client application, e.g.:
SELECT * FROM Issues

--//Query single issue by numeric Issue Id
--SELECT * FROM Issues Where Id=101234

--//Query issue by numeric Issue Ids (multiple)
--SELECT * FROM Issues WITH(SearchBy='Key', Key='101234,101235,101236')

--//Query issue by Issue Key(s) (alpha-numeric)
--SELECT * FROM Issues WITH(SearchBy='Key', Key='PROJ-11')
--SELECT * FROM Issues WITH(SearchBy='Key', Key='PROJ-11,PROJ-12,PROJ-13')

--//Query issue by project(s)
--SELECT * FROM Issues WITH(SearchBy='Project', Project='PROJ')
--SELECT * FROM Issues WITH(SearchBy='Project', Project='PROJ,KAN,CS')

--//Query issue by JQL expression
--SELECT * FROM Issues WITH(SearchBy='Jql', Jql='status IN (Done, Closed) AND created > -5d' )
Optional: Centralized data access via ZappySys Data Gateway
In some situations, you may need to provide Jira data access to multiple users or services. Configuring the data source on a Data Gateway creates a single, centralized connection point for this purpose.
This configuration provides two primary advantages:
-
Centralized data access
The data source is configured once on the gateway, eliminating the need to set it up individually on each user's machine or application. This significantly simplifies the management process.
-
Centralized access control
Since all connections route through the gateway, access can be governed or revoked from a single location for all users.
| Data Gateway |
Local ODBC
data source
|
|
|---|---|---|
| Simple configuration | ||
| Installation | Single machine | Per machine |
| Connectivity | Local and remote | Local only |
| Connections limit | Limited by License | Unlimited |
| Central data access | ||
| Central access control | ||
| More flexible cost |
To achieve this, you must first create a data source in the Data Gateway (server-side) and then create an ODBC data source in ODBC (client-side) to connect to it.
Let's not wait and get going!
Create Jira data source in the gateway
In this section we will create a data source for Jira in the Data Gateway. Let's follow these steps to accomplish that:
-
Search for
gatewayin the Windows Start Menu and open ZappySys Data Gateway Configuration:
-
Go to the Users tab and follow these steps to add a Data Gateway user:
- Click the Add button
-
In the Login field enter a username, e.g.,
john - Then enter a Password
- Check the Is Administrator checkbox
- Click OK to save

-
Now we are ready to add a data source:
- Click the Add button
- Give the Data source a name (have it handy for later)
- Then select Native - ZappySys API Driver
- Finally, click OK
JiraDSNZappySys API Driver
-
When the ZappySys API Driver configuration window opens, go back to ODBC Data Source Administrator where you already have the Jira ODBC data source created and configured, and follow these steps on how to Import data source configuration into the Gateway:
-
Open ODBC data source configuration and click Copy settings:
 ZappySys API Driver - JiraRead and write Jira data effortlessly. Track, manage, and automate issues, projects, worklogs, and comments — almost no coding required.JiraDSN
-
The window opens, telling us the connection string was successfully copied to the clipboard:

-
Then go to Data Gateway configuration and in data source configuration window click Load settings:
JiraDSN
ZappySys API Driver - Configuration [Version: 2.0.1.10418]ZappySys API Driver - JiraRead and write Jira data effortlessly. Track, manage, and automate issues, projects, worklogs, and comments — almost no coding required.JiraDSN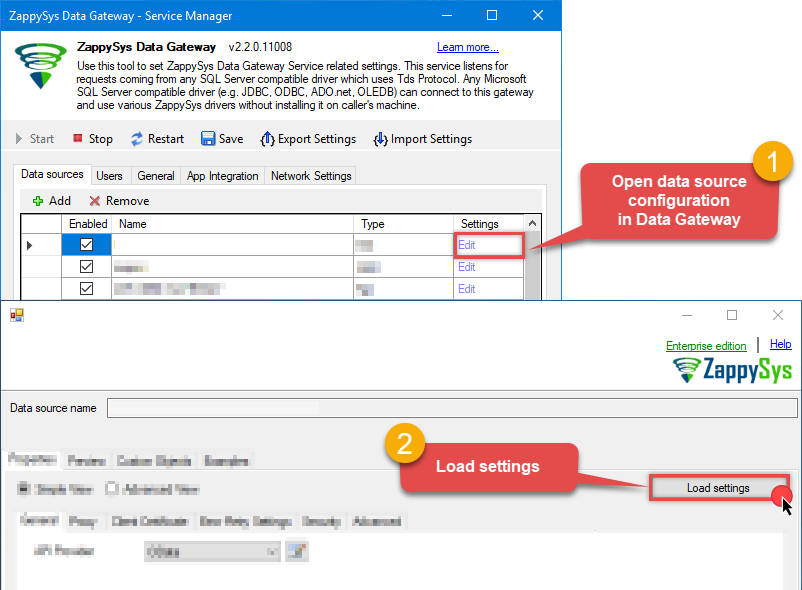
-
Once a window opens, just paste the settings by pressing
CTRL+Vor by clicking right mouse button and then Paste option.
-
Open ODBC data source configuration and click Copy settings:
-
Once done, go to the Network Settings tab and Add a firewall rule for inbound traffic:
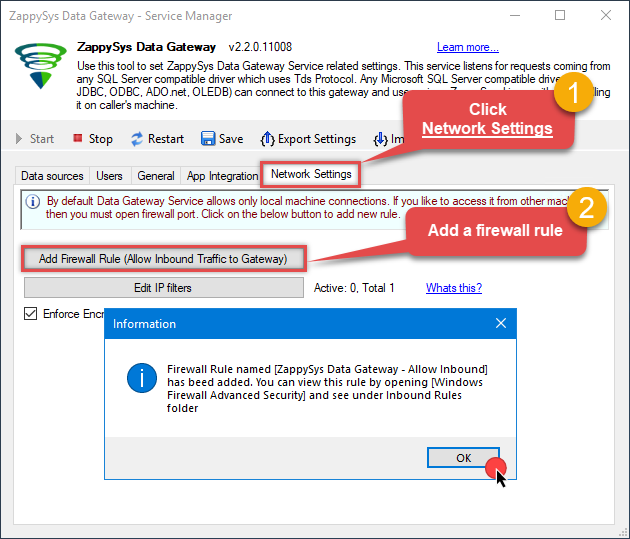
- This will initially allow all inbound traffic.
- Click Edit IP filters to restrict access to specific IP addresses or ranges.
-
Crucial Step: After creating or modifying the data source, you must:
- Click the Save button to persist your changes.
- Hit Yes when prompted to restart the Data Gateway service.
This ensures all changes are properly applied:
 Skipping this step may cause the new settings to fail, preventing you from connecting to the data source.
Create ODBC data source to connect to the gateway
In this part we will create an ODBC data source to connect to the ZappySys Data Gateway from ODBC. To achieve that, let's perform these steps:
-
Search for
odbcand open the ODBC Data Sources (64-bit):
-
Create a User data source (User DSN) based on the ODBC Driver 17 for SQL Server driver:
ODBC Driver 17 for SQL Server
If you don't see the ODBC Driver 17 for SQL Server driver in the list, choose a similar version. -
Then set a Name for the data source (e.g.
Gateway) and the address of the Data Gateway:ZappySysGatewayDSNlocalhost,5000 Make sure you separate the hostname and port with a comma, e.g.
localhost,5000. -
Proceed with the authentication part:
- Select SQL Server authentication
-
In the Login ID field enter the user name you created in the Data Gateway, e.g.,
john - Set Password to the one you configured in the Data Gateway

-
Then set the default database property to
JiraDSN(the one we used in the Data Gateway):JiraDSNJiraDSN Make sure to type the data source name manually or copy/paste it directly into the field. Using the dropdown might fail because the Trust server certificate option is not enabled yet (next step).
 -
Continue by checking the Trust server certificate option:

-
Once you do that, test the connection:

-
If the connection is successful, everything is good:

-
Done!
We are ready to move to the final step. Let's do it!
Access data in ODBC via the gateway
Finally, we are ready to read data from Jira in ODBC via the Data Gateway. Follow these final steps:
-
Go back to ODBC.
-
Open your ODBC client application and use
ZappySysGatewayDSNto connect to Jira. -
Read the data the same way we discussed at the beginning of this article.
-
That's it!
Now you can connect to Jira data in ODBC via the ZappySys Data Gateway.
john and your password.
Explore supported Jira Connector actions
Got a specific use case in mind? We've mapped out exactly how to perform a variety of essential Jira operations directly in ODBC, so you don't have to figure out the setup from scratch. Check out the step-by-step guides below:
- Create Issue Comment
- Create Issues
- Create Project
- Create User
- Create Worklog
- Delete Issue
- Delete Issue Comment
- Delete Project
- Delete User
- Delete Worklog
- Get custom field context options
- Get custom field contexts
- Read Application Roles
- Read Changelog Details
- Read Changelogs
- Read Changelogs by IDs
- Read Comments
- Read Custom Fields
- Read Fields
- Read Groups
- Read Issue (By Id)
- Read Issue Types
- Read Issues
- Read Projects
- Read Resources
- Read Users
- Read Worklogs
- Read Worklogs modified after a specified date
- Update Issue
- Update Issue Comment
- Update Worklog
- Upsert Project
- Make Generic REST API Request
- Make Generic REST API Request (Bulk Write)
Conclusion
In this article we showed you how to connect to Jira in ODBC and integrate data without writing complex code — all of this was powered by Jira ODBC Driver.
Download ODBC PowerPack now or ping us via chat if you have any questions or are looking for a specific feature (you can also reach out to us by submitting a ticket):


 Connector")


 Connector")


 Connector")


 Connector")


