Jira Connector for SQL Server
Jira connector can be used to read, write, delete Issues, Users, Worklogs, Comments, Projects, Custom fileds and many other details
In this article you will learn how to quickly and efficiently integrate Jira data in SQL Server without coding. We will use high-performance Jira Connector to easily connect to Jira and then access the data inside SQL Server.
Let's follow the steps below to see how we can accomplish that!
Jira Connector for SQL Server is based on ZappySys API Driver which is part of ODBC PowerPack. It is a collection of high-performance ODBC drivers that enable you to integrate data in SQL Server, SSIS, a programming language, or any other ODBC-compatible application. ODBC PowerPack supports various file formats, sources and destinations, including REST/SOAP API, SFTP/FTP, storage services, and plain files, to mention a few.
Video Tutorial - Integrate Jira data in SQL Server
This video covers the following topics and more, so please watch carefully. After watching the video, follow the steps outlined in this article:
- How to download and install the required PowerPack for Jira integration in SQL Server
- How to configure the connection for Jira
- Features of the ZappySys API Driver (Authentication / Query Language / Examples / Driver UI)
- How to use the Jira in SQL Server
Create Data Source in Data Gateway based on ZappySys API Driver
In this section we will create a data source for Jira in Data Gateway. Let's follow these steps to accomplish that:
-
Download and install ODBC PowerPack.
-
Search for
gatewayin Windows Start Menu and open ZappySys Data Gateway Configuration: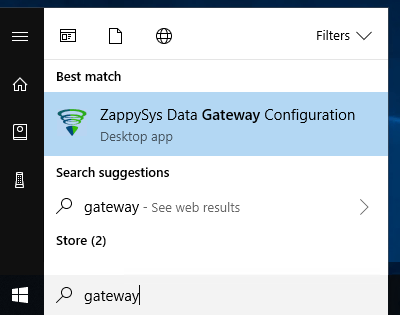
-
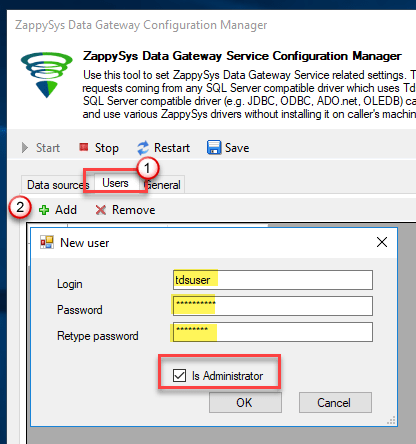
Go to Users tab and follow these steps to add a Data Gateway user:
- Click Add button
-
In Login field enter username, e.g.,
john - Then enter a Password
- Check Is Administrator checkbox
- Click OK to save
-
Now we are ready to add a data source:
- Click Add button
- Give Datasource a name (have it handy for later)
- Then select Native - ZappySys API Driver
- Finally, click OK
JiraDSNZappySys API Driver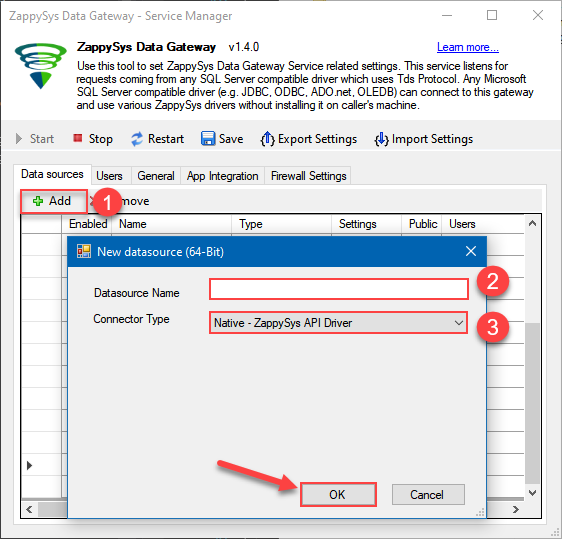
-
When the Configuration window appears give your data source a name if you haven't done that already, then select "Jira" from the list of Popular Connectors. If "Jira" is not present in the list, then click "Search Online" and download it. Then set the path to the location where you downloaded it. Finally, click Continue >> to proceed with configuring the DSN:
JiraDSNJira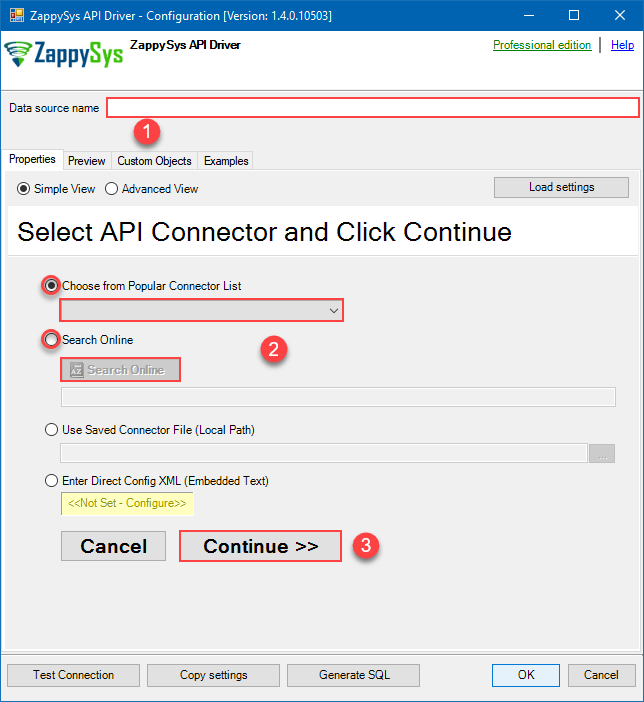
-
Now it's time to configure the Connection Manager. Select Authentication Type, e.g. Token Authentication. Then select API Base URL (in most cases, the default one is the right one). More info is available in the Authentication section.
Jira authentication
Firstly, login into your Atlassian account and then go to your Jira profile:- Go to Profile > Security.
- Click Create and manage API tokens.
- Then click Create API token button and give your token a label.
- When window appears with new API token, copy and use it in this connection manager.
- That's it!
API Connection Manager configuration
Just perform these simple steps to finish authentication configuration:
-
Set Authentication Type to
API Key based Authentication [Http] - Optional step. Modify API Base URL if needed (in most cases default will work).
- Fill in all the required parameters and set optional parameters if needed.
- Finally, hit OK button:
JiraDSNJiraAPI Key based Authentication [Http]https://[$Subdomain$].atlassian.net/rest/api/3Required Parameters Subdomain Fill-in the parameter... Atlassian User Name (email) Fill-in the parameter... API Key Fill-in the parameter... Optional Parameters CustomColumnsRegex 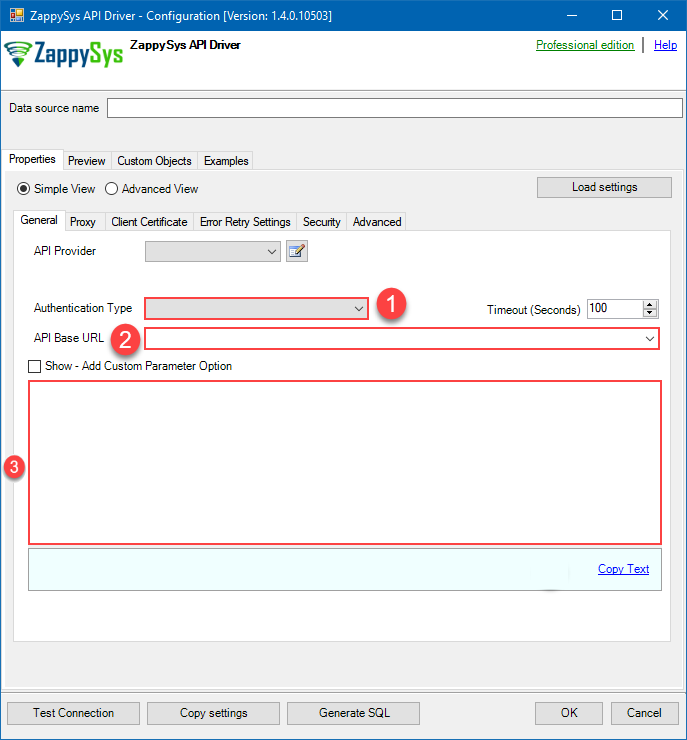
Jira authentication
Follow official Atlassian instructions on how to create a PAT (Personal Access Token) for JIRAAPI Connection Manager configuration
Just perform these simple steps to finish authentication configuration:
-
Set Authentication Type to
Personal Access Token (PAT) Authentication [Http] - Optional step. Modify API Base URL if needed (in most cases default will work).
- Fill in all the required parameters and set optional parameters if needed.
- Finally, hit OK button:
JiraDSNJiraPersonal Access Token (PAT) Authentication [Http]https://[$Subdomain$].atlassian.net/rest/api/3Required Parameters Subdomain Fill-in the parameter... Token (PAT Bearer Token) Fill-in the parameter... Optional Parameters CustomColumnsRegex 
Jira authentication
OAuth App must be created in Atlassian Developer Console. It is found at https://developer.atlassian.com/console/myapps/ [API reference]
Firstly, login into your Atlassian account and then create Jira application:- Go to Atlassian Developer area.
-
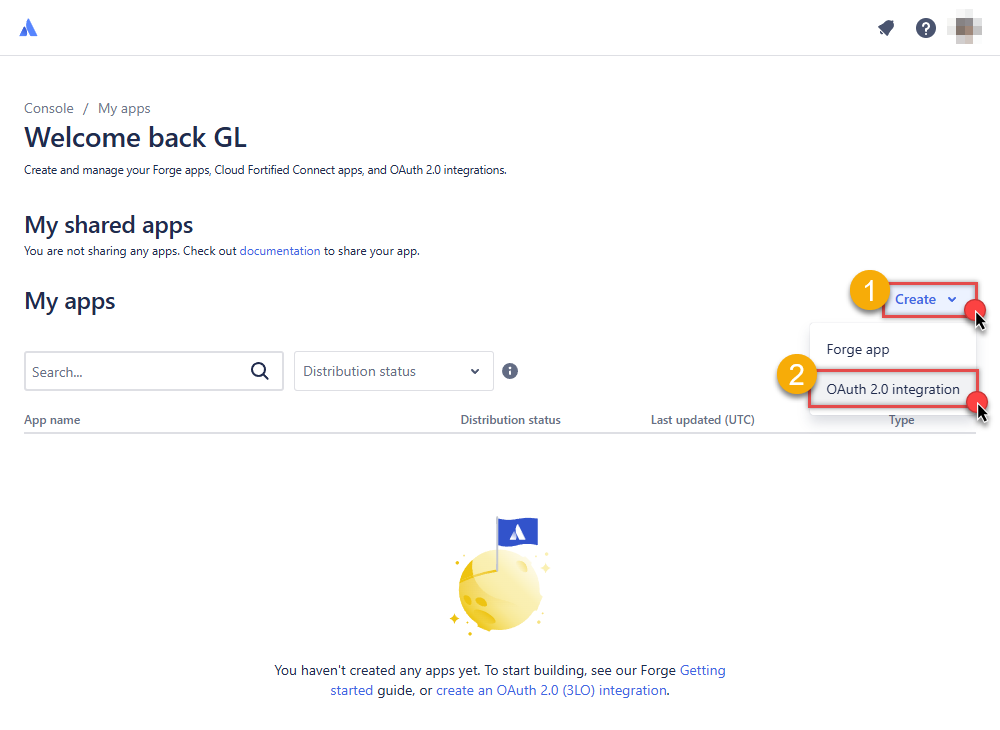
Click Create and select OAuth 2.0 integration item to create an OAuth app:
-
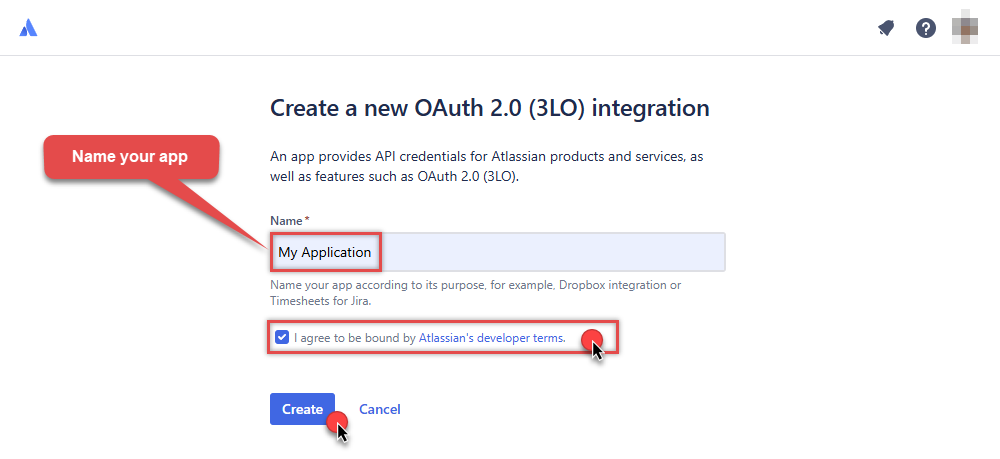
Give your app a name, accept the terms and hit Create:
-
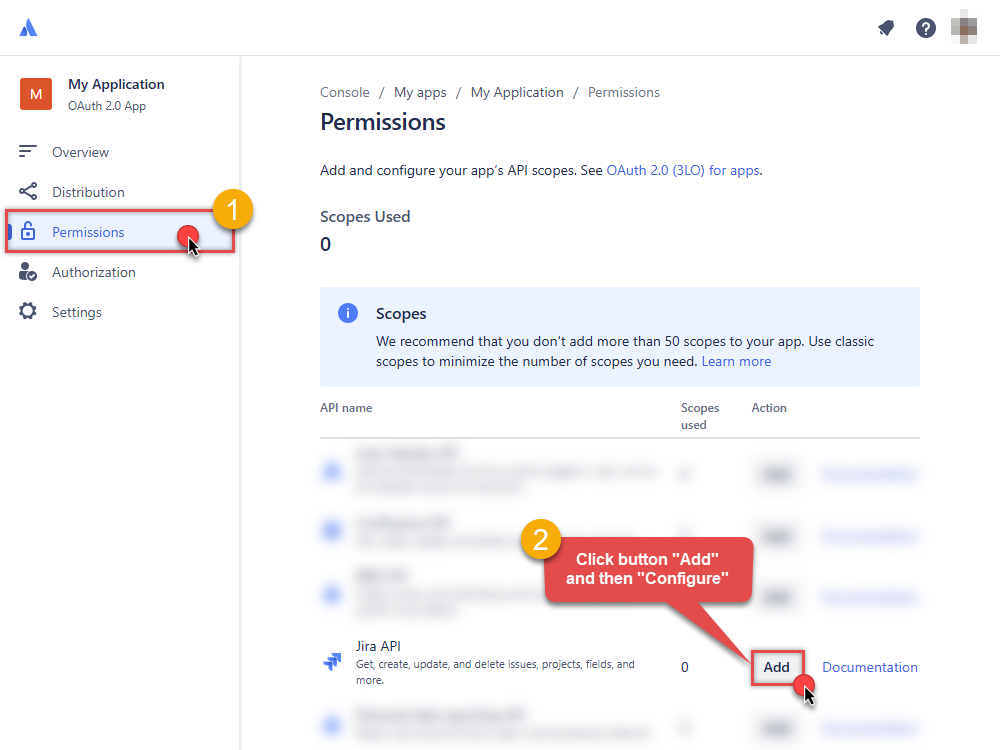
To enable permissions/scopes for your application, click Permissions tab, then hit Add button, and click Configure button, once it appears:
-
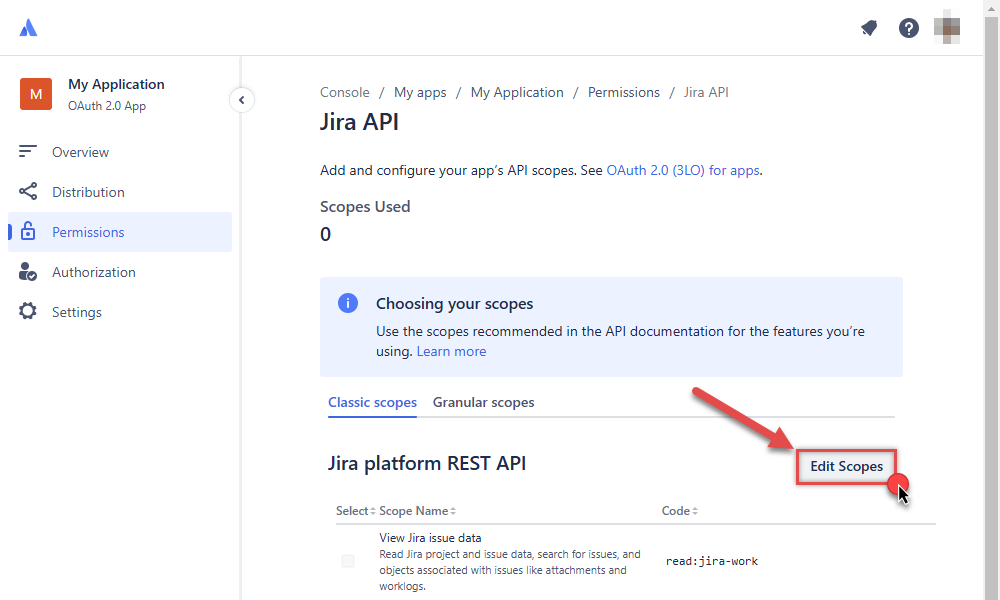
Continue by hitting Edit Scopes button to assign scopes for the application:
-
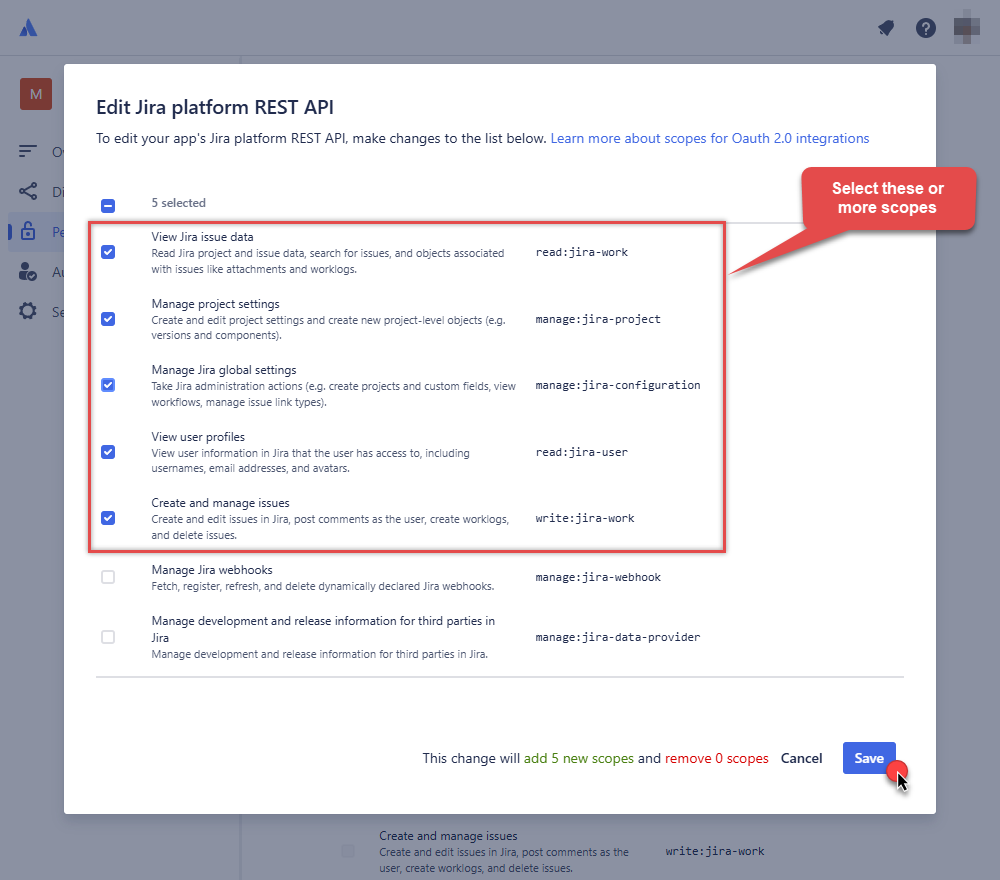
Select these scopes or all of them:
-
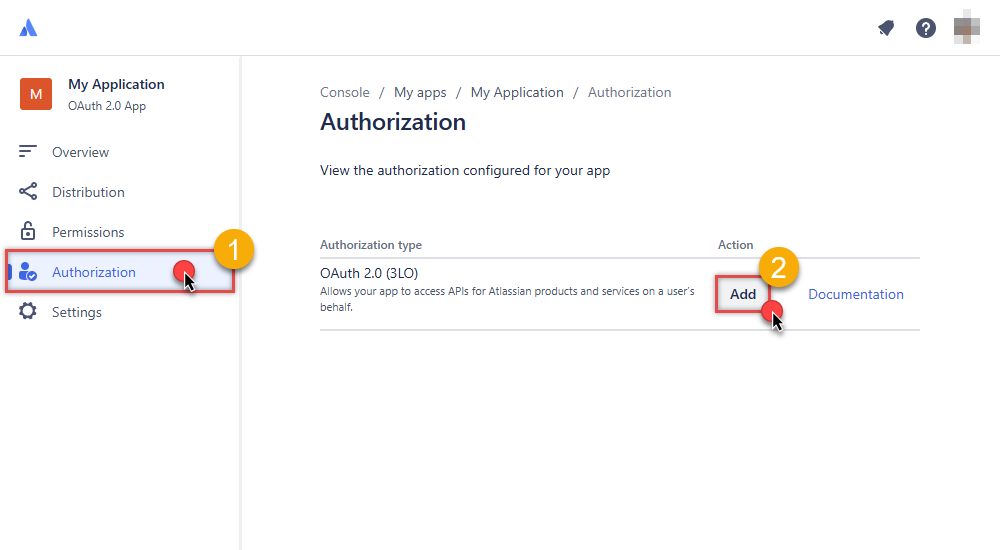
Then click Authorization option on the left and click Add button:
-
Enter your own Callback URL (Redirect URL) or simply enter
https://zappysys.com/oauth, if you don't have one: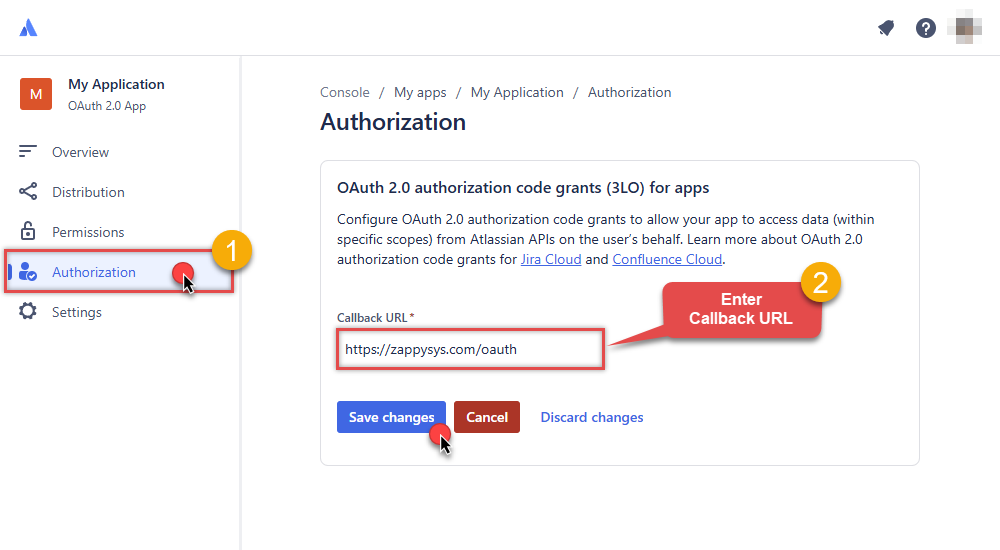
-
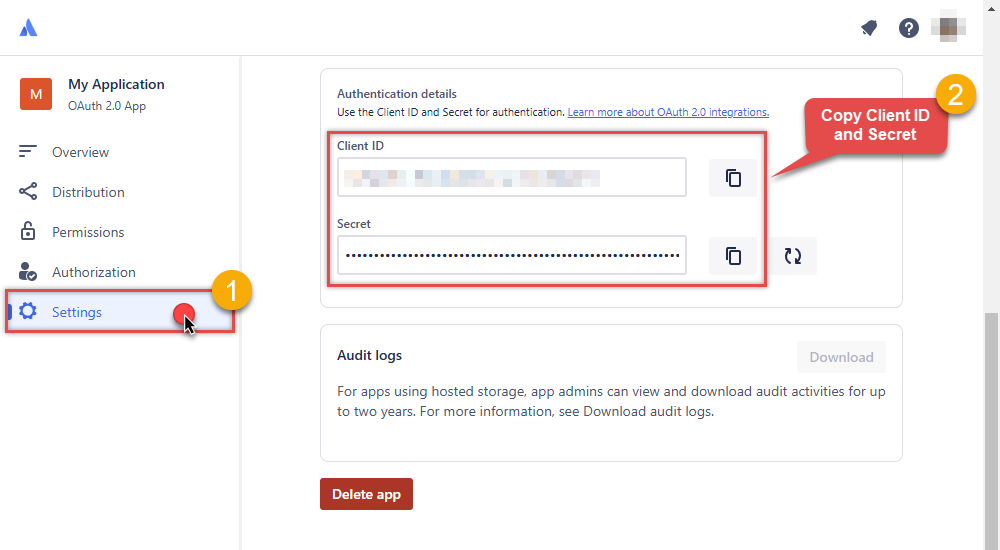
Then hit Settings option and copy Client ID and Secret into your favorite text editor (we will need them in the next step):
-
Now go to SSIS package or ODBC data source and in OAuth authentication set these parameters:
- For ClientId parameter use Client ID value from the previous steps.
- For ClientSecret parameter use Secret value from the previous steps.
- For Scope parameter use the Scopes you set previously (specify them all here):
- offline_access (a must)
- read:jira-user
- read:jira-work
- write:jira-work
- manage:jira-project
- manage:jira-configuration
NOTE: A full list of available scopes is available in Atlassian documentation. -
For Subdomain parameter use your Atlassian subdomain value
(e.g.
mycompany, if full host name ismycompany.atlassian.net).
- Click Generate Token to generate tokens.
- Finally, select Organization Id from the drop down.
- That's it! You can now use Jira Connector!
API Connection Manager configuration
Just perform these simple steps to finish authentication configuration:
-
Set Authentication Type to
OAuth (**Must change API Base URL to V3 OAuth**) [OAuth] - Optional step. Modify API Base URL if needed (in most cases default will work).
- Fill in all the required parameters and set optional parameters if needed.
- Press Generate Token button to generate the tokens.
- Finally, hit OK button:
JiraDSNJiraOAuth (**Must change API Base URL to V3 OAuth**) [OAuth]https://[$Subdomain$].atlassian.net/rest/api/3Required Parameters ClientId Fill-in the parameter... ClientSecret Fill-in the parameter... Scope Fill-in the parameter... ReturnUrl Fill-in the parameter... Organization Id (Select after clicking [Generate Token]) Fill-in the parameter... Optional Parameters Custom Columns for output (Select after clicking [Generate Token]) 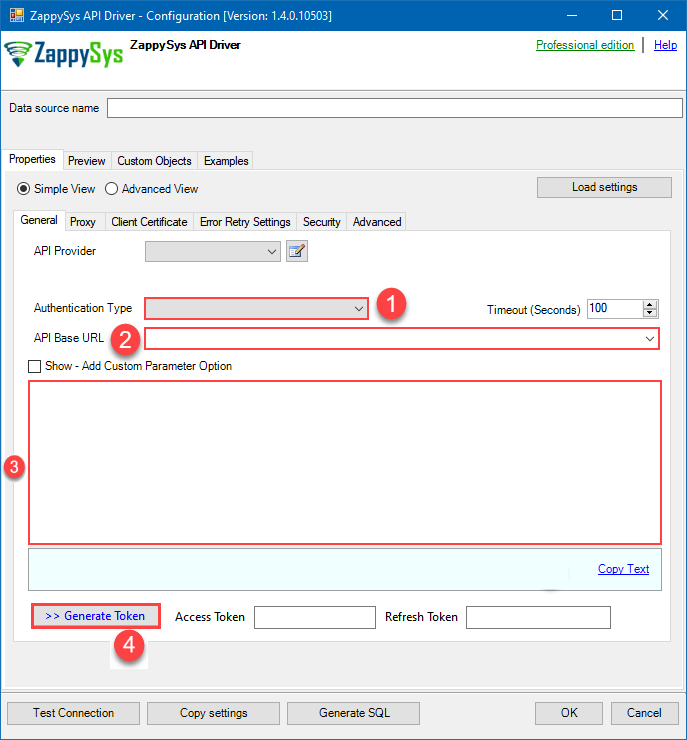
-
Once the data source connection has been configured, it's time to configure the SQL query. Select the Preview tab and then click Query Builder button to configure the SQL query:
ZappySys API Driver - JiraJira connector can be used to read, write, delete Issues, Users, Worklogs, Comments, Projects, Custom fileds and many other detailsJiraDSN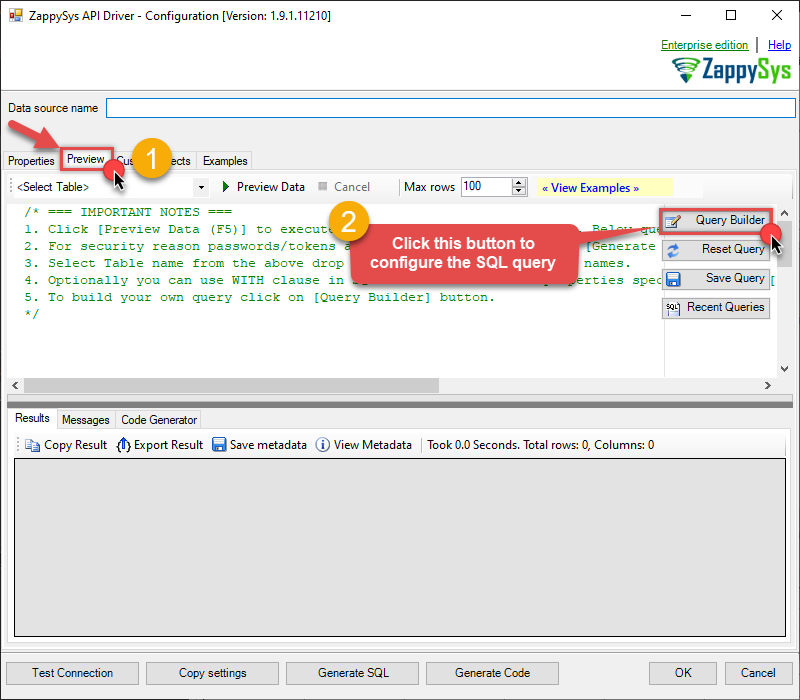
-
Start by selecting the Table or Endpoint you are interested in and then configure the parameters. This will generate a query that we will use in SQL Server to retrieve data from Jira. Hit OK button to use this query in the next step.
SELECT * FROM Issues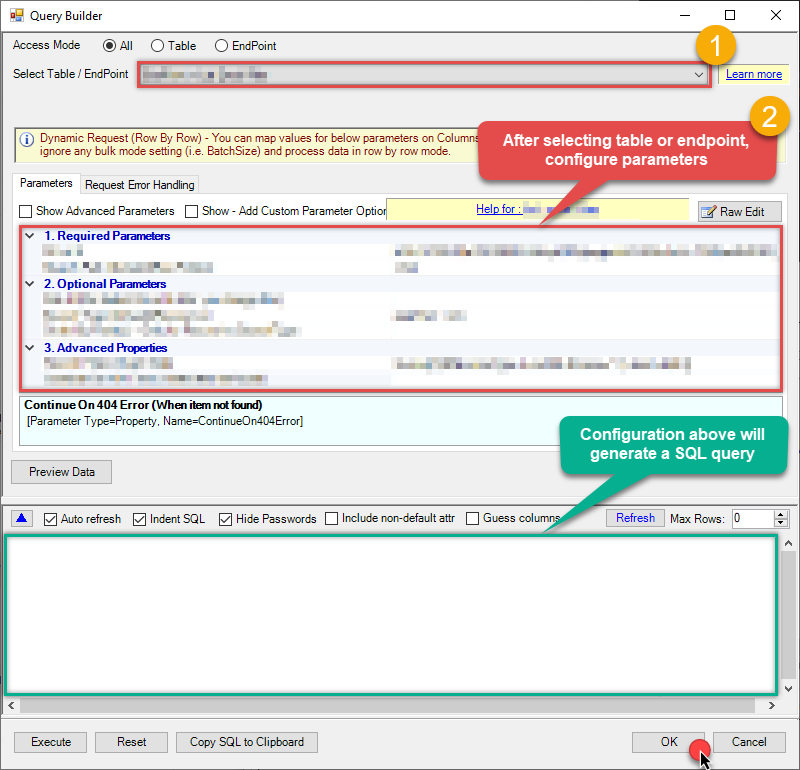 Some parameters configured in this window will be passed to the Jira API, e.g. filtering parameters. It means that filtering will be done on the server side (instead of the client side), enabling you to get only the meaningful data
much faster . -
Now hit Preview Data button to preview the data using the generated SQL query. If you are satisfied with the result, use this query in SQL Server:
ZappySys API Driver - JiraJira connector can be used to read, write, delete Issues, Users, Worklogs, Comments, Projects, Custom fileds and many other detailsJiraDSNSELECT * FROM Issues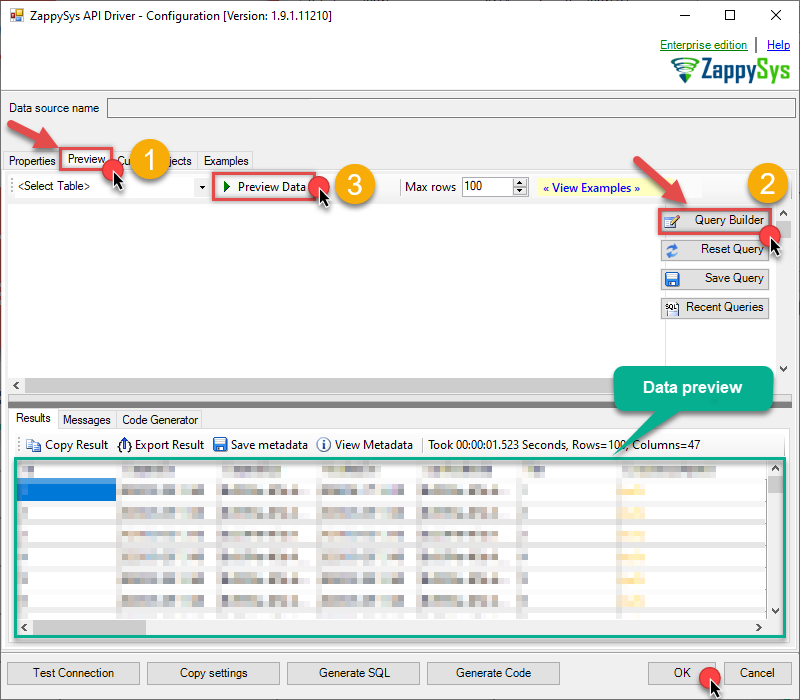 You can also access data quickly from the tables dropdown by selecting <Select table>.A
WHEREclause,LIMITkeyword will be performed on the client side, meaning that thewhole result set will be retrieved from the Jira API first, and only then the filtering will be applied to the data. If possible, it is recommended to use parameters in Query Builder to filter the data on the server side (in Jira servers). -
Click OK to finish creating the data source.
-
Very important step. Now, after creating or modifying the data source make sure you:
- Click the Save button to persist your changes.
- Hit Yes, once asked if you want to restart the Data Gateway service.
This will ensure all changes are properly applied:
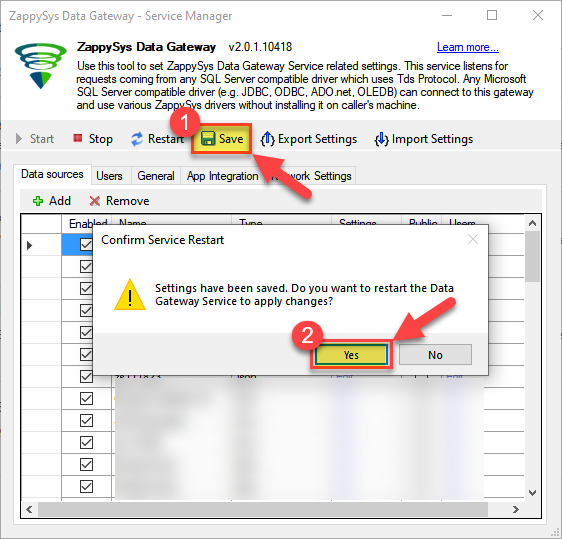 Skipping this step may result in the new settings not taking effect and, therefore you will not be able to connect to the data source.
Read data in SQL Server via Data Gateway
After configuring your data source using the ZappySys ODBC Driver, the next mandatory step to read that data in SQL Server is to create a Linked Server. SQL Server requires a Linked Server definition to access any ODBC-based source through the ZappySys Data Gateway, allowing the source driver data to be queried using standard T-SQL.
There are two ways to create the Linked Server:- Method 1: Using a SQL Script automatically generated by the Data Gateway
- Method 2: Using SQL Server UI (SSMS) to manually configure the Linked Server
Method 1: Using a SQL Script automatically generated by the Data Gateway
The fastest and most reliable way to create the Linked Server is to use the SQL Script generated by the Data Gateway. This ensures all settings are applied correctly with minimal manual steps.
In the Data Gateway, open the App Integration tab.
Update the prefilled Linked Server Name if you want to use a custom name.
Select the JiraDSN data source which we created earlier as the Database.
-
Choose the correct SQL Server version for your environment.
- SQL 2019 or Lower (
@provider='SQLNCLI11') - SQL 2022 or Higher (
@provider='MSOLEDBSQL')
- SQL 2019 or Lower (
Click Generate Code.
-
In the generated script scroll down to 4. Attach Gateway login with linked server step, enter your Data Gateway admin username and password.
'LS_TO_JIRA_IN_GATEWAY'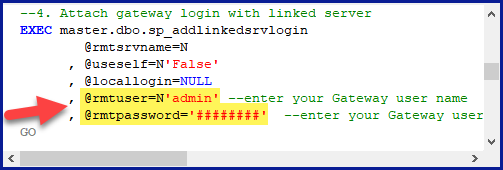
-
Press Ctrl + A and Ctrl + C to copy the entire script.
LS_TO_JIRA_IN_GATEWAYJiraDSN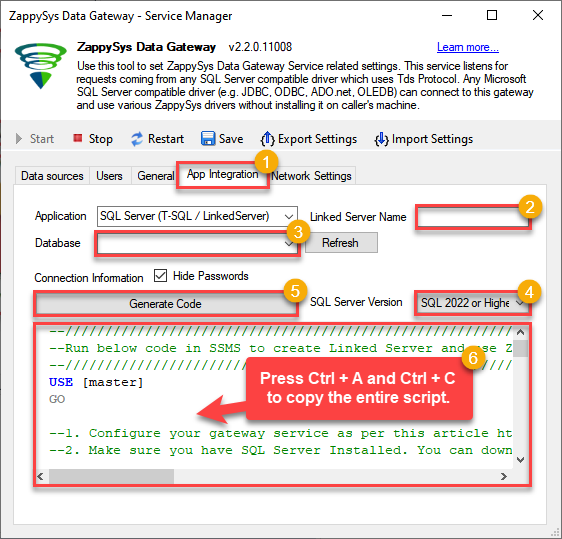
-
Paste the script into SQL Server Management Studio (SSMS) and run it.
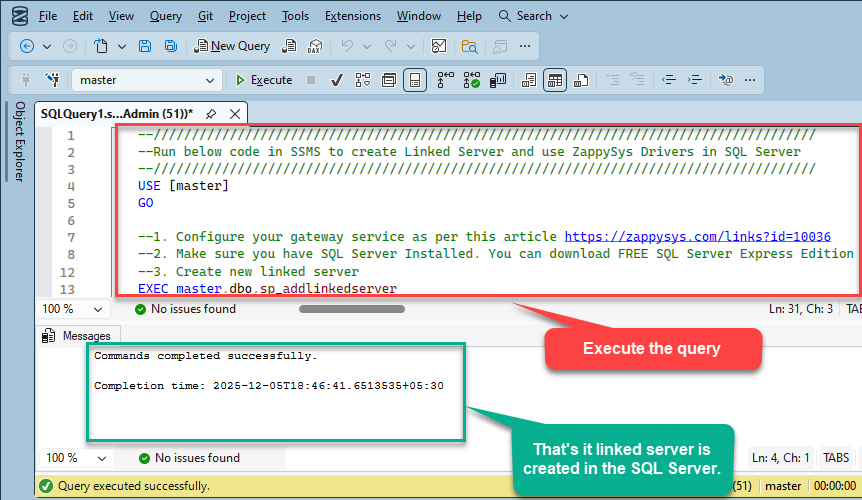
That's it linked server is created in the SQL Server.
-
Finally, open a new query and execute a query we saved in one of the previous steps:
SELECT * FROM OPENQUERY([LS_TO_JIRA_IN_GATEWAY], 'SELECT * FROM Issues')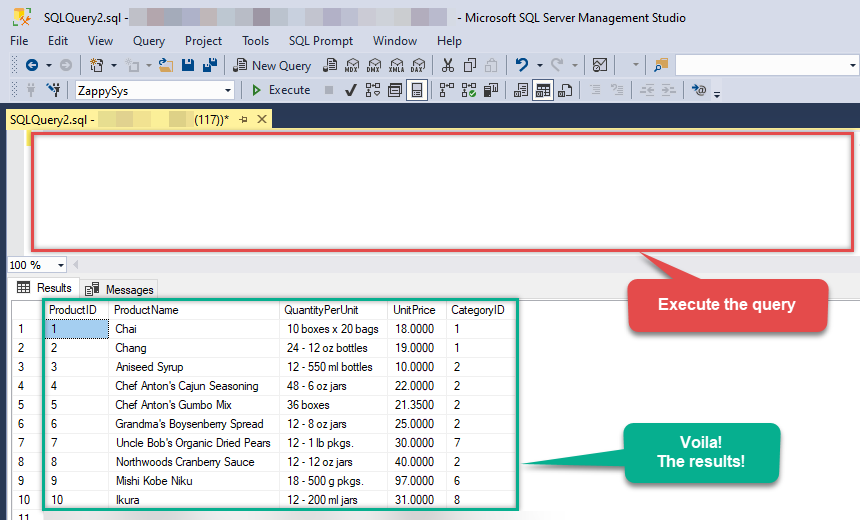
SELECT * FROM OPENQUERY([LS_TO_JIRA_IN_GATEWAY], 'SELECT * FROM Issues')
Sample SQL Script for Creating a Linked Server in SQL Server
USE [master]
GO
--///////////////////////////////////////////////////////////////////////////////////////
--Run below code in SSMS to create Linked Server and use ZappySys Drivers in SQL Server
--///////////////////////////////////////////////////////////////////////////////////////

-- Replace YOUR_GATEWAY_USER, YOUR_GATEWAY_PASSWORD
-- Replace localhost with IP/Machine name if ZappySys Gateway Running on different machine other than SQL Server
-- Replace Port 5000 if you configured gateway on a different port


--1. Configure your gateway service as per this article https://zappysys.com/links?id=10036

--2. Make sure you have SQL Server Installed. You can download FREE SQL Server Express Edition from here if you dont want to buy Paid version https://www.microsoft.com/en-us/sql-server/sql-server-editions-express

--Uncomment below if you like to drop linked server if it already exists
--EXEC master.dbo.sp_dropserver @server=N'LS_TO_JIRA_IN_GATEWAY', @droplogins='droplogins'

--3. Create new linked server

EXEC master.dbo.sp_addlinkedserver
    @server = N'LS_TO_JIRA_IN_GATEWAY'  --Linked server name (this will be used in OPENQUERY sql
, @srvproduct=N''
---- For MSSQL 2012, 2014, 2016, 2017, and 2019 use below (SQL Server Native Client 11.0)---
, @provider=N'SQLNCLI11'
---- For MSSQL 2022 or higher use below (Microsoft OLE DB Driver for SQL Server)---
--, @provider=N'MSOLEDBSQL'
, @datasrc=N'localhost,5000' --//Machine / Port where Gateway service is running
, @provstr=N'Network Library=DBMSSOCN;'
, @catalog=N'JiraDSN' --Data source name you gave on Gateway service settings

--4. Attach gateway login with linked server

EXEC master.dbo.sp_addlinkedsrvlogin
@rmtsrvname=N'LS_TO_JIRA_IN_GATEWAY'  --linked server name
, @useself=N'False'
, @locallogin=NULL
, @rmtuser=N'YOUR_GATEWAY_USER' --enter your Gateway user name
, @rmtpassword='YOUR_GATEWAY_PASSWORD'  --enter your Gateway user's password
GO

--5. Enable RPC OUT (This is Optional - Only needed if you plan to use EXEC(...) AT YourLinkedServerName rather than OPENQUERY
EXEC sp_serveroption 'LS_TO_JIRA_IN_GATEWAY', 'rpc', true;
EXEC sp_serveroption 'LS_TO_JIRA_IN_GATEWAY', 'rpc out', true;

--Disable MSDTC - Below needed to support INSERT INTO from EXEC AT statement
EXEC sp_serveroption 'LS_TO_JIRA_IN_GATEWAY', 'remote proc transaction promotion', false;

--Increase query timeout if query is going to take longer than 10 mins (Default timeout is 600 seconds)
--EXEC sp_serveroption 'LS_TO_JIRA_IN_GATEWAY', 'query timeout', 1200;
GO
Method 2: Using SQL Server UI (SSMS) to manually configure the Linked Server
You can also create the Linked Server manually through SSMS if you prefer a visual setup. This method lets you configure the provider, data source, and security interactively.
-
First, let's open SQL Server Management Studio, create a new Linked Server, and start configuring it:
LS_TO_JIRA_IN_GATEWAYMicrosoft OLE DB Driver for SQL Serverlocalhost,5000JiraDSNJiraDSN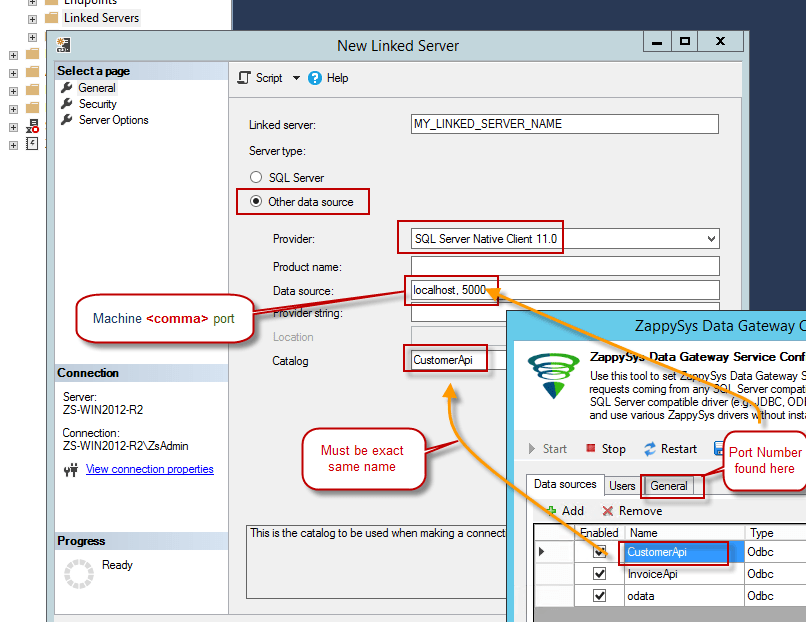
- For SQL Server 2012, 2014, 2016, 2017, and 2019, choose SQL Server Native Client 11.0 as the provider.
- For SQL Server 2022 or higher, choose Microsoft OLE DB Driver for SQL Server as the provider.
-
Then click on Security option and configure username we created in ZappySys Data Gateway in one of the previous steps, e.g.
john: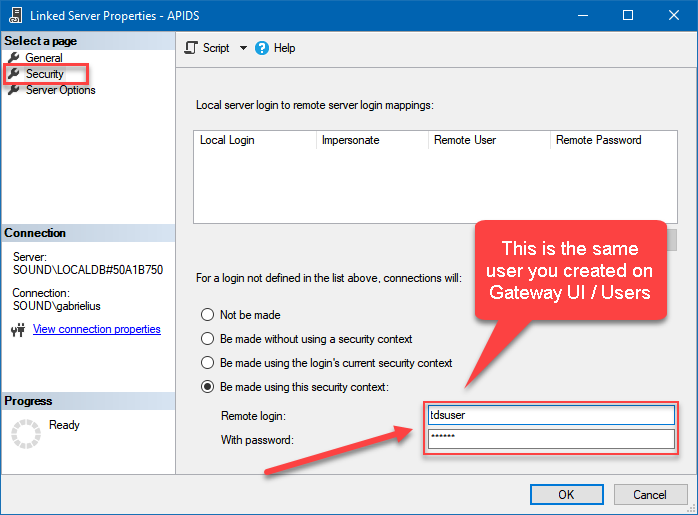
-
Optional step. Under the Server Options, Enable RPC and RPC Out and Disable Promotion of Distributed Transactions(MSDTC).
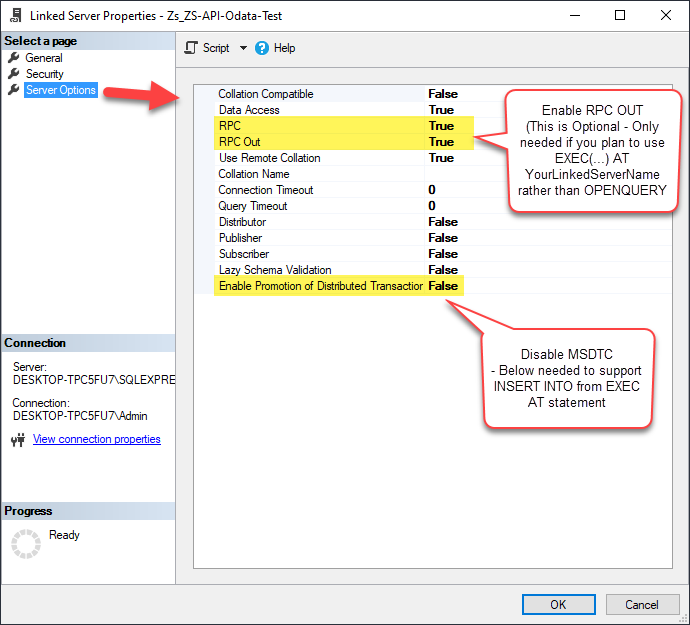
You need to enable RPC Out if you plan to use
EXEC(...) AT [LS_TO_JIRA_IN_GATEWAY]rather than OPENQUERY.
If don't enabled it, you will encounter theServer 'LS_TO_JIRA_IN_GATEWAY' is not configured for RPCerror.Query Example:
DECLARE @MyQuery NVARCHAR(MAX) = 'SELECT * FROM Issues';

EXEC (@MyQuery) AT [LS_TO_JIRA_IN_GATEWAY];
If you plan to use
'INSERT INTO <TABLE> EXEC(...) AT [LS_TO_JIRA_IN_GATEWAY]'in that case you need to Disable Promotion of Distributed Transactions(MSDTC).
If don't disabled it, you will encounter theThe operation could not be performed because OLE DB provider "SQLNCLI11" for linked server "MY_LINKED_SERVER_NAME" was unable to begin a distributed transaction.error.Query Example:
INSERT INTO dbo.Products DECLARE @MyQuery NVARCHAR(MAX) = 'SELECT * FROM Issues'; EXEC (@MyQuery) AT [LS_TO_JIRA_IN_GATEWAY]; -
Finally, open a new query and execute a query we saved in one of the previous steps:
SELECT * FROM OPENQUERY([LS_TO_JIRA_IN_GATEWAY], 'SELECT * FROM Issues')
SELECT * FROM OPENQUERY([LS_TO_JIRA_IN_GATEWAY], 'SELECT * FROM Issues')
Firewall settings
So far we have assumed that Gateway is running on the same machine as SQL Server. However there will be a case when ZappySys ODBC PowerPack is installed on a different machine than SQL Server. In such case you may have to perform additional Firewall configurations. On most computers firewall settings wont allow outside traffic to ZappySys Data Gateway. In such case perform following steps to allow other machines to connect to Gateway.
Method-1 (Preferred)If you are using newer version of ZappySys Data Gateway then adding firewall rule is just a single click.
- Search for gateway in start menu and open ZappySys Data Gateway.
-
Go to Firewall Tab and click Add Firewall Rule button like below. This will create Firewall rule to all Inbound Traffic on Port 5000 (Unless you changed it).
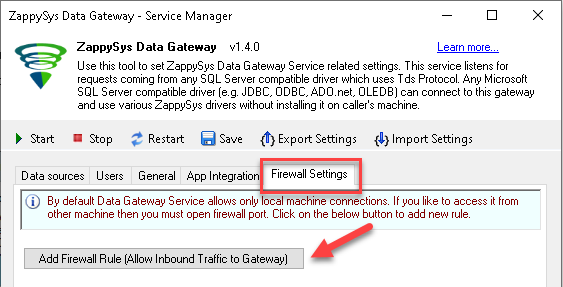
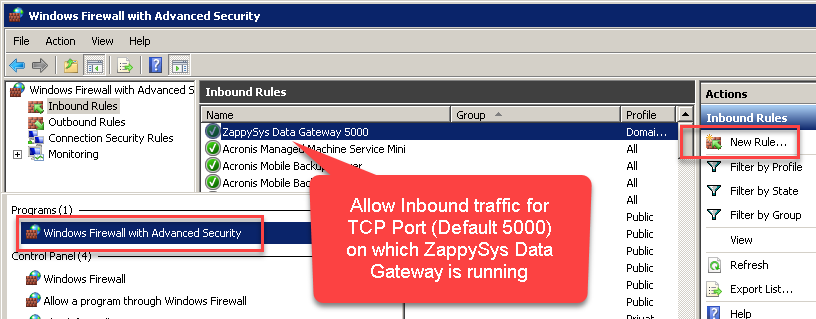
Here is another way to add / edit Inbound Traffic rule in windows firewall. Use below method if you choose to customize your rule (for advanced users).
- Search for Windows Firewall Advanced Security in start menu.
- Under Inbound Rules > Right click and click [New Rule] >> Click Next
- Select Port on Rule Type >> Click Next
- Click on TCP and enter port number under specified local port as 5000 (use different one if you changed Default port) >> Click Next
- Select Profile (i.e. Private, Public) >> Click Next
- Enter Rule name [i.e. ZappySys Data Gateway – Allow Inbound ] >> Click Next
- Click OK to save the rule
OPENQUERY vs EXEC (handling larger SQL text)
So far we have seen examples of using OPENQUERY. It allows us to send pass-through query at remote server. The biggest limitation of OPENQUERY is it doesn't allow you to use variables inside SQL so often we have to use unpleasant looking dynamic SQL (Lots of tick, tick …. and escape hell). Well there is good news. With SQL 2005 and later you can use EXEC(your_sql) AT your_linked_server syntax .
Disadvantage of EXEC AT is you cannot do SELECT INTO like OPENQUERY. Also you cannot perform JOIN like below in EXEC AT
SELECT a.*
FROM OPENQUERY([LS_TO_JIRA_IN_GATEWAY],'SELECT * FROM Customers') AS A
JOIN OPENQUERY([LS_TO_JIRA_IN_GATEWAY],'SELECT * FROM Orders') AS B
ON A.CustomerId = B.CustomerId;INSERT INTO SomeTable EXEC(…) AT your_linked_server. So table must exists when you do that way.
Here is how to use it. To use EXEC(..) AT {linked-server} you must turn on RPC OUT option. Notice how we used variable in SQL to make it dynamic. This is much cleaner than previous approach we saw.
USE [master]
GO
--Replace YOUR_GATEWAY_USER, YOUR_GATEWAY_PASSWORD
--Replace localhost with IP/Machine name if ZappySys Gateway Running on different machine other than SQL Server

--Create new linked server
EXEC master.dbo.sp_addlinkedserver
@server = N'LS_TO_JIRA_IN_GATEWAY'  --Linked server name (this will be used in OPENQUERY sql)
, @srvproduct=N''
---- For MSSQL 2012, 2014, 2016, 2017, and 2019 use below (SQL Server Native Client 11.0)---
, @provider=N'SQLNCLI11'
---- For MSSQL 2022 or higher use below (Microsoft OLE DB Driver for SQL Server)---
--, @provider=N'MSOLEDBSQL'
, @datasrc=N'localhost,5000' --//Machine / Port where Gateway service is running
, @provstr=N'Network Library=DBMSSOCN;'
, @catalog=N'JiraDSN' --Data source name you gave on Gateway service settings

--Attach gateway login with linked server
EXEC master.dbo.sp_addlinkedsrvlogin
@rmtsrvname=N'LS_TO_JIRA_IN_GATEWAY'  --linked server name
, @useself=N'False'
, @locallogin=NULL
, @rmtuser=N'YOUR_GATEWAY_USER' --enter your Gateway user name
, @rmtpassword='YOUR_GATEWAY_PASSWORD'  --enter your Gateway user's password
GO

--5. Enable RPC OUT (This is Optional - Only needed if you plan to use EXEC(...) AT YourLinkedServerName rather than OPENQUERY
EXEC sp_serveroption 'LS_TO_JIRA_IN_GATEWAY', 'rpc', true;
EXEC sp_serveroption 'LS_TO_JIRA_IN_GATEWAY', 'rpc out', true;
--Disable MSDTC - Below needed to support INSERT INTO from EXEC AT statement
EXEC sp_serveroption 'LS_TO_JIRA_IN_GATEWAY', 'remote proc transaction promotion', false;
--Increase query timeout if query is going to take longer than 10 mins (Default timeout is 600 seconds)
--EXEC sp_serveroption 'LS_TO_JIRA_IN_GATEWAY', 'query timeout', 1200;
GO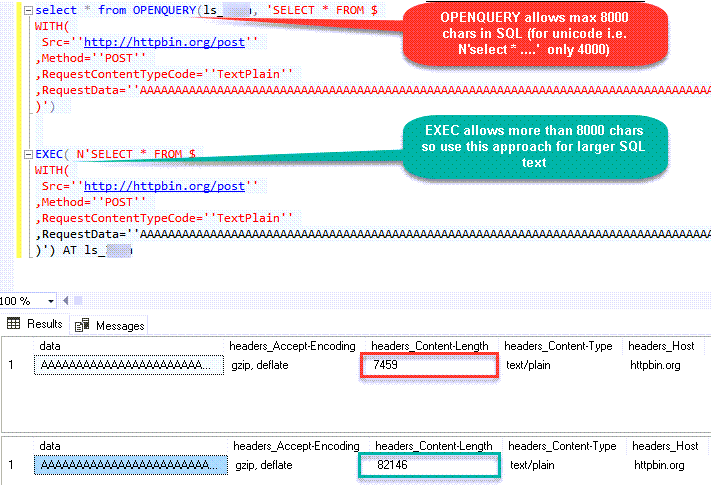
Fetching Tables / Columns using metadata stored procs
ZappySys Data Gateway emulates certains system procs you might find in real SQL Server. You can call using below syntax using 4-Parts syntaxEXEC [LS_TO_JIRA_IN_GATEWAY].[JiraDSN].[DATA].sp_tablesEXEC [LS_TO_JIRA_IN_GATEWAY].[JiraDSN].[DATA].sp_columns_90 N'your-table-name'-- List all tables
EXEC [LS_TO_JIRA_IN_GATEWAY].[JiraDSN].[DATA].sp_tables
-- List all columns and its type for specified table
EXEC [LS_TO_JIRA_IN_GATEWAY].[JiraDSN].[DATA].sp_columns_90 N'Account'Known Issues
Let's explore some common problems that can occur when using OPENQUERY or Data Gateway connectivity.
SQL Native Client 11.0 not visible in the Providers dropdown (Linked Server Creation)
If you are following some screenshots / steps from our article it might say use SQL Native Client to create Linked Server to ZappySys Gateway but for some users they dont see that driver entry in the dropdown. This is due to the fact that Microsoft has deprecated SQL Native Client OLEDB Driver (SQLNCLI and SQLNCLI11) going forward after SQL 2022. So you need to use [Microsoft OLE DB Driver for SQL Server] instead (MSOLEDBSQL). Please follow all other instructions except the driver type selection, use new suggested driver instead if you dont see SQL Native Client.
Error: The data is invalid
There will be a time when, you may encounter unexpected errors like the ones listed below. These can include:
OLE DB provider "SQLNCLI11" for linked server "Zs_Csv" returned message "Deferred prepare could not be completed.".
OLE DB provider "SQLNCLI11" for linked server "Zs_Csv" returned message "Communication link failure".
Msg 13, Level 16, State 1, Line 0

Session Provider: The data is invalid.
Possible Cause:
There are few reasons for such error but below are two main reasons
-
If the query length exceeds 2000 characters, as shown below, you might encounter this error.
SELECT * FROM OPENQUERY(LS, '--some really long text more than 2000 chars--') -
If a query contains multiple OPENQUERY statements for JOINs or UNIONs, as shown below, it might fail due to a MARS compatibility issue where the gateway doesn't support parallel queries on a single connection.
SELECT a.id, b.name from OPENQUERY(LS, 'select * from tbl1') a join OPENQUERY(LS, 'select * from tbl2') b on a.id=b.id
There are few ways to fix above error based on reason why you getting this error (i.e. Query Length issue OR JOIN/UNION in the same statement)
-
If your query has long SQL (more than 2000 chars ) then reduce SQL length using different techniques
- e.g. use SELECT * FROM MyTable rather than SELECT col1,col2… FROM MyTable
- Use Meta Option in WITH clause if you must use column name. (e.g. SELECT * FROM MyTable WITH(META=’c:\meta.txt’) this way you can define column in Meta file rather than SELECT query. Check this article
- Consider using EXECT (….) AT [Linked_Server_name] option rather than OPENQUERY so you can use very long SQL (See next section on EXEC..AT usecase)
-
Consider
using Virtual Table / Stored Proc
to wrap long SQL so your call is very small (where usp_GetOrdersByYear is custom proc created on ZappySys Driver UI)
SELECT * FROM OPENQUERY(LS, 'EXEC usp_GetOrdersByYear 2021')
-
If your query uses JOIN / UNION with multiple OPENQUERY in same SQL then use multiple Linked servers (one for each OPENQUERY clause) as below.
select a.id, b.name from OPENQUERY(LS_1, 'select * from tbl1') a join OPENQUERY(LS_2, 'select * from tbl2') b on a.id=b.id
Error: Unable to begin a distributed transaction (When INSERT + EXEC used)
If you try to use the EXEC statement to insert data into a table, as shown below, you might encounter the following error unless the MSDTC option is turned off.
INSERT INTO MyTable EXEC('select * from tbl') AT MyLinkedServer"Protocol error in TDS stream" The operation could not be performed because OLE DB provider "SQLNCLI11" for linked server "ls_Json2" was unable to begin a distributed transaction. --OR-- The operation could not be performed because OLE DB provider "MSOLEDBSQL" for linked server "ls_Json" was unable to begin a distributed transaction.
Solution:
Method-1: Go to linked server properties | Server Options | Enable Promotion of Distributed Transaction | Change to false (Default is true)
Now your try your INSERT with EXEC AT and it should work
Method-2: Run the below command if you dont want to use UI
EXEC master.dbo.sp_serveroption @server=N'My_Linked_Server', @optname=N'remote proc transaction promotion', @optvalue=N'false'Error: Cannot use OPENQUERY with JOIN / UNION
When you perform a JOIN or UNION ALL on the same Linked Server, it may fail to process sometimes because the Data Gateway doesn't support parallel query requests on the same connection. A workaround for that would be to create multiple linked servers for the same data source. Refer to the section above for the same workaround.
Error: Truncation errors due to data length mismatch
Many times, you may encounter truncation errors if a table column's length is less than the actual column size from the query column. To solve this issue, use the new version of Data Gateway and check the 'Use nvarchar(max) for string options' option found on the General Tab.
Performance Tips
Now, let's look at a few performance tips in this section.
Use INSERT INTO rather than SELECT INTO to avoid extra META request
We discussed some Pros and Cons of OPENQUERY vs EXEC (…) AT in previous section. One obvious advantage of EXEC (….) AT is it reduces number of requests to driver (It sends pass through query). With EXEC you cannot load data dynamically like SELECT INTO tmp FROM OPENQUERY. Table must exist before hand if you use EXEC.
INSERT INTO tmp_API_Report_Load(col1,col2)
EXEC('select col1,col2 from some_api_table') AT [API-LINKED-SERVER]
--OR--
INSERT INTO tmp_API_Report_Load(col1,col2)
select col1,col2 from OPENQUERY([API-LINKED-SERVER], 'select col1,col2 from some_api_table')
The advantage of this method is that your query speed will increase because the system only calls the API once when you use EXEC AT. In contrast, with OPENROWSET, the query needs to be called twice: once to obtain metadata and once to retrieve the data.
Use Cached Metadata if possible
By default, most SQL queries sent to the Data Gateway need to invoke two phases: first, to get metadata, and second, to fetch data. However, you can bypass the metadata API call by supplying static metadata. Use the META property in the WITH clause, as explained in this article , to speed up your SQL queries.Actions supported by Jira Connector
Learn how to perform common Jira actions directly in SQL Server with these how-to guides:
- Create Issue Comment
- Create Issues
- Create Project
- Create User
- Create Worklog
- Delete Issue
- Delete Issue Comment
- Delete Project
- Delete User
- Delete Worklog
- Get custom field context options
- Get custom field contexts
- Read Application Roles
- Read Changelog Details
- Read Changelogs
- Read Changelogs by IDs
- Read Comments
- Read Custom Fields
- Read Fields
- Read Groups
- Read Issue Types
- Read Issues
- Read Projects
- Read Resources
- Read Users
- Read Worklogs
- Read Worklogs modified after a specified date
- Update Issue
- Update Issue Comment
- Update Worklog
- Upsert Project
- Make Generic API Request
- Make Generic API Request (Bulk Write)
Conclusion
In this article we showed you how to connect to Jira in SQL Server and integrate data without any coding, saving you time and effort.
We encourage you to download Jira Connector for SQL Server and see how easy it is to use it for yourself or your team.
If you have any questions, feel free to contact ZappySys support team. You can also open a live chat immediately by clicking on the chat icon below.
Download Jira Connector for SQL Server Documentation


