
Introduction
You can connect to your SharePoint Online data in Tableau using the high-performance SharePoint Online ODBC Driver (powered by SharePoint Online Connector). We'll walk you through the entire setup.
Let's not waste time and get started!
Create data source in ZappySys Data Gateway
In this section we will create a data source for SharePoint Online in the Data Gateway. Let's follow these steps to accomplish that:
-
Download and install ODBC PowerPack (if you haven't already).
-
Search for
gatewayin the Windows Start Menu and open ZappySys Data Gateway Configuration:
-
Go to the Users tab and follow these steps to add a Data Gateway user:
- Click the Add button
-
In the Login field enter a username, e.g.,
john - Then enter a Password
- Check the Is Administrator checkbox
- Click OK to save

-
Now we are ready to add a data source:
- Click the Add button
- Give the Data source a name (have it handy for later)
- Then select Native - ZappySys API Driver
- Finally, click OK
SharepointOnlineDSNZappySys API Driver
-
When the Configuration window appears give your data source a name if you haven't done that already, then select "SharePoint Online" from the list of Popular Connectors. If "SharePoint Online" is not present in the list, then click "Search Online" and download it. Then set the path to the location where you downloaded it. Finally, click Continue >> to proceed with configuring the DSN:
SharepointOnlineDSNSharePoint Online
-
Select your authentication scenario below to expand connection configuration steps to:
- Configure the authentication in SharePoint Online.
- Enter those details into the ZappySys API Driver data source configuration.
User Credentials
SharePoint Online authentication
Use delegated access (User Credentials) whenever you want to let a signed-in user work with their own resources or resources they can access. Whether it's an admin setting up policies for their entire organization or a user deleting an email in their inbox, all scenarios involving user actions should use delegated access. [API reference]
Follow these simple steps below to create Microsoft Entra ID application with delegated access:
WARNING: If you are planning to automate processes, we recommend that you use a Application Credentials authentication method. In case, you still need to use User Credentials, then make sure you use a system/generic account (e.g.automation@my-company.com). When you use a personal account which is tied to a specific employee profile and that employee leaves the company, the token may become invalid and any automated processes using that token will start to fail.- Navigate to the Azure Portal and log in using your credentials.
- Access Microsoft Entra ID.
-
Register a new application by going to App registrations and clicking on New registration button:
 INFO: Find more information on how to register an application in Graph API reference.
 -
When configuration window opens, configure these fields:
-
Supported account type
- Use
Accounts in this organizational directory only, if you need access to data in your organization only.
- Use
-
Supported account type
-
Redirect URI:
- Set the type to
Public client/native (mobile & desktop). - Use
https://zappysys.com/oauthas the URL.
- Set the type to
-
After registering the app, copy the Application (client) ID for later:

-
Copy OAuth authorization endpoint (v2) & OAuth token endpoint (v2) URLs to use later in the configuration:

-
Now go to SSIS package or ODBC data source and use the copied values in User Credentials authentication configuration:
- In the Authorization URL field paste the OAuth authorization endpoint (v2) URL value you copied in the previous step.
- In the Token URL field paste the OAuth token endpoint (v2) URL value you copied in the previous step.
- In the Client ID field paste the Application (client) ID value you copied in the previous step.
-
In the Scope field use the default value or select individual scopes, e.g.:
-
email -
offline_access -
openid -
profile -
User.Read -
Sites.Read.All -
Sites.ReadWrite.All -
Files.Read.All -
Files.ReadWrite.All
-
- Press Generate Token button to generate Access and Refresh Tokens.
- Optional step. Choose Default Site Id from the drop down menu.
- Click Test Connection to confirm the connection is working.
- Done! Now you are ready to use the API Connector!

API Connection Manager configuration
Just perform these simple steps to finish authentication configuration:
-
Set Authentication Type to
User Credentials [OAuth] - Optional step. Modify API Base URL if needed (in most cases default will work).
- Fill in all the required parameters and set optional parameters if needed.
- Press Generate Token button to generate the tokens.
- Finally, hit OK button:
SharepointOnlineDSNSharePoint OnlineUser Credentials [OAuth]https://graph.microsoft.com/v1.0Required Parameters Authorization URL Fill-in the parameter... Token URL Fill-in the parameter... Client ID Fill-in the parameter... Scope Fill-in the parameter... Return URL Fill-in the parameter... Default Site Id (select after pressing 'Generate Token') Fill-in the parameter... Optional Parameters Client Secret Default Drive Id (select after pressing 'Generate Token') Login Prompt Option RetryMode RetryWhenStatusCodeMatch RetryStatusCodeList 429|503|423 RetryCountMax 5 RetryMultiplyWaitTime True Search Option For Non-Indexed Fields (Default=Blank - Search Only Indexed) Extra Headers (e.g. Header1:AAA||Header2:BBB) IsAppCred 0  Find full details in the SharePoint Online Connector authentication reference.
Application Credentials
SharePoint Online authentication
Application-only access is broader and more powerful than delegated access (User Credentials), so you should only use app-only access where needed. Use it when: 1. The application needs to run in an automated way, without user input (for example, a daily script that checks emails from certain contacts and sends automated responses). 2. The application needs to access resources belonging to multiple different users (for example, a backup or data loss prevention app might need to retrieve messages from many different chat channels, each with different participants). 3. You find yourself tempted to store credentials locally and allow the app to sign in 'as' the user or admin. [API reference]
Follow these simple steps to create Microsoft Entra ID application with application access permissions:
- Create an OAuth app
- Configure App Permissions
-
Grant granular permissions to the OAuth application (optional)
This step allows to grant OAuth application granular permissions, i.e. access configured specificSites,Lists, andList Items.Step-1: Create OAuth app
- Navigate to the Azure Portal and log in using your credentials.
- Access Microsoft Entra ID.
-
Register a new application by going to
App registrations
and clicking on New registration button:
INFO: Find more information on how to register an application in Graph API reference.
-
When configuration window opens, configure these fields:
-
Supported account type
- e.g. select
Accounts in this organizational directory onlyif you need access to data in your organization only.
- e.g. select
-
Supported account type
-
Redirect URI:
- Set the type to
Public client/native (mobile & desktop). - Leave the URL field empty.
- Set the type to
-
After registering the app, copy the Application (client) ID for later:
-
Then copy OAuth authorization endpoint (v2) & OAuth token endpoint (v2) URLs:
-
Continue and create Client secret:

-
Then copy the Client secret for later steps:

Step-2: Configure App Permissions
-
Continue by adding permissions for the app by going to the API permissions section, and clicking on Add a permission:

-
Select Microsoft Graph:

-
Then choose Application permissions option:

-
Continue by adding these Sites permissions (search for
site): INFO: If you want to access specific lists or list items (table-level vs row-level security) rather than the full site, then add
Lists.SelectedOperations.SelectedorListItems.SelectedOperations.Selectedpermissions , just like in the previous step (search forlist).WARNING: If you add any of these permissions -Sites.Selected,Lists.SelectedOperations.Selected, orListItems.SelectedOperations.Selected- you must grant the app the SharePoint permissions for the specific resource (e.g. aSite, aList, or aListItem). Follow instructions in Grant SharePoint permissions to the OAuth app (optional) section on how to accomplish that. -
Finish by clicking Add permissions button:

-
Now it's time to Grant admin consent for your application:

-
Confirm all the permissions are granted:

-
Now go to SSIS package or ODBC data source and use the copied values in Application Credentials authentication configuration:
- In the Token URL field paste the OAuth token endpoint (v2) URL value you copied in the previous step.
- In the Client ID field paste the Application (client) ID value you copied in the previous step.
- In the Client Secret field paste the Client secret value you copied in the previous step.
- Optional step. Choose Default Site Id from the drop down menu.
- Click Test Connection to confirm the connection is working.
- Done!
Step-3 (optional): Grant SharePoint permissions to the OAuth app
If you used
Sites.Selected,Lists.SelectedOperations.SelectedorListItems.SelectedOperations.Selectedpermission in the previous section, you must grant the app the SharePoint permissions for the specific resource (e.g. aSite, aList, or aListItem). You can do it using PowerShell or SharePoint admin center (obsolete method).Granting SharePoint permissions using PowerShell
Unfortunately, there is no user interface available to control these permissions yet. For now, granting permissions has to be accomplished via Microsoft Graph API [Microsoft reference]:
You must be the owner of the resource to grant permissions (i.e. belong to SharePoint owners group or be the owner of theSiteorList).- Open PowerShell (run as admin).
-
Call the following PowerShell code to grant
readandwritepermission for the app we created earlier (assuming Application (client) ID is89ea5c94-aaaa-bbbb-cccc-3fa95f62b66e):##### CONFIGURATION ############################################################################################ # More info at: # - https://learn.microsoft.com/en-us/graph/permissions-selected-overview?tabs=powershell # - https://learn.microsoft.com/en-us/powershell/module/microsoft.graph.sites/?view=graph-powershell-1.0 # Find SharePoint Site Id by following these steps: # - Login into SharePoint Online # - Open this URL https://{your-company}.sharepoint.com/_api/site in the browser # NOTE: For a subsite use https://{your-company}.sharepoint.com/sites/{your-subsite}/_api/site # - Find 'Id' element in the response (e.g. <d:Id m:type="Edm.Guid">efcdd21a-aaaa-bbbb-cccc-5d8104d8b5e3</d:Id>) # - Copy the Site Id, i.e.: efcdd21a-aaaa-bbbb-cccc-5d8104d8b5e3 # Set $siteId variable to the retrieved Site Id: $siteId="efcdd21a-aaaa-bbbb-cccc-5d8104d8b5e3" # Find your Application Id (i.e. Client Id) in the Azure Portal, in App Registrations page: # https://portal.azure.com/#view/Microsoft_AAD_RegisteredApps/ApplicationsListBlade $applicationId="89ea5c94-aaaa-bbbb-cccc-3fa95f62b66e" # Set one of app permissions: read, write, fullcontrol, owner ('write' includes 'read' permission) $appPermission="write" ##### SCRIPT ################################################################################################### # Step-1: Install 'Microsoft.Graph.Sites' module if it's not installed if (-not (Get-Module Microsoft.Graph.Sites -ListAvailable)) { Install-Module Microsoft.Graph.Sites } # Step-2: Load module Import-Module Microsoft.Graph.Sites # Step-3: Login (use Azure admin or SharePoint owner account) DisConnect-MgGraph Connect-MgGraph # Step-4: Set parameters for API call (set permissions, Site ID and Application ID) $params = @{ roles = @($appPermission) grantedTo = @{ application = @{id = $applicationId} } } # Step-5: Grant permissions New-MgSitePermission -SiteId $siteId -BodyParameter $params # Done! Write-Host "Granted SharePoint permissions to application '$applicationId' for site '$siteId'." - That's it! Now you can use the connector.
Granting SharePoint permissions using SharePoint admin center (obsolete method)
If you used
Site.Selectedpermission you can link it SharePoint site in SharePoint admin center [SharePoint reference]. Follow these simple steps to accomplish that:-
Log in to SharePoint admin center using this URL:
(replace
YOURCOMPANYwith your company name):https://YOURCOMPANY-admin.sharepoint.com/_layouts/15/appinv.aspx
INFO: To view all the registered apps in SharePoint, visit this page:https://YOURCOMPANY-admin.sharepoint.com/_layouts/15/appprincipals.aspx?Scope=Web. - In the App Id field enter Application (client) ID you copied in the previous step.
-
In the Permission Request XML field enter XML snippet which describes which SharePoint permissions you want to grant to the OAuth app, e.g.:
<AppPermissionRequests AllowAppOnlyPolicy="true">
  <AppPermissionRequest Scope="http://sharepoint/content/tenant" Right="FullControl" />
</AppPermissionRequests>
INFO: This example gives appFullControl, but you can also grant itReadorWritepermissions. - Click Create to grant the permission to your OAuth app.
- That's it! Now you can use the connector.
API Connection Manager configuration
Just perform these simple steps to finish authentication configuration:
-
Set Authentication Type to
Application Credentials [OAuth] - Optional step. Modify API Base URL if needed (in most cases default will work).
- Fill in all the required parameters and set optional parameters if needed.
- Finally, hit OK button:
SharepointOnlineDSNSharePoint OnlineApplication Credentials [OAuth]https://graph.microsoft.com/v1.0Required Parameters Token URL Fill-in the parameter... Client ID Fill-in the parameter... Client Secret Fill-in the parameter... Default Site Id Fill-in the parameter... Optional Parameters Scope https://graph.microsoft.com/.default Default Drive Id RetryMode RetryWhenStatusCodeMatch RetryStatusCodeList 429|503|423 RetryCountMax 5 RetryMultiplyWaitTime True Search Option For Non-Indexed Fields (Default=Blank - Search Only Indexed) Extra Headers (e.g. Header1:AAA||Header2:BBB) IsAppCred 1  Find full details in the SharePoint Online Connector authentication reference.
Application Credentials with Certificate (Sign JWT with Private Key)
SharePoint Online authentication
Follow these simple steps to create Microsoft Entra ID application with application access permissions:
- Create an OAuth app
- Configure App Permissions
- Create Public/Private Key Pair
- Upload Public Key
- Configure ZappySys Connection for Private Key use
-
Grant granular permissions (optional)
This step allows to grant OAuth application granular permissions, i.e. access configured specificSites,Lists, andList Items.Step-1: Create OAuth app
- Navigate to the Azure Portal and log in using your credentials.
- Access Microsoft Entra ID.
-
Register a new application by going to
App registrations
and clicking on New registration button:
INFO: Find more information on how to register an application in Graph API reference.
-
When configuration window opens, configure these fields:
-
Supported account type
- e.g. select
Accounts in this organizational directory onlyif you need access to data in your organization only.
- e.g. select
-
Supported account type
-
After registering the app, copy the Application (client) ID for later:
-
Then copy OAuth authorization endpoint (v2) & OAuth token endpoint (v2) URLs:
Step-2: Configure App Permissions
-
Continue by adding permissions for the app by going to the API permissions section, and clicking on Add a permission:
-
Select Microsoft Graph:
-
Then choose Application permissions option:
-
Continue by adding these Sites permissions (search for
site):
INFO: If you want to access specific lists or list items (table-level vs row-level security) rather than the full site, then addLists.SelectedOperations.SelectedorListItems.SelectedOperations.Selectedpermissions , just like in the previous step (search forlist).WARNING: If you add any of these permissions -Sites.Selected,Lists.SelectedOperations.Selected, orListItems.SelectedOperations.Selected- you must grant the app the SharePoint permissions for the specific resource (e.g. aSite, aList, or aListItem). Follow instructions in Grant SharePoint permissions to the OAuth app (optional) section on how to accomplish that. -
Finish by clicking Add permissions button:
-
Now it's time to Grant admin consent for your application:
-
Confirm all the permissions are granted:
Step-3: Generate a Self-Signed Certificate
Now let's go through setting up a certificate-based authentication flow for Microsoft Graph or other Azure AD protected APIs using client credentials and a JWT.
You can use OpenSSL or any other way to generate Certificate file but to make it simple we will use below example PowerShell script.
Open PowerShell and execute code listed in below steps.
# Run this in PowerShell
#Change .AddYears(1) to desired number. By default it expires certificate in one year as per below code.

$cert = New-SelfSignedCertificate `
  -Subject "CN=MyClientAppCert" `
  -KeySpec Signature `
  -KeyExportPolicy Exportable `
  -KeyLength 2048 `
  -CertStoreLocation "Cert:\CurrentUser\My" `
  -KeyAlgorithm RSA `
  -HashAlgorithm SHA256 `
  -NotAfter (Get-Date).AddYears(1) `
  -Provider "Microsoft Enhanced RSA and AES Cryptographic Provider"

# Export private key (.pfx)  - Keep this with you to make API calls (SECRET KEY - DONOT SHARE)
$pfxPath = "$env:USERPROFILE\Desktop\private_key.pfx"
$pwd = ConvertTo-SecureString -String "yourStrongPassword123" -Force -AsPlainText
Export-PfxCertificate -Cert $cert -FilePath $pfxPath -Password $pwd

# Export public certificate (.cer) - UPLOAD this to Azure Portal
$cerPath = "$env:USERPROFILE\Desktop\public_key.cer"
Export-Certificate -Cert $cert -FilePath $cerPath
Step-4: Upload the Certificate (i.e. Public Key *.cer)
Once we have certificate file generated.- In your App Registration, go to Certificates & secrets
- Under Certificates, click Upload certificate
- Select the
.cerfile (public certificate)
- Click Select a file (Browse button)
- Select public key file (*.cer) from local machine and click OK to upload
Step-5: Configure ZappySys Connection - Use private key (i.e. *.pfx or *.pem)
Now its time to use certificate pfx file (private key) generated in the previous step (NOTE: PFX file contains both private key and public key).-
Go to SSIS package or ODBC data source and use the copied values in Application Credentials authentication configuration:
- In the Token URL field paste the OAuth token endpoint (v2) URL value you copied in the previous step.
- In the Client ID field paste the Application (client) ID value you copied in the previous step.
- Configure private key
- go to
Certificate Tab - Change Storage Mode to
Disk File: *.pfx format (PKCS#12).NOTE: You can also useStored In LocalMachinemode if PFX file already imported in the Local Certificate Storage Area - User Store OR Machine Store. If you used OpenSSL to generate key pair then useDisk File: *.pem format (PKCS#8 or PKCS#1)Mode for Cert Store Location. - Supply the key file path
- Supply the certificate password (same password used in earlier PowerShell script)
- go to
- Now go back to General Tab, choose Default Site Id and Default Drive Id from the drop down menu.
- Click Test connection see everything is good
Step-6 (optional): Grant granular permissions to the OAuth app
If you used
Sites.Selected,Lists.SelectedOperations.SelectedorListItems.SelectedOperations.Selectedpermission in the previous section, you must grant the app the SharePoint permissions for the specific resource (e.g. aSite, aList, or aListItem). You can do it using PowerShell or SharePoint admin center (obsolete method).Granting SharePoint permissions using PowerShell
Unfortunately, there is no user interface available to control these permissions yet. For now, granting permissions has to be accomplished via Microsoft Graph API [Microsoft reference]:
You must be the owner of the resource to grant permissions (i.e. belong to SharePoint owners group or be the owner of theSiteorList).- Open PowerShell (run as admin).
-
Call the following PowerShell code to grant
readandwritepermission for the app we created earlier (assuming Application (client) ID is89ea5c94-aaaa-bbbb-cccc-3fa95f62b66e):##### CONFIGURATION ############################################################################################ # More info at: # - https://learn.microsoft.com/en-us/graph/permissions-selected-overview?tabs=powershell # - https://learn.microsoft.com/en-us/powershell/module/microsoft.graph.sites/?view=graph-powershell-1.0 # Find SharePoint Site Id by following these steps: # - Login into SharePoint Online # - Open this URL https://{your-company}.sharepoint.com/_api/site in the browser # NOTE: For a subsite use https://{your-company}.sharepoint.com/sites/{your-subsite}/_api/site # - Find 'Id' element in the response (e.g. <d:Id m:type="Edm.Guid">efcdd21a-aaaa-bbbb-cccc-5d8104d8b5e3</d:Id>) # - Copy the Site Id, i.e.: efcdd21a-aaaa-bbbb-cccc-5d8104d8b5e3 # Set $siteId variable to the retrieved Site Id: $siteId="efcdd21a-aaaa-bbbb-cccc-5d8104d8b5e3" # Find your Application Id (i.e. Client Id) in the Azure Portal, in App Registrations page: # https://portal.azure.com/#view/Microsoft_AAD_RegisteredApps/ApplicationsListBlade $applicationId="89ea5c94-aaaa-bbbb-cccc-3fa95f62b66e" # Set one of app permissions: read, write, fullcontrol, owner ('write' includes 'read' permission) $appPermission="write" ##### SCRIPT ################################################################################################### # Step-1: Install 'Microsoft.Graph.Sites' module if it's not installed if (-not (Get-Module Microsoft.Graph.Sites -ListAvailable)) { Install-Module Microsoft.Graph.Sites } # Step-2: Load module Import-Module Microsoft.Graph.Sites # Step-3: Login (use Azure admin or SharePoint owner account) DisConnect-MgGraph Connect-MgGraph # Step-4: Set parameters for API call (set permissions, Site ID and Application ID) $params = @{ roles = @($appPermission) grantedTo = @{ application = @{id = $applicationId} } } # Step-5: Grant permissions New-MgSitePermission -SiteId $siteId -BodyParameter $params # Done! Write-Host "Granted SharePoint permissions to application '$applicationId' for site '$siteId'." - That's it! Now you can use the connector.
API Connection Manager configuration
Just perform these simple steps to finish authentication configuration:
-
Set Authentication Type to
Application Credentials with Certificate (Sign JWT with Private Key) [OAuth] - Optional step. Modify API Base URL if needed (in most cases default will work).
- Fill in all the required parameters and set optional parameters if needed.
- Finally, hit OK button:
SharepointOnlineDSNSharePoint OnlineApplication Credentials with Certificate (Sign JWT with Private Key) [OAuth]https://graph.microsoft.com/v1.0Required Parameters Token URL Fill-in the parameter... Client ID Fill-in the parameter... Certificate: *** Configure [Client Certificate] Tab *** Fill-in the parameter... Default Site Id Fill-in the parameter... Optional Parameters Default Drive Id RetryMode RetryWhenStatusCodeMatch RetryStatusCodeList 429|503|423 RetryCountMax 5 RetryMultiplyWaitTime True Search Option For Non-Indexed Fields (Default=Blank - Search Only Indexed) Extra Headers (e.g. Header1:AAA||Header2:BBB) IsAppCred 1
Find full details in the SharePoint Online Connector authentication reference.
Once the data source connection has been configured, it's time to configure the SQL query. Select the Preview tab and then click Query Builder button to configure the SQL query:
 ZappySys API Driver - SharePoint OnlineRead and write SharePoint Online data effortlessly. Integrate, manage, and automate sites, lists, document libraries, and files — almost no coding required.SharepointOnlineDSN
Start by selecting the Table or Endpoint you are interested in and then configure the parameters. This will generate a query that we will use in Tableau to retrieve data from SharePoint Online. Hit OK button to use this query in the next step.
SELECT * FROM Lists Some parameters configured in this window will be passed to the SharePoint Online API, e.g. filtering parameters. It means that filtering will be done on the server side (instead of the client side), enabling you to get only the meaningful data
much faster .Now hit Preview Data button to preview the data using the generated SQL query. If you are satisfied with the result, use this query in Tableau:
ZappySys API Driver - SharePoint OnlineRead and write SharePoint Online data effortlessly. Integrate, manage, and automate sites, lists, document libraries, and files — almost no coding required.SharepointOnlineDSNSELECT * FROM Lists You can also access data quickly from the tables dropdown by selecting <Select table>.A
WHEREclause,LIMITkeyword will be performed on the client side, meaning that thewhole result set will be retrieved from the SharePoint Online API first, and only then the filtering will be applied to the data. If possible, it is recommended to use parameters in Query Builder to filter the data on the server side (in SharePoint Online servers).Click OK to finish creating the data source.
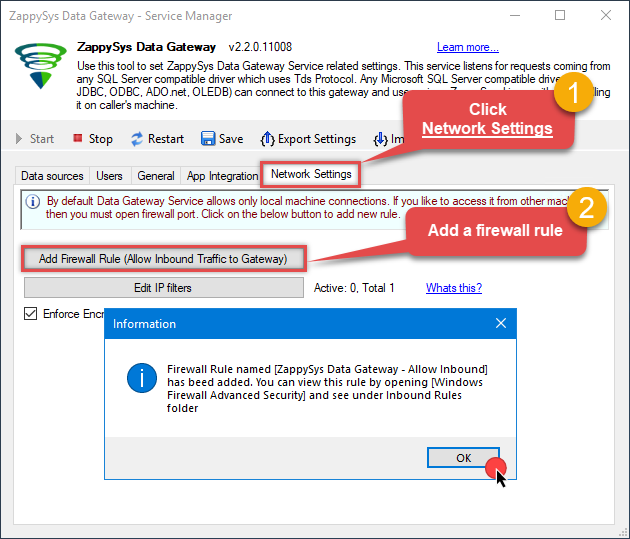
Once done, go to the Network Settings tab and Add a firewall rule for inbound traffic:
- This will initially allow all inbound traffic.
- Click Edit IP filters to restrict access to specific IP addresses or ranges.
Crucial Step: After creating or modifying the data source, you must:
- Click the Save button to persist your changes.
- Hit Yes when prompted to restart the Data Gateway service.
This ensures all changes are properly applied:
 Skipping this step may cause the new settings to fail, preventing you from connecting to the data source.
Read data in SQL Server via Data Gateway
After configuring your data source using the ZappySys ODBC Driver, the next mandatory step to read that data in SQL Server is to create a Linked Server. SQL Server requires a Linked Server definition to access any ODBC-based source through the ZappySys Data Gateway, allowing the source driver data to be queried using standard T-SQL.
There are two ways to create the Linked Server:- Method 1: Using a SQL Script automatically generated by the Data Gateway
- Method 2: Using SQL Server UI (SSMS) to manually configure the Linked Server
Method 1: Using a SQL Script automatically generated by the Data Gateway
The fastest and most reliable way to create the Linked Server is to use the SQL Script generated by the Data Gateway. This ensures all settings are applied correctly with minimal manual steps.
In the Data Gateway, open the App Integration tab.
Update the prefilled Linked Server Name if you want to use a custom name.
Select the SharepointOnlineDSN data source which we created earlier as the Database.
-
Choose the correct SQL Server version for your environment.
- SQL 2019 or Lower (
@provider='SQLNCLI11') - SQL 2022 or Higher (
@provider='MSOLEDBSQL')
- SQL 2019 or Lower (
Click Generate Code.
-
In the generated script scroll down to 4. Attach Gateway login with linked server step, enter your Data Gateway admin username and password.
'LS_TO_SHAREPOINT_ONLINE_IN_GATEWAY'
-
Press Ctrl + A and Ctrl + C to copy the entire script.
LS_TO_SHAREPOINT_ONLINE_IN_GATEWAYSharepointOnlineDSN
-
Paste the script into SQL Server Management Studio (SSMS) and run it.

That's it linked server is created in the SQL Server.
-
Finally, open a new query and execute a query we saved in one of the previous steps:
SELECT * FROM OPENQUERY([LS_TO_SHAREPOINT_ONLINE_IN_GATEWAY], 'SELECT * FROM Lists')
SELECT * FROM OPENQUERY([LS_TO_SHAREPOINT_ONLINE_IN_GATEWAY], 'SELECT * FROM Lists')
Sample SQL Script for Creating a Linked Server in SQL Server
USE [master]
GO
--///////////////////////////////////////////////////////////////////////////////////////
--Run below code in SSMS to create Linked Server and use ZappySys Drivers in SQL Server
--///////////////////////////////////////////////////////////////////////////////////////

-- Replace YOUR_GATEWAY_USER, YOUR_GATEWAY_PASSWORD
-- Replace localhost with IP/Machine name if ZappySys Gateway Running on different machine other than SQL Server
-- Replace Port 5000 if you configured gateway on a different port


--1. Configure your gateway service as per this article https://zappysys.com/links?id=10036

--2. Make sure you have SQL Server Installed. You can download FREE SQL Server Express Edition from here if you dont want to buy Paid version https://www.microsoft.com/en-us/sql-server/sql-server-editions-express

--Uncomment below if you like to drop linked server if it already exists
--EXEC master.dbo.sp_dropserver @server=N'LS_TO_SHAREPOINT_ONLINE_IN_GATEWAY', @droplogins='droplogins'

--3. Create new linked server

EXEC master.dbo.sp_addlinkedserver
    @server = N'LS_TO_SHAREPOINT_ONLINE_IN_GATEWAY'  --Linked server name (this will be used in OPENQUERY sql
, @srvproduct=N''
---- For MSSQL 2012, 2014, 2016, 2017, and 2019 use below (SQL Server Native Client 11.0)---
, @provider=N'SQLNCLI11'
---- For MSSQL 2022 or higher use below (Microsoft OLE DB Driver for SQL Server)---
--, @provider=N'MSOLEDBSQL'
, @datasrc=N'localhost,5000' --//Machine / Port where Gateway service is running
, @provstr=N'Network Library=DBMSSOCN;'
, @catalog=N'SharepointOnlineDSN' --Data source name you gave on Gateway service settings

--4. Attach gateway login with linked server

EXEC master.dbo.sp_addlinkedsrvlogin
@rmtsrvname=N'LS_TO_SHAREPOINT_ONLINE_IN_GATEWAY'  --linked server name
, @useself=N'False'
, @locallogin=NULL
, @rmtuser=N'YOUR_GATEWAY_USER' --enter your Gateway user name
, @rmtpassword='YOUR_GATEWAY_PASSWORD'  --enter your Gateway user's password
GO

--5. Enable RPC OUT (This is Optional - Only needed if you plan to use EXEC(...) AT YourLinkedServerName rather than OPENQUERY
EXEC sp_serveroption 'LS_TO_SHAREPOINT_ONLINE_IN_GATEWAY', 'rpc', true;
EXEC sp_serveroption 'LS_TO_SHAREPOINT_ONLINE_IN_GATEWAY', 'rpc out', true;

--Disable MSDTC - Below needed to support INSERT INTO from EXEC AT statement
EXEC sp_serveroption 'LS_TO_SHAREPOINT_ONLINE_IN_GATEWAY', 'remote proc transaction promotion', false;

--Increase query timeout if query is going to take longer than 10 mins (Default timeout is 600 seconds)
--EXEC sp_serveroption 'LS_TO_SHAREPOINT_ONLINE_IN_GATEWAY', 'query timeout', 1200;
GO
Method 2: Using SQL Server UI (SSMS) to manually configure the Linked Server
You can also create the Linked Server manually through SSMS if you prefer a visual setup. This method lets you configure the provider, data source, and security interactively.
-
First, let's open SQL Server Management Studio, create a new Linked Server, and start configuring it:
LS_TO_SHAREPOINT_ONLINE_IN_GATEWAYMicrosoft OLE DB Driver for SQL Serverlocalhost,5000SharepointOnlineDSNSharepointOnlineDSN
- For SQL Server 2012, 2014, 2016, 2017, and 2019, choose SQL Server Native Client 11.0 as the provider.
- For SQL Server 2022 or higher, choose Microsoft OLE DB Driver for SQL Server as the provider.
-
Then click on Security option and configure username we created in ZappySys Data Gateway in one of the previous steps, e.g.
john:
-
Optional step. Under the Server Options, Enable RPC and RPC Out and Disable Promotion of Distributed Transactions(MSDTC).

You need to enable RPC Out if you plan to use
EXEC(...) AT [LS_TO_SHAREPOINT_ONLINE_IN_GATEWAY]rather than OPENQUERY.
If don't enabled it, you will encounter theServer 'LS_TO_SHAREPOINT_ONLINE_IN_GATEWAY' is not configured for RPCerror.Query Example:
DECLARE @MyQuery NVARCHAR(MAX) = 'SELECT * FROM Lists';

EXEC (@MyQuery) AT [LS_TO_SHAREPOINT_ONLINE_IN_GATEWAY];
If you plan to use
'INSERT INTO <TABLE> EXEC(...) AT [LS_TO_SHAREPOINT_ONLINE_IN_GATEWAY]'in that case you need to Disable Promotion of Distributed Transactions(MSDTC).
If don't disabled it, you will encounter theThe operation could not be performed because OLE DB provider "SQLNCLI11" for linked server "MY_LINKED_SERVER_NAME" was unable to begin a distributed transaction.error.Query Example:
INSERT INTO dbo.Products DECLARE @MyQuery NVARCHAR(MAX) = 'SELECT * FROM Lists'; EXEC (@MyQuery) AT [LS_TO_SHAREPOINT_ONLINE_IN_GATEWAY]; -
Finally, open a new query and execute a query we saved in one of the previous steps:
SELECT * FROM OPENQUERY([LS_TO_SHAREPOINT_ONLINE_IN_GATEWAY], 'SELECT * FROM Lists')
SELECT * FROM OPENQUERY([LS_TO_SHAREPOINT_ONLINE_IN_GATEWAY], 'SELECT * FROM Lists')
Create View in SQL Server
Finally, use this or similar query in a view or stored procedure, which you will be able to use in Tableau. We will create a view to return invoices:
-
CREATE VIEW vwApiInvoices AS
 SELECT * FROM OPENQUERY([LS_TO_SHAREPOINT_ONLINE_IN_GATEWAY], 'SELECT * FROM Invoices')
Read data in Tableau from SQL Server
Actually, we will be getting data from SQL Server which in turn will be getting data from ZappySys Data Gateway data source. Let's begin and see how to accomplish that:
-
Open Tableau Desktop and click File > New.
-
To create new Connection click More > Microsoft SQL Server > Enter your credentials to connect to SQL Server (in our example before we used john):

-
Once connection is created for SQL Server we can read SharePoint Online data 3 different ways:
- Query View which contains OPENQUERY to Linked Server for SharePoint Online data
- Use direct SQL Query using OPENQUERY
- Use Stored Procedure (Mostly useful to parameterize calls
-
See below example to pull data from SharePoint Online in Tableau using SQL View approach:

-
Once your data sources are created you can click on Sheet1 and drag fields to create visualizations for Tableau Dashboard:

Passing Parameters to SharePoint Online calls in Tableau (Dynamic SQL)
Now let's look at scenario where you have to pass parameters to build Dynamic Dashboard. You can try to insert Parameters in your Direct SQL when you build Dynamic SQL but we found some issues with that so we are going to suggest Stored Procedure approach. For more information on Known issue on Dynamic Metadata Check this post.-
First lets create a stored procedure in SQL Server for Parameter Example. Notice how we added WITH RESULT SETS in the code to describe metadata.
--DROP PROC dbo.usp_GetInvoicesByCountry --GO /* Purpose: Parameterize SharePoint Online call via SQL. Call ZappySys Drivers inside SQL Server. */ CREATE PROC dbo.usp_GetInvoicesByCountry @country varchar(100) AS DECLARE @sql varchar(max) --//Escape single ticks carefully SET @sql = 'SELECT OrderID,CustomerID,Country,Quantity FROM $ WITH (Src=''https://services.odata.org/V3/Northwind/Northwind.svc/Invoices?$format=json@filter=Country eq '+ @country +''' ,Filter=''$.value[*]'' ,DataFormat=''OData'' )' DECLARE @sqlFull varchar(max) SET @sqlFull='SELECT * FROM OPENQUERY([LS_TO_SHAREPOINT_ONLINE_IN_GATEWAY], ''' + REPLACE( @sql, '''', '''''' ) + ''' )' PRINT @sqlFull --//For DEBUG purpose EXECUTE (@sqlFull) WITH RESULT SETS ( (OrderID int,CustomerID varchar(100),Country varchar(100),Quantity int) --//describe first result. If you don't do this then wont work in Tableau ) GO -- Example call EXEC dbo.usp_GetInvoicesByCountry @country='Germany' - Once you create a stored procedure go to Tableau datasource and select Database which contains the stored procedure we just created.
-
Now find your stored proc and drag it on the datasource pane. You will see parameters UI as below. You can create new parameter - Select New Parameter under Value Column.
")
- Thats it now you can reuse your parameterized datasource anywhere in Dashboard.
-
If you have need to select Parameters from predefined values rather than free text then edit your parameter and select List option. Define values you like to select from as below.

-
When you create Tableau Dashboard you will see Parameter dropdown (If you selected List) elase you may see Textbox to enter custom value.

Firewall settings
So far we have assumed that Gateway is running on the same machine as SQL Server. However there will be a case when ZappySys ODBC PowerPack is installed on a different machine than SQL Server. In such case you may have to perform additional Firewall configurations. On most computers firewall settings wont allow outside traffic to ZappySys Data Gateway. In such case perform following steps to allow other machines to connect to Gateway.
Method-1 (Preferred)If you are using newer version of ZappySys Data Gateway then adding firewall rule is just a single click.
- Search for gateway in start menu and open ZappySys Data Gateway.
-
Go to Firewall Tab and click Add Firewall Rule button like below. This will create Firewall rule to all Inbound Traffic on Port 5000 (Unless you changed it).

Here is another way to add / edit Inbound Traffic rule in windows firewall. Use below method if you choose to customize your rule (for advanced users).
- Search for Windows Firewall Advanced Security in start menu.
- Under Inbound Rules > Right click and click [New Rule] >> Click Next
- Select Port on Rule Type >> Click Next
- Click on TCP and enter port number under specified local port as 5000 (use different one if you changed Default port) >> Click Next
- Select Profile (i.e. Private, Public) >> Click Next
- Enter Rule name [i.e. ZappySys Data Gateway – Allow Inbound ] >> Click Next
- Click OK to save the rule

SharePoint Online Connector actions
Got a specific use case in mind? We've mapped out exactly how to perform a variety of essential SharePoint Online operations directly in Tableau, so you don't have to figure out the setup from scratch. Check out the step-by-step guides below:
- Read Main Site
- List Sites
- List Drives
- Read Drive
- List Folders
- List Files
- List Excel Files
- List SharePoint Lists
- List SharePoint System Lists
- Read List Fields
- Read List
- Read List Items
- Read List Items (Dynamic Columns)
- Read List Item (By ID)
- Create List Item
- Update List Item
- Delete List Item
- List Excel Worksheets of a File (i.e. List Tabs)
- Read Excel Worksheet (Auto Detect Range)
- Read Excel Worksheet (From Exact Range)
- Read CSV File (Generic)
- Create / Update CSV File (Generic)
- Read JSON File (Generic)
- Create / Update JSON File (Generic)
- Read File Data (As Byte Array)
- Download File
- Upload File
- Get Item (File or Folder)
- Delete Item (File or Folder)
- Move or rename item (File or Folder)
- Copy item (File or Folder)
- Make Generic REST API Request
- Make Generic REST API Request (Bulk Write)
Conclusion
In this guide, we demonstrated how to connect to SharePoint Online in Tableau and integrate your data — all without writing complex code.
Ready to get started? Download ODBC PowerPack now or ping us via chat if you still need help:
Want more?Don't stop here. Discover more integrations. Explore all Tableau connectors
Explore all SharePoint Online integration scenarios
Explore all Tableau connectors
Explore all SharePoint Online integration scenarios


 Connector")


 Connector")


 Connector")


 Connector")


