SharePoint Online Connector for Talend Studio
SharePoint Connector can be used to read, write data in SharePoint Online List / Document Library, perform file operations such as upload, download, create, move, delete, rename in a few clicks!
In this article you will learn how to quickly and efficiently integrate SharePoint Online data in Talend Studio without coding. We will use high-performance SharePoint Online Connector to easily connect to SharePoint Online and then access the data inside Talend Studio.
Let's follow the steps below to see how we can accomplish that!
SharePoint Online Connector for Talend Studio is based on ZappySys API Driver which is part of ODBC PowerPack. It is a collection of high-performance ODBC drivers that enable you to integrate data in SQL Server, SSIS, a programming language, or any other ODBC-compatible application. ODBC PowerPack supports various file formats, sources and destinations, including REST/SOAP API, SFTP/FTP, storage services, and plain files, to mention a few.
Create Data Source in Data Gateway based on ZappySys API Driver
In this section we will create a data source for SharePoint Online in Data Gateway. Let's follow these steps to accomplish that:
-
Download and install ODBC PowerPack.
-
Search for
gatewayin Windows Start Menu and open ZappySys Data Gateway Configuration: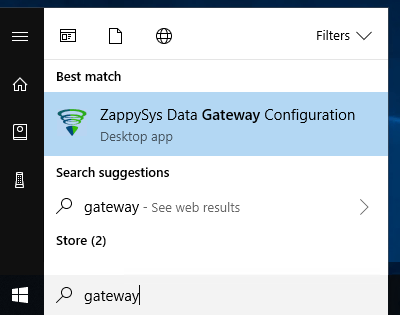
-
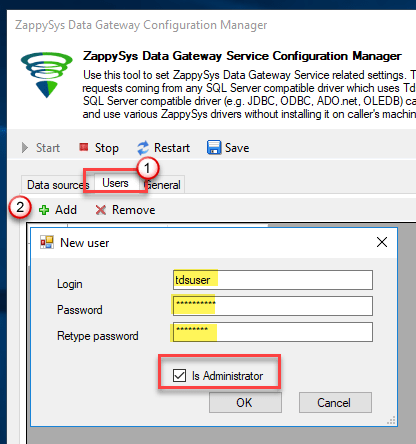
Go to Users tab and follow these steps to add a Data Gateway user:
- Click Add button
-
In Login field enter username, e.g.,
john - Then enter a Password
- Check Is Administrator checkbox
- Click OK to save
-
Now we are ready to add a data source:
- Click Add button
- Give Datasource a name (have it handy for later)
- Then select Native - ZappySys API Driver
- Finally, click OK
SharepointOnlineDSNZappySys API Driver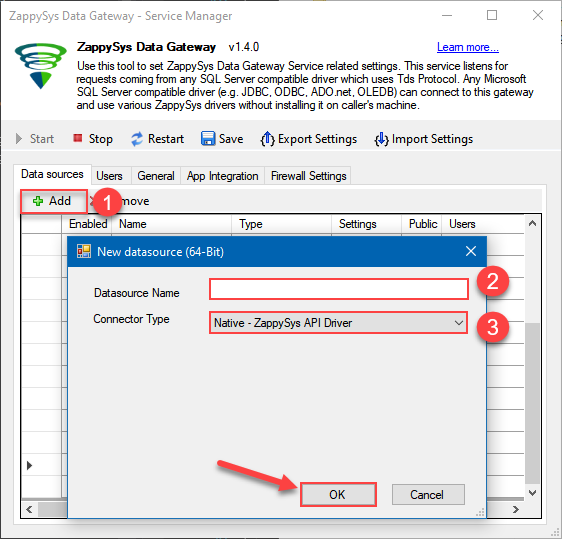
-
When the Configuration window appears give your data source a name if you haven't done that already, then select "SharePoint Online" from the list of Popular Connectors. If "SharePoint Online" is not present in the list, then click "Search Online" and download it. Then set the path to the location where you downloaded it. Finally, click Continue >> to proceed with configuring the DSN:
SharepointOnlineDSNSharePoint Online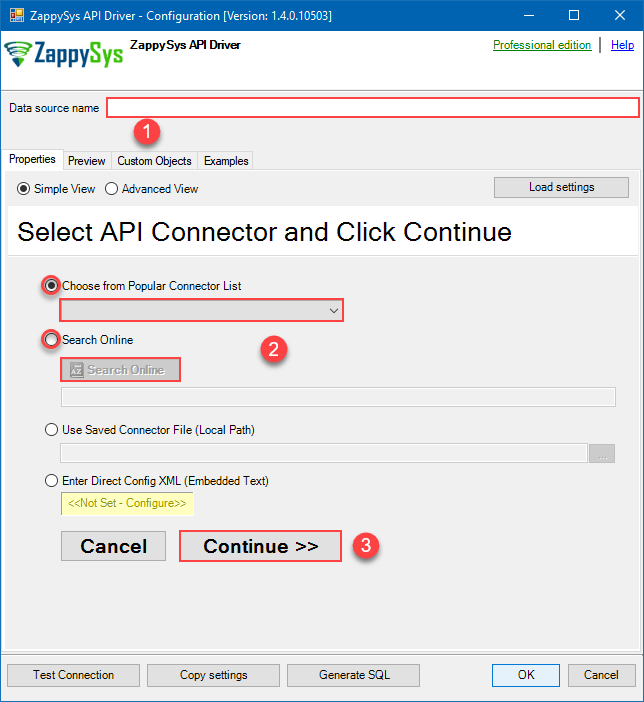
-
Now it's time to configure the Connection Manager. Select Authentication Type, e.g. Token Authentication. Then select API Base URL (in most cases, the default one is the right one). More info is available in the Authentication section.
SharePoint Online authentication
Use delegated access (User Credentials) whenever you want to let a signed-in user work with their own resources or resources they can access. Whether it's an admin setting up policies for their entire organization or a user deleting an email in their inbox, all scenarios involving user actions should use delegated access. [API reference]
Follow these simple steps below to create Microsoft Entra ID application with delegated access:
WARNING: If you are planning to automate processes, we recommend that you use a Application Credentials authentication method. In case, you still need to use User Credentials, then make sure you use a system/generic account (e.g.automation@my-company.com). When you use a personal account which is tied to a specific employee profile and that employee leaves the company, the token may become invalid and any automated processes using that token will start to fail.- Navigate to the Azure Portal and log in using your credentials.
- Access Microsoft Entra ID.
-
Register a new application by going to App registrations and clicking on New registration button:
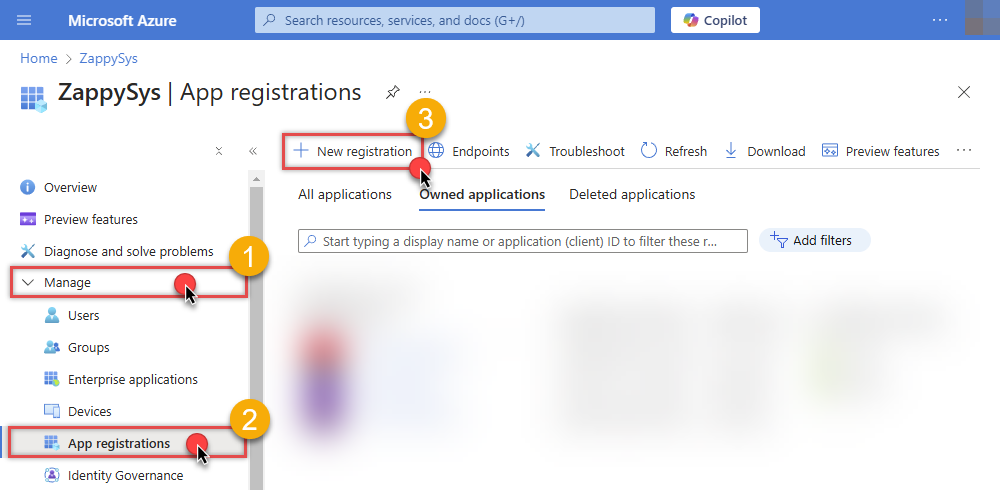 INFO: Find more information on how to register an application in Graph API reference.
 -
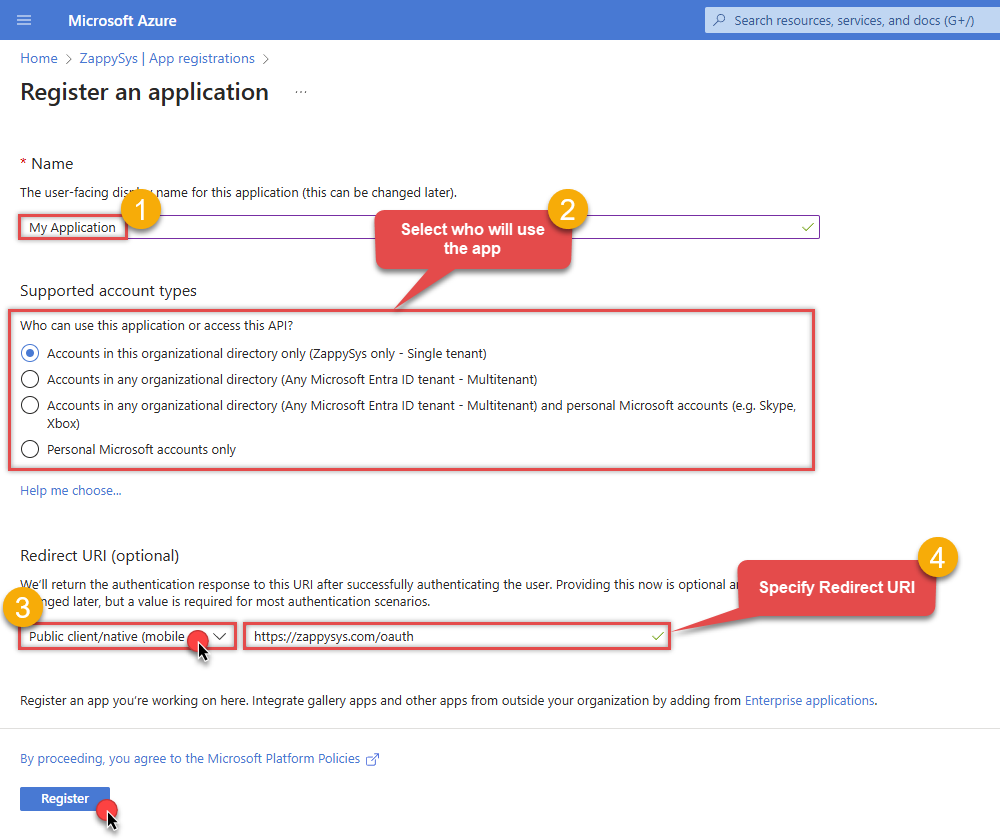
When configuration window opens, configure these fields:
-
Supported account type
- Use
Accounts in this organizational directory only, if you need access to data in your organization only.
- Use
-
Supported account type
-
Redirect URI:
- Set the type to
Public client/native (mobile & desktop). - Use
https://zappysys.com/oauthas the URL.
- Set the type to
-
After registering the app, copy the Application (client) ID for later:
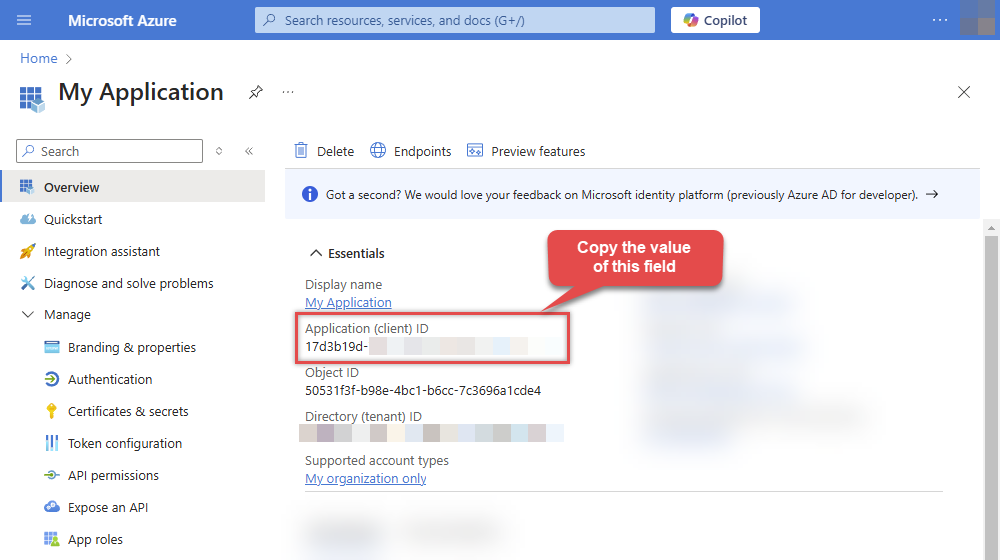
-
Copy OAuth authorization endpoint (v2) & OAuth token endpoint (v2) URLs to use later in the configuration:
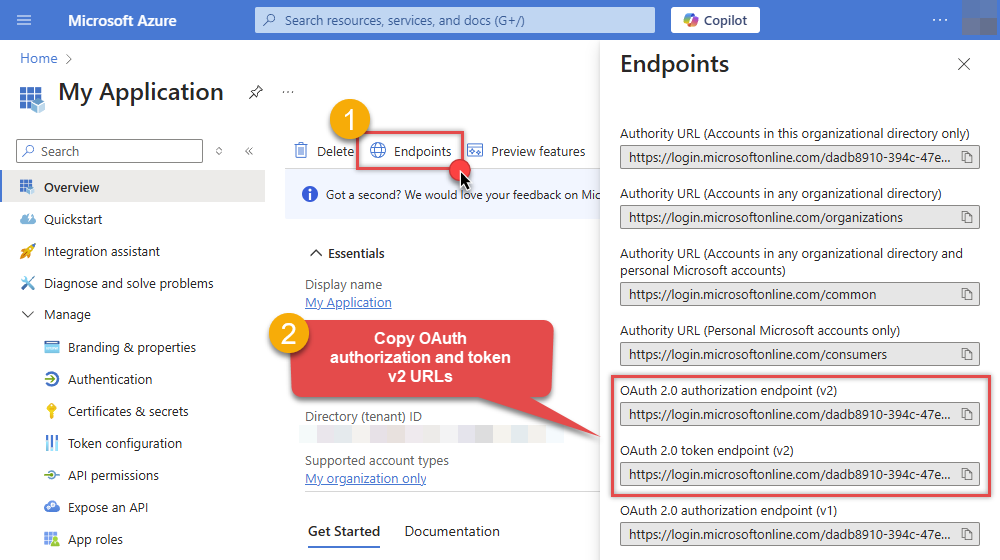
-
Now go to SSIS package or ODBC data source and use the copied values in User Credentials authentication configuration:
- In the Authorization URL field paste the OAuth authorization endpoint (v2) URL value you copied in the previous step.
- In the Token URL field paste the OAuth token endpoint (v2) URL value you copied in the previous step.
- In the Client ID field paste the Application (client) ID value you copied in the previous step.
-
In the Scope field use the default value or select individual scopes, e.g.:
-
email -
offline_access -
openid -
profile -
User.Read -
Sites.Read.All -
Sites.ReadWrite.All -
Files.Read.All -
Files.ReadWrite.All
-
- Press Generate Token button to generate Access and Refresh Tokens.
- Optional step. Choose Default Site Id from the drop down menu.
- Click Test Connection to confirm the connection is working.
- Done! Now you are ready to use the API Connector!
API Connection Manager configuration
Just perform these simple steps to finish authentication configuration:
-
Set Authentication Type to
User Credentials [OAuth] - Optional step. Modify API Base URL if needed (in most cases default will work).
- Fill in all the required parameters and set optional parameters if needed.
- Press Generate Token button to generate the tokens.
- Finally, hit OK button:
SharepointOnlineDSNSharePoint OnlineUser Credentials [OAuth]https://graph.microsoft.com/v1.0Required Parameters Authorization URL Fill-in the parameter... Token URL Fill-in the parameter... Client ID Fill-in the parameter... Scope Fill-in the parameter... Return URL Fill-in the parameter... Default Site Id (select after pressing 'Generate Token') Fill-in the parameter... Optional Parameters Client Secret Default Drive Id (select after pressing 'Generate Token') Login Prompt Option RetryMode RetryWhenStatusCodeMatch RetryStatusCodeList 429|503|423 RetryCountMax 5 RetryMultiplyWaitTime True Search Option For Non-Indexed Fields (Default=Blank - Search Only Indexed) Extra Headers (e.g. Header1:AAA||Header2:BBB) IsAppCred 0 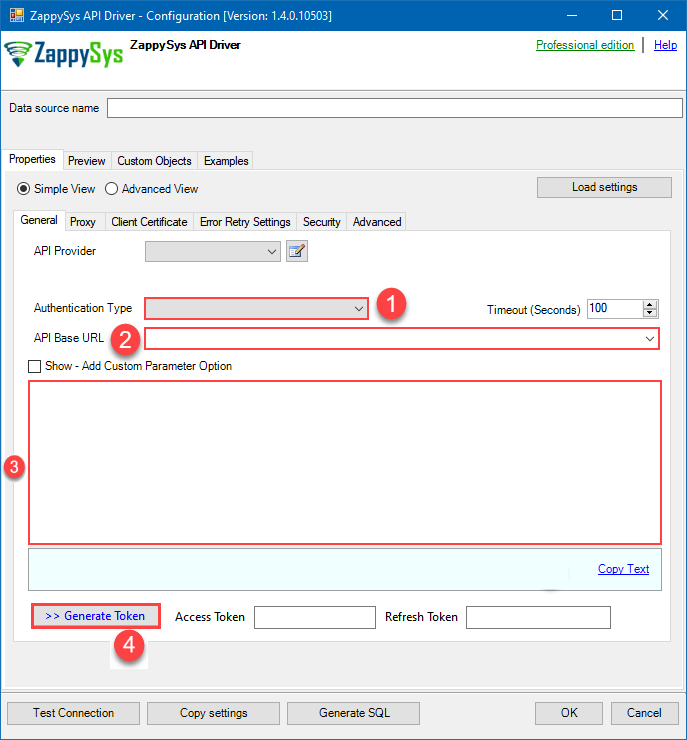
SharePoint Online authentication
Application-only access is broader and more powerful than delegated access (User Credentials), so you should only use app-only access where needed. Use it when: 1. The application needs to run in an automated way, without user input (for example, a daily script that checks emails from certain contacts and sends automated responses). 2. The application needs to access resources belonging to multiple different users (for example, a backup or data loss prevention app might need to retrieve messages from many different chat channels, each with different participants). 3. You find yourself tempted to store credentials locally and allow the app to sign in 'as' the user or admin. [API reference]
Follow these simple steps to create Microsoft Entra ID application with application access permissions:
- Create an OAuth app
- Configure App Permissions
-
Grant granular permissions to the OAuth application (optional)
This step allows to grant OAuth application granular permissions, i.e. access configured specificSites,Lists, andList Items.Step-1: Create OAuth app
- Navigate to the Azure Portal and log in using your credentials.
- Access Microsoft Entra ID.
-
Register a new application by going to
App registrations
and clicking on New registration button:
 INFO: Find more information on how to register an application in Graph API reference.
 -
When configuration window opens, configure these fields:
-
Supported account type
- e.g. select
Accounts in this organizational directory onlyif you need access to data in your organization only.
- e.g. select
-
Supported account type
-
Redirect URI:
- Set the type to
Public client/native (mobile & desktop). - Leave the URL field empty.
- Set the type to
-
After registering the app, copy the Application (client) ID for later:

-
Then copy OAuth authorization endpoint (v2) & OAuth token endpoint (v2) URLs:

-
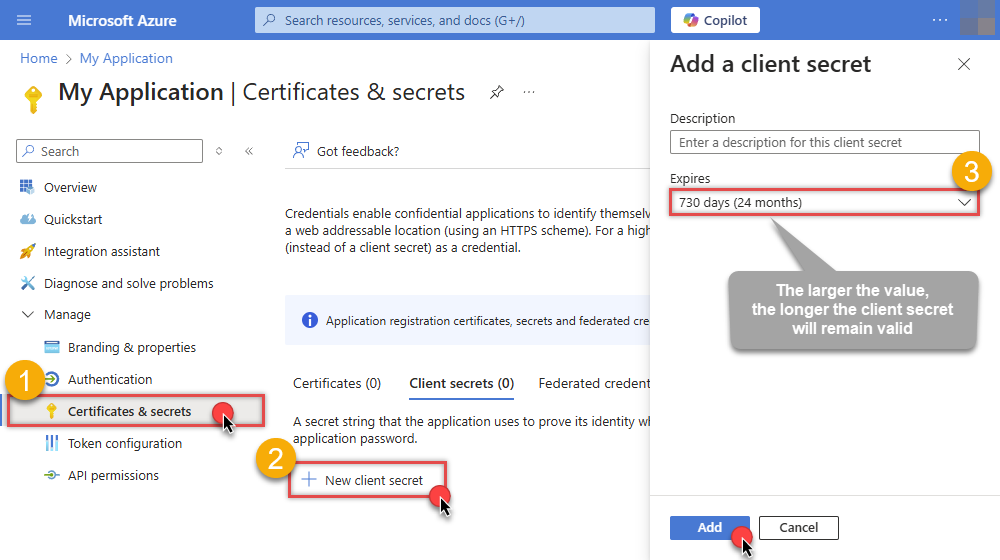
Continue and create Client secret:
-
Then copy the Client secret for later steps:


Step-2: Configure App Permissions
-
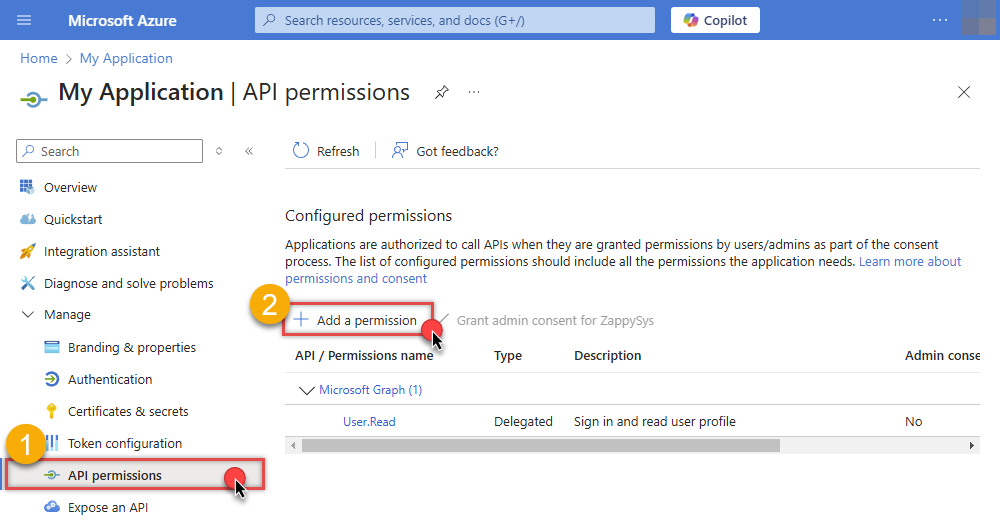
Continue by adding permissions for the app by going to the API permissions section, and clicking on Add a permission:
-
Select Microsoft Graph:
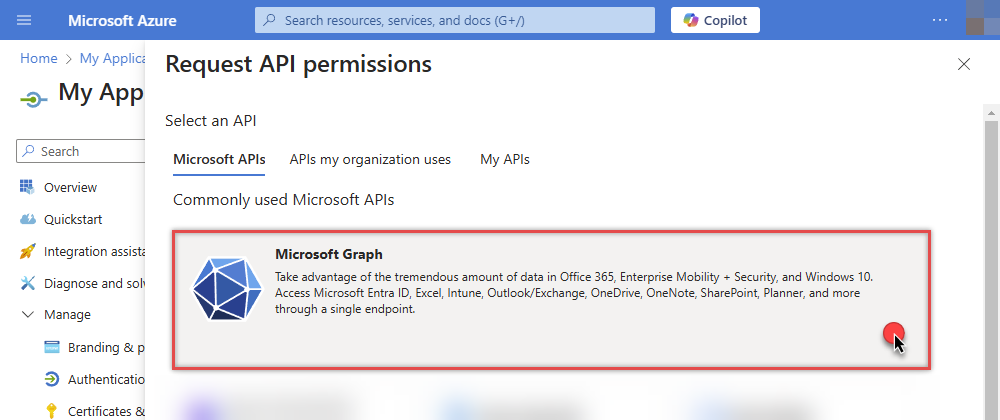
-
Then choose Application permissions option:

-
Continue by adding these Sites permissions (search for
site):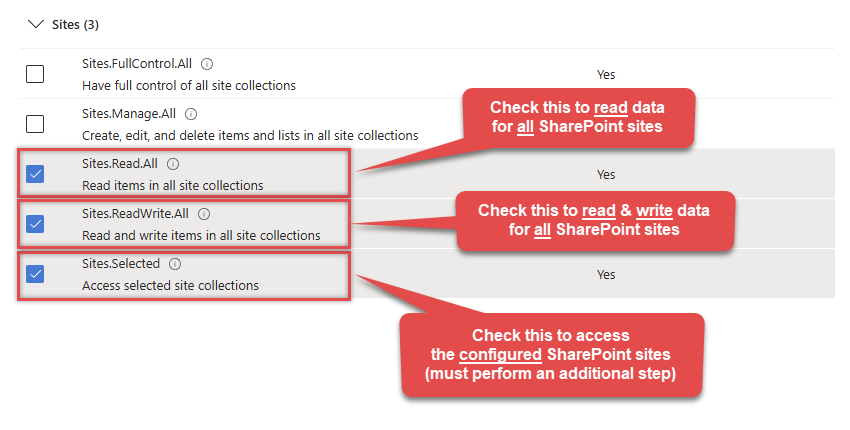 INFO: If you want to access specific lists or list items (table-level vs row-level security) rather than the full site, then add
Lists.SelectedOperations.SelectedorListItems.SelectedOperations.Selectedpermissions , just like in the previous step (search forlist).WARNING: If you add any of these permissions -Sites.Selected,Lists.SelectedOperations.Selected, orListItems.SelectedOperations.Selected- you must grant the app the SharePoint permissions for the specific resource (e.g. aSite, aList, or aListItem). Follow instructions in Grant SharePoint permissions to the OAuth app (optional) section on how to accomplish that. -
Finish by clicking Add permissions button:

-
Now it's time to Grant admin consent for your application:
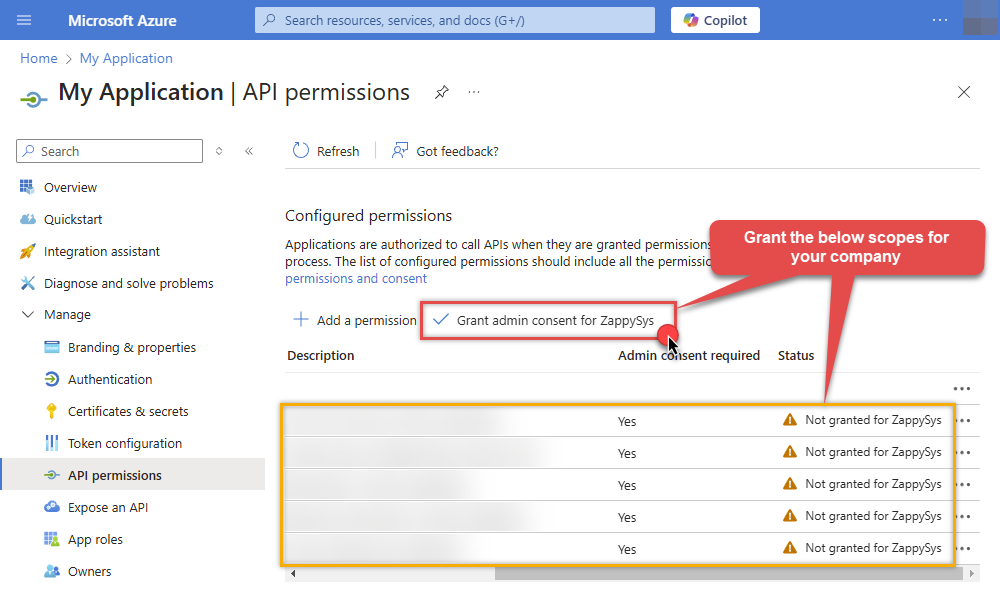
-
Confirm all the permissions are granted:

-
Now go to SSIS package or ODBC data source and use the copied values in Application Credentials authentication configuration:
- In the Token URL field paste the OAuth token endpoint (v2) URL value you copied in the previous step.
- In the Client ID field paste the Application (client) ID value you copied in the previous step.
- In the Client Secret field paste the Client secret value you copied in the previous step.
- Optional step. Choose Default Site Id from the drop down menu.
- Click Test Connection to confirm the connection is working.
- Done!
Step-3 (optional): Grant SharePoint permissions to the OAuth app
If you used
Sites.Selected,Lists.SelectedOperations.SelectedorListItems.SelectedOperations.Selectedpermission in the previous section, you must grant the app the SharePoint permissions for the specific resource (e.g. aSite, aList, or aListItem). You can do it using PowerShell or SharePoint admin center (obsolete method).Granting SharePoint permissions using PowerShell
Unfortunately, there is no user interface available to control these permissions yet. For now, granting permissions has to be accomplished via Microsoft Graph API [Microsoft reference]:
You must be the owner of the resource to grant permissions (i.e. belong to SharePoint owners group or be the owner of theSiteorList).- Open PowerShell (run as admin).
-
Call the following PowerShell code to grant
readandwritepermission for the app we created earlier (assuming Application (client) ID is89ea5c94-aaaa-bbbb-cccc-3fa95f62b66e):##### CONFIGURATION ############################################################################################ # More info at: # - https://learn.microsoft.com/en-us/graph/permissions-selected-overview?tabs=powershell # - https://learn.microsoft.com/en-us/powershell/module/microsoft.graph.sites/?view=graph-powershell-1.0 # Find SharePoint Site Id by following these steps: # - Login into SharePoint Online # - Open this URL https://{your-company}.sharepoint.com/_api/site in the browser # NOTE: For a subsite use https://{your-company}.sharepoint.com/sites/{your-subsite}/_api/site # - Find 'Id' element in the response (e.g. <d:Id m:type="Edm.Guid">efcdd21a-aaaa-bbbb-cccc-5d8104d8b5e3</d:Id>) # - Copy the Site Id, i.e.: efcdd21a-aaaa-bbbb-cccc-5d8104d8b5e3 # Set $siteId variable to the retrieved Site Id: $siteId="efcdd21a-aaaa-bbbb-cccc-5d8104d8b5e3" # Find your Application Id (i.e. Client Id) in the Azure Portal, in App Registrations page: # https://portal.azure.com/#view/Microsoft_AAD_RegisteredApps/ApplicationsListBlade $applicationId="89ea5c94-aaaa-bbbb-cccc-3fa95f62b66e" # Set one of app permissions: read, write, fullcontrol, owner ('write' includes 'read' permission) $appPermission="write" ##### SCRIPT ################################################################################################### # Step-1: Install 'Microsoft.Graph.Sites' module if it's not installed if (-not (Get-Module Microsoft.Graph.Sites -ListAvailable)) { Install-Module Microsoft.Graph.Sites } # Step-2: Load module Import-Module Microsoft.Graph.Sites # Step-3: Login (use Azure admin or SharePoint owner account) DisConnect-MgGraph Connect-MgGraph # Step-4: Set parameters for API call (set permissions, Site ID and Application ID) $params = @{ roles = @($appPermission) grantedTo = @{ application = @{id = $applicationId} } } # Step-5: Grant permissions New-MgSitePermission -SiteId $siteId -BodyParameter $params # Done! Write-Host "Granted SharePoint permissions to application '$applicationId' for site '$siteId'." - That's it! Now you can use the API Connector!
Granting SharePoint permissions using SharePoint admin center (obsolete method)
If you used
Site.Selectedpermission you can link it SharePoint site in SharePoint admin center [SharePoint reference]. Follow these simple steps to accomplish that:-
Log in to SharePoint admin center using this URL:
(replace
YOURCOMPANYwith your company name):https://YOURCOMPANY-admin.sharepoint.com/_layouts/15/appinv.aspx
INFO: To view all the registered apps in SharePoint, visit this page:https://YOURCOMPANY-admin.sharepoint.com/_layouts/15/appprincipals.aspx?Scope=Web. - In the App Id field enter Application (client) ID you copied in the previous step.
-
In the Permission Request XML field enter XML snippet which describes which SharePoint permissions you want to grant to the OAuth app, e.g.:
<AppPermissionRequests AllowAppOnlyPolicy="true">
  <AppPermissionRequest Scope="http://sharepoint/content/tenant" Right="FullControl" />
</AppPermissionRequests>
INFO: This example gives appFullControl, but you can also grant itReadorWritepermissions. - Click Create to grant the permission to your OAuth app.
- That's it! Now you can use the API Connector!
API Connection Manager configuration
Just perform these simple steps to finish authentication configuration:
-
Set Authentication Type to
Application Credentials [OAuth] - Optional step. Modify API Base URL if needed (in most cases default will work).
- Fill in all the required parameters and set optional parameters if needed.
- Finally, hit OK button:
SharepointOnlineDSNSharePoint OnlineApplication Credentials [OAuth]https://graph.microsoft.com/v1.0Required Parameters Token URL Fill-in the parameter... Client ID Fill-in the parameter... Client Secret Fill-in the parameter... Default Site Id Fill-in the parameter... Optional Parameters Scope https://graph.microsoft.com/.default Default Drive Id RetryMode RetryWhenStatusCodeMatch RetryStatusCodeList 429|503|423 RetryCountMax 5 RetryMultiplyWaitTime True Search Option For Non-Indexed Fields (Default=Blank - Search Only Indexed) Extra Headers (e.g. Header1:AAA||Header2:BBB) IsAppCred 1 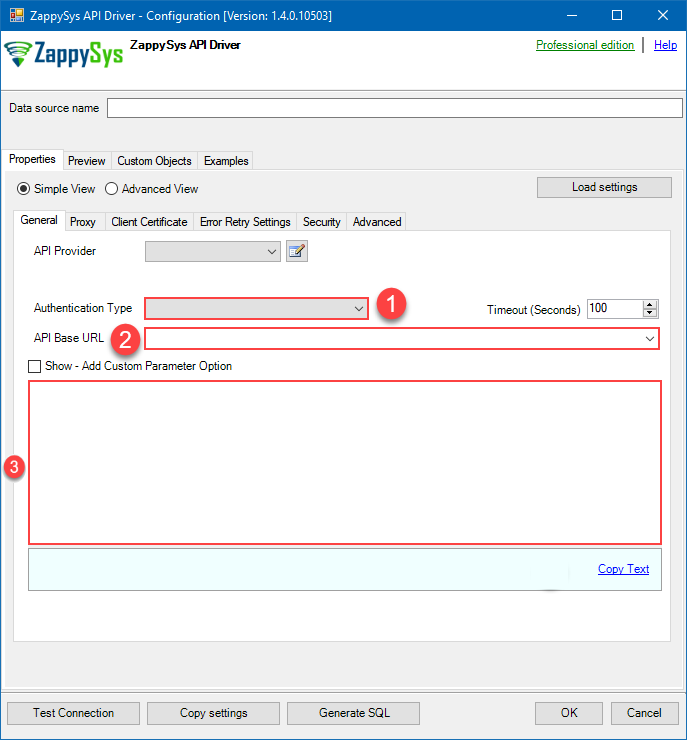
SharePoint Online authentication
Follow these simple steps to create Microsoft Entra ID application with application access permissions:
- Create an OAuth app
- Configure App Permissions
- Create Public/Private Key Pair
- Upload Public Key
- Configure ZappySys Connection for Private Key use
-
Grant granular permissions (optional)
This step allows to grant OAuth application granular permissions, i.e. access configured specificSites,Lists, andList Items.Step-1: Create OAuth app
- Navigate to the Azure Portal and log in using your credentials.
- Access Microsoft Entra ID.
-
Register a new application by going to
App registrations
and clicking on New registration button:
 INFO: Find more information on how to register an application in Graph API reference.
 -
When configuration window opens, configure these fields:
-
Supported account type
- e.g. select
Accounts in this organizational directory onlyif you need access to data in your organization only.
- e.g. select

-
Supported account type
-
After registering the app, copy the Application (client) ID for later:

-
Then copy OAuth authorization endpoint (v2) & OAuth token endpoint (v2) URLs:

Step-2: Configure App Permissions
-
Continue by adding permissions for the app by going to the API permissions section, and clicking on Add a permission:

-
Select Microsoft Graph:

-
Then choose Application permissions option:

-
Continue by adding these Sites permissions (search for
site): INFO: If you want to access specific lists or list items (table-level vs row-level security) rather than the full site, then add
Lists.SelectedOperations.SelectedorListItems.SelectedOperations.Selectedpermissions , just like in the previous step (search forlist).WARNING: If you add any of these permissions -Sites.Selected,Lists.SelectedOperations.Selected, orListItems.SelectedOperations.Selected- you must grant the app the SharePoint permissions for the specific resource (e.g. aSite, aList, or aListItem). Follow instructions in Grant SharePoint permissions to the OAuth app (optional) section on how to accomplish that. -
Finish by clicking Add permissions button:

-
Now it's time to Grant admin consent for your application:

-
Confirm all the permissions are granted:

Step-3: Generate a Self-Signed Certificate
Now let's go through setting up a certificate-based authentication flow for Microsoft Graph or other Azure AD protected APIs using client credentials and a JWT.
You can use OpenSSL or any other way to generate Certificate file but to make it simple we will use below example PowerShell script.
Open PowerShell and execute code listed in below steps.
# Run this in PowerShell
#Change .AddYears(1) to desired number. By default it expires certificate in one year as per below code.

$cert = New-SelfSignedCertificate `
  -Subject "CN=MyClientAppCert" `
  -KeySpec Signature `
  -KeyExportPolicy Exportable `
  -KeyLength 2048 `
  -CertStoreLocation "Cert:\CurrentUser\My" `
  -KeyAlgorithm RSA `
  -HashAlgorithm SHA256 `
  -NotAfter (Get-Date).AddYears(1) `
  -Provider "Microsoft Enhanced RSA and AES Cryptographic Provider"

# Export private key (.pfx)  - Keep this with you to make API calls (SECRET KEY - DONOT SHARE)
$pfxPath = "$env:USERPROFILE\Desktop\private_key.pfx"
$pwd = ConvertTo-SecureString -String "yourStrongPassword123" -Force -AsPlainText
Export-PfxCertificate -Cert $cert -FilePath $pfxPath -Password $pwd

# Export public certificate (.cer) - UPLOAD this to Azure Portal
$cerPath = "$env:USERPROFILE\Desktop\public_key.cer"
Export-Certificate -Cert $cert -FilePath $cerPath
Step-4: Upload the Certificate (i.e. Public Key *.cer)
Once we have certificate file generated.- In your App Registration, go to Certificates & secrets
- Under Certificates, click Upload certificate
- Select the
.cerfile (public certificate)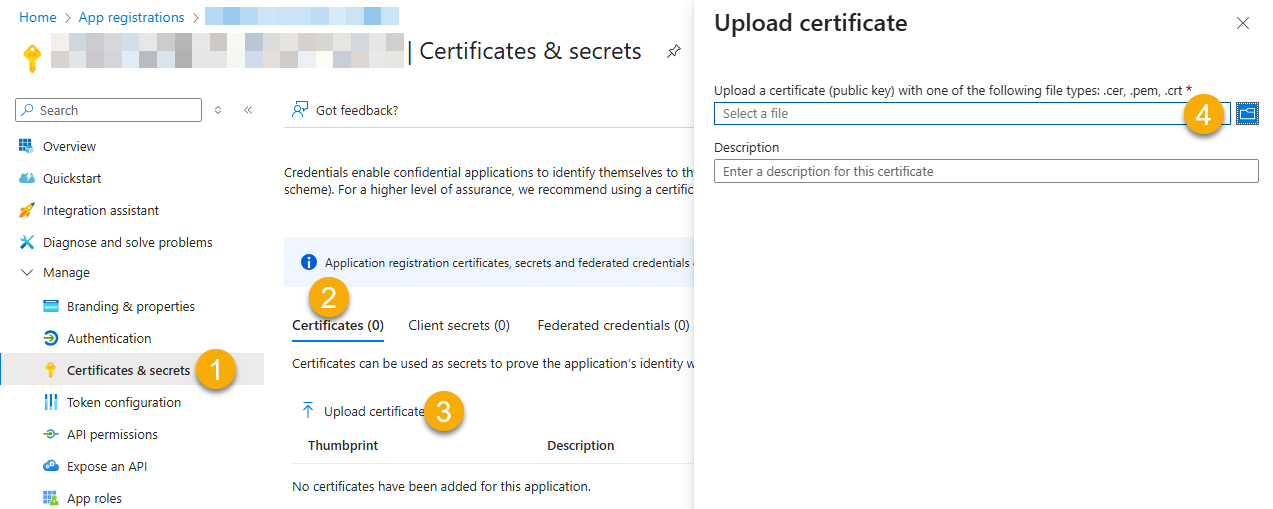
- Click Select a file (Browse button)
- Select public key file (*.cer) from local machine and click OK to upload
Step-5: Configure ZappySys Connection - Use private key (i.e. *.pfx or *.pem)
Now its time to use certificate pfx file (private key) generated in the previous step (NOTE: PFX file contains both private key and public key).-
Go to SSIS package or ODBC data source and use the copied values in Application Credentials authentication configuration:
- In the Token URL field paste the OAuth token endpoint (v2) URL value you copied in the previous step.
- In the Client ID field paste the Application (client) ID value you copied in the previous step.
- Configure private key
- go to
Certificate Tab - Change Storage Mode to
Disk File: *.pfx format (PKCS#12).NOTE: You can also useStored In LocalMachinemode if PFX file already imported in the Local Certificate Storage Area - User Store OR Machine Store. If you used OpenSSL to generate key pair then useDisk File: *.pem format (PKCS#8 or PKCS#1)Mode for Cert Store Location. - Supply the key file path
- Supply the certificate password (same password used in earlier PowerShell script)
- go to
- Now go back to General Tab, choose Default Site Id and Default Drive Id from the drop down menu.
- Click Test connection see everything is good
Step-6 (optional): Grant granular permissions to the OAuth app
If you used
Sites.Selected,Lists.SelectedOperations.SelectedorListItems.SelectedOperations.Selectedpermission in the previous section, you must grant the app the SharePoint permissions for the specific resource (e.g. aSite, aList, or aListItem). You can do it using PowerShell or SharePoint admin center (obsolete method).Granting SharePoint permissions using PowerShell
Unfortunately, there is no user interface available to control these permissions yet. For now, granting permissions has to be accomplished via Microsoft Graph API [Microsoft reference]:
You must be the owner of the resource to grant permissions (i.e. belong to SharePoint owners group or be the owner of theSiteorList).- Open PowerShell (run as admin).
-
Call the following PowerShell code to grant
readandwritepermission for the app we created earlier (assuming Application (client) ID is89ea5c94-aaaa-bbbb-cccc-3fa95f62b66e):##### CONFIGURATION ############################################################################################ # More info at: # - https://learn.microsoft.com/en-us/graph/permissions-selected-overview?tabs=powershell # - https://learn.microsoft.com/en-us/powershell/module/microsoft.graph.sites/?view=graph-powershell-1.0 # Find SharePoint Site Id by following these steps: # - Login into SharePoint Online # - Open this URL https://{your-company}.sharepoint.com/_api/site in the browser # NOTE: For a subsite use https://{your-company}.sharepoint.com/sites/{your-subsite}/_api/site # - Find 'Id' element in the response (e.g. <d:Id m:type="Edm.Guid">efcdd21a-aaaa-bbbb-cccc-5d8104d8b5e3</d:Id>) # - Copy the Site Id, i.e.: efcdd21a-aaaa-bbbb-cccc-5d8104d8b5e3 # Set $siteId variable to the retrieved Site Id: $siteId="efcdd21a-aaaa-bbbb-cccc-5d8104d8b5e3" # Find your Application Id (i.e. Client Id) in the Azure Portal, in App Registrations page: # https://portal.azure.com/#view/Microsoft_AAD_RegisteredApps/ApplicationsListBlade $applicationId="89ea5c94-aaaa-bbbb-cccc-3fa95f62b66e" # Set one of app permissions: read, write, fullcontrol, owner ('write' includes 'read' permission) $appPermission="write" ##### SCRIPT ################################################################################################### # Step-1: Install 'Microsoft.Graph.Sites' module if it's not installed if (-not (Get-Module Microsoft.Graph.Sites -ListAvailable)) { Install-Module Microsoft.Graph.Sites } # Step-2: Load module Import-Module Microsoft.Graph.Sites # Step-3: Login (use Azure admin or SharePoint owner account) DisConnect-MgGraph Connect-MgGraph # Step-4: Set parameters for API call (set permissions, Site ID and Application ID) $params = @{ roles = @($appPermission) grantedTo = @{ application = @{id = $applicationId} } } # Step-5: Grant permissions New-MgSitePermission -SiteId $siteId -BodyParameter $params # Done! Write-Host "Granted SharePoint permissions to application '$applicationId' for site '$siteId'." - That's it! Now you can use the API Connector!
API Connection Manager configuration
Just perform these simple steps to finish authentication configuration:
-
Set Authentication Type to
Application Credentials with Certificate (Sign JWT with Private Key) [OAuth] - Optional step. Modify API Base URL if needed (in most cases default will work).
- Fill in all the required parameters and set optional parameters if needed.
- Finally, hit OK button:
SharepointOnlineDSNSharePoint OnlineApplication Credentials with Certificate (Sign JWT with Private Key) [OAuth]https://graph.microsoft.com/v1.0Required Parameters Token URL Fill-in the parameter... Client ID Fill-in the parameter... Certificate: *** Configure [Client Certificate] Tab *** Fill-in the parameter... Default Site Id Fill-in the parameter... Optional Parameters Default Drive Id RetryMode RetryWhenStatusCodeMatch RetryStatusCodeList 429|503|423 RetryCountMax 5 RetryMultiplyWaitTime True Search Option For Non-Indexed Fields (Default=Blank - Search Only Indexed) Extra Headers (e.g. Header1:AAA||Header2:BBB) IsAppCred 1 
Once the data source connection has been configured, it's time to configure the SQL query. Select the Preview tab and then click Query Builder button to configure the SQL query:
ZappySys API Driver - SharePoint OnlineSharePoint Connector can be used to read, write data in SharePoint Online List / Document Library, perform file operations such as upload, download, create, move, delete, rename in a few clicks!SharepointOnlineDSN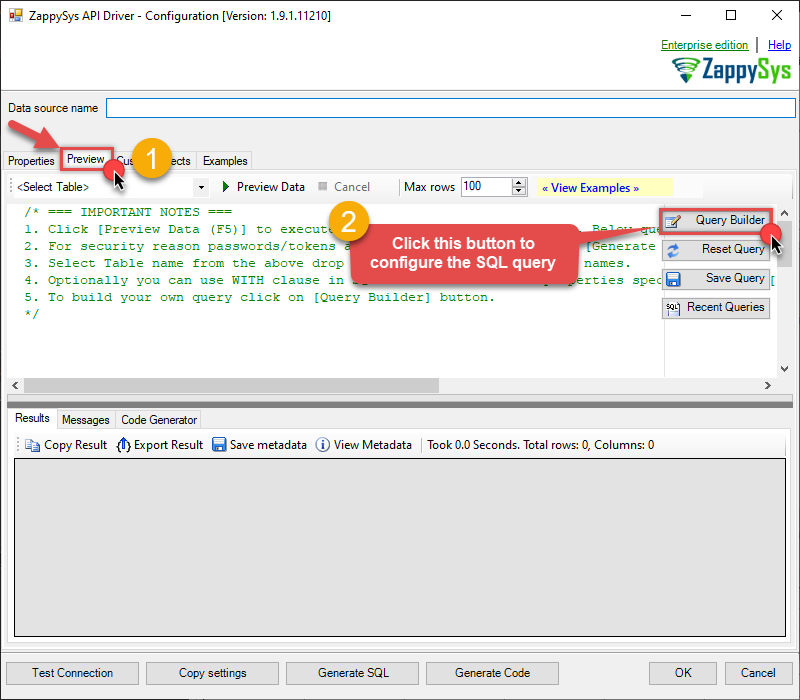
Start by selecting the Table or Endpoint you are interested in and then configure the parameters. This will generate a query that we will use in Talend Studio to retrieve data from SharePoint Online. Hit OK button to use this query in the next step.
SELECT * FROM Lists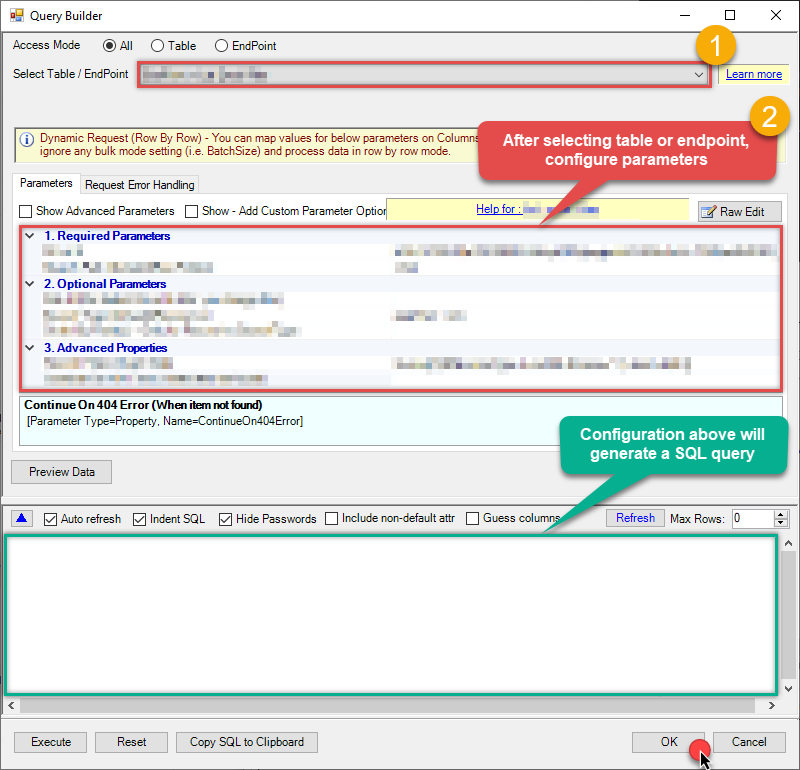 Some parameters configured in this window will be passed to the SharePoint Online API, e.g. filtering parameters. It means that filtering will be done on the server side (instead of the client side), enabling you to get only the meaningful data
much faster .Now hit Preview Data button to preview the data using the generated SQL query. If you are satisfied with the result, use this query in Talend Studio:
ZappySys API Driver - SharePoint OnlineSharePoint Connector can be used to read, write data in SharePoint Online List / Document Library, perform file operations such as upload, download, create, move, delete, rename in a few clicks!SharepointOnlineDSNSELECT * FROM Lists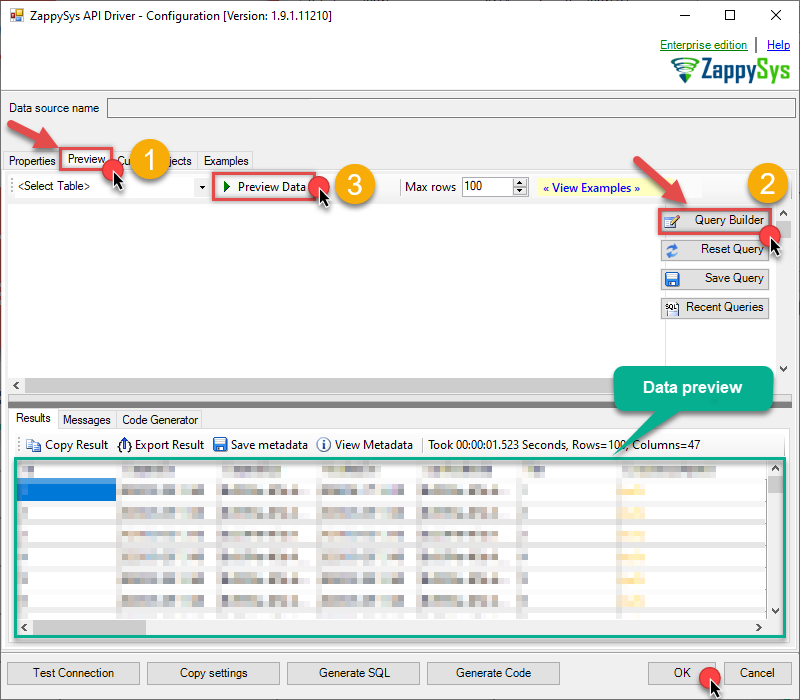 You can also access data quickly from the tables dropdown by selecting <Select table>.A
WHEREclause,LIMITkeyword will be performed on the client side, meaning that thewhole result set will be retrieved from the SharePoint Online API first, and only then the filtering will be applied to the data. If possible, it is recommended to use parameters in Query Builder to filter the data on the server side (in SharePoint Online servers).Click OK to finish creating the data source.
Very important step. Now, after creating or modifying the data source make sure you:
- Click the Save button to persist your changes.
- Hit Yes, once asked if you want to restart the Data Gateway service.
This will ensure all changes are properly applied:
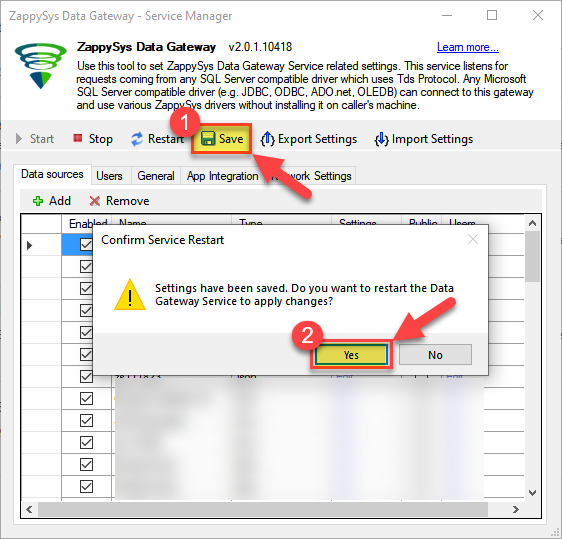 Skipping this step may result in the new settings not taking effect and, therefore you will not be able to connect to the data source.
Read SharePoint Online data in Talend Studio
To read SharePoint Online data in Talend Studio, we'll need to complete several steps. Let's get through them all right away!
This article is compatible with Talend Open Studio (a free version, currently retired by Qlik). If you don't have it, you can still purchase a shareware version of Talend Studio from Qlik.Create connection for input
- First of all, open Talend Studio
-
Create a new connection:
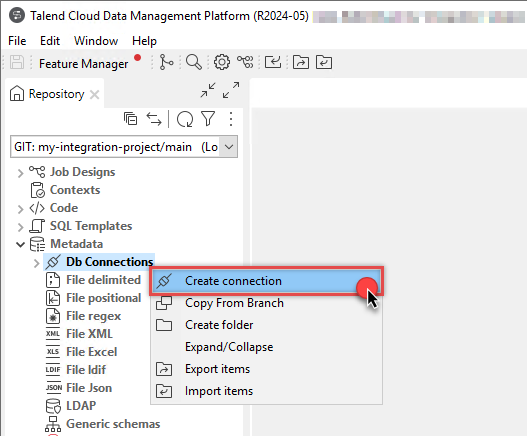
-
Select Microsoft SQL Server connection:
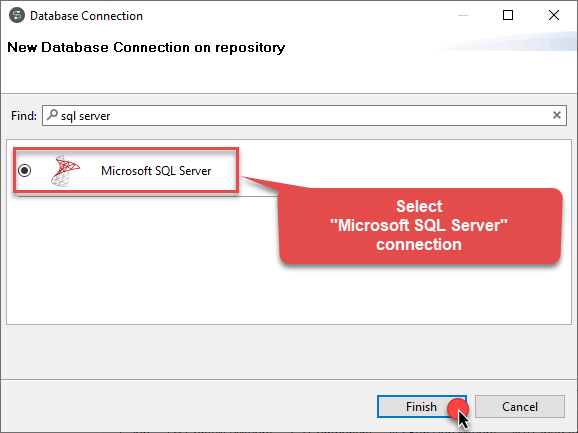
-
Name your connection:
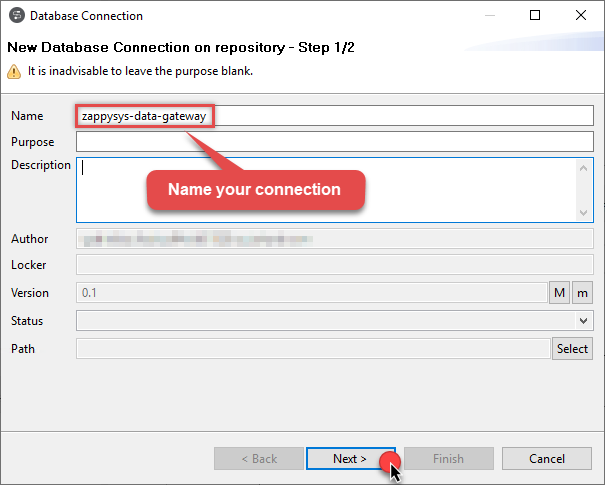
-
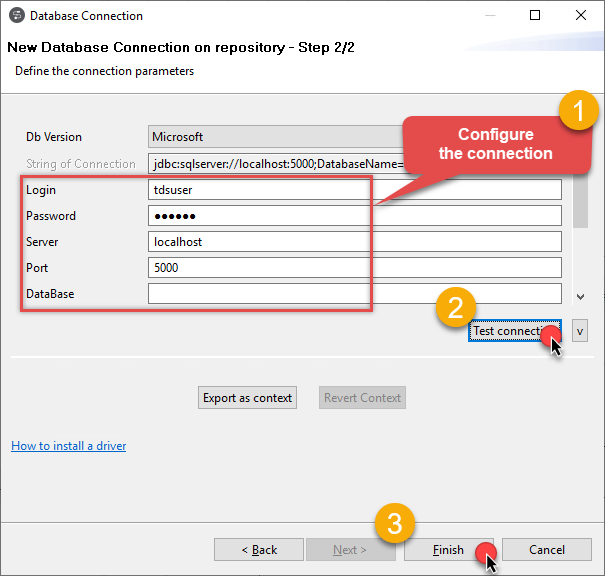
Fill-in connection parameters and then click Test connection:
SharepointOnlineDSN
-
If the List of modules not installed for this operation window shows up, then download and install all of them:
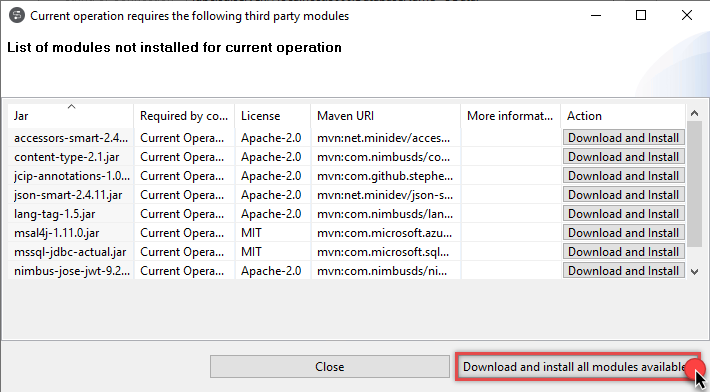 Review and accept all additional module license agreements during the process
 -
Finally, you should see a successful connection test result at the end:

Add input
-
Once we have a connection to ZappySys Data Gateway created, we can proceed by creating a job:
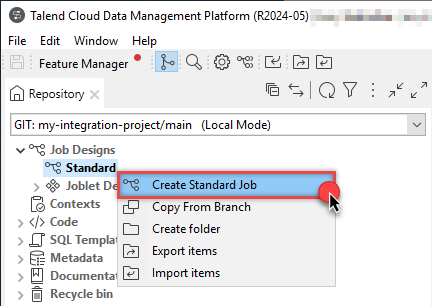
-
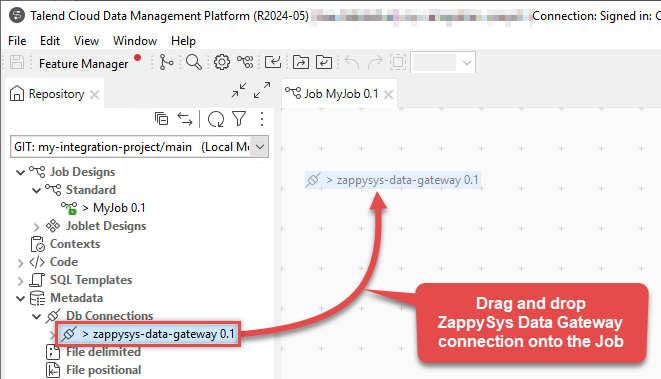
Simply drag and drop ZappySys Data Gateway connection onto the job:
-
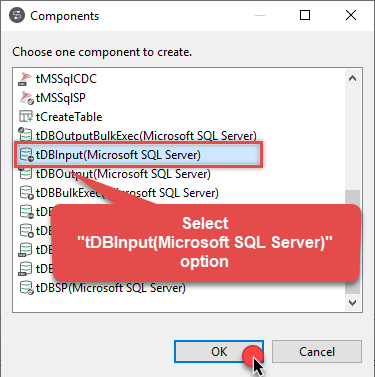
Then create an input based on ZappySys Data Gateway connection:
-
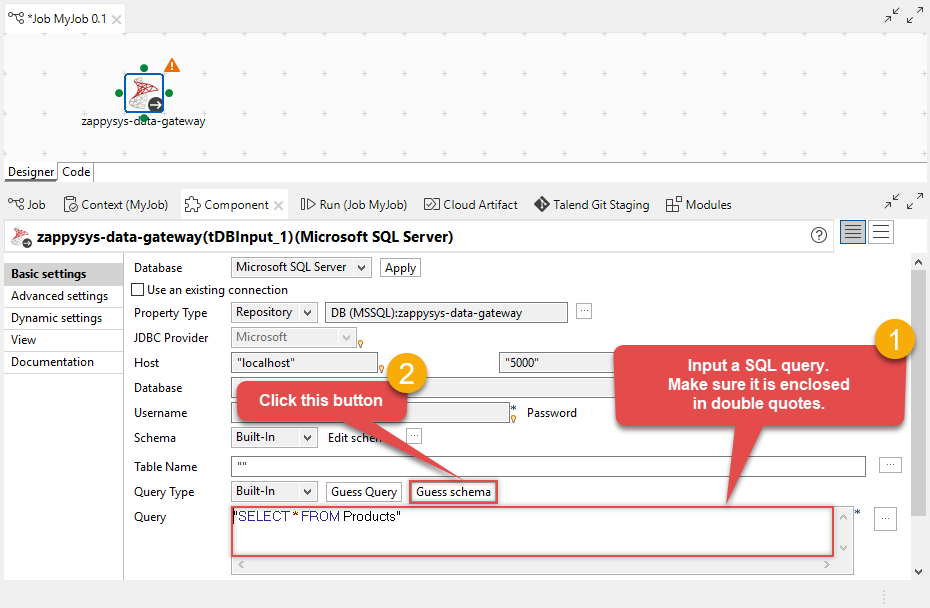
Continue by configuring a SQL query and click Guess schema button:
-
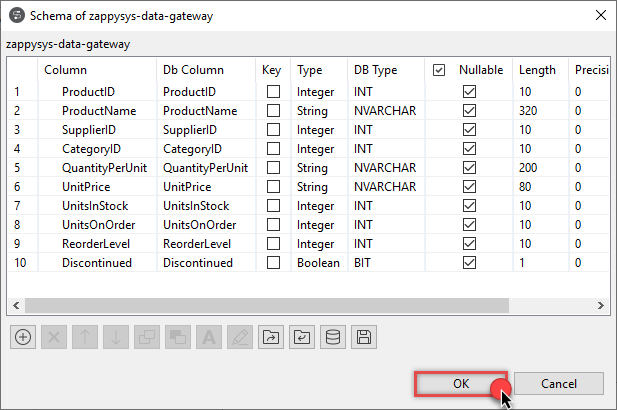
Finish by configuring the schema, for example:
Add output
We are ready to add an output. From Palette drag and drop a tFileOutputDelimited output and connect it to the input: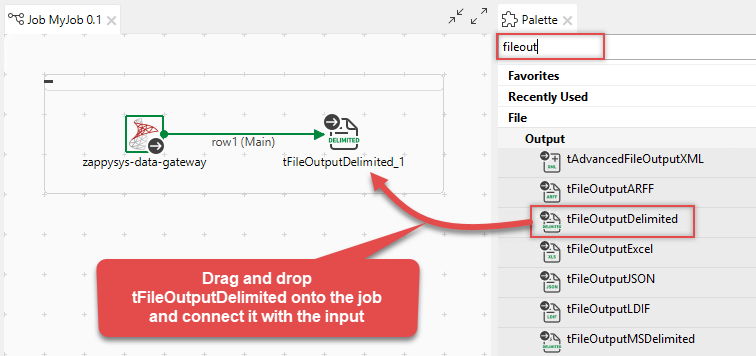
Run the job
Finally, run the job and integrate your SharePoint Online data: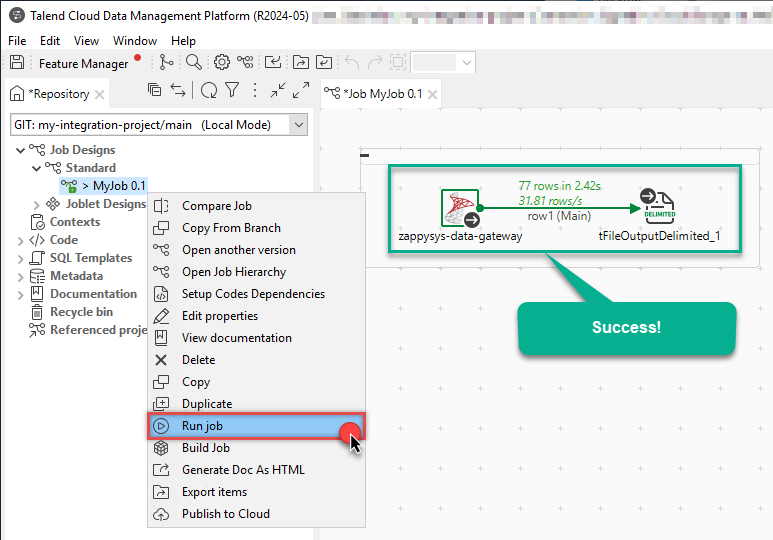
Actions supported by SharePoint Online Connector
Learn how to perform common SharePoint Online actions directly in Talend Studio with these how-to guides:
- Copy item (File or Folder)
- Create / Update CSV File (Generic)
- Create / Update JSON File (Generic)
- Create List Item
- Delete Item (File or Folder)
- Delete List Item
- Download File
- Get Item (File or Folder)
- List Drives
- List Excel Files
- List Excel Worksheets of a File (i.e. List Tabs)
- List Files
- List Folders
- List SharePoint Lists
- List SharePoint System Lists
- List Sites
- Move or rename item (File or Folder)
- Read CSV File (Generic)
- Read Drive
- Read Excel Worksheet (Auto Detect Range)
- Read Excel Worksheet (From Exact Range)
- Read File Data (As Byte Array)
- Read JSON File (Generic)
- Read List
- Read List Fields
- Read List Item (By ID)
- Read List Items
- Read List Items (Dynamic Columns)
- Read Main Site
- Update List Item
- Upload File
- Make Generic API Request
- Make Generic API Request (Bulk Write)
Conclusion
In this article we showed you how to connect to SharePoint Online in Talend Studio and integrate data without any coding, saving you time and effort.
We encourage you to download SharePoint Online Connector for Talend Studio and see how easy it is to use it for yourself or your team.
If you have any questions, feel free to contact ZappySys support team. You can also open a live chat immediately by clicking on the chat icon below.
Download SharePoint Online Connector for Talend Studio Documentation
More integrations
Other connectors for Talend Studio
AllBig Data & NoSQLDatabaseCRM & ERPMarketingCollaborationCloud StorageReportingCommerceAPI & FilesOther application integration scenarios for SharePoint Online
AllData IntegrationDatabaseBI & ReportingProductivityProgramming LanguagesAutomation & ScriptingODBC applications


