
Introduction
You can connect to your Salesforce Data Cloud (Data 360) data from SSIS via the high-performance Salesforce Data Cloud (Data 360) ODBC Driver (powered by ZappySys JDBC-ODBC Bridge Driver). We'll walk you through the entire setup.
Let's not waste time and get started!
Prerequisites
Before we begin, make sure you meet the following prerequisite: Java Runtime Environment (JRE) or Java Development Kit (JDK) must be installed on your system.
-
Minimum required version: Java 8
-
Recommended Java version: Java 21
If your JDBC Driver targets a different Java version (e.g., 11 / 17 / 21), install the corresponding or newer Java version.
Download Salesforce Data Cloud (Data 360) JDBC driver
To connect to Salesforce Data Cloud (Data 360), you will have to download JDBC driver for it, which we will use in later steps. Let's perform these little steps right away:
-
Visit Salesforce Data Cloud (Data 360) website or MVN Repository.
-
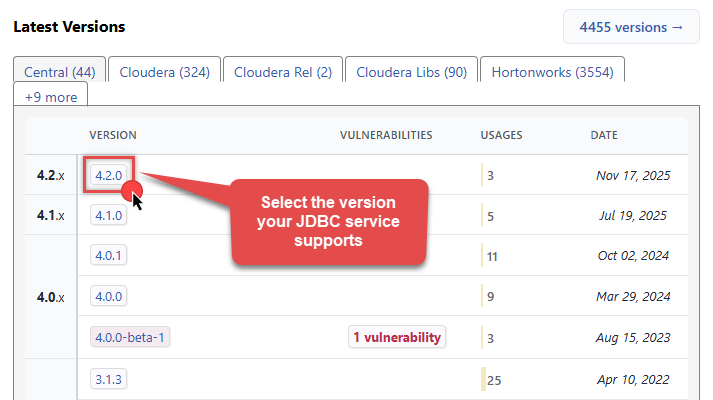
Select the appropriate JDBC driver version in Latest Versions section in MVN Repository:
-
Download the JDBC driver, and save it locally, e.g. to
C:\ZappySys\Jdbc\Salesforce Data Cloud (Data 360)\jdbc-0.29.0-shaded.jar.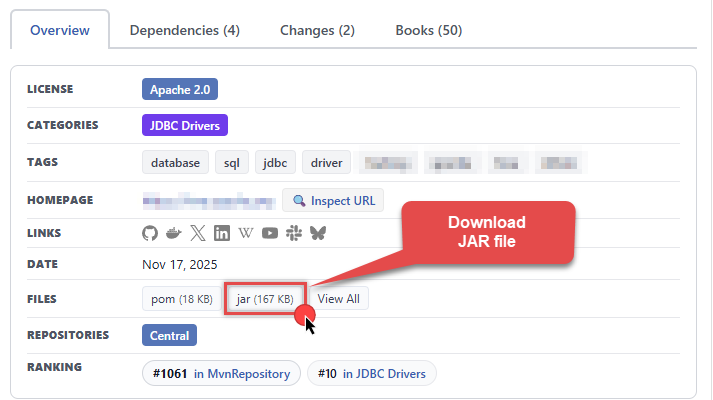
-
Done! That was easy, wasn't it? Let's proceed to the next step.
Create data source using Salesforce Data Cloud (Data 360) ODBC Driver
Video instructions
Watch this quick walkthrough to see how to configure your Salesforce Data Cloud (Data 360) ODBC data source, or scroll down for the step-by-step written guide.
Step-by-step instructions
To get data from Salesforce Data Cloud (Data 360) using SSIS, we first need to create an ODBC data source. We will later read this data in SSIS. Perform these steps:
-
Download and install ODBC PowerPack (if you haven't already).
-
Search for
odbcand open the ODBC Data Sources (64-bit):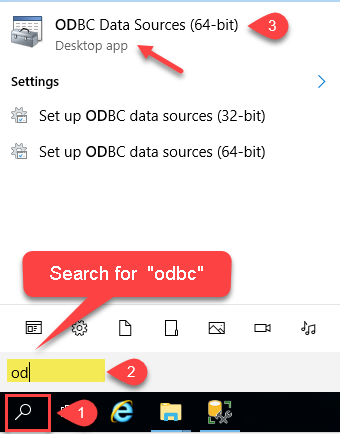
-
Create a User data source (User DSN) based on the ZappySys JDBC Bridge Driver driver:
ZappySys JDBC Bridge Driver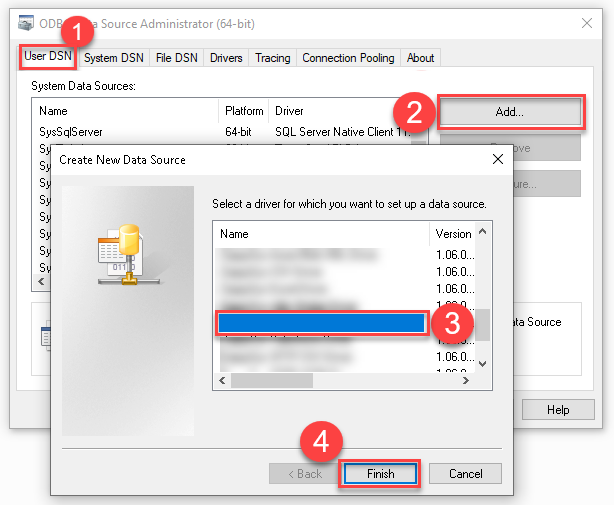
- Create and use a User DSN if the client application runs under a User Account. This is the ideal option at design time (e.g., when developing in Visual Studio). Use it for both types of applications (64-bit and 32-bit).
- Create and use a System DSN if the client application runs under a System Account (e.g., as a Windows Service). This is usually the required option in a production environment. If your Windows Service is a 32-bit application, you must use the 32-bit ODBC Data Source Administrator to configure this
When deployed to production, SSIS runs under a Service Account. Therefore, for the production environment, you must create and use a System DSN. -
Now, we need to configure the JDBC connection in the new ODBC data source. Simply enter the Connection string, credentials, configure other settings, and then click Test Connection button to test the connection:
Select your authentication scenario below to expand connection configuration steps to:
- Configure the authentication in Salesforce Data Cloud (Data 360).
- Enter those details into the ZappySys JDBC Bridge Driver data source configuration.
Production (login.salesforce.com)
Salesforce Data Cloud (Data 360) authentication
Follow these steps to create a Salesforce External Client App (or a legacy Connected App) so the Data Cloud JDBC driver can authenticate. JDBC Bridge then exposes Data Cloud SQL to Power BI, SQL Server Linked Server via ZappySys Data Gateway, Crystal Reports, SSRS, Azure Data Factory, and other ODBC tools.
WARNING: As of 21 Feb 2026 Salesforce no longer lets you create new Connected Apps. Use an External Client App. If you already have a Connected App, you can keep using it with username/password + consumer key/secret. Do not use a personal employee login for unattended jobs (Power BI refresh, Linked Server, ADF). Use a dedicated integration user.- Sign in to Salesforce Setup as an administrator.
- Go to App Manager (or External Client Apps) and create a new External Client App / Connected App. Enable OAuth Settings.
-
Callback URL (Redirect URI) must be exactly:
https://zappysys.com/oauthINFO: Use this ZappySys capture page so the authorizationcodeappears in the page title and URL during the 3-legged dance. Do not use localhost, a Salesforce "try it" page, or any other URL -- those often redirect again or drop the query string, so the code is not visible. - Select OAuth scopes your org requires for Data Cloud query (typically includes Data Cloud / CDP query and API access). Save.
- Open Manage Consumer Details and copy Consumer Key (Client ID) and Consumer Secret (Client Secret).
- Paste username, password (plus security token if your org requires it), Client ID, and Client Secret into this Auth profile.
- If you complete a browser authorization, wait until the browser lands on
https://zappysys.com/oauthand thecodeis in the title or address bar. - Finish the wizard. Then click Test Connection on the DSN Main UI (the wizard does not run Test Connection).
- Done. You can query from C#, Python, PowerShell, and ODBC apps.
JDBC Bridge Driver configuration
Just perform these simple steps to finish authentication configuration:
- Fill in the Connection string and required parameters using the values below.
- Click Test Connection to verify the JDBC connection.
- Finally, hit OK button:
Use these values when setting parameters:
-
Connection string :jdbc:salesforce-datacloud://[$LoginHost$] -
Driver class :com.salesforce.datacloud.jdbc.DataCloudJDBCDriver -
JDBC driver file(s) :C:\ZappySys\Jdbc\Salesforce Data Cloud (Data 360)\jdbc-0.29.0-shaded.jar -
Login host :login.salesforce.com -
User name : -
Password : -
Client ID (Consumer Key) : -
Client Secret (Consumer Secret) : -
Data space :default
SalesforceDataCloudData360DSNjdbc:salesforce-datacloud://[$LoginHost$]com.salesforce.datacloud.jdbc.DataCloudJDBCDriverC:\ZappySys\Jdbc\Salesforce Data Cloud (Data 360)\jdbc-0.29.0-shaded.jaroptional for Salesforce Data Cloud (Data 360)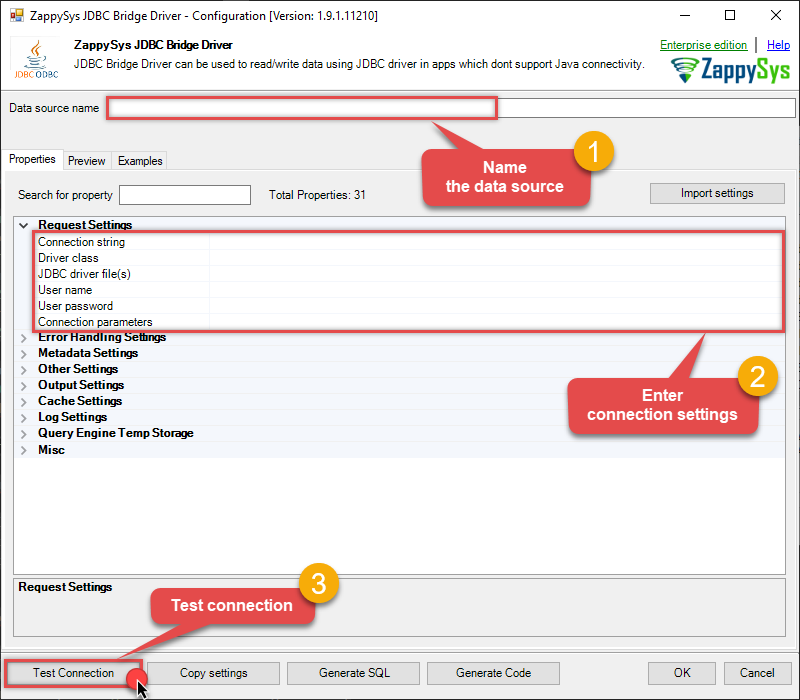 Find full details in the Salesforce Data Cloud (Data 360) Connector authentication reference.
Sandbox (test.salesforce.com)
Salesforce Data Cloud (Data 360) authentication
Follow these steps to create a Salesforce External Client App (or a legacy Connected App) so the Data Cloud JDBC driver can authenticate. JDBC Bridge then exposes Data Cloud SQL to Power BI, SQL Server Linked Server via ZappySys Data Gateway, Crystal Reports, SSRS, Azure Data Factory, and other ODBC tools.
WARNING: As of 21 Feb 2026 Salesforce no longer lets you create new Connected Apps. Use an External Client App. If you already have a Connected App, you can keep using it with username/password + consumer key/secret. Do not use a personal employee login for unattended jobs (Power BI refresh, Linked Server, ADF). Use a dedicated integration user.- Sign in to Salesforce Setup as an administrator.
- Go to App Manager (or External Client Apps) and create a new External Client App / Connected App. Enable OAuth Settings.
-
Callback URL (Redirect URI) must be exactly:
https://zappysys.com/oauthINFO: Use this ZappySys capture page so the authorizationcodeappears in the page title and URL during the 3-legged dance. Do not use localhost, a Salesforce "try it" page, or any other URL -- those often redirect again or drop the query string, so the code is not visible. - Select OAuth scopes your org requires for Data Cloud query (typically includes Data Cloud / CDP query and API access). Save.
- Open Manage Consumer Details and copy Consumer Key (Client ID) and Consumer Secret (Client Secret).
- Paste username, password (plus security token if your org requires it), Client ID, and Client Secret into this Auth profile.
- If you complete a browser authorization, wait until the browser lands on
https://zappysys.com/oauthand thecodeis in the title or address bar. - Finish the wizard. Then click Test Connection on the DSN Main UI (the wizard does not run Test Connection).
- Done. You can query from C#, Python, PowerShell, and ODBC apps.
JDBC Bridge Driver configuration
Just perform these simple steps to finish authentication configuration:
- Fill in the Connection string and required parameters using the values below.
- Click Test Connection to verify the JDBC connection.
- Finally, hit OK button:
Use these values when setting parameters:
-
Connection string :jdbc:salesforce-datacloud://[$LoginHost$] -
Driver class :com.salesforce.datacloud.jdbc.DataCloudJDBCDriver -
JDBC driver file(s) :C:\ZappySys\Jdbc\Salesforce Data Cloud (Data 360)\jdbc-0.29.0-shaded.jar -
Login host :test.salesforce.com -
User name : -
Password : -
Client ID (Consumer Key) : -
Client Secret (Consumer Secret) : -
Data space :default
SalesforceDataCloudData360DSNjdbc:salesforce-datacloud://[$LoginHost$]com.salesforce.datacloud.jdbc.DataCloudJDBCDriverC:\ZappySys\Jdbc\Salesforce Data Cloud (Data 360)\jdbc-0.29.0-shaded.jaroptional for Salesforce Data Cloud (Data 360)
Find full details in the Salesforce Data Cloud (Data 360) Connector authentication reference.JWT Bearer (External Client App)
Salesforce Data Cloud (Data 360) authentication
JWT Bearer Flow with an External Client App (current Salesforce recommendation for JDBC). No refresh-token dance; you still register the callback URL so the app is valid.
- Create an External Client App in Salesforce Setup. Enable OAuth and JWT Bearer.
- Callback URL must be exactly
https://zappysys.com/oauth(do not use localhost or another capture URL). - Upload or generate a certificate. Download the private key as PEM (
-----BEGIN PRIVATE KEY-----). - Copy the Consumer Key (Client ID).
- Paste Client ID, integration username, and the full PEM into this profile. Do not check a private key into source control.
- Finish the wizard. Then click Test Connection on the DSN Main UI (the wizard does not run Test Connection).
- Done. You can query from C#, Python, PowerShell, and ODBC apps.
JDBC Bridge Driver configuration
Just perform these simple steps to finish authentication configuration:
- Fill in the Connection string and required parameters using the values below.
- Click Test Connection to verify the JDBC connection.
- Finally, hit OK button:
Use these values when setting parameters:
-
Connection string :jdbc:salesforce-datacloud://[$LoginHost$] -
Driver class :com.salesforce.datacloud.jdbc.DataCloudJDBCDriver -
JDBC driver file(s) :C:\ZappySys\Jdbc\Salesforce Data Cloud (Data 360)\jdbc-0.29.0-shaded.jar -
Login host :login.salesforce.com -
User name : -
Client ID (Consumer Key) : -
Private key (PEM) : -
Data space :default
SalesforceDataCloudData360DSNjdbc:salesforce-datacloud://[$LoginHost$]com.salesforce.datacloud.jdbc.DataCloudJDBCDriverC:\ZappySys\Jdbc\Salesforce Data Cloud (Data 360)\jdbc-0.29.0-shaded.jaroptional for Salesforce Data Cloud (Data 360)optional for Salesforce Data Cloud (Data 360)
Find full details in the Salesforce Data Cloud (Data 360) Connector authentication reference. -
You should see a message saying that connection test is successful:
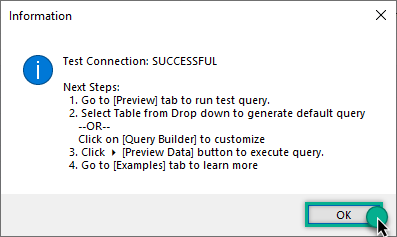
-
Otherwise, if you are getting an error, start by troubleshooting the JDBC connection with DBeaver in the section below:
-
We are at the point where we can preview a SQL query. For more SQL query examples visit JDBC Bridge documentation:
SalesforceDataCloudData360DSNSHOW TABLES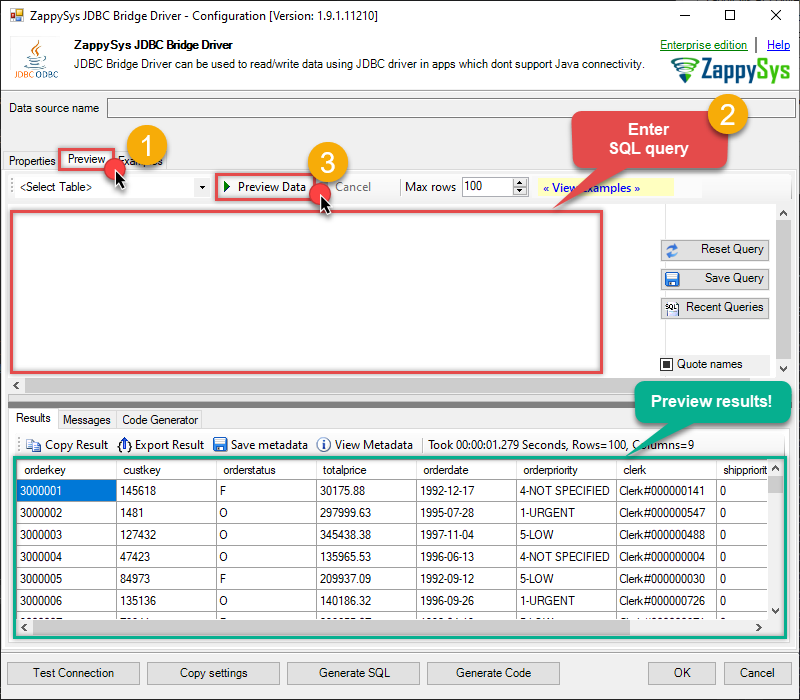
SHOW TABLESYou can also click on the <Select Table> dropdown and select a table from the list.The ZappySys JDBC Bridge Driver acts as a transparent intermediary, passing SQL queries directly to the JDBC driver, which then handles the query execution. This means the JDBC-ODBC Bridge Driver simply relays the SQL query without altering it.
Some JDBC drivers don't support
INSERT/UPDATE/DELETEstatements, so you may get an error saying "action is not supported" or a similar one. Please, be aware, this is not the limitation of ZappySys JDBC Bridge Driver, but is a limitation of the specific JDBC driver you are using. -
Click OK to finish creating the data source.
How to read Salesforce Data Cloud (Data 360) data in SSIS
In this section we will learn how to configure and use Salesforce Data Cloud (Data 360) Connector in the ODBC Source to get data from Salesforce Data Cloud (Data 360).
-
Open Visual Studio and click Create a new project.
-
Select Integration Services Project. Enter a name and location for your project, then click OK.
-
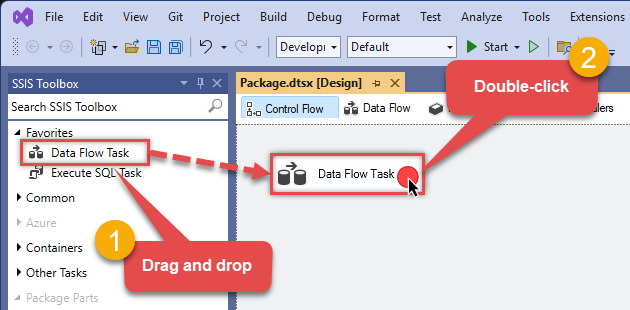
From the SSIS Toolbox, drag and drop a Data Flow Task onto the Control Flow surface, and double-click it:
-
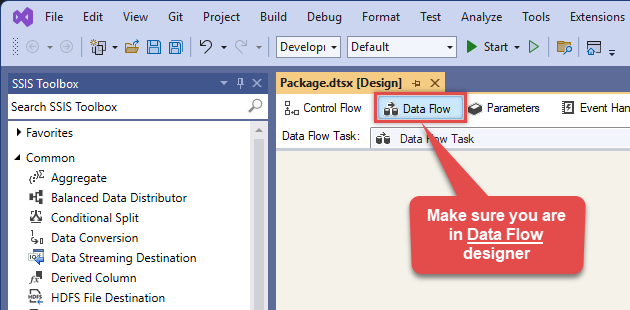
Make sure you are in the Data Flow Task designer:
-
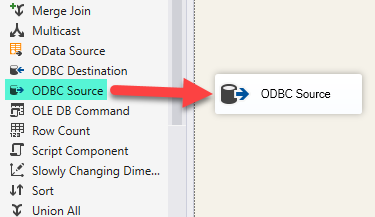
From the SSIS toolbox drag and drop ODBC Source on the dataflow designer surface:
-
Double-click on ODBC Source component to configure it.
-
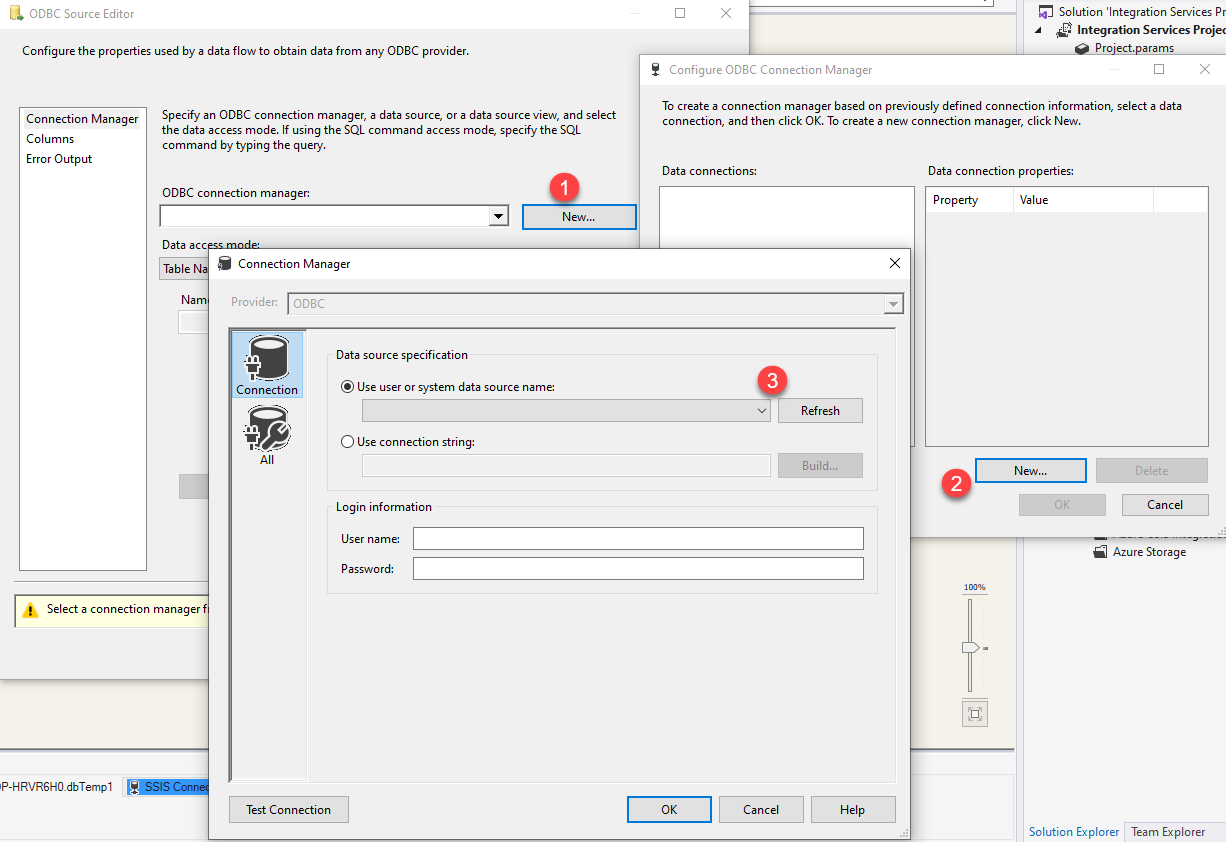
Click on New... button, it will open Configure ODBC Connection Manager window. Once it opens, click on New... button to create a new ODBC connection to Salesforce Data Cloud (Data 360) ODBC data source:
-
Then choose the data source from the list and click Test Connection button. If the connection test is successful, close the window, and then click OK button to finish the configuration:
SalesforceDataCloudData360DSN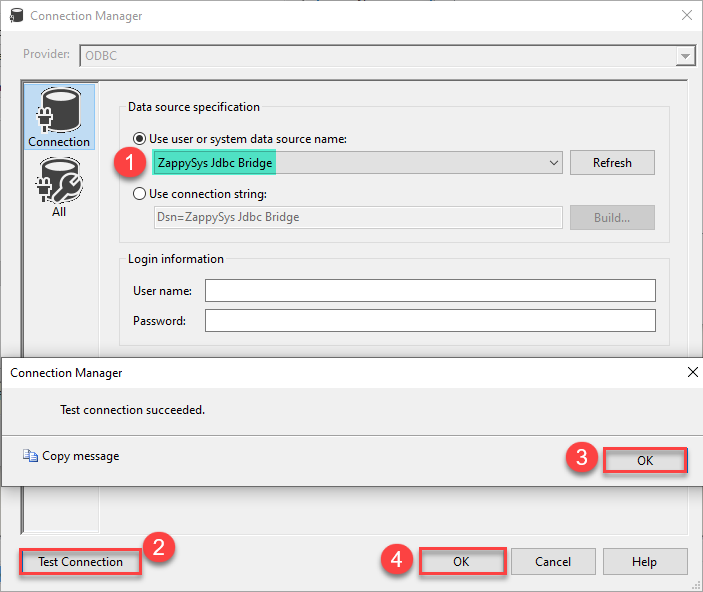
-
Once we configured the ODBC connection, we are ready to configure the data source. First, choose Data access mode:
Table NameorSQL command. Then select a table from the list or enter your SQL query, appropriately. Finally, hit Preview... button to preview the results and click OK button to close the window.SalesforceDataCloudData360DSN"schema"."orders"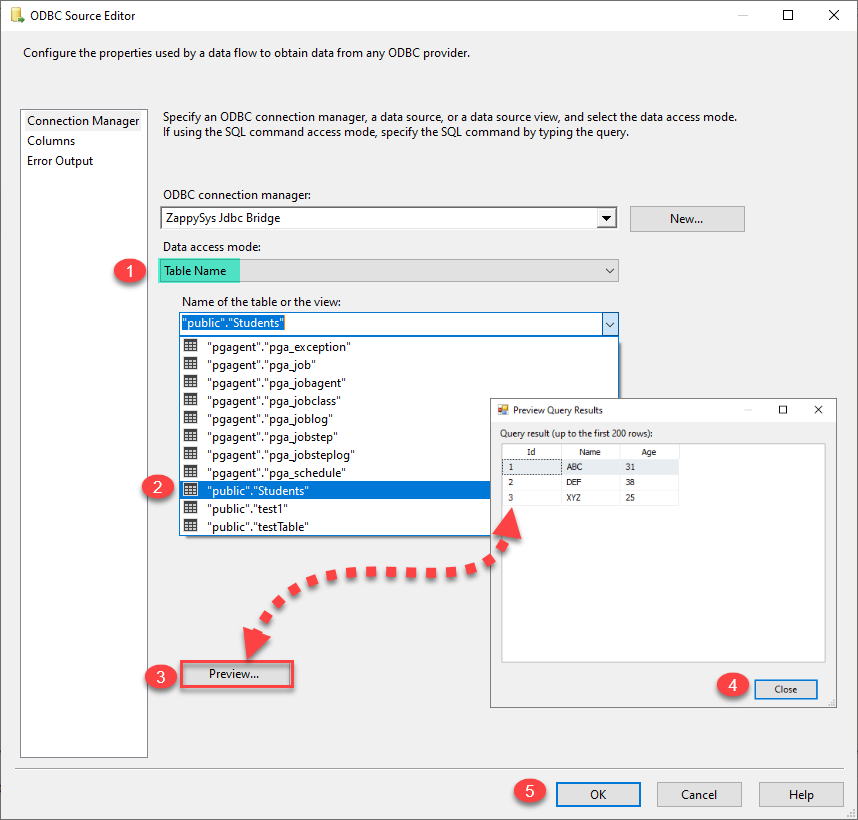
-
That's it, we are done! Now you can read Salesforce Data Cloud (Data 360) data in SSIS.
Load Salesforce Data Cloud (Data 360) data into SQL Server using Upsert Destination (Insert or Update)
Once you configured the data source, you can load Salesforce Data Cloud (Data 360) data into SQL Server using Upsert Destination.
Upsert Destination can merge or synchronize source data with the target table.
It supports Microsoft SQL Server, PostgreSQL, and Redshift databases as targets.
Upsert Destination also supports very fast bulk upsert operation along with bulk delete.
Upsert operation
- a database operation which performs INSERT or UPDATE SQL commands
based on record's existence condition in the target table.
It
Upsert Destination supports INSERT, UPDATE, and DELETE operations,
so it is similar to SQL Server's MERGE command, except it can be used directly in SSIS package.
-
Download and install SSIS PowerPack.
-
From the SSIS Toolbox drag-and-drop Upsert Destination component onto the Data Flow designer background.
-
Connect your SSIS source component to Upsert Destination.
-
Double-click on Upsert Destination component to open configuration window.
-
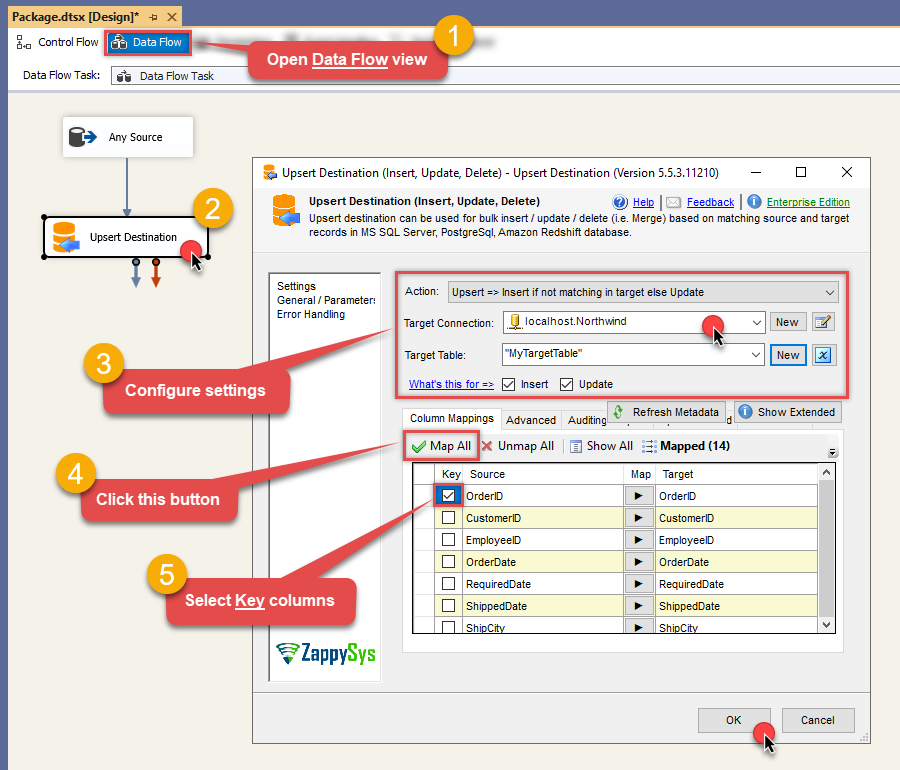
Start by selecting the Action from the list.
-
Next, select the desired target connection or create one by clicking <New [provider] Connection> menu item from the Target Connection dropdown.
-
Then select a table from the Target Table list or click New button to create a new table based on the source columns.
-
Continue by checking Insert and Update options according to your scenario (e.g. if Update option is unchecked, no updates will be made).
-
Finally, click Map All button to map all columns and then select the Key columns to match the columns on:
-
Click OK to save the configuration.
-
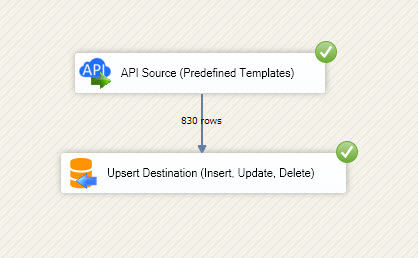
Run the package and Salesforce Data Cloud (Data 360) data will be merged with the target table in SQL Server, PostgreSQL, or Redshift:
-
Done!
Deploy and schedule SSIS package
After you are done creating SSIS package, most likely, you want to deploy it to SQL Server Catalog and run it periodically. Just follow the instructions in this article:
Troubleshooting
Validating JDBC connection in DBeaver
If you are experiencing JDBC connection issues, start by testing your JDBC driver in a JDBC client tool like DBeaver. If the JDBC connection fails in DBeaver, it naturally will not work in your ODBC data source either.
Create generic JDBC driver
-
Download and install DBeaver Community Edition.
-
Open DBeaver.
-
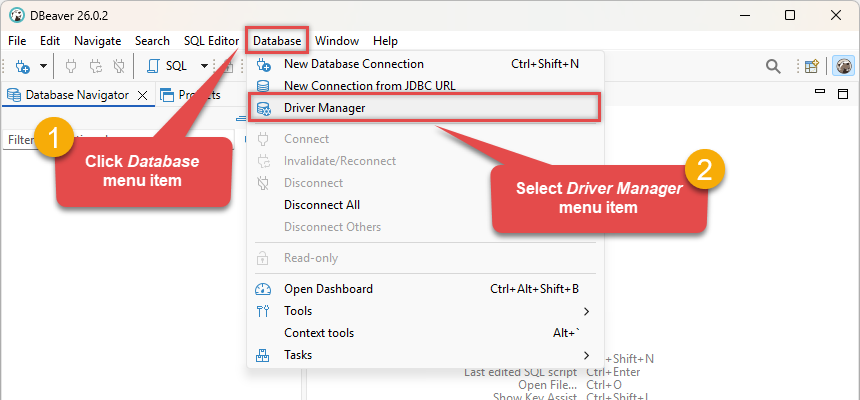
Click Database in the top menu and select Driver Manager:
-
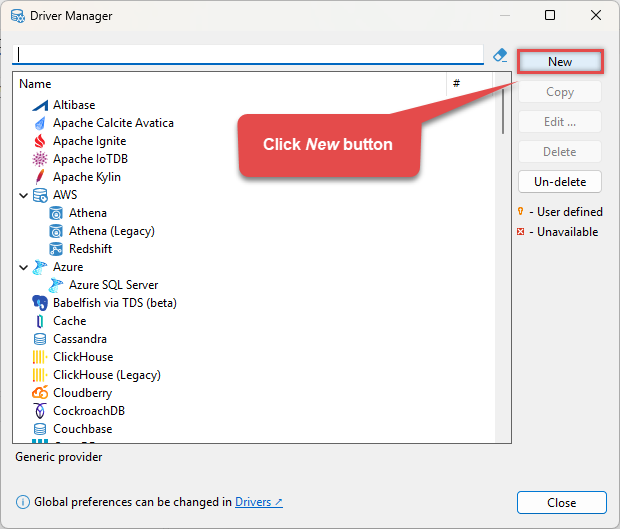
Click the New button to start adding a custom JDBC driver:
-
Configure the connection settings by entering the Driver Name and Class Name (
com.salesforce.datacloud.jdbc.DataCloudJDBCDriver):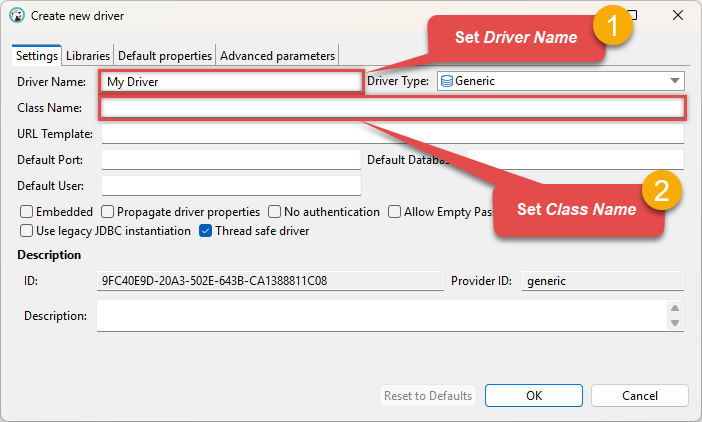 com.salesforce.datacloud.jdbc.DataCloudJDBCDriver
 -
Go to the Libraries tab, click Add File, and select your Salesforce Data Cloud (Data 360) driver library file(s), e.g.
C:\ZappySys\Jdbc\Salesforce Data Cloud (Data 360)\jdbc-0.29.0-shaded.jar: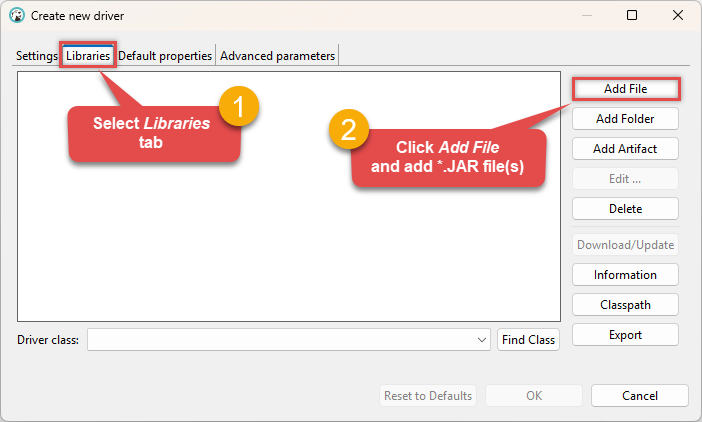 Make sure to add all the required library dependencies.
 -
Your JDBC driver
jarlibrary is now added: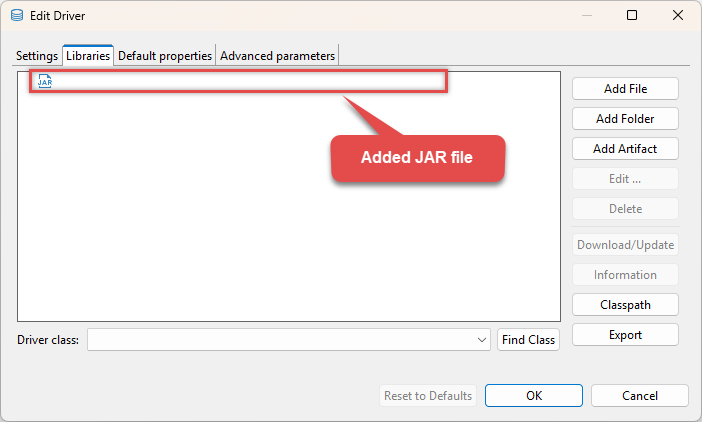 C:\ZappySys\Jdbc\Salesforce Data Cloud (Data 360)\jdbc-0.29.0-shaded.jar
 -
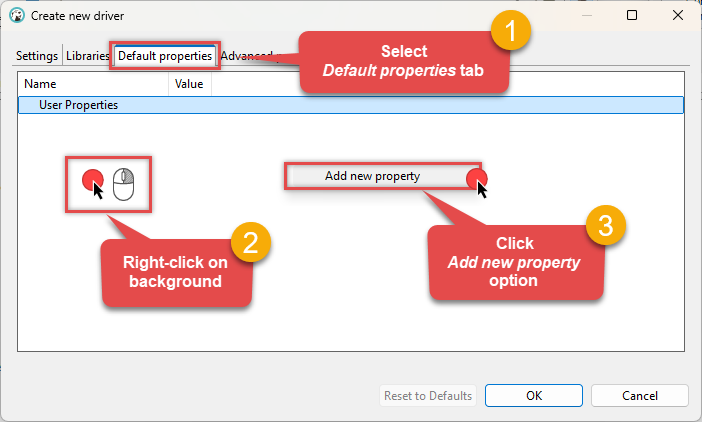
(Optional). If required by your JDBC driver, add additional properties by going to the Default properties tab, Right-clicking on the background, and selecting Add new property:
-
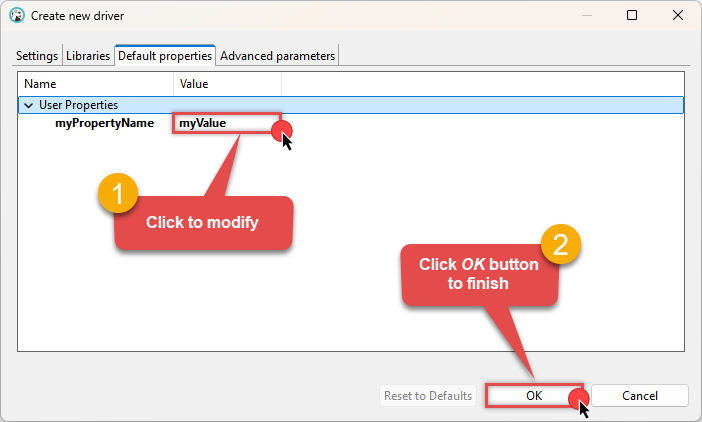
Click on a value to modify it, then click OK to finish:
We are now ready to test the connection. Let's proceed!
Test connection
-
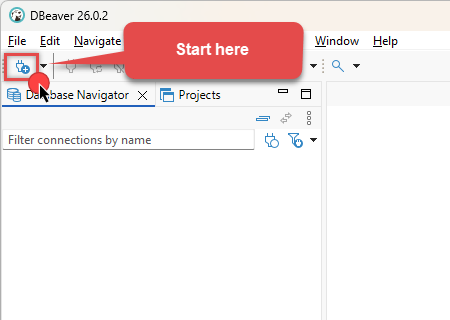
Click the New Database Connection icon in the toolbar:
-
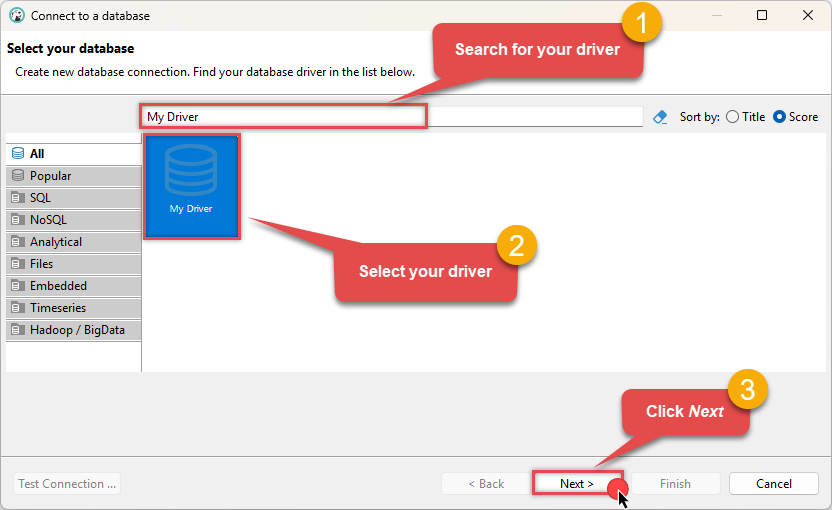
Select your newly created JDBC driver from the list and click Next:
-
Enter your JDBC URL (e.g.
jdbc:salesforce-datacloud://[$LoginHost$]), click Test Connection to verify it works, and then click Finish: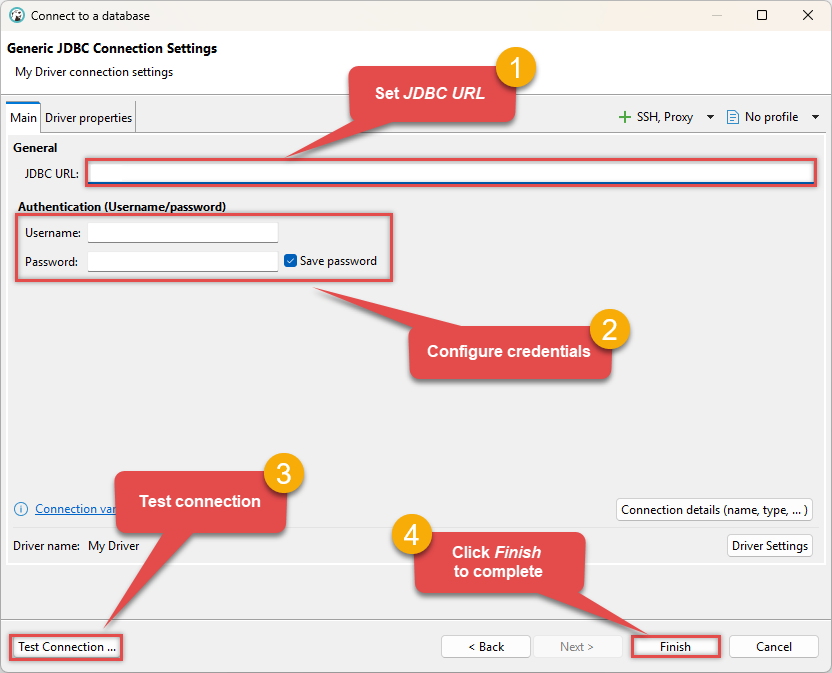 jdbc:salesforce-datacloud://[$LoginHost$]
 -
Finally, expand the database and table list to check the connection status:
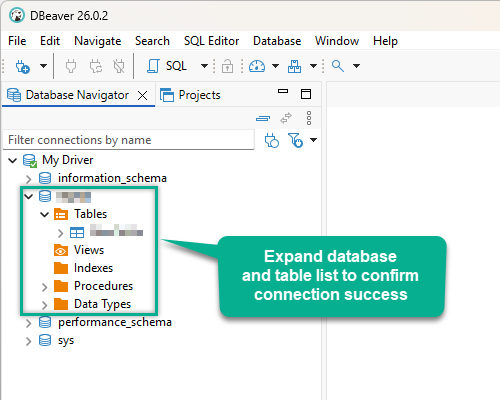
There are two possible outcomes from the connection test:
- Reason:The JDBC driver works perfectly, meaning the issue lies within your ODBC data source configuration.
- Action:Double-check your ODBC data source configuration and ensure it matches the settings that successfully connected in DBeaver.
-
Reason:There is likely an issue with the JDBC driver configuration or the connection details provided.
-
Action:Contact the ZappySys Support Team for assistance.
If you are still experiencing issues or need further help, please contact us:
Chat with an ExpertFrequent issues and solutions
Below are some useful community articles to help you troubleshoot and configure the ZappySys JDBC Bridge Driver:
-
How to combine multiple JAR files
Learn how to merge multiple
.jardependencies when your JDBC driver requires more than one file. -
How to fix JBR error: “Data lake is not available / Unable to verify trust for server certificate chain”
Resolve SSL or certificate validation issues encountered during JDBC connections.
-
System Exception: “Java is not installed or not accessible”
Fix Java path or environment issues that prevent the JDBC Bridge from launching Java.
-
JDBC Bridge Driver disconnect from Java host error
Troubleshoot unexpected disconnection problems between your client application and the Java process.
-
Error: Could not open jvm.cfg while using JDBC Bridge Driver
Resolve JVM configuration path errors during driver initialization.
-
How to enable JDBC Bridge Driver logging
Enable detailed driver logging for better visibility during troubleshooting.
-
How to pass JDBC connection parameters (not by URL)
Learn how to specify connection properties programmatically instead of embedding them in the JDBC URL.
-
How to fix JDBC Bridge error: “No connection could be made because the target machine actively refused it”
Troubleshoot firewall or local port binding issues preventing communication with the Java host.
-
How to use JDBC Bridge options (System Property for Java command line, e.g., classpath, proxy)
Configure custom Java options like classpath and proxy using JDBC Bridge system properties.
Optional: Centralized data access via ZappySys Data Gateway
In some situations, you may need to provide Salesforce Data Cloud (Data 360) data access to multiple users or services. Configuring the data source on a Data Gateway creates a single, centralized connection point for this purpose.
This configuration provides two primary advantages:
-
Centralized data access
The data source is configured once on the gateway, eliminating the need to set it up individually on each user's machine or application. This significantly simplifies the management process.
-
Centralized access control
Since all connections route through the gateway, access can be governed or revoked from a single location for all users.
| Data Gateway |
Local ODBC
data source
|
|
|---|---|---|
| Simple configuration | ||
| Installation | Single machine | Per machine |
| Connectivity | Local and remote | Local only |
| Connections limit | Limited by License | Unlimited |
| Central data access | ||
| Central access control | ||
| More flexible cost |
To achieve this, you must first create a data source in the Data Gateway (server-side) and then create an ODBC data source in SSIS (client-side) to connect to it.
Let's not wait and get going!
Create Salesforce Data Cloud (Data 360) data source in the gateway
In this section we will create a data source for Salesforce Data Cloud (Data 360) in the Data Gateway. Let's follow these steps to accomplish that:
-
Search for
gatewayin the Windows Start Menu and open ZappySys Data Gateway Configuration: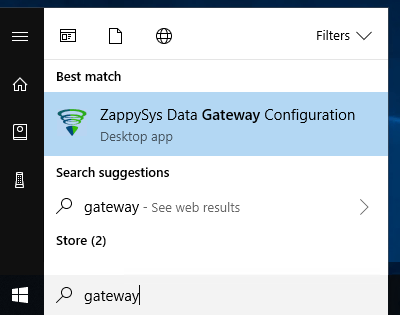
-
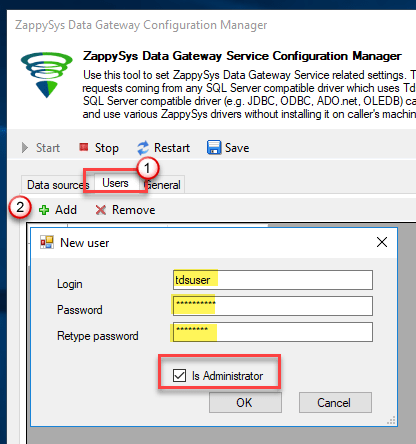
Go to the Users tab and follow these steps to add a Data Gateway user:
- Click the Add button
-
In the Login field enter a username, e.g.,
john - Then enter a Password
- Check the Is Administrator checkbox
- Click OK to save
-
Now we are ready to add a data source:
- Click the Add button
- Give the Data source a name (have it handy for later)
- Then select Native - ZappySys JDBC Bridge Driver
- Finally, click OK
SalesforceDataCloudData360DSNZappySys JDBC Bridge Driver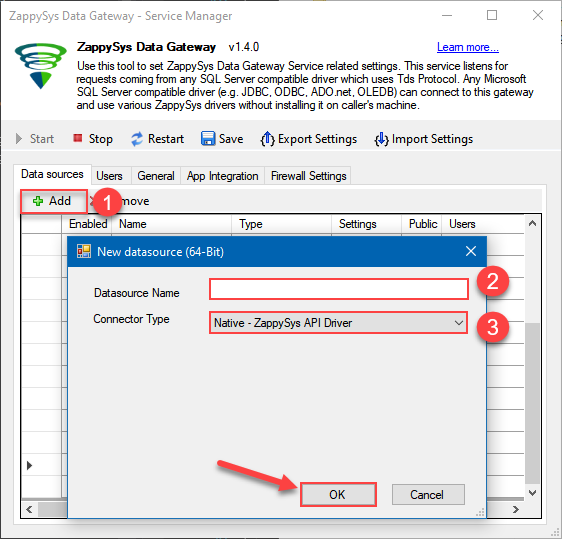
-
When the ZappySys JDBC Bridge Driver configuration window opens, go back to ODBC Data Source Administrator where you already have the Salesforce Data Cloud (Data 360) ODBC data source created and configured, and follow these steps on how to Import data source configuration into the Gateway:
-
Open ODBC data source configuration and click Copy settings:
 ZappySys JDBC Bridge Driver - Salesforce Data Cloud (Data 360)Read Salesforce Data Cloud (Data 360) with SQL. Query data graphs and lake objects from Power BI, SQL Server Linked Server via ZappySys Data Gateway, Crystal Reports, SSRS, Azure Data Factory, and other ODBC tools -- almost no coding required.SalesforceDataCloudData360DSN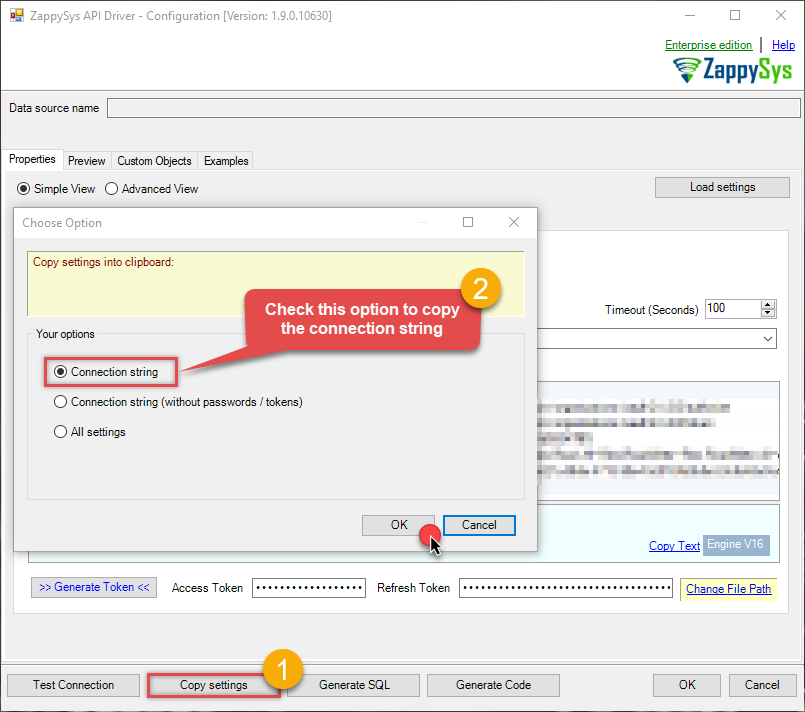
-
The window opens, telling us the connection string was successfully copied to the clipboard:
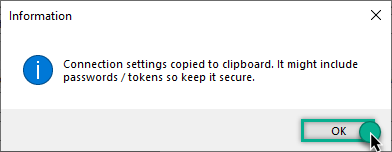
-
Then go to Data Gateway configuration and in data source configuration window click Load settings:
SalesforceDataCloudData360DSN
ZappySys JDBC Bridge Driver - Configuration [Version: 2.0.1.10418]ZappySys JDBC Bridge Driver - Salesforce Data Cloud (Data 360)Read Salesforce Data Cloud (Data 360) with SQL. Query data graphs and lake objects from Power BI, SQL Server Linked Server via ZappySys Data Gateway, Crystal Reports, SSRS, Azure Data Factory, and other ODBC tools -- almost no coding required.SalesforceDataCloudData360DSN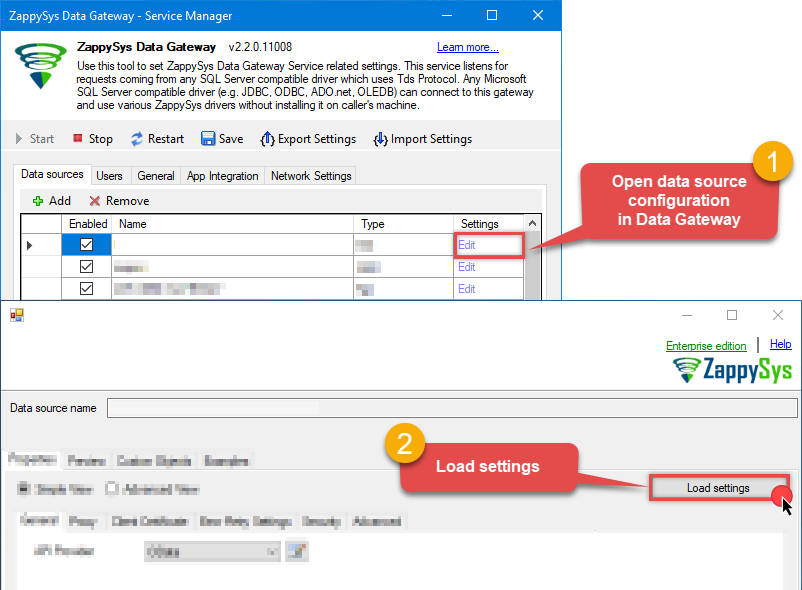
-
Once a window opens, just paste the settings by pressing
CTRL+Vor by clicking right mouse button and then Paste option.
-
Open ODBC data source configuration and click Copy settings:
-
Once done, go to the Network Settings tab and Add a firewall rule for inbound traffic:
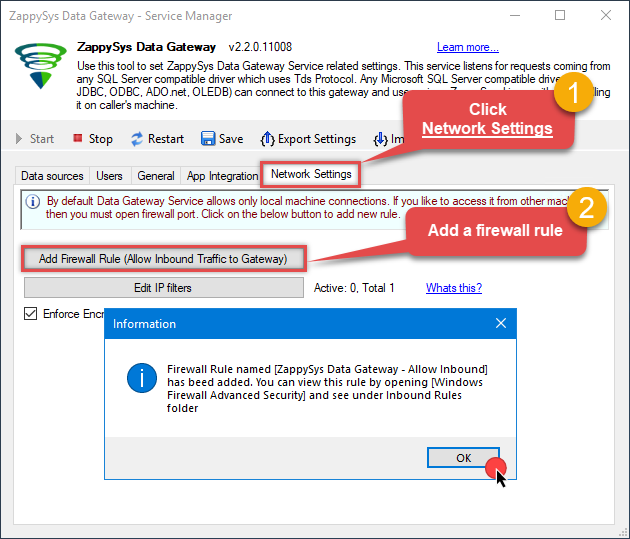
- This will initially allow all inbound traffic.
- Click Edit IP filters to restrict access to specific IP addresses or ranges.
-
Crucial Step: After creating or modifying the data source, you must:
- Click the Save button to persist your changes.
- Hit Yes when prompted to restart the Data Gateway service.
This ensures all changes are properly applied:
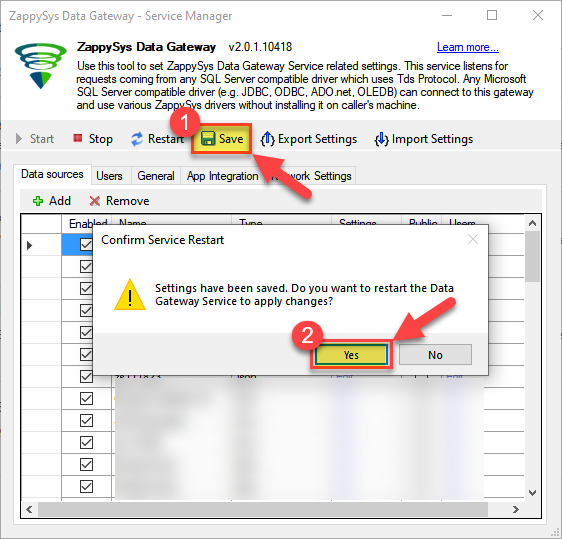 Skipping this step may cause the new settings to fail, preventing you from connecting to the data source.
Create ODBC data source to connect to the gateway
In this part we will create an ODBC data source to connect to the ZappySys Data Gateway from SSIS. To achieve that, let's perform these steps:
-
Search for
odbcand open the ODBC Data Sources (64-bit):
-
Create a User data source (User DSN) based on the ODBC Driver 17 for SQL Server driver:
ODBC Driver 17 for SQL Server
If you don't see the ODBC Driver 17 for SQL Server driver in the list, choose a similar version. -
Then set a Name for the data source (e.g.
Gateway) and the address of the Data Gateway:ZappySysGatewayDSNlocalhost,5000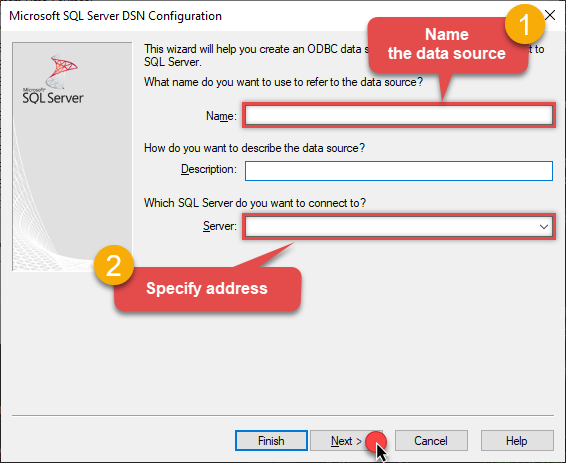 Make sure you separate the hostname and port with a comma, e.g.
localhost,5000. -
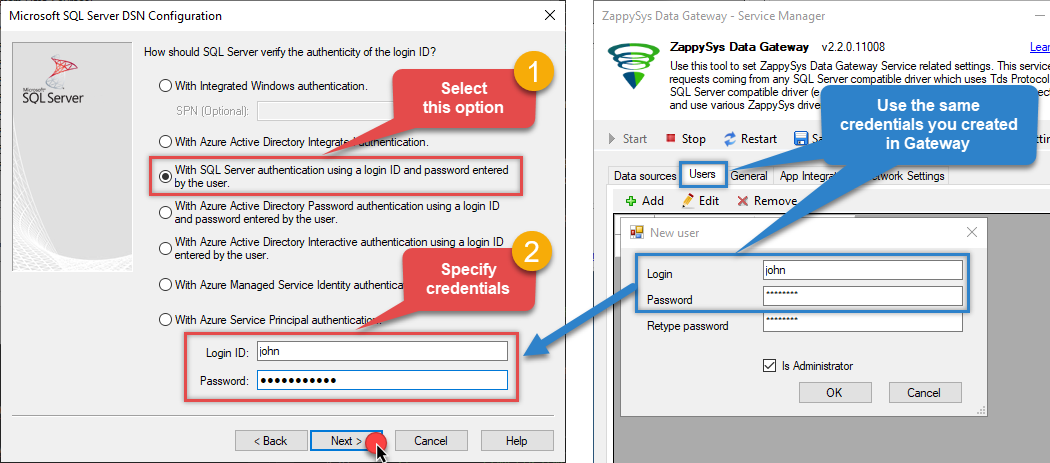
Proceed with the authentication part:
- Select SQL Server authentication
-
In the Login ID field enter the user name you created in the Data Gateway, e.g.,
john - Set Password to the one you configured in the Data Gateway
-
Then set the default database property to
SalesforceDataCloudData360DSN(the one we used in the Data Gateway):SalesforceDataCloudData360DSNSalesforceDataCloudData360DSN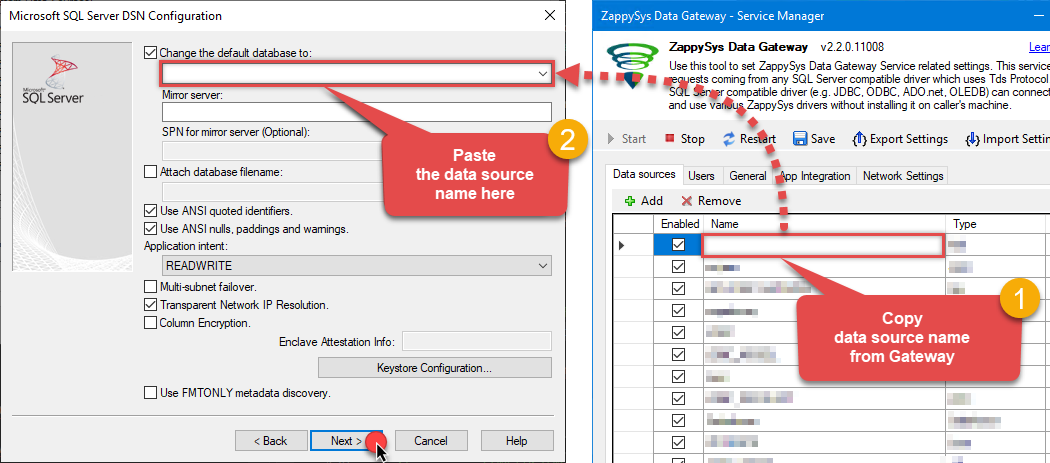 Make sure to type the data source name manually or copy/paste it directly into the field. Using the dropdown might fail because the Trust server certificate option is not enabled yet (next step).
 -
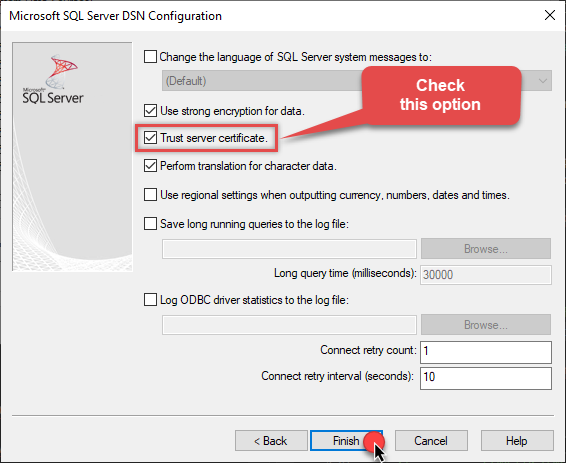
Continue by checking the Trust server certificate option:
-
Once you do that, test the connection:
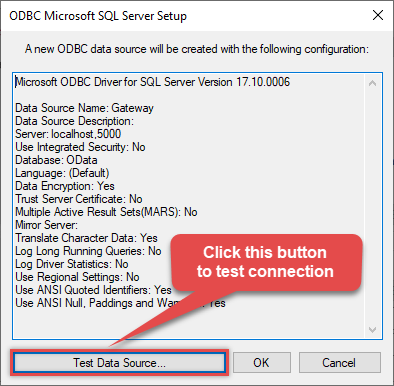
-
If the connection is successful, everything is good:
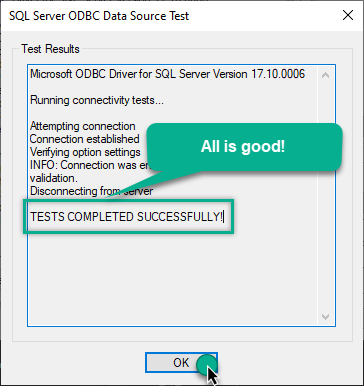
-
Done!
We are ready to move to the final step. Let's do it!
Access data in SSIS via the gateway
Finally, we are ready to read data from Salesforce Data Cloud (Data 360) in SSIS via the Data Gateway. Follow these final steps:
-
Go back to SSIS.
-
From the SSIS toolbox drag and drop ODBC Source on the dataflow designer surface:
-
Double-click on ODBC Source component to configure it.
-
Click on New... button, it will open Configure ODBC Connection Manager window. Once it opens, click on New... button to create a new ODBC connection to Salesforce Data Cloud (Data 360) ODBC data source:
-
Then choose the data source from the list and click Test Connection button. If the connection test is successful, close the window, and then click OK button to finish the configuration:
ZappySysGatewayDSN
-
Read the data the same way we discussed at the beginning of this article.
-
That's it!
Now you can connect to Salesforce Data Cloud (Data 360) data in SSIS via the ZappySys Data Gateway.
john and your password.
Conclusion
In this guide, we demonstrated how to connect to Salesforce Data Cloud (Data 360) in SSIS and integrate your data — all without writing complex code. It's worth noting that ZappySys JDBC Bridge Driver allows you to connect not only to Salesforce Data Cloud (Data 360), but to any Java application that supports JDBC (just use a different JDBC driver and configure it appropriately).
Ready to get started? Download ODBC PowerPack now or ping us via chat if you still need help: