Zendesk Connector for SSIS : Read ticket attachments

Learn how to read ticket attachments using the Zendesk Connector for SSIS. This connector enables you to read and write Zendesk data effortlessly. Manage tickets, users, and organizations — almost no coding required. We'll walk you through the exact setup.
Let's dive in!
Video tutorial
Watch this quick video to see the integration in action. It walks you through the end-to-end setup, including:
- Installing the SSIS PowerPack
- Configuring a secure connection to Zendesk
- Working with Zendesk data directly inside SSIS
- Exploring advanced API Source features

Once you are done watching, simply follow the step-by-step written guide below to configure your data source.
Prerequisites
Before we begin, make sure the following prerequisites are met:
- SSIS designer installed. Sometimes it is referred as BIDS or SSDT (download it from Microsoft).
- Basic knowledge of SSIS package development using Microsoft SQL Server Integration Services.
- SSIS PowerPack is installed (if you are new to SSIS PowerPack, then get started!).
Read ticket attachments in SSIS
-
Open Visual Studio and click Create a new project.
-
Select Integration Services Project. Enter a name and location for your project, then click OK.
-
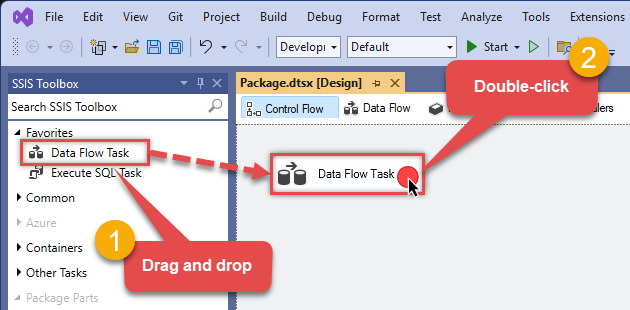
From the SSIS Toolbox, drag and drop a Data Flow Task onto the Control Flow surface, and double-click it:
-
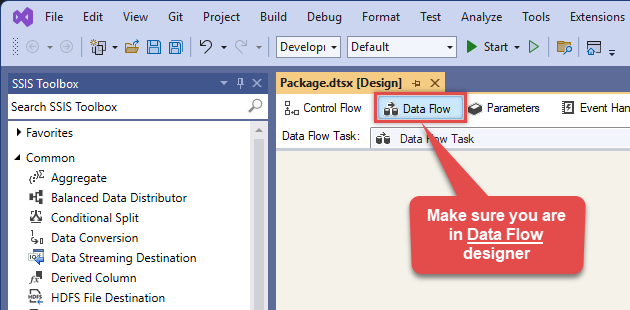
Make sure you are in the Data Flow Task designer:
-
From the SSIS toolbox drag and API Source (Predefined Templates) on the data flow designer surface, and double click on it to edit it:
 - Drag and Drop")
-
Select New Connection to create a new connection:

-
Use a preinstalled Zendesk Connector from Popular Connector List or press Search Online radio button to download Zendesk Connector. Once downloaded simply use it in the configuration:
Zendesk
-
Select your authentication scenario below to expand connection configuration steps to:
- Configure the authentication in Zendesk.
- Enter those details into the API Connection Manager configuration.
Zendesk authentication
Authenticate using Static Token instead of userid / password ([Token Access] option must be enabled under Admin Console > Channel > API > Settings and then Click [ADD API Token] to generate new token. These settings typically found here https://YOUR-SUB-DOMAIN.zendesk.com/agent/admin/api/settings [API reference]
Please refer to external API reference
API Connection Manager configuration
Just perform these simple steps to finish authentication configuration:
-
Set Authentication Type to
Token Authentication [Http] - Optional step. Modify API Base URL if needed (in most cases default will work).
- Fill in all the required parameters and set optional parameters if needed.
- Finally, hit OK button:
ZendeskToken Authentication [Http]https://[$Domain$].zendesk.com/api/v2Required Parameters Sub Domain (e.g. mycompany) Fill-in the parameter... UserId Fill-in the parameter... Token Fill-in the parameter... Optional Parameters RetryMode RetryWhenStatusCodeMatch RetryStatusCodeList 429 RetryCountMax 5 RetryMultiplyWaitTime True  Find full details in the Zendesk Connector authentication reference.
Zendesk authentication
OAuth App must be created under Admin Console > Channel > API > Settings. These settings typically found here https://YOUR-SUB-DOMAIN.zendesk.com/agent/admin/api/oauth_clients [API reference]
Please refer to external API reference
API Connection Manager configuration
Just perform these simple steps to finish authentication configuration:
-
Set Authentication Type to
OAuth Authentication [OAuth] - Optional step. Modify API Base URL if needed (in most cases default will work).
- Fill in all the required parameters and set optional parameters if needed.
- Press Generate Token button to generate the tokens.
- Finally, hit OK button:
ZendeskOAuth Authentication [OAuth]https://[$Domain$].zendesk.com/api/v2Required Parameters Sub Domain (e.g. mycompany) Fill-in the parameter... ClientId Fill-in the parameter... ClientSecret Fill-in the parameter... Permissions Fill-in the parameter... RedirectUrl Fill-in the parameter... Optional Parameters RetryMode RetryWhenStatusCodeMatch RetryStatusCodeList 429 RetryCountMax 5 RetryMultiplyWaitTime True  Find full details in the Zendesk Connector authentication reference.
Zendesk authentication
Authenticate using your userid / password (2FA must be OFF and [Password Access] option must be enabled under Admin Console > Channel > API > Settings. These settings typically found here https://YOUR-SUB-DOMAIN.zendesk.com/agent/admin/api/settings [API reference]
Please refer to external API reference
API Connection Manager configuration
Just perform these simple steps to finish authentication configuration:
-
Set Authentication Type to
UserID/Password Authentication (2FA must be OFF) [Http] - Optional step. Modify API Base URL if needed (in most cases default will work).
- Fill in all the required parameters and set optional parameters if needed.
- Finally, hit OK button:
ZendeskUserID/Password Authentication (2FA must be OFF) [Http]https://[$Domain$].zendesk.com/api/v2Required Parameters Sub Domain (e.g. mycompany) Fill-in the parameter... UserName (2FA Must be OFF) Fill-in the parameter... Password Fill-in the parameter... Optional Parameters RetryMode RetryWhenStatusCodeMatch RetryStatusCodeList 429 RetryCountMax 5 RetryMultiplyWaitTime True
Find full details in the Zendesk Connector authentication reference. -
Select Read Ticket Attachments endpoint from the dropdown and hit Preview Data:
 API Source - ZendeskRead and write Zendesk data effortlessly. Manage tickets, users, and organizations — almost no coding required.ZendeskRead Ticket Attachments
Required Parameters Ticket ID Fill-in the parameter... Optional Parameters Sort Order Include inline images 
-
That's it! We are done! Just in a few clicks we configured the call to Zendesk using Zendesk Connector.
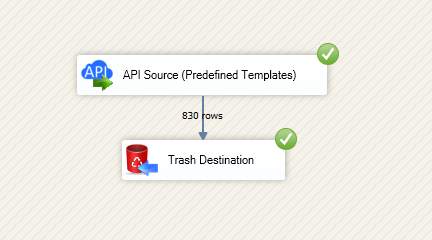
You can load the source data into your desired destination using the Upsert Destination , which supports SQL Server, PostgreSQL, and Amazon Redshift. We also offer other destinations such as CSV , Excel , Azure Table , Salesforce , and more . You can check out our SSIS PowerPack Tasks and components for more options. (*loaded in Trash Destination)
Conclusion
And there you have it — a complete guide on how to read ticket attachments in SSIS without writing complex code. All of this was powered by Zendesk Connector, which handled the REST API pagination and authentication for us automatically.
Download the trial now or ping us via chat if you have any questions or are looking for a specific feature (you can also reach out to us by submitting a ticket):
More actions supported by Zendesk Connector
Got another use case in mind? We've documented the exact setups for a variety of essential Zendesk operations directly in SSIS, so you can skip the trial and error. Find your next step-by-step guide below:
- Create Organization
- Create Ticket (Single)
- Create Tickets (Bulk)
- Create User
- Delete Attachment
- Delete Organization
- Delete Ticket
- Delete Tickets (Bulk)
- Delete Upload Session
- Delete User
- Read Attachment
- Read Brands
- Read Current User Info
- Read Groups
- Read Macros
- Read Organization Count
- Read Organization Fields
- Read Organization(s) by ID
- Read Organizations (All)
- Read Organizations (Incremental) changed after a specified date
- Read Requests
- Read Requests Search
- Read Sessions
- Read Tags
- Read Ticket ActivityStream
- Read Ticket ActivityStream Details
- Read Ticket Comments
- Read Ticket Events (Incremental) changed after a specified date
- Read Ticket Fields
- Read Ticket Forms
- Read Ticket Metric Events (Incremental) changed after a specified date
- Read Ticket Metrics
- Read Ticket(s) by ID
- Read Tickets (All)
- Read Tickets (Incremental) changed after a specified date
- Read Tickets (Recent)
- Read Tickets Count (All)
- Read Tickets Count (for Organization)
- Read Tickets for Organization
- Read Tickets for User (Assigned)
- Read Tickets for User (CCed)
- Read Tickets for User (Requested)
- Read User Fields
- Read User Sessions
- Read User(s) by ID
- Read Users (All)
- Read Users (Incremental) changed after a specified date
- Read Views
- Search Records - NO Sorting (Allows more than 1000 rows)
- Search Records - WITH Sorting and Extra Columns (Max 1000 rows)
- Update Organization
- Update Ticket (Single)
- Update Tickets (Bulk)
- Update User
- Upload Attachment (Single file)
- Upsert Organization - Create or Update
- Upsert User - Create or Update
- Upsert Users (Bulk) - Create or Update
- Make Generic REST API Request
- Make Generic REST API Request (Bulk Write)