Introduction
You can connect to your Hubspot data from Python via the high-performance Hubspot ODBC Driver. We'll walk you through the entire setup.
Let's not waste time and get started!
Create data source using Hubspot ODBC Driver
Video instructions
Watch this quick walkthrough to see how to configure your Hubspot ODBC data source, or scroll down for the step-by-step written guide.
Step-by-step instructions
To get data from Hubspot using Python, we first need to create an ODBC data source. We will later read this data in Python. Perform these steps:
-
Download and install ODBC PowerPack (if you haven't already).
-
Search for
odbcand open the ODBC Data Sources (64-bit):
-
Create a User data source (User DSN) based on the ZappySys API Driver driver:
ZappySys API Driver
- Create and use a User DSN if the client application runs under a User Account. This is the ideal option at design time (e.g., when developing in Visual Studio). Use it for both types of applications (64-bit and 32-bit).
- Create and use a System DSN if the client application runs under a System Account (e.g., as a Windows Service). This is usually the required option in a production environment. If your Windows Service is a 32-bit application, you must use the 32-bit ODBC Data Source Administrator to configure this
-
When the Configuration window appears give your data source a name if you haven't done that already, then select "Hubspot" from the list of Popular Connectors. If "Hubspot" is not present in the list, then click "Search Online" and download it. Then set the path to the location where you downloaded it. Finally, click Continue >> to proceed with configuring the DSN:
HubspotDSNHubspot
-
Select your authentication scenario below to expand connection configuration steps to:
- Configure the authentication in Hubspot.
- Enter those details into the ZappySys API Driver data source configuration.
Private app (Static Access Token)
Hubspot authentication
Private apps allow you to use HubSpot's APIs to access specific data from your HubSpot account. You can authorize what each private app can request or change in your account, which will generate an access token that's unique to your app. [API reference]
Follow these instructions to create a Private app in HubSpot and configure HubSpot authentication in SSIS package or ODBC data source:
- First of all, go to HubSpot portal.
-
Then click Data Management option on the left
and then hit Integrations menu item:

-
Move on by clicking Private Apps menu item
and then click Create a private app button to create one:

- Then continue by following the instructions on HubSpot Docs.
-
Once you create an app, go to SSIS package or ODBC data source and in Private App authentication set these parameters:
- For AccessToken field use Access token value from the Private app configuration in HubSpot.
- Done! Now you are ready to use HubSpot Connector!
API Connection Manager configuration
Just perform these simple steps to finish authentication configuration:
-
Set Authentication Type to
Private app (Static Access Token) [Http] - Optional step. Modify API Base URL if needed (in most cases default will work).
- Fill in all the required parameters and set optional parameters if needed.
- Finally, hit OK button:
HubspotDSNHubspotPrivate app (Static Access Token) [Http]https://api.hubapi.comRequired Parameters AccessToken Fill-in the parameter... Optional Parameters RetryMode RetryWhenStatusCodeMatch RetryStatusCodeList 429 RetryCountMax 5 RetryMultiplyWaitTime True  Find full details in the Hubspot Connector authentication reference.
Public app
Hubspot authentication
In HubSpot, a public app is a type of integration that can be installed on customer accounts or listed on the App Marketplace. It requires authentication via OAuth. Once a user installs your app on their HubSpot account, you’ll be able to make API calls to that account using an OAuth access token. [API reference]
Follow these instructions to create a Public app in HubSpot and configure HubSpot authentication in SSIS package or ODBC data source:
- First of all, if you don't have HubSpot Developer's account, register one.
- Go to HubSpot and select your Developer account.
-
Click Apps on the left hand side and then click Create app button to create a Public app:

-
Then continue by following the instructions in HubSpot Docs.
NOTE: If you don't have a working Redirect URL, you can use
https://zappysys.com/oauth(it's safe).- Once you create an app, go to SSIS package or ODBC data source and in Public app authentication set these parameters (use values from your Public app configuration in HubSpot):
- For ClientId field use Client ID value.
- For ClientSecret field use Client secret value.
-
For Scope field use Scopes values, e.g.:
accounting
tickets
files

crm.lists.read
crm.lists.write

crm.objects.contacts.read
crm.objects.contacts.write
crm.schemas.contacts.read

crm.objects.custom.read
crm.objects.custom.write
crm.schemas.custom.read

crm.objects.companies.read
crm.objects.companies.write
crm.schemas.companies.read

crm.objects.deals.read
crm.objects.deals.write
crm.schemas.deals.read

crm.objects.quotes.read
crm.objects.quotes.write
crm.schemas.quotes.read

crm.objects.line_items.read
crm.objects.line_items.write
crm.schemas.line_items.read
NOTE: You can use other scopes too, but they must match the scopes defined in your Public app.- For ReturnUrl field use one of Redirect URLs.
- When you are done with that, click Generate Token button to generate Access and Refresh Tokens.
- Done! Now you are ready to use HubSpot Connector!
API Connection Manager configuration
Just perform these simple steps to finish authentication configuration:
-
Set Authentication Type to
Public app [OAuth] - Optional step. Modify API Base URL if needed (in most cases default will work).
- Fill in all the required parameters and set optional parameters if needed.
- Press Generate Token button to generate the tokens.
- Finally, hit OK button:
HubspotDSNHubspotPublic app [OAuth]https://api.hubapi.comRequired Parameters UseCustomApp Fill-in the parameter... Scope (Must Match with App Scopes) Fill-in the parameter... Optional Parameters Client ID Client Secret ReturnUrl RetryMode RetryWhenStatusCodeMatch RetryStatusCodeList 429 RetryCountMax 5 RetryMultiplyWaitTime True  Find full details in the Hubspot Connector authentication reference.
Developer API key (Deprecated)
Hubspot authentication
Deprecated authentication method. Use [Private app] instead. [API reference]
Using HubSpot API key is deprecated method for authentication. Use Private app authentication instead. If you still need one, then follow these instructions to get HubSpot API key:
- First of all, if you don't have HubSpot Developer's account, register one.
- Go to HubSpot and select your Developer account.
-
Click Apps on the left hand side and then click Get HubSpot API key button to get one:

-
When a popup appears, click Show Key button and then hit Copy button to copy API key:

-
Once copy the API key, go to SSIS package or ODBC data source and use it in API Key authentication configuration:
- Paste it in ApiKey parameter field.
- Done! Now you are ready to use HubSpot Connector!
API Connection Manager configuration
Just perform these simple steps to finish authentication configuration:
-
Set Authentication Type to
Developer API key (Deprecated) [Http] - Optional step. Modify API Base URL if needed (in most cases default will work).
- Fill in all the required parameters and set optional parameters if needed.
- Finally, hit OK button:
HubspotDSNHubspotDeveloper API key (Deprecated) [Http]https://api.hubapi.comRequired Parameters ApiKey Fill-in the parameter... Optional Parameters RetryMode RetryWhenStatusCodeMatch RetryStatusCodeList 429 RetryCountMax 5 RetryMultiplyWaitTime True
Find full details in the Hubspot Connector authentication reference. - Once you create an app, go to SSIS package or ODBC data source and in Public app authentication set these parameters (use values from your Public app configuration in HubSpot):
Once the data source connection has been configured, it's time to configure the SQL query. Select the Preview tab and then click Query Builder button to configure the SQL query:
 ZappySys API Driver - HubspotRead and write HubSpot data effortlessly. Integrate, manage, and automate contacts, companies, deals, and tickets — almost no coding required.HubspotDSN
Start by selecting the Table or Endpoint you are interested in and then configure the parameters. This will generate a query that we will use in Python to retrieve data from Hubspot. Hit OK button to use this query in the next step.
SELECT * FROM Companies
-- WHERE Id=123
Some parameters configured in this window will be passed to the Hubspot API, e.g. filtering parameters. It means that filtering will be done on the server side (instead of the client side), enabling you to get only the meaningful data
much faster .Now hit Preview Data button to preview the data using the generated SQL query. If you are satisfied with the result, use this query in Python:
ZappySys API Driver - HubspotRead and write HubSpot data effortlessly. Integrate, manage, and automate contacts, companies, deals, and tickets — almost no coding required.HubspotDSNSELECT * FROM Companies -- WHERE Id=123 You can also access data quickly from the tables dropdown by selecting <Select table>.A
WHEREclause,LIMITkeyword will be performed on the client side, meaning that thewhole result set will be retrieved from the Hubspot API first, and only then the filtering will be applied to the data. If possible, it is recommended to use parameters in Query Builder to filter the data on the server side (in Hubspot servers).Click OK to finish creating the data source.
Read data in Python
Using ODBC DSN
-
Use this code snippet to read the data using
HubspotDSNdata source:HubspotDSN')
-
When you run the code it will make the API call and read the data:

-
Here is Python program's code in text format:
    import pyodbc
    conn = pyodbc.connect('DSN=HubspotDSN')

    cursor = conn.cursor()

    #execute query to fetch data from API service
    cursor.execute("SELECT id,title FROM products")

    row = cursor.fetchone()
    while row:
        print(row)
        row = cursor.fetchone()

    ##For loop example
    #for row in cursor:
    #    print(row)
Using a full ODBC connection string
If you want to avoid being dependent on a DSN and creating multiple DSNs for each platform (x86, x64), then you can use a fully qualified connection string. Simply go to your DSN and copy the Connection String:
-
Open ODBC data source configuration and click Copy settings:
ZappySys API Driver - HubspotRead and write HubSpot data effortlessly. Integrate, manage, and automate contacts, companies, deals, and tickets — almost no coding required.HubspotDSN

-
The window opens, telling us the connection string was successfully copied to the clipboard:

-
Then in your Python code use Connection String when initializing OdbcConnection object, for example:
conn = pyodbc.connect('DRIVER={ZappySys API Driver};ServiceUrl=https://yourservices.provider.com/api/xxxx....;AuthName=Http;')
How to install `pyodbc` in the Python?
You would need to install
pyodbcin Python if you intend to establish connections to databases that support ODBC (Open Database Connectivity). This module facilitates communication between Python applications and various database management systems, enabling you to perform operations such as querying, retrieving data, and managing databases. Here's how you can installpyodbcin Python:Installation Steps:
Ensure you have Python installed on your system. If not, download it from the official Python website and follow the installation instructions.
Open your terminal or command prompt.
-
Use the following command to install
pyodbcusing pip, the Python package installer:python -m pip install "pyodbc"Make sure you have a stable internet connection and the necessary permissions to install Python packages.

Reasons to Install:
- If pyodbc is not installed, your Python script will generate the following error:
"ModuleNotFoundError: No module named 'pyodbc'"
. Database Connectivity:
pyodbcallows Python to connect to various databases that support ODBC, such as Microsoft SQL Server, PostgreSQL, MySQL, and more.Data Operations: It facilitates the execution of SQL queries, retrieval of data, and other database operations from within Python scripts.
Cross-Platform Support:
pyodbcis designed to work across different operating systems, including Windows, macOS, and various Linux distributions.Simplicity and Efficiency: The module provides an intuitive interface for managing database transactions and connections, simplifying the process of working with databases in Python.
By installing
pyodbc, you can seamlessly integrate your Python applications with a wide range of ODBC-supported databases, enabling efficient and effective data management and analysis.Hubspot Connector actions
Got a specific use case in mind? We've mapped out exactly how to perform a variety of essential Hubspot operations directly in Python, so you don't have to figure out the setup from scratch. Check out the step-by-step guides below:
- Search Companies
- Search Contacts
- Search Tickets
- Search Deals
- Search Products
- Search LineItems
- Search Quotes
- Get Contacts
- Get Contact By ID
- Get Contact Properties
- Create Contacts
- Update Contacts
- Archive Contacts
- Get Deals
- Get Deal Properties
- Get Deal By ID
- Create Deals
- Archive Deals
- Update Deals
- Get Products
- Get Product By ID
- Get Product Properties
- Create Products
- Archive Products
- Update Products
- Get Companies
- Get Company By ID
- Get Company Properties
- Create Companies
- Archive Companies
- Update Companies
- Get Line Items
- Get Line Item By ID
- Get Line Item Properties
- Create Line Items
- Archive Line Items
- Update Line items
- Get Tickets
- Get Ticket By ID
- Get Tickets Properties
- Create Tickets
- Archive Tickets
- Update Tickets
- Get Quotes
- Get Quote By ID
- Get Quotes Properties
- Create Quotes
- Archive Quotes
- Update Quotes
- Get Owners
- Upload File from Local Disk
- Make Generic REST API Request
- Make Generic REST API Request (Bulk Write)
Optional: Centralized data access via ZappySys Data Gateway
In some situations, you may need to provide Hubspot data access to multiple users or services. Configuring the data source on a Data Gateway creates a single, centralized connection point for this purpose.
This configuration provides two primary advantages:
-
Centralized data access
The data source is configured once on the gateway, eliminating the need to set it up individually on each user's machine or application. This significantly simplifies the management process.
-
Centralized access control
Since all connections route through the gateway, access can be governed or revoked from a single location for all users.
Data Gateway Local ODBCdata sourceSimple configuration Installation Single machine Per machine Connectivity Local and remote Local only Connections limit Limited by License Unlimited Central data access Central access control More flexible cost To achieve this, you must first create a data source in the Data Gateway (server-side) and then create an ODBC data source in Python (client-side) to connect to it.
Let's not wait and get going!
Create Hubspot data source in the gateway
In this section we will create a data source for Hubspot in the Data Gateway. Let's follow these steps to accomplish that:
-
Search for
gatewayin the Windows Start Menu and open ZappySys Data Gateway Configuration:
-
Go to the Users tab and follow these steps to add a Data Gateway user:
- Click the Add button
-
In the Login field enter a username, e.g.,
john - Then enter a Password
- Check the Is Administrator checkbox
- Click OK to save

-
Now we are ready to add a data source:
- Click the Add button
- Give the Data source a name (have it handy for later)
- Then select Native - ZappySys API Driver
- Finally, click OK
HubspotDSNZappySys API Driver
-
When the ZappySys API Driver configuration window opens, go back to ODBC Data Source Administrator where you already have the Hubspot ODBC data source created and configured, and follow these steps on how to Import data source configuration into the Gateway:
-
Open ODBC data source configuration and click Copy settings:
 ZappySys API Driver - HubspotRead and write HubSpot data effortlessly. Integrate, manage, and automate contacts, companies, deals, and tickets — almost no coding required.HubspotDSN
-
The window opens, telling us the connection string was successfully copied to the clipboard:
-
Then go to Data Gateway configuration and in data source configuration window click Load settings:
HubspotDSN
ZappySys API Driver - Configuration [Version: 2.0.1.10418]ZappySys API Driver - HubspotRead and write HubSpot data effortlessly. Integrate, manage, and automate contacts, companies, deals, and tickets — almost no coding required.HubspotDSN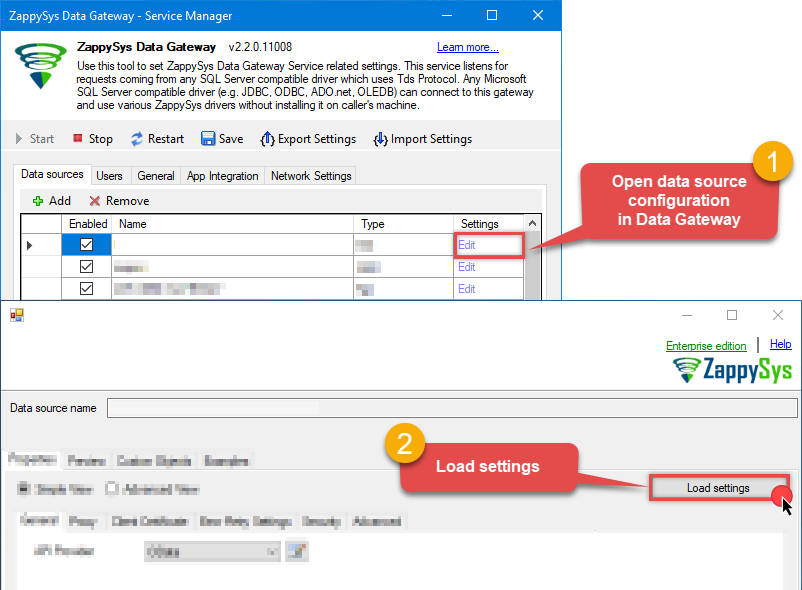
-
Once a window opens, just paste the settings by pressing
CTRL+Vor by clicking right mouse button and then Paste option.
-
Open ODBC data source configuration and click Copy settings:
-
Once done, go to the Network Settings tab and Add a firewall rule for inbound traffic:
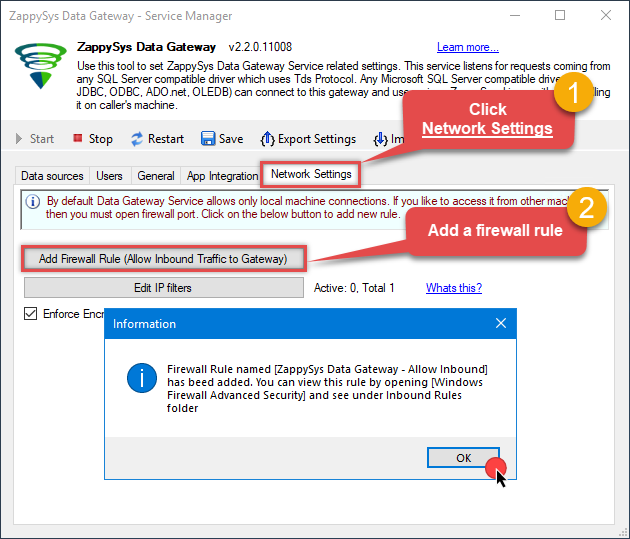
- This will initially allow all inbound traffic.
- Click Edit IP filters to restrict access to specific IP addresses or ranges.
-
Crucial Step: After creating or modifying the data source, you must:
- Click the Save button to persist your changes.
- Hit Yes when prompted to restart the Data Gateway service.
This ensures all changes are properly applied:
 Skipping this step may cause the new settings to fail, preventing you from connecting to the data source.
Create ODBC data source to connect to the gateway
In this part we will create an ODBC data source to connect to the ZappySys Data Gateway from Python. To achieve that, let's perform these steps:
-
Search for
odbcand open the ODBC Data Sources (64-bit):
-
Create a User data source (User DSN) based on the ODBC Driver 17 for SQL Server driver:
ODBC Driver 17 for SQL Server
If you don't see the ODBC Driver 17 for SQL Server driver in the list, choose a similar version. -
Then set a Name for the data source (e.g.
Gateway) and the address of the Data Gateway:ZappySysGatewayDSNlocalhost,5000 Make sure you separate the hostname and port with a comma, e.g.
localhost,5000. -
Proceed with the authentication part:
- Select SQL Server authentication
-
In the Login ID field enter the user name you created in the Data Gateway, e.g.,
john - Set Password to the one you configured in the Data Gateway

-
Then set the default database property to
HubspotDSN(the one we used in the Data Gateway):HubspotDSNHubspotDSN Make sure to type the data source name manually or copy/paste it directly into the field. Using the dropdown might fail because the Trust server certificate option is not enabled yet (next step).
 -
Continue by checking the Trust server certificate option:

-
Once you do that, test the connection:

-
If the connection is successful, everything is good:

-
Done!
We are ready to move to the final step. Let's do it!
Access data in Python via the gateway
Finally, we are ready to read data from Hubspot in Python via the Data Gateway. Follow these final steps:
-
Go back to Python.
-
Use this code snippet to read the data using
ZappySysGatewayDSNdata source:ZappySysGatewayDSN')
-
Read the data the same way we discussed at the beginning of this article.
-
That's it!
Now you can connect to Hubspot data in Python via the ZappySys Data Gateway.
If you are asked for authentication details, use Database authentication, SQL authentication or Basic authentication option and enter the credentials you used when configuring the Data Gateway, e.g.johnand your password.Conclusion
In this guide, we demonstrated how to connect to Hubspot using Python and integrate your data — all without writing complex code.
Ready to get started? Download ODBC PowerPack now or ping us via chat if you still need help:
Want more?Don't stop here. Discover more integrations. Explore all Python connectors
Explore all Hubspot integration scenarios
Explore all Python connectors
Explore all Hubspot integration scenarios


 Connector")


 Connector")


 Connector")


 Connector")


