Introduction
You can connect to your SOAP data from Qlik Cloud via the high-performance SOAP ODBC Driver. We'll walk you through the entire setup.
Let's not waste time and get started!
What is SOAP Web Service?
If you are new to SOAP Web Service sometimes referred as XML Web Service then please read some concept about SOAP Web service standard from this link
There are two important aspects in SOAP Web service.
- Getting WSDL file or URL
- Knowing exact Web Service URL
What is WSDL
In very simple term WSDL (often pronounced as whiz-dull) is nothing but a document which describes Service metadata (e.g. Functions you can call, Request parameters, response structure etc). Some service simply give you WSDL as xml file you can download on local machine and then analyze or sometimes you may get direct URL (e.g. http://api.mycompany.com/hr-soap-service/?wsdl )
What is Service URL
Service URL is actual API URL you can call to get data. When you make a request to SOAP service url make sure following things.
- Use correct service URL (Its not same as WSDL url). If you are not sure about service URL contact API vendor or refer API documentation.
-
Each service call you have to supply function you want to call. This can be done in 3 different ways.
- Pass via SOAPAction HTTP Header
- Pass via Url parameter or Url Path (http://myserver/service/function1 — http://myserver/service/?method=function1 )
- Pass via Request BODY
- Find out how to pass credentials. It can be done via Basic Authorization or WSS Security Header in the Request body. Check this link to learn more
Using SoapUI to test SOAP API call / Create Request Body XML
If you do not have WSDL file or URL handy then contact your API provider (sometimes you just have to add ?wsdl at the end of your Service URL to get WSDL so try that. Example: http://mycompany/myservice?wsdl ). If you don't know what is WSDL then in short, WSDL is Web service Description Language (i.e. XML file which describes your SOAP Service). WSDL helps to craft SOAP API request Body for ZappySys XML Driver. So Let's get started.
- Download and Install SoapUI (It’s a Free tool to test SOAP / REST Services)
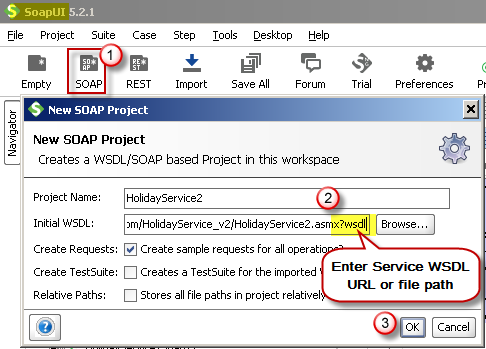
- Open SoapUI and click SOAP button to create new SOAP Project
-
Enter WSDL URL or File Path of WSDLFor example WSDL for our sample service can be accessed via this URL
http://www.holidaywebservice.com/HolidayService_v2/HolidayService2.asmx?wsdl
 Create new SOAP API Project in SoapUI tool for SOAP API Testing
 - Once WSDL is loaded you will see possible operations you can call for your SOAP Web Service.
-
If your web service requires credentials then you have to configure it. There are two common credential types for public services (SOAP WSS or BASIC )
-
To use SOAP WSS Credentials select request node and enter UserId, Password, and WSS-PasswordType (PasswordText or PasswordHash)
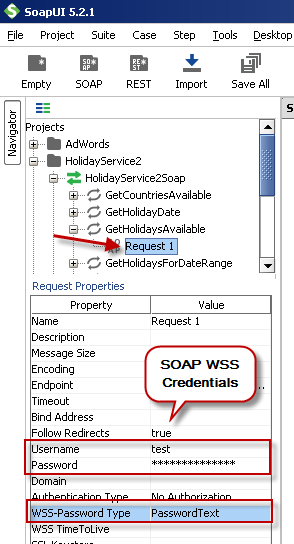 Configure SOAP WSS Credentials for SoapUI (SOAP API Testing Tool)
 -
To use BASIC Auth Credentials select request node and double-click it. At the bottom click on Auth (Basic) and From Authorization dropdown click Add New and Select Basic.
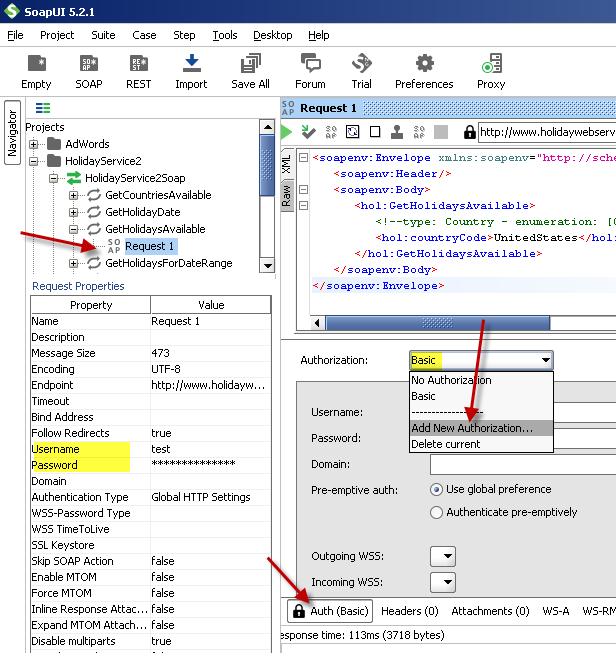 Configure Basic Authorization for SoapUI (SOAP API Testing Tool)
-
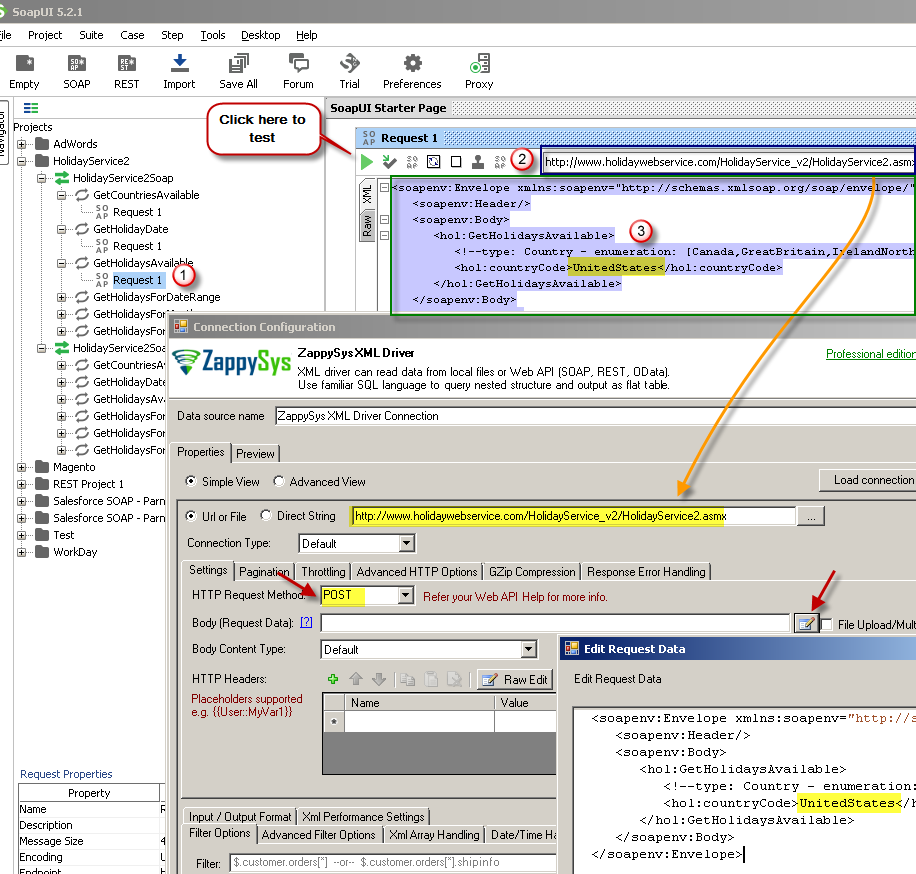
- Now you can test your request first Double-click on the request node to open request editor.
-
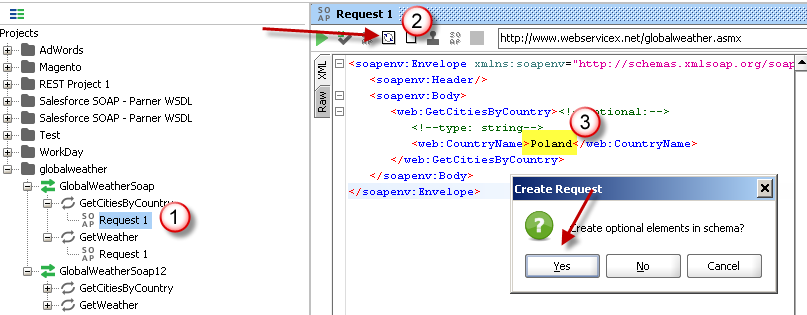
Change necessary parameters, remove optional or unwanted parameters. If you want to regenerate request you can click on Recreate default request toolbar icon.
 Create SOAP Request XML (With Optional Parameters)
 -
Once your SOAP Request XML is ready, Click the Play button in the toolbar to execute SOAP API Request and Response will appear in Right side panel.
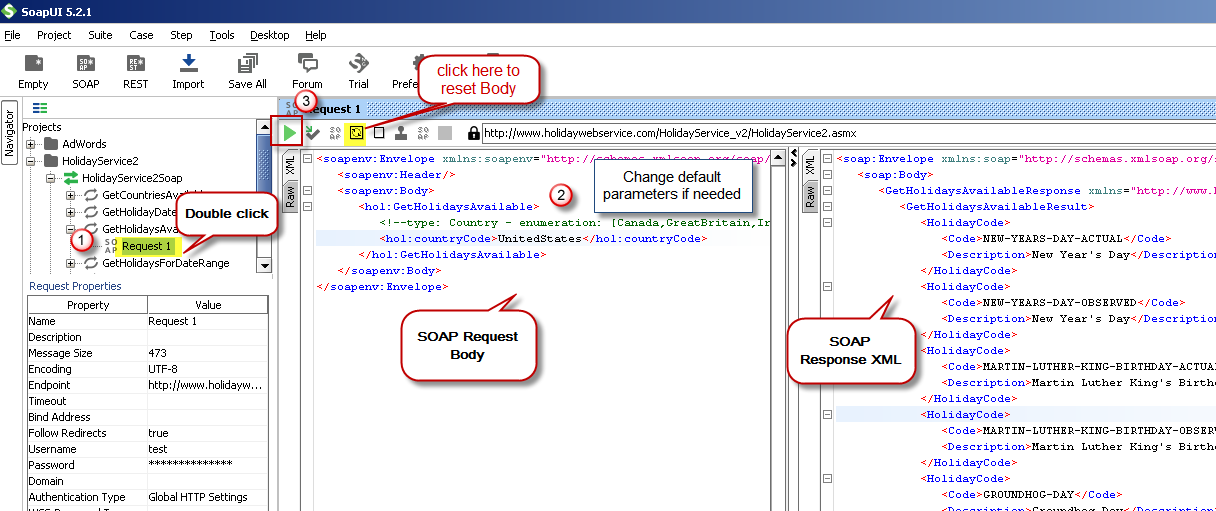 Test SOAP API using SoapUI Tool (Change Default XML Body / Parameters, Execute and See Response)


Once you have tested your SOAP API in SoapUI tool, we are ready to use ZappySys SSIS Tasks/Components or ODBC Drivers to call SOAP API in SSIS or your preferred BI tool or Programming language.
Create data source using SOAP ODBC Driver
Video instructions
Watch this quick walkthrough to see how to configure your SOAP ODBC data source, or scroll down for the step-by-step written guide.
Step-by-step instructions
To get data from SOAP using Qlik Cloud, we first need to create an ODBC data source. We will later read this data in Qlik Cloud. Perform these steps:
-
Download and install ODBC PowerPack (if you haven't already).
-
Search for
odbcand open the ODBC Data Sources (64-bit):
-
Create a User data source (User DSN) based on the ZappySys XML Driver driver:
ZappySys XML Driver
- Create and use a User DSN if the client application runs under a User Account. This is the ideal option at design time (e.g., when developing in Visual Studio). Use it for both types of applications (64-bit and 32-bit).
- Create and use a System DSN if the client application runs under a System Account (e.g., as a Windows Service). This is usually the required option in a production environment. If your Windows Service is a 32-bit application, you must use the 32-bit ODBC Data Source Administrator to configure this
-
Configure API URL, Request Method and Request Body as below screen. Select Url or File and paste the following Url for this example OR you can load existing connection string as per this article.
NOTE: Here i am using demo SOAP API URL, but you need to refer your own API documentation and based on that you need to use your own API URL and need to configure connection based on API Authentication type.http://www.holidaywebservice.com/HolidayService_v2/HolidayService2.asmx?wsdl
 ZappySys XML Driver - Calling SOAP API - Configure URL, Method, Body
 -
(This step is Optional) If your SOAP API requires credentials then Select Connection Type to HTTP and configure as below.
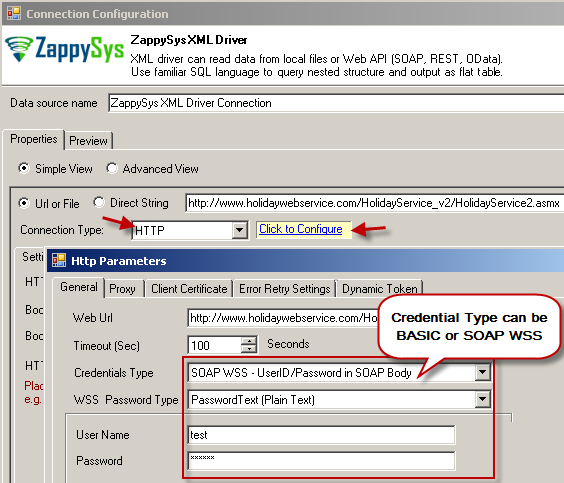 ZappySys XML Driver - Configure SOAP WSS Credentials or Basic Authorization (Userid, Password)
 -
Configure-Request Headers as below (You can get it from Request > Raw tab from SoapUI after you test the request by clicking the Play button)
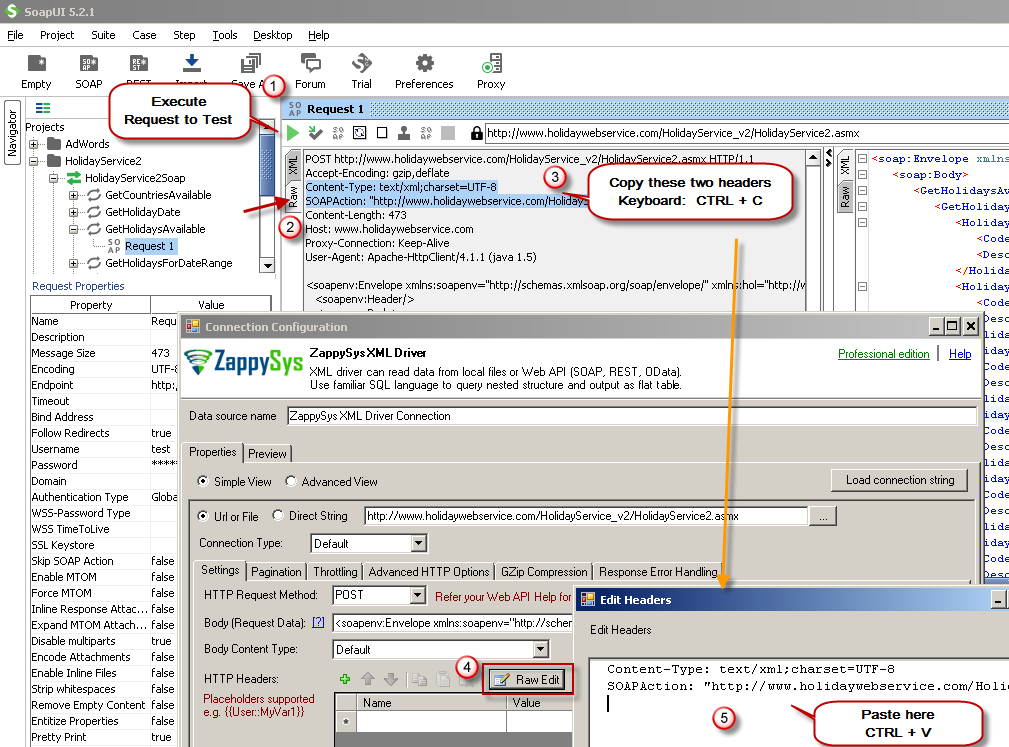 Configure SOAP API Request Headers - ZappySys XML Driver
 -
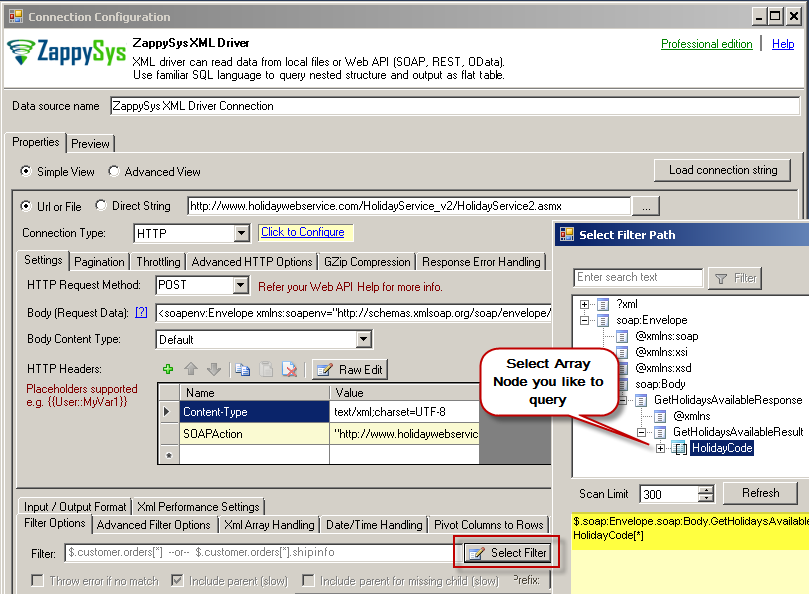
Once credentials entered you can select Filter to extract data from the desired node. Make sure to select array node (see special icon) or select the node which contains all necessary columns if you don't have array node.
 Select Filter - Extract data from nested XML / SOAP API Response (Denormalize Hierarchy)
 -
If prompted select yes to treat selected node as Array (This is helpful when you expect one or more record for selected node)
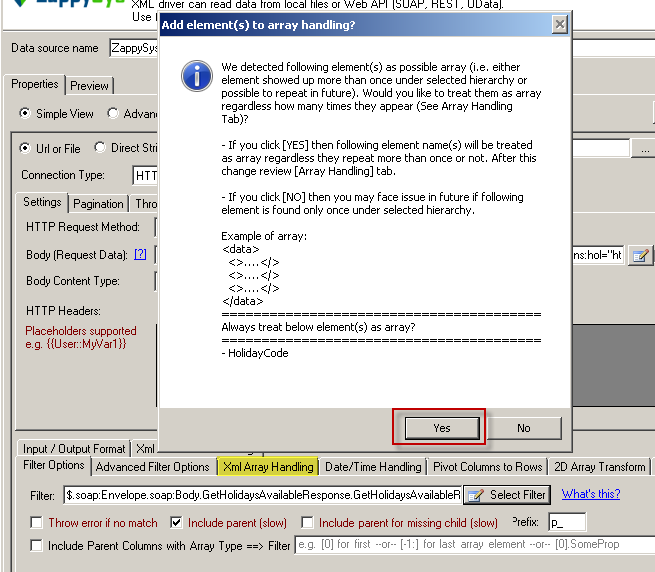 Treat selected node as XML Array Option for SOAP API Response XML
 -
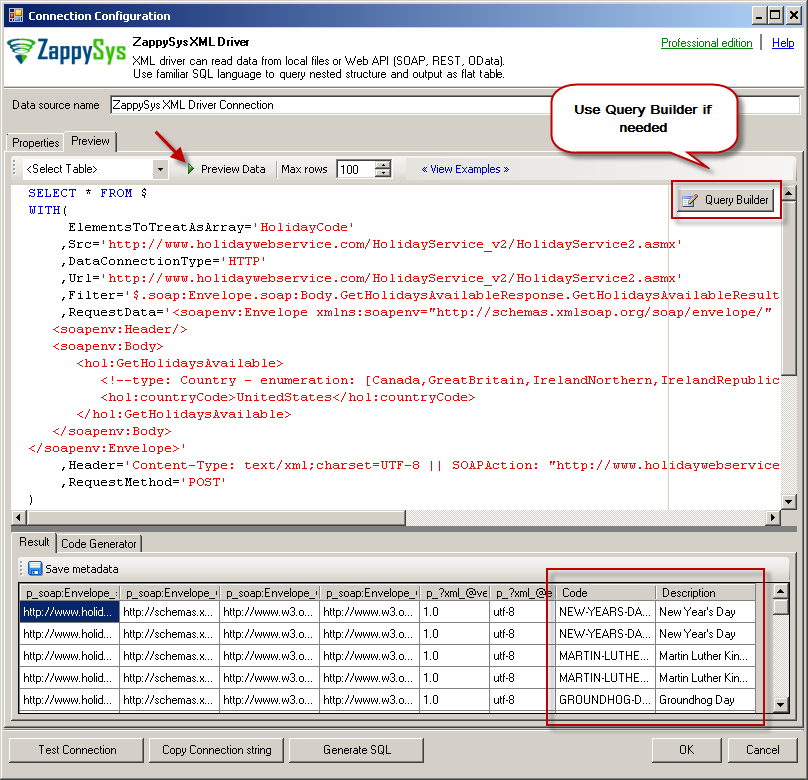
Once the data source has been configured, Go to Preview tab and click on preview data to view the data.
You can create the default query, generated based on settings you entered in previous sections also, by using Query Builder. Attributes listed in WITH clause are optional. If you omit attribute in WITH clause it will use it from Properties tab. Preview SOAP API Response in ZappySys XML Driver
 -
Click OK to finish creating the data source.
-
That's it; we are done. In a few clicks we configured the call to SOAP API using ZappySys SOAP Connector.


Set up Qlik Direct Access data gateway
To connect to the SOAP data, you need a secure pipeline between your Qlik Cloud tenant and the SOAP ODBC DSN. Let's download, deploy, and register the Qlik data gateway to make this happen.
-
First, log into your My Qlik tenants portal and choose your tenant:
-
Navigate to Administration.
-
Select Spaces.

-
-
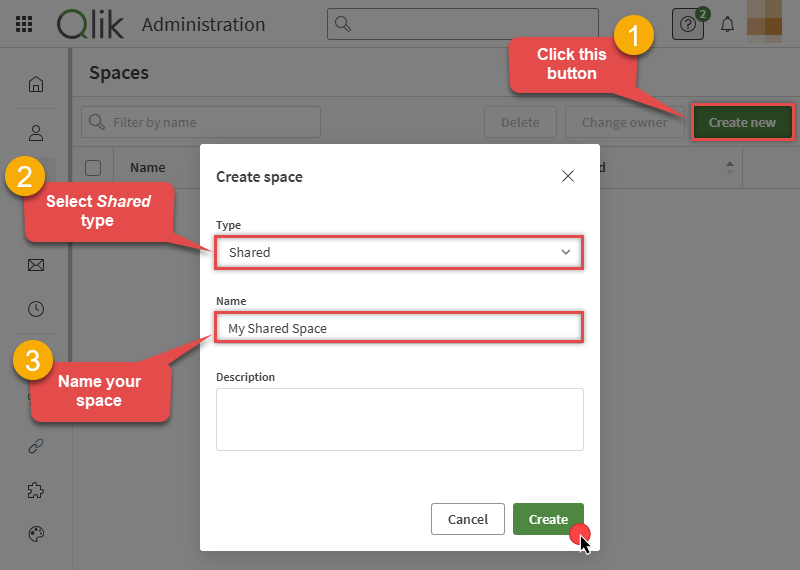
Create a shared space if you do not have one yet:
-
Click Create new.
-
Name shared space and confirm.
-
-
Next, let's grab the gateway installer:
-
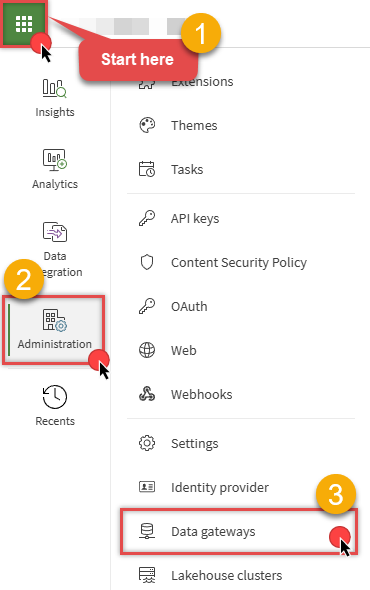
Navigate to Administration.
-
Select Data gateways.
-
-
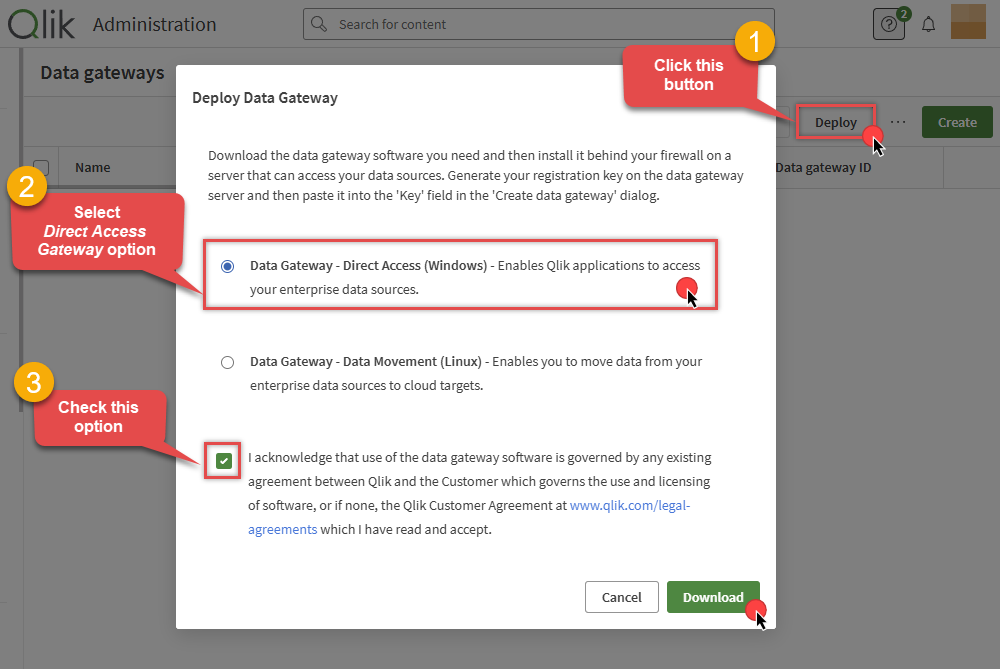
Download the gateway:
-
Click Deploy.
-
Select Data Gateway - Direct Access (Windows).
-
Check acknowledgement box.
-
Click Download.
-
-
If you are not running this locally, copy the installer to your target machine.
The ODBC PowerPack and the Qlik Direct Access gateway must be installed on the exact same machine. -
Install the Qlik Direct Access gateway.
-
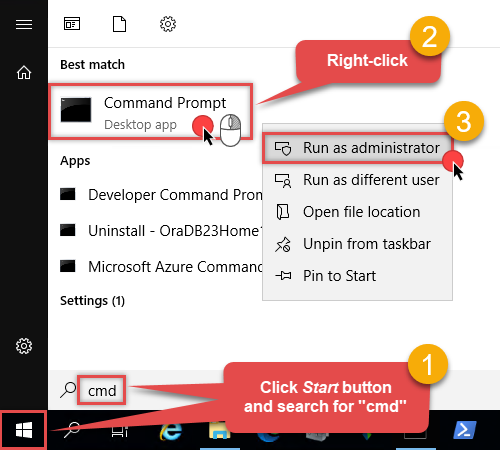
Once installed, open an elevated Command Prompt on the gateway machine:
-
Link the gateway to your tenant:
-
Navigate to ConnectorAgent directory.
-
Run tenant URL setup command.
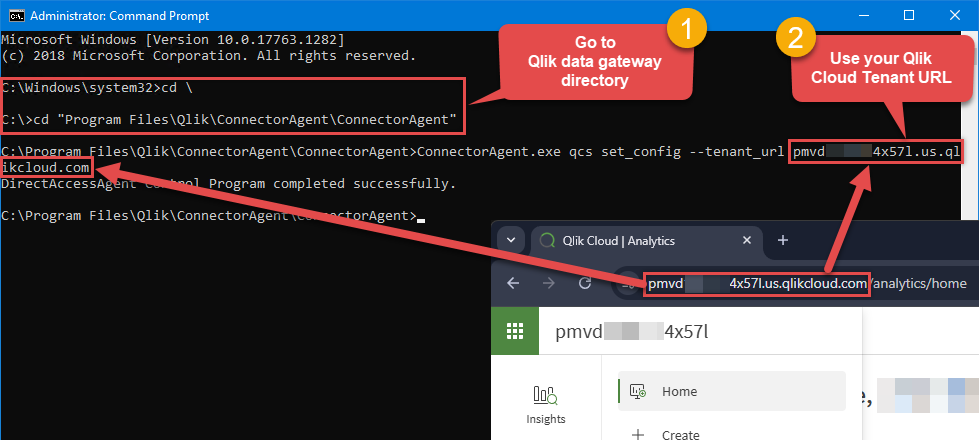
cd \ cd "Program Files\Qlik\ConnectorAgent\ConnectorAgent" ConnectorAgent.exe qcs set_config --tenant_url https://<tenant>.qlikcloud.com -
-
Generate your data gateway key:
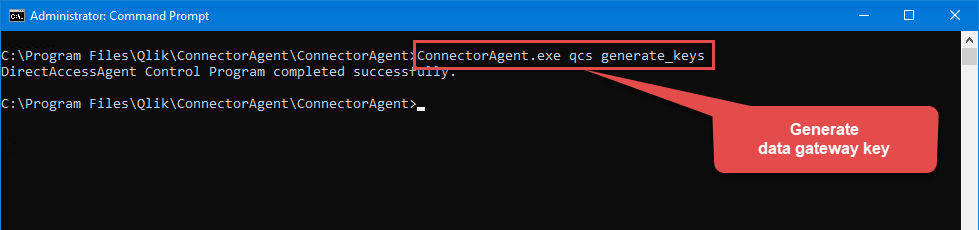
ConnectorAgent.exe qcs generate_keys -
Start the gateway service:
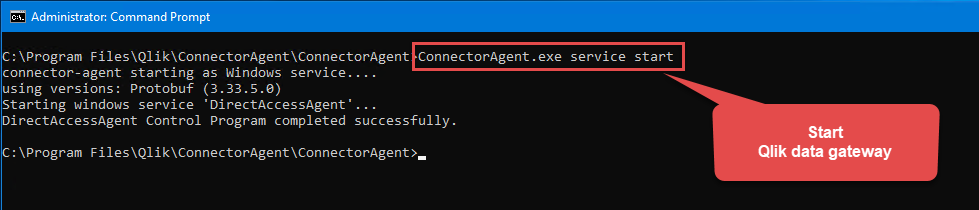
ConnectorAgent.exe service start -
Generate and copy the registration payload:
-
Run registration command.
-
Copy output text.
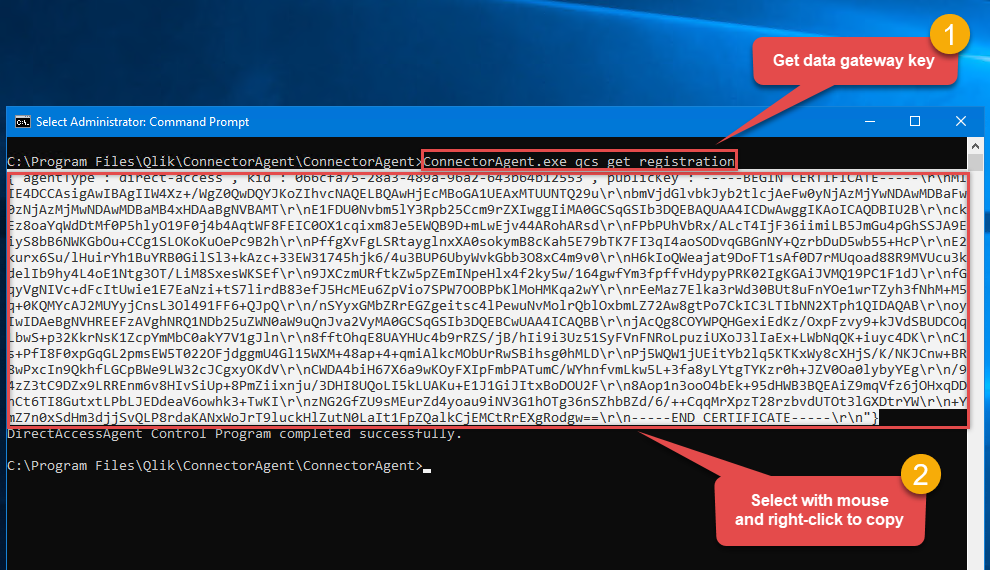
ConnectorAgent.exe qcs get_registration -
-
Now let's head back to the Qlik Cloud Administration page to complete the data gateway registration.
-
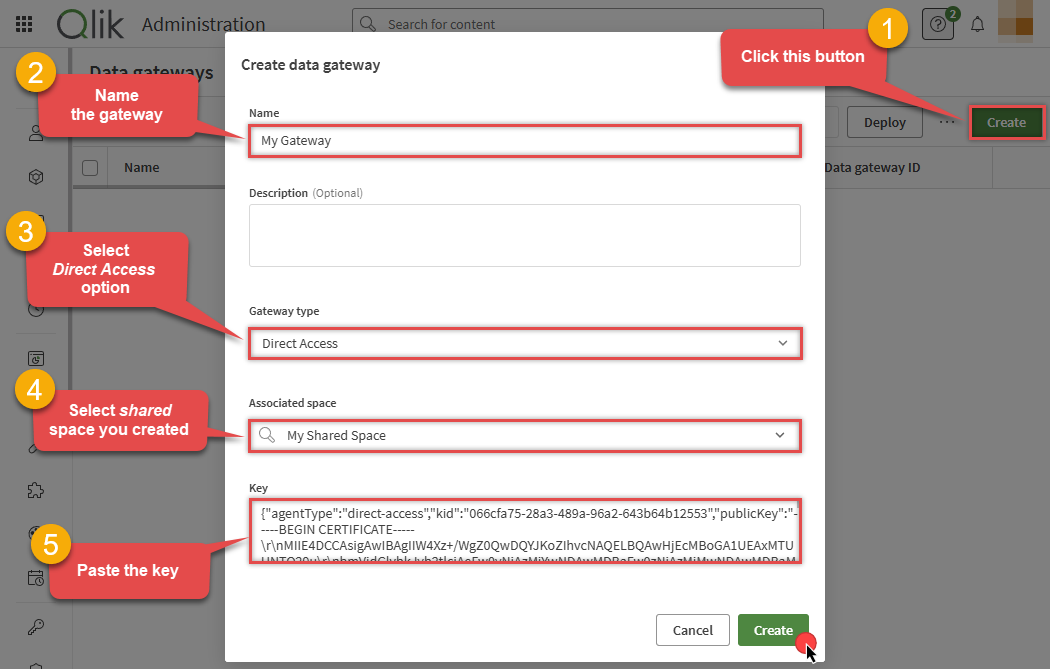
Create the gateway entry in your tenant and apply the key:
-
Name gateway.
-
Select Direct Access for Gateway type.
-
Select shared space.
-
Paste generated key.
-
Click Create.
-
-
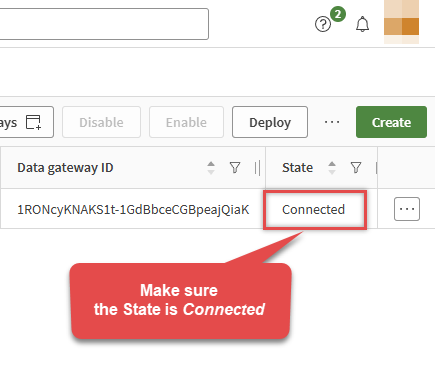
Finally, verify the status shows Connected:
Create ODBC connection in Analytics
With the gateway actively running, let's build the actual ODBC connection in Analytics.
-
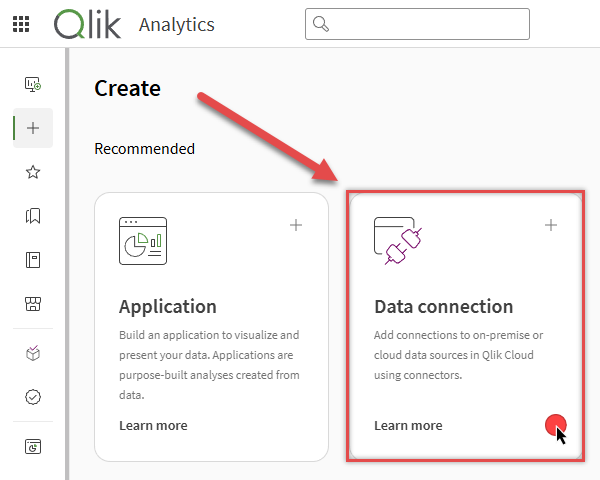
Navigate to your My Qlik tenants page, choose your tenant, select the Analytics tile, and click the Create menu item:
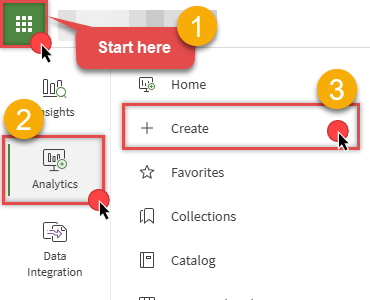
-
Click the Data connection tile:
-
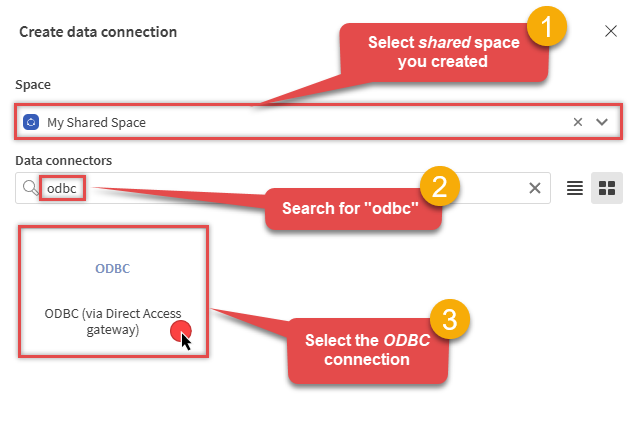
Next, let's create the ODBC data connection by selecting your shared space and finding the right connector:
-
Pick your shared space.
-
Search for odbc.
-
Choose the ODBC (via Direct Access gateway) option.
-
-
Finally, configure the ODBC connection fields to wrap up the setup:
-
Select your Data gateway.
-
Select the System DSN option.
-
Choose the ODBC source (DSN).
-
Select the DB2 SQL syntax.
-
Name the connection.
-
Click Test connection, then click Create.
SoapDSN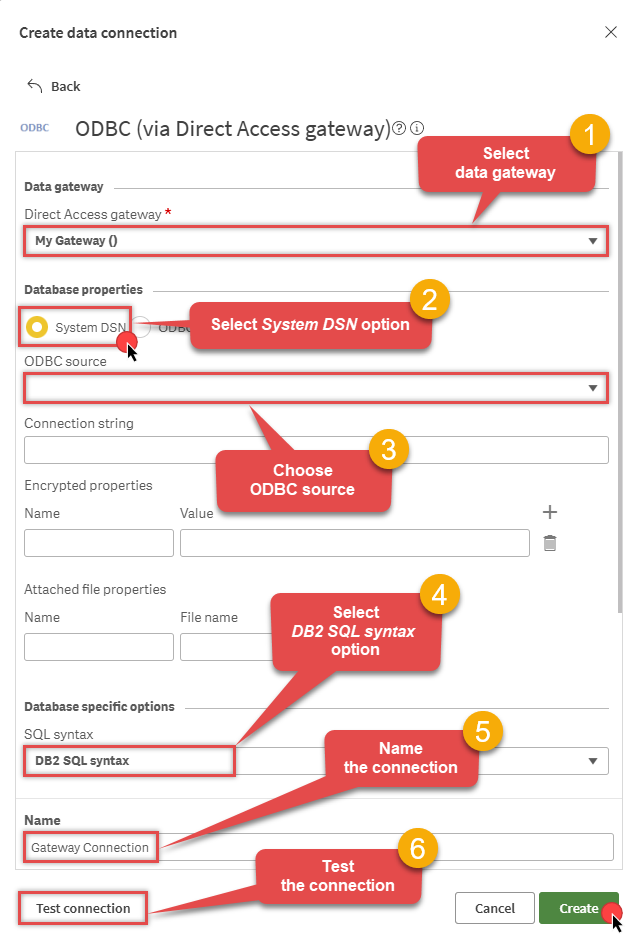
-
-
Connection is ready!
You are now successfully wired up to your SOAP data. Let's see how to actually load it into your dashboard.
Load SOAP data into Qlik Cloud
Depending on your specific use case, you can choose one of the two methods below to bring your data into the Qlik Cloud environment for analysis.
Use Analytics app with Data load editor
This is the best method if you need to run dynamic SQL. We will use your new gateway connection in the Data load editor to pull the data and verify it visually.
-
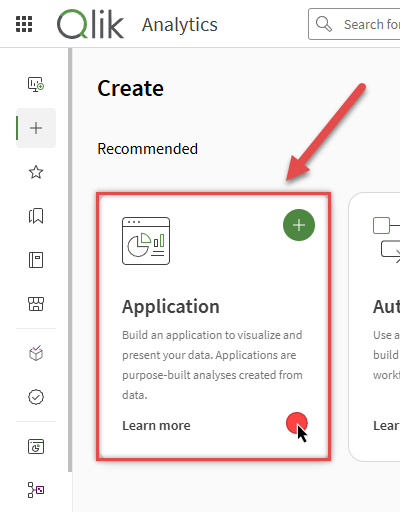
Navigate to your My Qlik tenants page, choose your tenant, select the Analytics tile, and click the Create menu item:
-
Click the Application tile to start creating a new application:
-
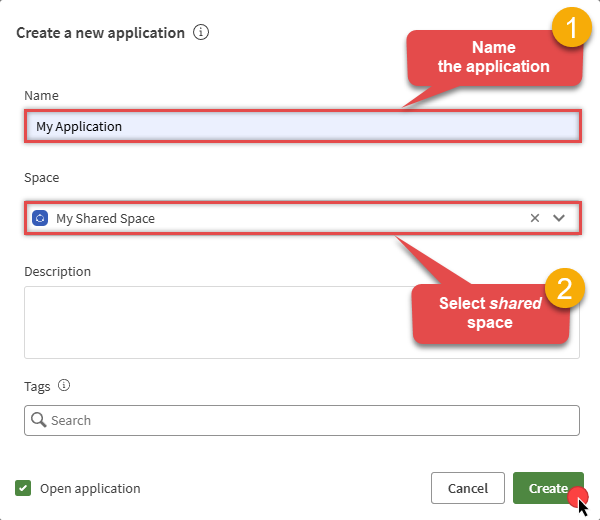
Next, create the application within your shared space:
Name the application.
Select your shared space.
Click the Create button.
-
Now, open the new application and click the Data load editor option:
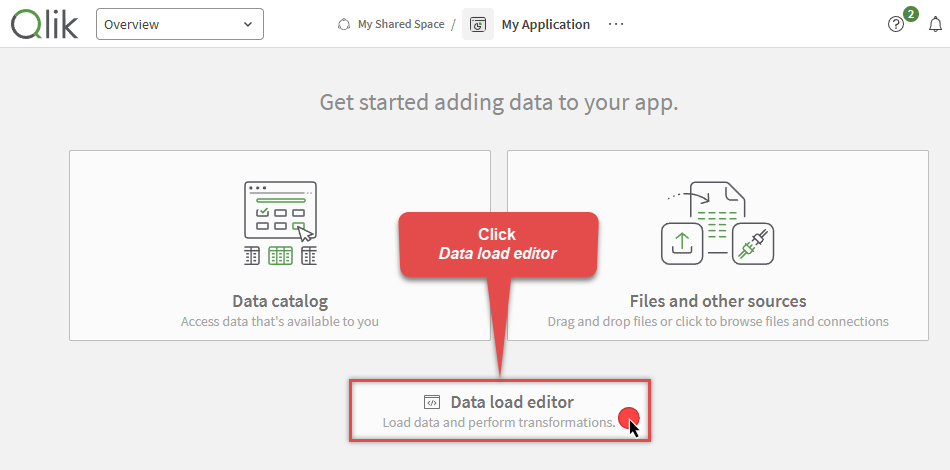
-
With the editor open, you can configure your DSN and SQL query before running the data load:
-
Select your shared space connection.
-
Click the gateway connection button to use the ODBC (via Direct Access gateway) option.
-
Name the table as MyData and prepare your SQL load script.
-
Click Load data.
SELECT * FROM Orders
        SELECT * FROM Orders SELECT * FROM Orders SELECT * FROM Orders SELECT * FROM OrdersSELECT * FROM Orders SELECT * FROM OrdersSELECT * FROM Orders SELECT * FROM OrdersSELECT * FROM Orders SELECT * FROM Orders SELECT * FROM Orders SELECT * FROM OrdersSELECT * FROM Orders SELECT * FROM OrdersSELECT * FROM Orders SELECT * FROM OrdersSELECT * FROM Orders SELECT * FROM Orders SELECT * FROM Orders SELECT * FROM OrdersSELECT * FROM Orders SELECT * FROM OrdersSELECT * FROM Orders SELECT * FROM OrdersSELECT * FROM Orders SELECT * FROM OrdersSELECT * FROM Orders SELECT * FROM OrdersSELECT * FROM Orders SELECT * FROM OrdersSELECT * FROM Orders SELECT * FROM OrdersSELECT * FROM Orders SELECT * FROM OrdersSELECT * FROM Orders SELECT * FROM OrdersSELECT * FROM Orders SELECT * FROM OrdersSELECT * FROM Orders SELECT * FROM OrdersSELECT * FROM Orders SELECT * FROM OrdersSELECT * FROM Orders SELECT * FROM OrdersSELECT * FROM Orders SELECT * FROM OrdersSELECT * FROM Orders SELECT * FROM OrdersSELECT * FROM Orders SELECT * FROM OrdersSELECT * FROM Orders SELECT * FROM OrdersSELECT * FROM Orders SELECT * FROM OrdersSELECT * FROM Orders SELECT * FROM OrdersSELECT * FROM Orders SELECT * FROM OrdersSELECT * FROM Orders SELECT * FROM OrdersSELECT * FROM Orders SELECT * FROM OrdersSELECT * FROM Orders SELECT * FROM OrdersSELECT * FROM Orders SELECT * FROM OrdersSELECT * FROM Orders SELECT * FROM OrdersSELECT * FROM Orders SELECT * FROM OrdersSELECT * FROM Orders SELECT * FROM OrdersSELECT * FROM Orders SELECT * FROM OrdersSELECT * FROM Orders SELECT * FROM OrdersSELECT * FROM Orders SELECT * FROM OrdersSELECT * FROM Orders SELECT * FROM OrdersSELECT * FROM Orders SELECT * FROM OrdersSELECT * FROM Orders SELECT * FROM OrdersSELECT * FROM Orders SELECT * FROM OrdersSELECT * FROM Orders SELECT * FROM OrdersSELECT * FROM Orders SELECT * FROM OrdersSELECT * FROM Orders SELECT * FROM OrdersSELECT * FROM Orders SELECT * FROM OrdersSELECT * FROM Orders SELECT * FROM OrdersSELECT * FROM Orders SELECT * FROM OrdersSELECT * FROM Orders SELECT * FROM OrdersSELECT * FROM Orders SELECT * FROM OrdersSELECT * FROM Orders SELECT * FROM OrdersSELECT * FROM Orders SELECT * FROM OrdersSELECT * FROM Orders SELECT * FROM OrdersSELECT * FROM Orders SELECT * FROM OrdersSELECT * FROM Orders SELECT * FROM OrdersSELECT * FROM Orders SELECT * FROM Orders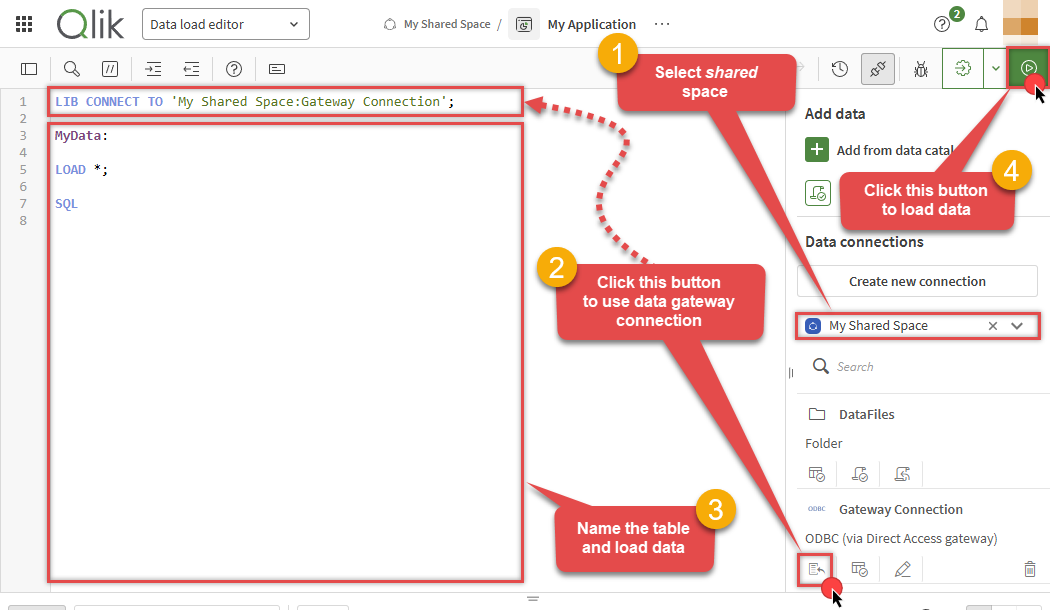
LIB CONNECT TO 'My Shared Space:Gateway Connection'; MyData: LOAD *; SQL SELECT * FROM Orders -
-
Once the data has successfully loaded, go to the sheet to build your dashboard:
Select the Sheet option.
Select the Fields section.
Drag and drop the fields onto the sheet to create your visuals.
MyData
-
Your SOAP data is now ready for analysis!
Use Data flow for data integration
Use this method if you want to build a complete source-to-destination pipeline directly inside Qlik Cloud.
-
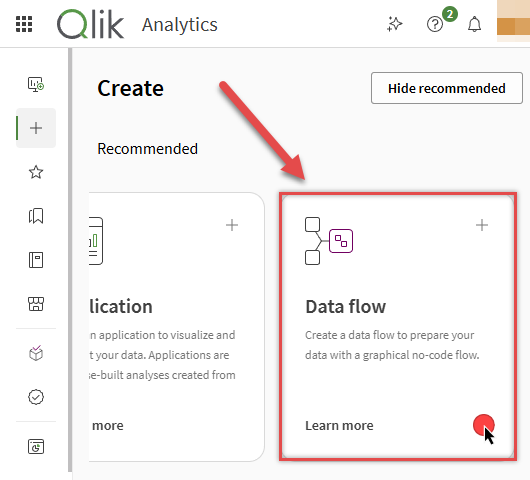
Navigate to your My Qlik tenants page, choose your tenant, select the Analytics tile, and click the Create menu item:
-
Click the Data flow tile to start building your integration:
-
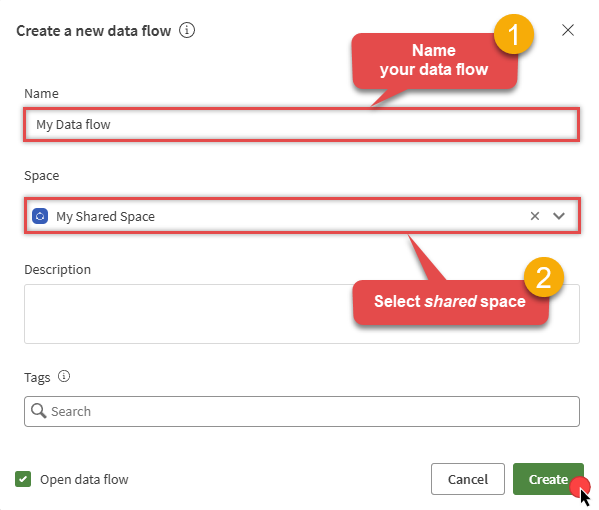
Next, create the data flow within your shared space:
Name your data flow.
Select your shared space.
Click the Create button.
-
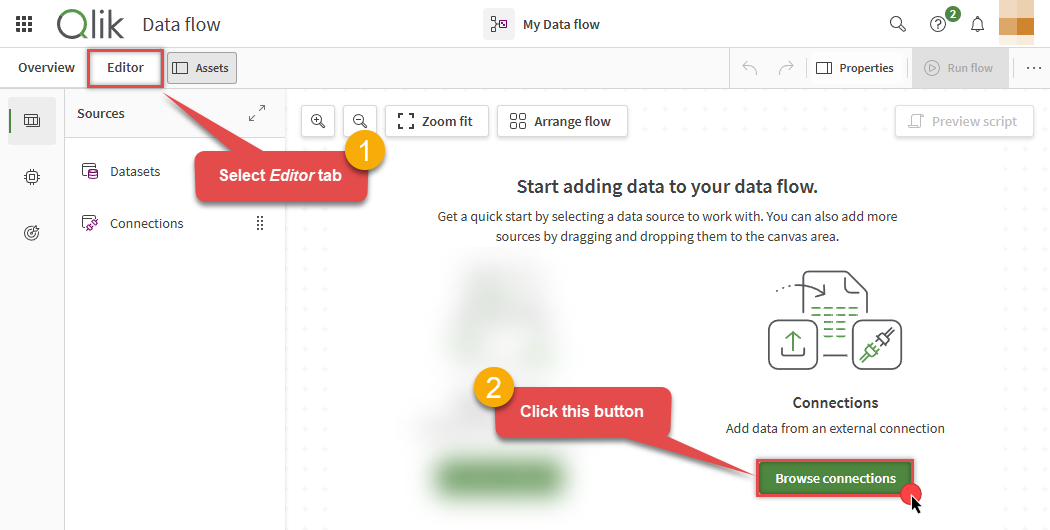
Now that the data flow is created, open the editor and browse your available connections:
Select the Editor tab.
Click the Browse connections button.
-
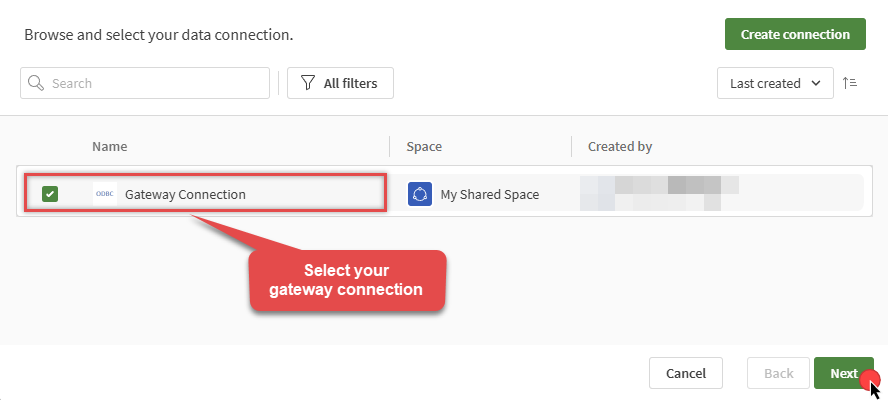
Select the gateway-backed ODBC connection we set up earlier:
Choose your gateway connection.
Click Next.
-
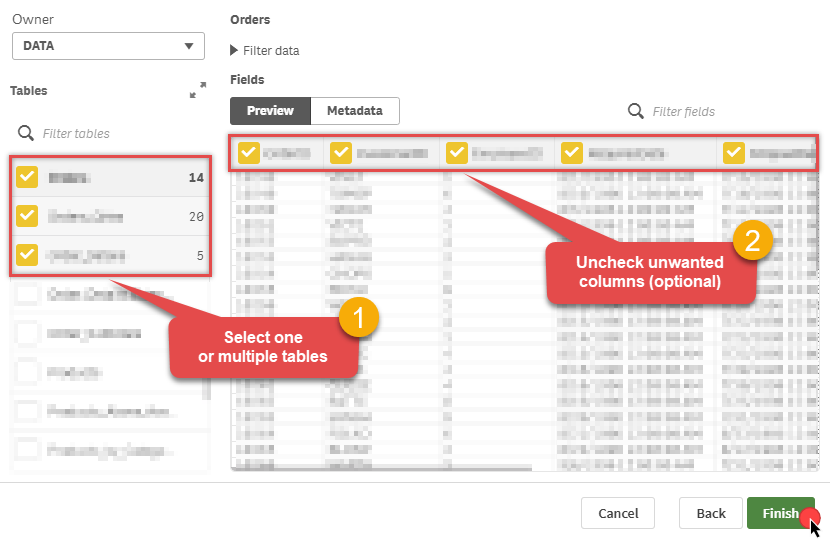
Select your source tables and the specific fields you want to import:
Select one or multiple tables.
Uncheck any unwanted columns (optional).
Click Finish.
-
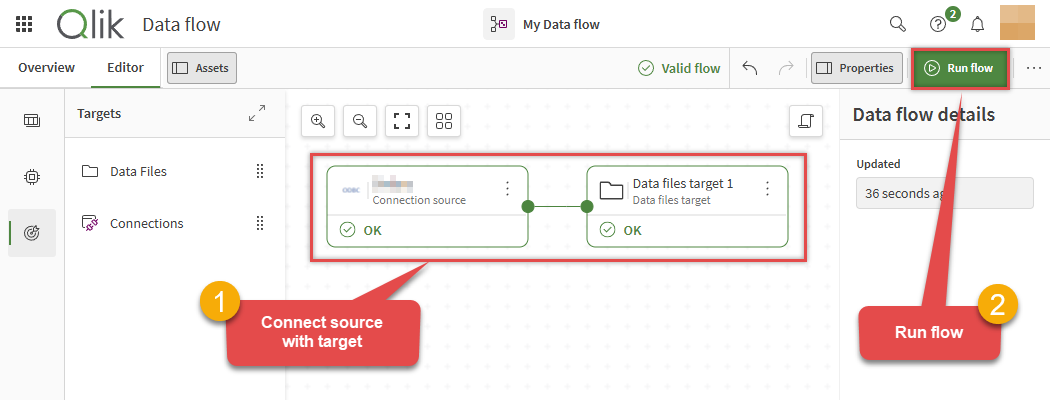
Map your source and destination nodes to define the flow:
Connect the source node to the destination node.
Click Run flow to start the integration process.
-
Wait for the successful completion message to appear:
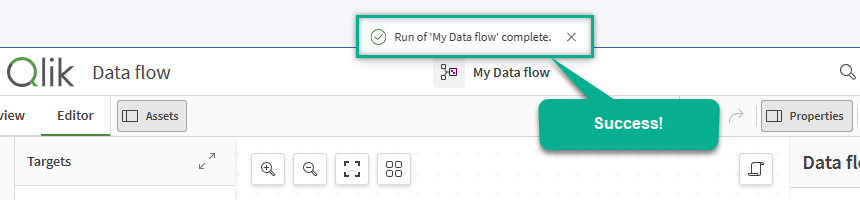
-
Your SOAP data integration is now complete!
Configuring pagination in the XML Driver
ZappySys XML Driver equips users with powerful tools for seamless data extraction and management from REST APIs, leveraging advanced pagination methods for enhanced efficiency. These options are designed to handle various types of pagination structures commonly used in APIs. Below are the detailed descriptions of these options:
Page-based Pagination: This method works by retrieving data in fixed-size pages from the Rest API. It allows you to specify the page size and navigate through the results by requesting different page numbers, ensuring that you can access all the data in a structured manner.
Offset-based Pagination: With this approach, you can extract data by specifying the starting point or offset from which to begin retrieving data. It allows you to define the number of records to skip and fetch subsequent data accordingly, providing precise control over the data extraction process.
Cursor-based Pagination: This technique involves using a cursor or a marker that points to a specific position in the dataset. It enables you to retrieve data starting from the position indicated by the cursor and proceed to subsequent segments, ensuring that you capture all the relevant information without missing any records.
Token-based Pagination: In this method, a token serves as a unique identifier for a specific data segment. It allows you to access the next set of data by using the token provided in the response from the previous request. This ensures that you can systematically retrieve all the data segments without duplication or omission.
Utilizing these comprehensive pagination features in the ZappySys XML Driver facilitates efficient data management and extraction from REST APIs, optimizing the integration and analysis of extensive datasets.
For more detailed steps, please refer to this link: How to do REST API Pagination in SSIS / ODBC Drivers
Authentication
ZappySys offers various authentication methods to securely access data from various sources. These authentication methods include OAuth, Basic Authentication, Token-based Authentication, and more, allowing users to connect to a wide range of data sources securely.
ZappySys Authentication is a robust system that facilitates secure access to data from a diverse range of sources. It includes a variety of authentication methods tailored to meet the specific requirements of different data platforms and services. These authentication methods may involve:
OAuth: ZappySys supports OAuth for authentication, which allows users to grant limited access to their data without revealing their credentials. It's commonly used for applications that require access to user account information.
Basic Authentication: This method involves sending a username and password with every request. ZappySys allows users to securely access data using this traditional authentication approach.
Token-based Authentication: ZappySys enables users to utilize tokens for authentication. This method involves exchanging a unique token with each request to authenticate the user's identity without revealing sensitive information.
By implementing these authentication methods, ZappySys ensures the secure and reliable retrieval of data from various sources, providing users with the necessary tools to access and integrate data securely and efficiently. For more comprehensive details on the authentication process, please refer to the official ZappySys documentation or reach out to their support team for further assistance.
For more details, please refer to this link: ZappySys Connections
Optional: Centralized data access via ZappySys Data Gateway
In some situations, you may need to provide SOAP data access to multiple users or services. Configuring the data source on a Data Gateway creates a single, centralized connection point for this purpose.
This configuration provides two primary advantages:
-
Centralized data access
The data source is configured once on the gateway, eliminating the need to set it up individually on each user's machine or application. This significantly simplifies the management process.
-
Centralized access control
Since all connections route through the gateway, access can be governed or revoked from a single location for all users.
| Data Gateway |
Local ODBC
data source
|
|
|---|---|---|
| Simple configuration | ||
| Installation | Single machine | Per machine |
| Connectivity | Local and remote | Local only |
| Connections limit | Limited by License | Unlimited |
| Central data access | ||
| Central access control | ||
| More flexible cost |
To achieve this, you must first create a data source in the Data Gateway (server-side) and then create an ODBC data source in Qlik Cloud (client-side) to connect to it.
Let's not wait and get going!
Create SOAP data source in the gateway
In this section we will create a data source for SOAP in the Data Gateway. Let's follow these steps to accomplish that:
-
Search for
gatewayin the Windows Start Menu and open ZappySys Data Gateway Configuration:
-
Go to the Users tab and follow these steps to add a Data Gateway user:
- Click the Add button
-
In the Login field enter a username, e.g.,
john - Then enter a Password
- Check the Is Administrator checkbox
- Click OK to save

-
Now we are ready to add a data source:
- Click the Add button
- Give the Data source a name (have it handy for later)
- Then select Native - ZappySys XML Driver
- Finally, click OK
SoapDSNZappySys XML Driver
-
When the ZappySys XML Driver configuration window opens, go back to ODBC Data Source Administrator where you already have the SOAP ODBC data source created and configured, and follow these steps on how to Import data source configuration into the Gateway:
-
Open ODBC data source configuration and click Copy settings:
 ZappySys XML Driver - SOAPRead and write SOAP data effortlessly. Query, sync, and manage XML SOAP services and requests for analytics, reporting, and data pipelines — almost no coding required.SoapDSN
-
The window opens, telling us the connection string was successfully copied to the clipboard:

-
Then go to Data Gateway configuration and in data source configuration window click Load settings:
SoapDSN
ZappySys XML Driver - Configuration [Version: 2.0.1.10418]ZappySys XML Driver - SOAPRead and write SOAP data effortlessly. Query, sync, and manage XML SOAP services and requests for analytics, reporting, and data pipelines — almost no coding required.SoapDSN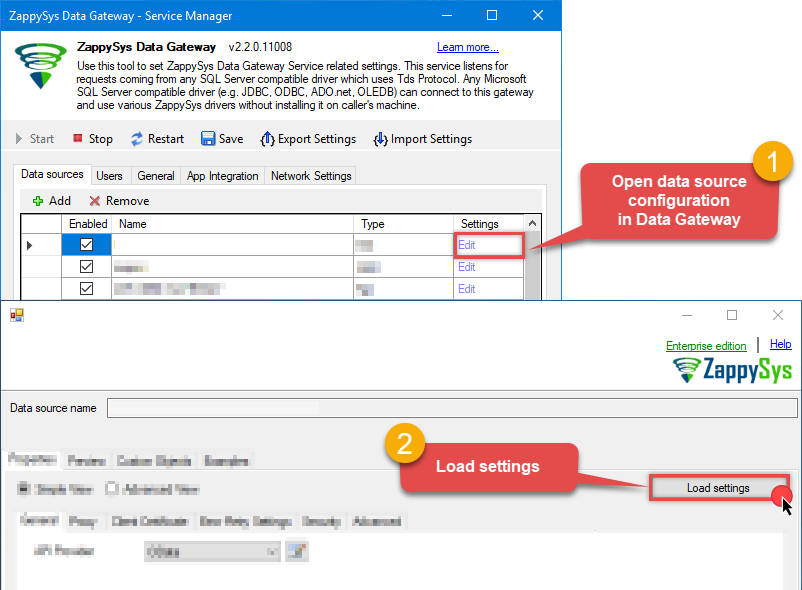
-
Once a window opens, just paste the settings by pressing
CTRL+Vor by clicking right mouse button and then Paste option.
-
Open ODBC data source configuration and click Copy settings:
-
Once done, go to the Network Settings tab and Add a firewall rule for inbound traffic:
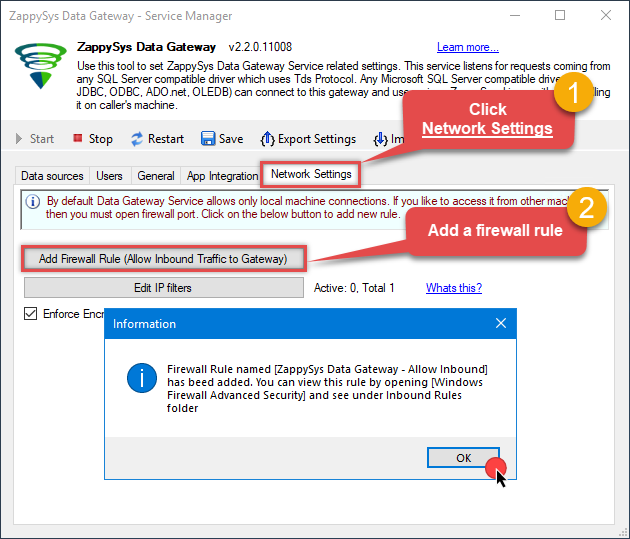
- This will initially allow all inbound traffic.
- Click Edit IP filters to restrict access to specific IP addresses or ranges.
-
Crucial Step: After creating or modifying the data source, you must:
- Click the Save button to persist your changes.
- Hit Yes when prompted to restart the Data Gateway service.
This ensures all changes are properly applied:
 Skipping this step may cause the new settings to fail, preventing you from connecting to the data source.
Create ODBC data source to connect to the gateway
In this part we will create an ODBC data source to connect to the ZappySys Data Gateway from Qlik Cloud. To achieve that, let's perform these steps:
-
Search for
odbcand open the ODBC Data Sources (64-bit):
-
Create a User data source (User DSN) based on the ODBC Driver 17 for SQL Server driver:
ODBC Driver 17 for SQL Server
If you don't see the ODBC Driver 17 for SQL Server driver in the list, choose a similar version. -
Then set a Name for the data source (e.g.
Gateway) and the address of the Data Gateway:ZappySysGatewayDSNlocalhost,5000 Make sure you separate the hostname and port with a comma, e.g.
localhost,5000. -
Proceed with the authentication part:
- Select SQL Server authentication
-
In the Login ID field enter the user name you created in the Data Gateway, e.g.,
john - Set Password to the one you configured in the Data Gateway

-
Then set the default database property to
SoapDSN(the one we used in the Data Gateway):SoapDSNSoapDSN Make sure to type the data source name manually or copy/paste it directly into the field. Using the dropdown might fail because the Trust server certificate option is not enabled yet (next step).
 -
Continue by checking the Trust server certificate option:

-
Once you do that, test the connection:

-
If the connection is successful, everything is good:

-
Done!
We are ready to move to the final step. Let's do it!
Access data in Qlik Cloud via the gateway
Finally, we are ready to read data from SOAP in Qlik Cloud via the Data Gateway. Follow these final steps:
-
Go back to Qlik Cloud.
-
Navigate to your My Qlik tenants page, choose your tenant, select the Analytics tile, and click the Create menu item:
-
Click the Data connection tile:
-
Next, let's create the ODBC data connection by selecting your shared space and finding the right connector:
-
Pick your shared space.
-
Search for odbc.
-
Choose the ODBC (via Direct Access gateway) option.
-
-
Finally, configure the ODBC connection fields to wrap up the setup:
-
Select your Data gateway.
-
Select the System DSN option.
-
Choose the ODBC source (DSN).
-
Select the DB2 SQL syntax.
-
Name the connection.
-
Click Test connection, then click Create.
ZappySysGatewayDSN
-
-
Read the data the same way we discussed at the beginning of this article.
-
That's it!
Now you can connect to SOAP data in Qlik Cloud via the ZappySys Data Gateway.
john and your password.
Conclusion
In this guide, we demonstrated how to connect to SOAP in Qlik Cloud and integrate your data — all without writing complex code.
Ready to get started? Download ODBC PowerPack now or ping us via chat if you still need help:


 Connector")


 Connector")


 Connector")


 Connector")


