SOAP Connector for Power BI
SOAP Connector can be used to consume data from XML SOAP Service without any programming. It supports advanced filtering along with flexible approach to configure request parameters for web service.
In this article you will learn how to quickly and efficiently integrate SOAP data in Power BI without coding. We will use high-performance SOAP Connector to easily connect to SOAP and then access the data inside Power BI.
Let's follow the steps below to see how we can accomplish that!
SOAP Connector for Power BI is based on ZappySys XML Driver which is part of ODBC PowerPack. It is a collection of high-performance ODBC drivers that enable you to integrate data in SQL Server, SSIS, a programming language, or any other ODBC-compatible application. ODBC PowerPack supports various file formats, sources and destinations, including REST/SOAP API, SFTP/FTP, storage services, and plain files, to mention a few.
Video Tutorial - Integrate SOAP data in Power BI
This video covers the following topics and more, so please watch carefully. After watching the video, follow the steps outlined in this article:
- How to download and install the required PowerPack for SOAP integration in Power BI
- How to configure the connection for SOAP
- Features of the ZappySys XML Driver (Authentication / Query Language / Examples / Driver UI)
- How to use the SOAP in Power BI
What is SOAP Web Service?
If you are new to SOAP Web Service sometimes referred as XML Web Service then please read some concept about SOAP Web service standard from this link
There are two important aspects in SOAP Web service.
- Getting WSDL file or URL
- Knowing exact Web Service URL
What is WSDL
In very simple term WSDL (often pronounced as whiz-dull) is nothing but a document which describes Service metadata (e.g. Functions you can call, Request parameters, response structure etc). Some service simply give you WSDL as xml file you can download on local machine and then analyze or sometimes you may get direct URL (e.g. http://api.mycompany.com/hr-soap-service/?wsdl )
What is Service URL
Service URL is actual API URL you can call to get data. When you make a request to SOAP service url make sure following things.
- Use correct service URL (Its not same as WSDL url). If you are not sure about service URL contact API vendor or refer API documentation.
-
Each service call you have to supply function you want to call. This can be done in 3 different ways.
- Pass via SOAPAction HTTP Header
- Pass via Url parameter or Url Path (http://myserver/service/function1 — http://myserver/service/?method=function1 )
- Pass via Request BODY
- Find out how to pass credentials. It can be done via Basic Authorization or WSS Security Header in the Request body. Check this link to learn more
Using SoapUI to test SOAP API call / Create Request Body XML
If you do not have WSDL file or URL handy then contact your API provider (sometimes you just have to add ?wsdl at the end of your Service URL to get WSDL so try that. Example: http://mycompany/myservice?wsdl ). If you don't know what is WSDL then in short, WSDL is Web service Description Language (i.e. XML file which describes your SOAP Service). WSDL helps to craft SOAP API request Body for ZappySys XML Driver. So Let's get started.
- Download and Install SoapUI (It’s a Free tool to test SOAP / REST Services)
- Open SoapUI and click SOAP button to create new SOAP Project
-
Enter WSDL URL or File Path of WSDLFor example WSDL for our sample service can be accessed via this URL
http://www.holidaywebservice.com/HolidayService_v2/HolidayService2.asmx?wsdl
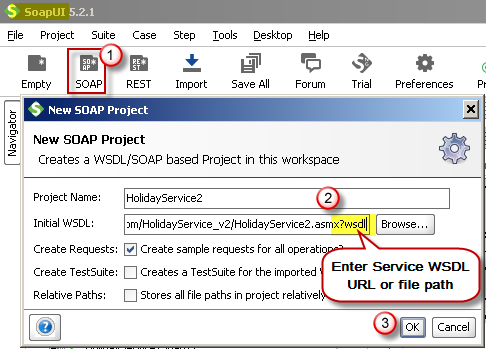 Create new SOAP API Project in SoapUI tool for SOAP API Testing
 - Once WSDL is loaded you will see possible operations you can call for your SOAP Web Service.
-
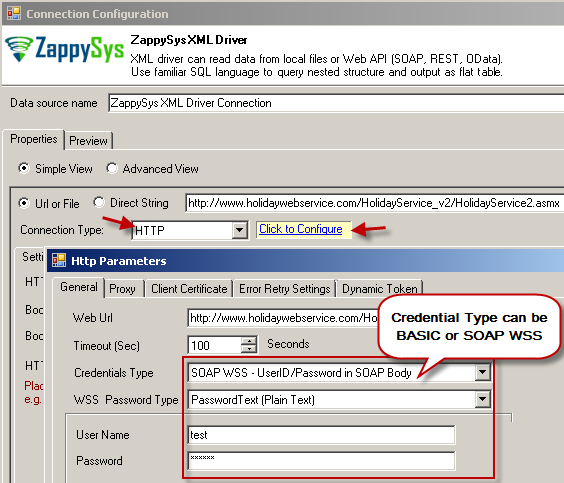
If your web service requires credentials then you have to configure it. There are two common credential types for public services (SOAP WSS or BASIC )
-
To use SOAP WSS Credentials select request node and enter UserId, Password, and WSS-PasswordType (PasswordText or PasswordHash)
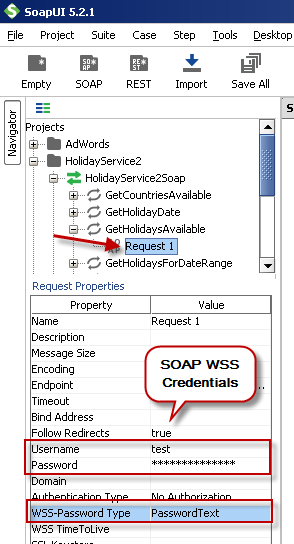 Configure SOAP WSS Credentials for SoapUI (SOAP API Testing Tool)
 -
To use BASIC Auth Credentials select request node and double-click it. At the bottom click on Auth (Basic) and From Authorization dropdown click Add New and Select Basic.
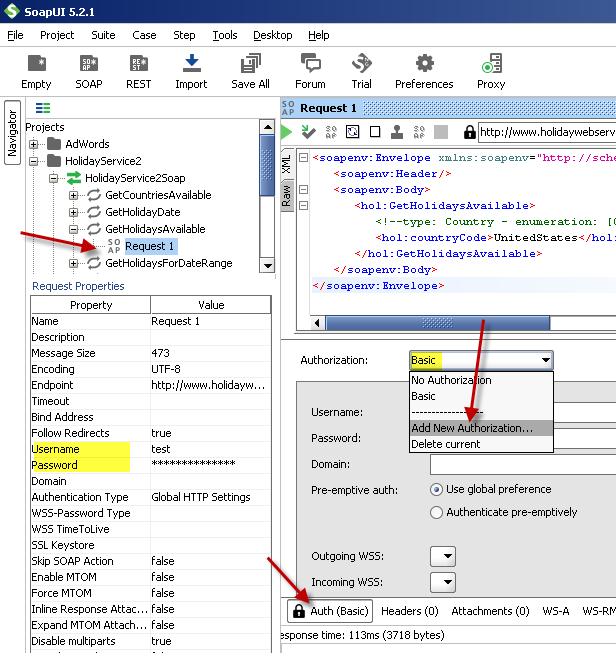 Configure Basic Authorization for SoapUI (SOAP API Testing Tool)
-
- Now you can test your request first Double-click on the request node to open request editor.
-
Change necessary parameters, remove optional or unwanted parameters. If you want to regenerate request you can click on Recreate default request toolbar icon.
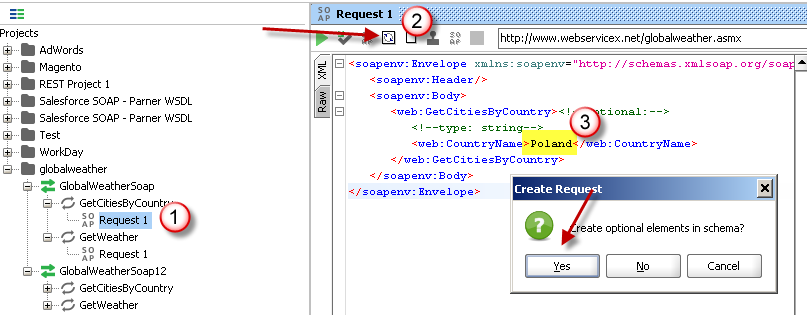 Create SOAP Request XML (With Optional Parameters)
 -
Once your SOAP Request XML is ready, Click the Play button in the toolbar to execute SOAP API Request and Response will appear in Right side panel.
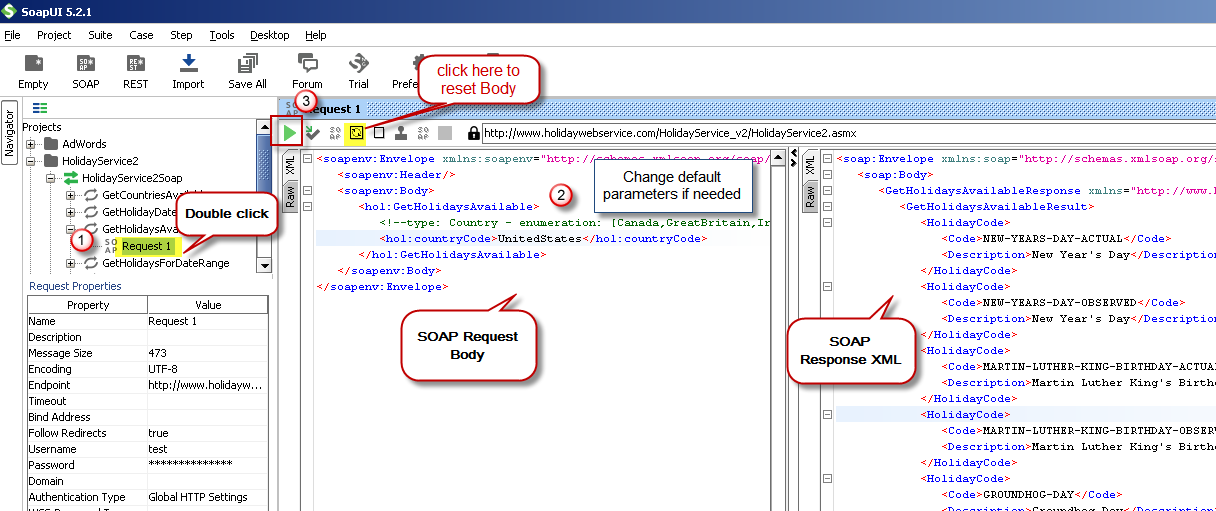 Test SOAP API using SoapUI Tool (Change Default XML Body / Parameters, Execute and See Response)
Once you have tested your SOAP API in SoapUI tool, we are ready to use ZappySys SSIS Tasks/Components or ODBC Drivers to call SOAP API in SSIS or your preferred BI tool or Programming language.
Create ODBC Data Source (DSN) based on ZappySys XML Driver
Step-by-step instructions
To get data from SOAP using Power BI we first need to create a DSN (Data Source) which will access data from SOAP. We will later be able to read data using Power BI. Perform these steps:
-
Download and install ODBC PowerPack.
-
Open ODBC Data Sources (x64):
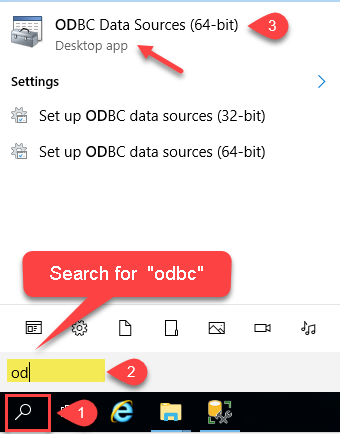
-
Create a User data source (User DSN) based on ZappySys XML Driver:
ZappySys XML Driver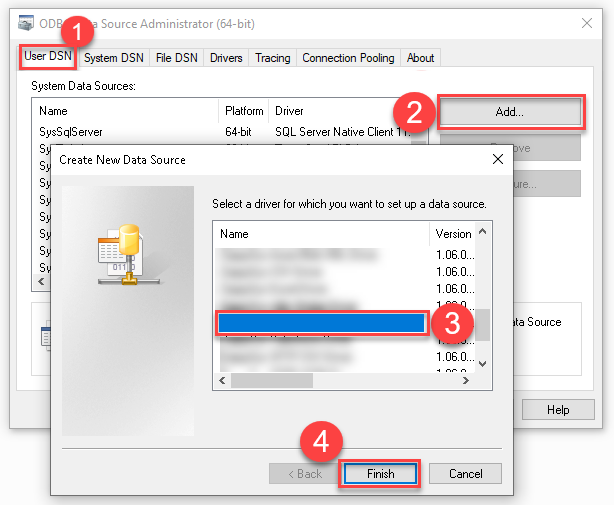
-
Create and use User DSN
if the client application is run under a User Account.
This is an ideal option
in design-time , when developing a solution, e.g. in Visual Studio 2019. Use it for both type of applications - 64-bit and 32-bit. -
Create and use System DSN
if the client application is launched under a System Account, e.g. as a Windows Service.
Usually, this is an ideal option to use
in a production environment . Use ODBC Data Source Administrator (32-bit), instead of 64-bit version, if Windows Service is a 32-bit application.
Power BI uses a Service Account, when a solution is deployed to production environment, therefore for production environment you have to create and use a System DSN. -
Create and use User DSN
if the client application is run under a User Account.
This is an ideal option
-
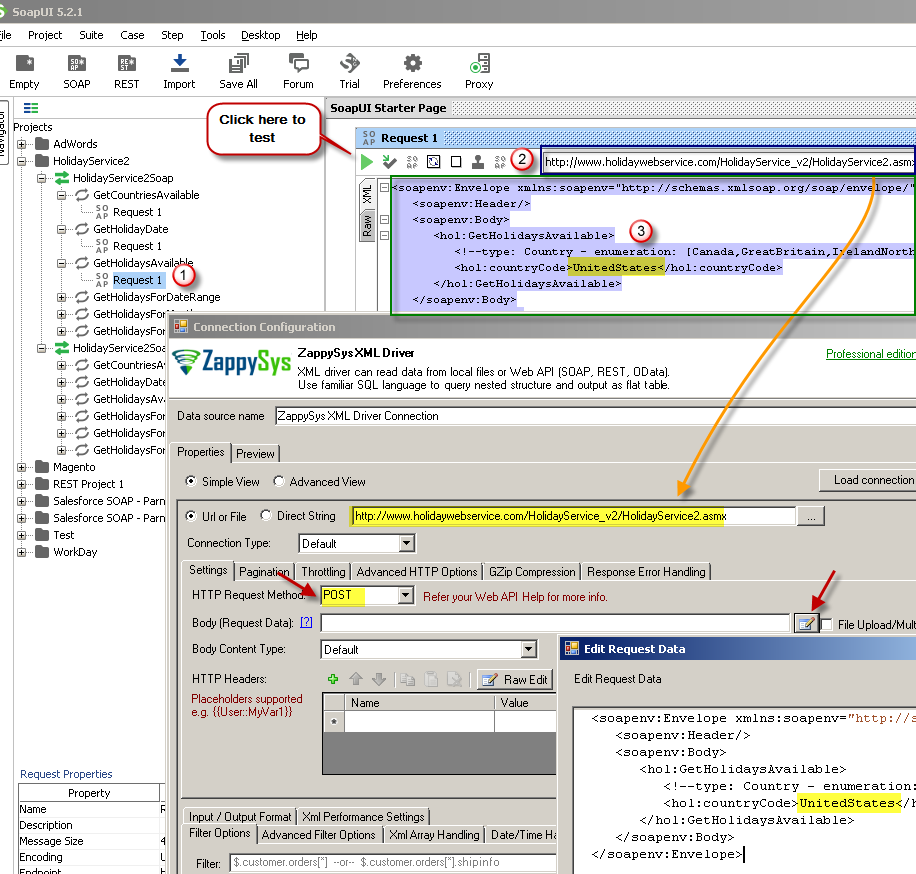
Configure API URL, Request Method and Request Body as below screen. Select Url or File and paste the following Url for this example OR you can load existing connection string as per this article.
NOTE: Here i am using demo SOAP API URL, but you need to refer your own API documentation and based on that you need to use your own API URL and need to configure connection based on API Authentication type.http://www.holidaywebservice.com/HolidayService_v2/HolidayService2.asmx?wsdl
-
(This step is Optional) If your SOAP API requires credentials then Select Connection Type to HTTP and configure as below.
-
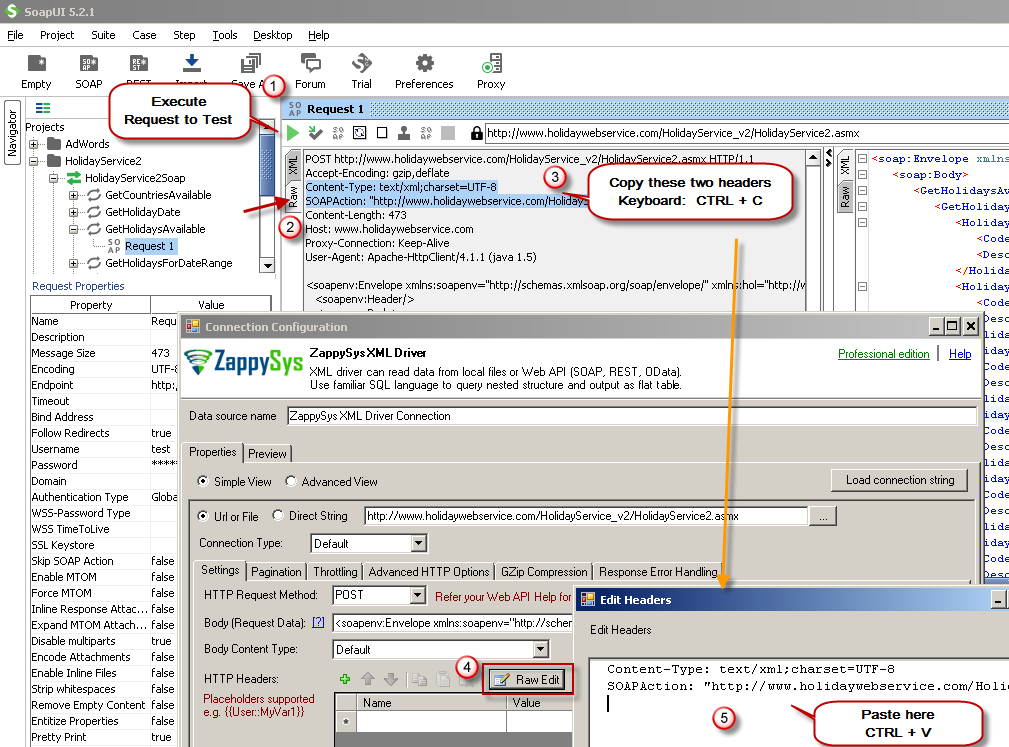
Configure-Request Headers as below (You can get it from Request > Raw tab from SoapUI after you test the request by clicking the Play button)
-
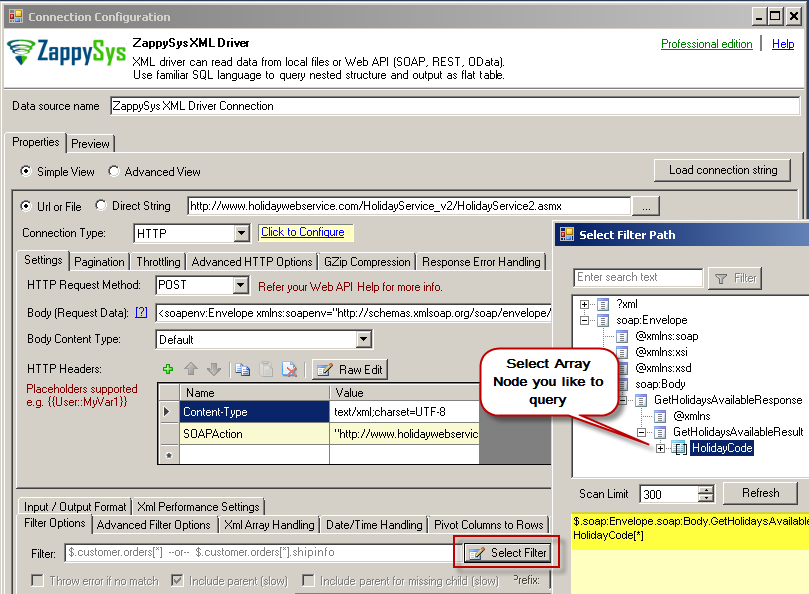
Once credentials entered you can select Filter to extract data from the desired node. Make sure to select array node (see special icon) or select the node which contains all necessary columns if you don't have array node.
-
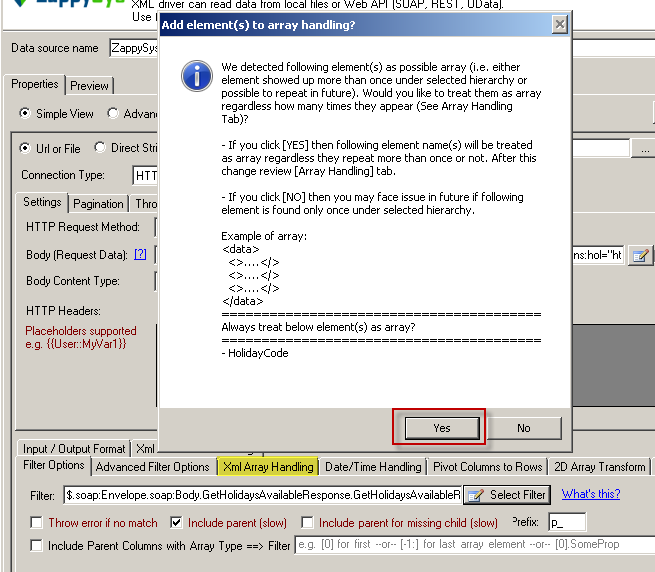
If prompted select yes to treat selected node as Array (This is helpful when you expect one or more record for selected node)
-
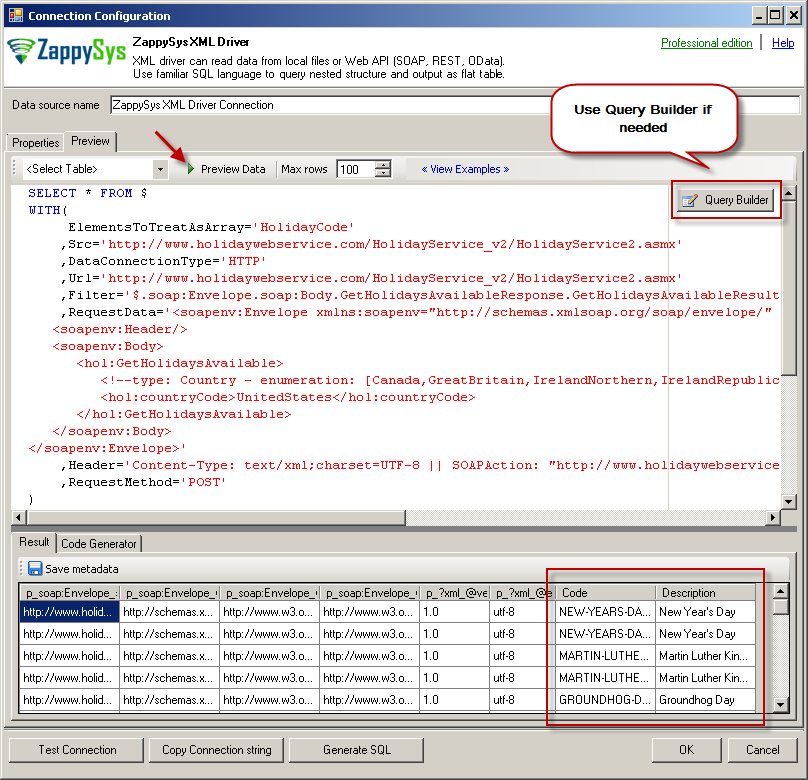
Once the data source has been configured, Go to Preview tab and click on preview data to view the data.
You can create the default query, generated based on settings you entered in previous sections also, by using Query Builder. Attributes listed in WITH clause are optional. If you omit attribute in WITH clause it will use it from Properties tab. -
Click OK to finish creating the data source.
-
That's it; we are done. In a few clicks we configured the call to SOAP API using ZappySys SOAP Connector.
Video Tutorial
Read SOAP data in Power BI using ODBC
Importing SOAP data into Power BI from table or view
-
Once you open Power BI Desktop click Get Data to get data from ODBC:
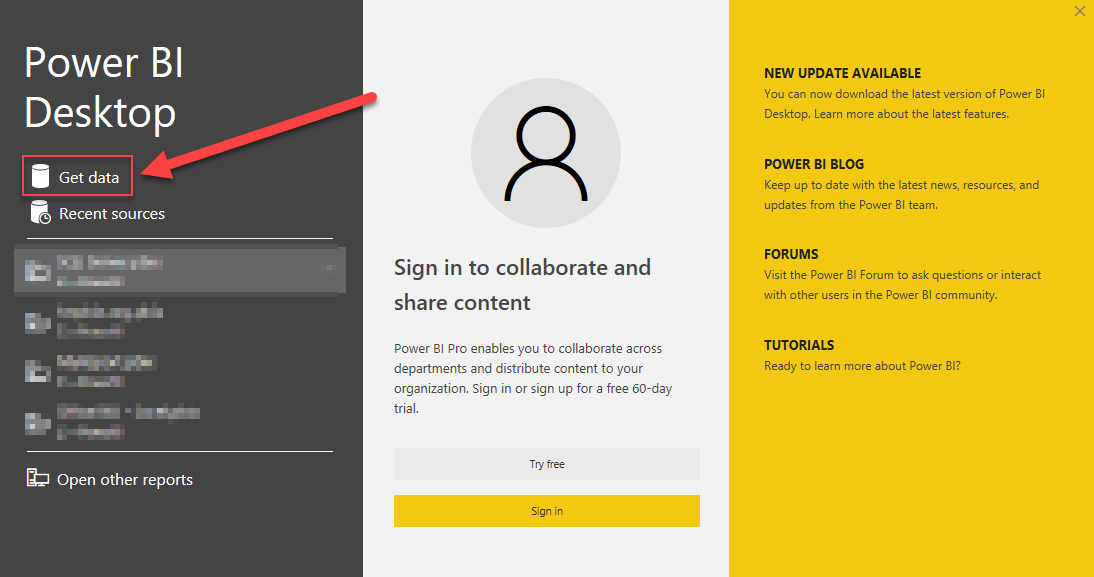
-
A window opens, and then search for "odbc" to get data from ODBC data source:
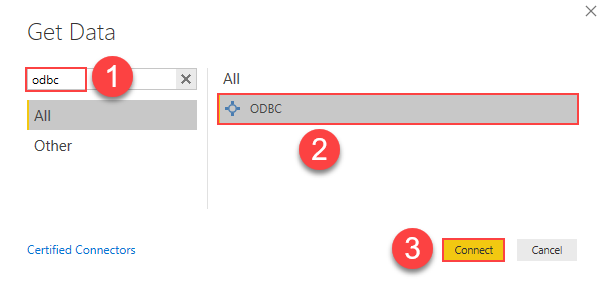
-
Another window opens and asks to select a Data Source we already created. Choose SoapDSN and continue:
SoapDSN
-
Most likely, you will be asked to authenticate to a newly created DSN. Just select Windows authentication option together with Use my current credentials option:
SoapDSN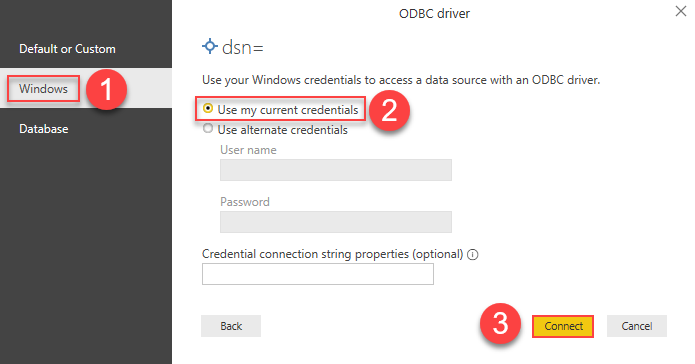
-
Finally, you will be asked to select a table or view to get data from. Select one and load the data!
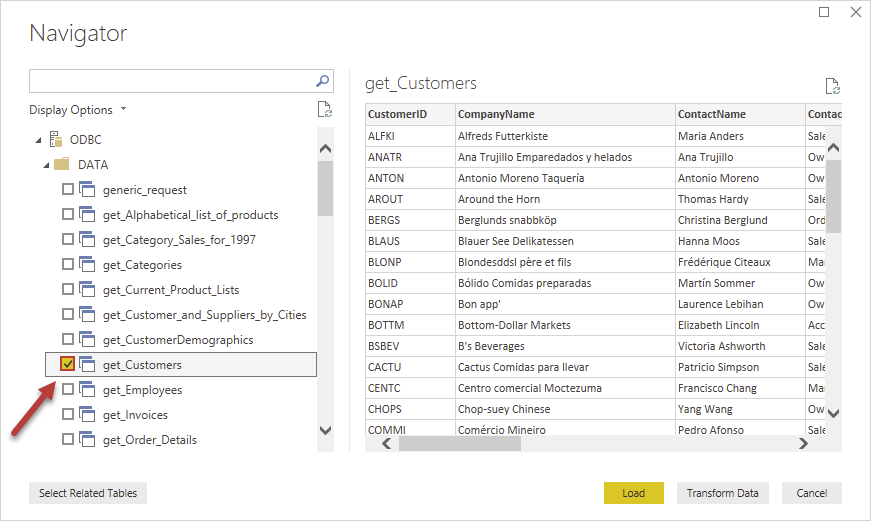
-
Finally, finally, use extracted data from SOAP in a Power BI report:
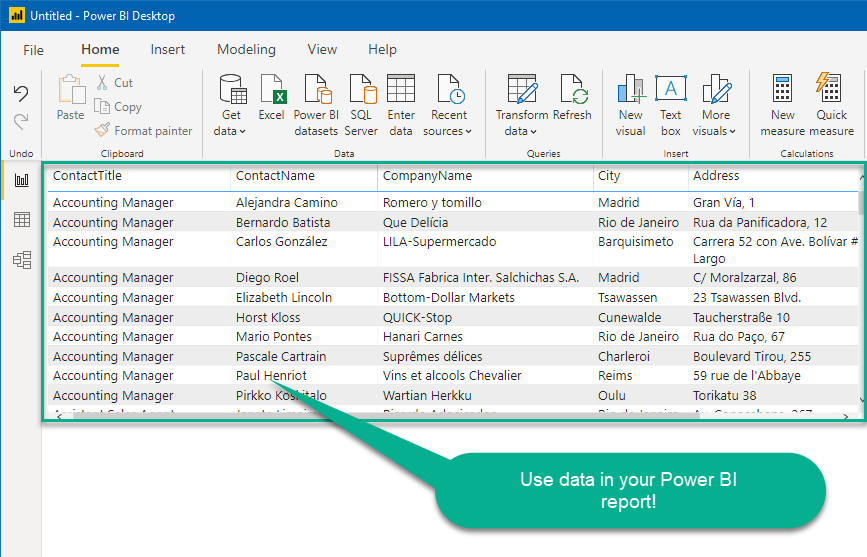
Importing SOAP data into Power BI using SQL query
If you wish to import SOAP data from SQL query rather than a table then you can use advanced options during import steps (as below). After selecting DSN you can click on advanced options to see SQL Query editor.
            SELECT
                ProductID,
                ProductName,
                SupplierID,
                CategoryID,
                QuantityPerUnit,
                UnitPrice
            FROM _root_
            WHERE UnitPrice > 20
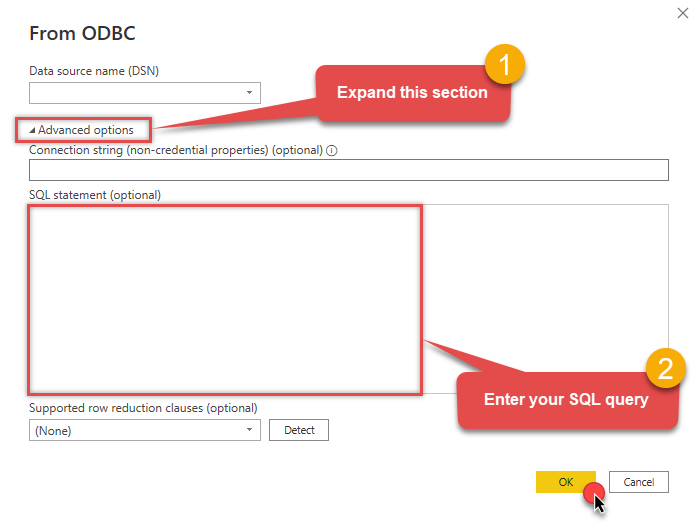
$ as the table name, e.g. SELECT * FROM $.
Use _root_ instead, e.g. SELECT * FROM _root_.
Using a full ODBC connection string
In the previous steps we used a very short format of ODBC connection string - a DSN. Yet sometimes you don't want a dependency on an ODBC data source (and an extra step). In those times, you can define a full connection string and skip creating an ODBC data source entirely. Let's see below how to accomplish that in the below steps:
-
Open ODBC data source configuration and click Copy settings:
 ZappySys XML Driver - SOAPSOAP Connector can be used to consume data from XML SOAP Service without any programming. It supports advanced filtering along with flexible approach to configure request parameters for web service.SoapDSN
-
The window opens, telling us the connection string was successfully copied to the clipboard:

-
Then just paste the connection string into your script:
SoapDSNDRIVER={ZappySys XML Driver};DataPath='http://www.holidaywebservice.com/HolidayService_v2/HolidayService2.asmx';Filter='$.soapEnvelope.soap:Body.GetHolidaysAvailableResponse.GetHolidaysAvailableResult.HolidayCode[*]';
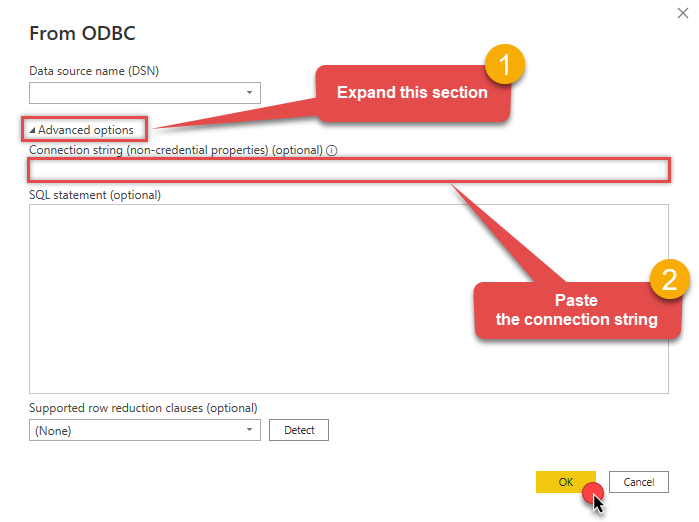
- You are good to go! The script will execute the same way as using a DSN.
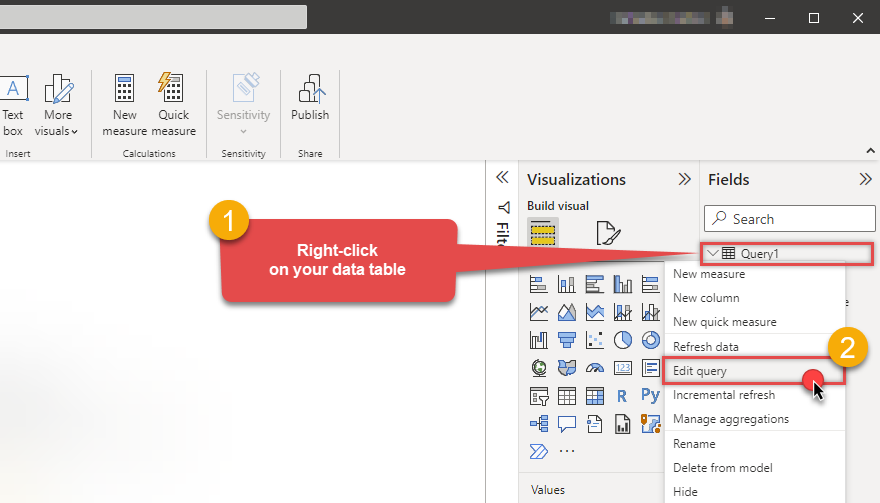
Editing query for table in Power BI
There will be a time you need to change the initial query after importing data into Power BI. Don't worry, just right-click on your table and click Edit query menu item:
Using parameters in Power BI (dynamic query)
In the real world, many values of your REST / SOAP API call may be coming from parameters. If that's the case for you can try to edit script manually as below. In below example its calling SQL Query with POST method and passing some parameters. Notice below where paraAPIKey is Power BI Parameter (string type). You can use parameters anywhere in your script just like the normal variable.
To use a parameter in Power BI report, follow these simple steps:
-
Firstly, you need to Edit query of your table (see previous section)
-
Then just create a new parameter by clicking Manage Parameters dropdown, click New Parameter option, and use it in the query:
= Odbc.Query("dsn=SoapDSN", "SELECT * FROM _root_ WITH (SRC='http://my-api-provider.com/api/" & MyParameter & "/items')")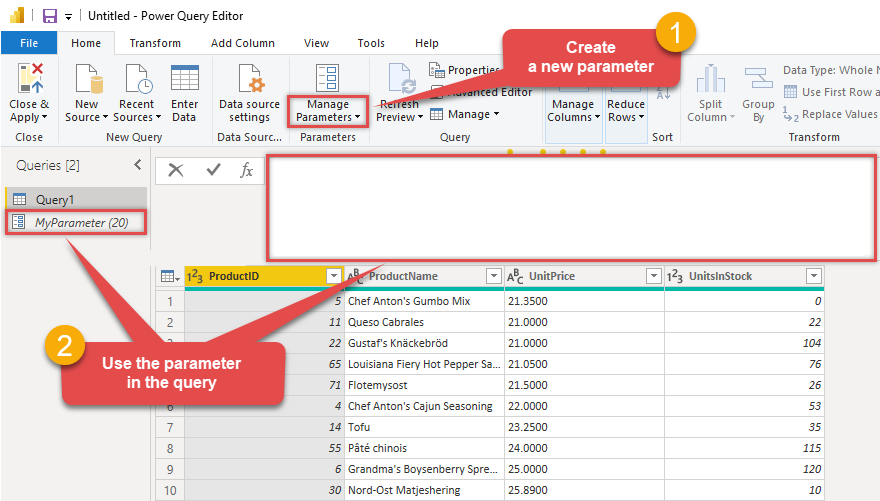 Refer to Power Query M reference for more information on how to use its advanced features in your queries.
Using DirectQuery Option rather than Import
So far we have seen how to Import SOAP data into Power BI, but what if you have too much data and you don't want to import but link it. Power BI Offers very useful feature for this scenario. It's called DirectQuery Option. In this section we will explore how to use DirectQuery along with ZappySys Drivers.
Out of the box ZappySys Drivers won't work in ODBC Connection Mode, so you have to use SQL Server Connection rather than ODBC if you wish to use Live data using DirectQuery option. See below step-by-step instructions to enable DirectQuery mode in Power BI for SOAP data.
Basically we will use ZappySys Data Gateway its part of ODBC PowerPack.
We will then use Linked Server in SQL Server to Link API Service,
then issue OPENROWSET queries from Power BI to SQL Server,
and it will then call SOAP via ZappySys Data Gateway.
- First, create a data source in ZappySys Data Gateway and create a Linked Server based on it.
- Once SQL Server Linked Server is configured we are ready to issue a SQL query in Power BI.
- Click Get Data in Power BI, select SQL Server Database
- Enter your server name and any database name
- Select Mode as DirectQuery
-
Click on Advanced and enter query like below
(we are assuming you have created SOAP Data Source in Data Gateway and defined linked server - change the name below).
SELECT * FROM OPENQUERY([LS_TO_SOAP_IN_GATEWAY], 'SELECT * FROM Orders')SELECT * FROM OPENQUERY([LS_TO_SOAP_IN_GATEWAY], 'SELECT * FROM Orders')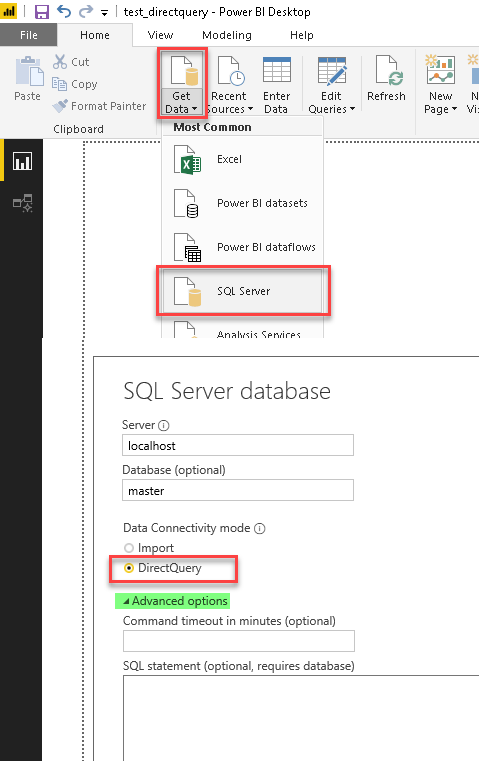
DirectQuery option for Power BI (Read SOAP Data Example using SQL Server Linked Server and ZappySys Data Gateway) - Click OK and Load data... That's it. Now your SOAP API data is linked rather than imported.
Publishing Power BI report to Power BI service
Here are the instructions on how to publish a Power BI report to Power BI service from Power BI Desktop application:
-
First of all, go to Power BI Desktop, open a Power BI report, and click Publish button:

-
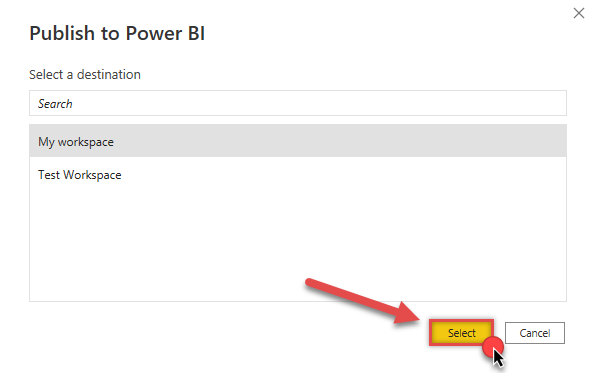
Then select the Workspace you want to publish report to and hit Select button:
-
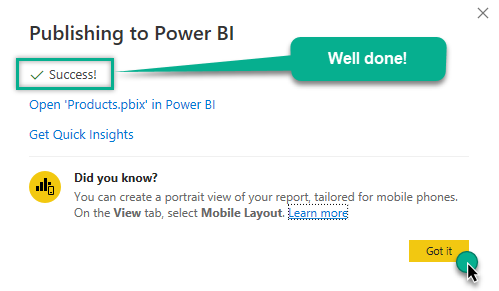
Finally, if everything went right, you will see a window indicating success:
If you need to periodically refresh Power BI semantic model (dataset) to ensure data accuracy and up-to-dateness, you can accomplish that by using Microsoft On-premises data gateway. Proceed to the next section - Refreshing Power BI semantic model (dataset) using On-premises data gateway - and learn how to do that.
Refreshing Power BI semantic model (dataset) using On-premises data gateway
Power BI allows to refresh semantic models which are based on data sources that reside on-premises. This can be achieved using Microsoft On-premises data gateway.
There are two types of On-premises data gateways:
- Standard Mode
- Personal Mode
Standard Mode supports Power BI and other Microsoft Data Fabric services. It fits perfectly for Enterprise solutions as it installs as a Windows Service and also supports Direct Query feature.
Personal Mode, on the other hand, can be configured faster, but is designed more for home users (you cannot install it as a Windows Service and it does not support DirectQuery). You will find a detailed comparison in the link above.
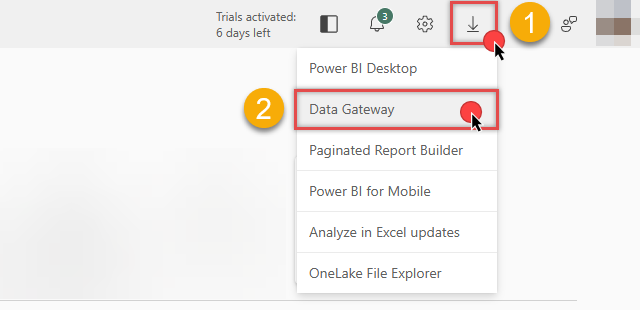
We recommend to go with Personal Mode for a quick POC solution, but use Standard Mode in production environment. You can download On-premises data gateway straight from Microsoft Data Fabric or Power BI web app:
Below you will find instructions on how to refresh semantic model using both types of gateways.
Refresh using On-premises data gateway (standard mode)
Here are the instructions on how to refresh a Power BI semantic model using On-premises data gateway (standard mode):
-
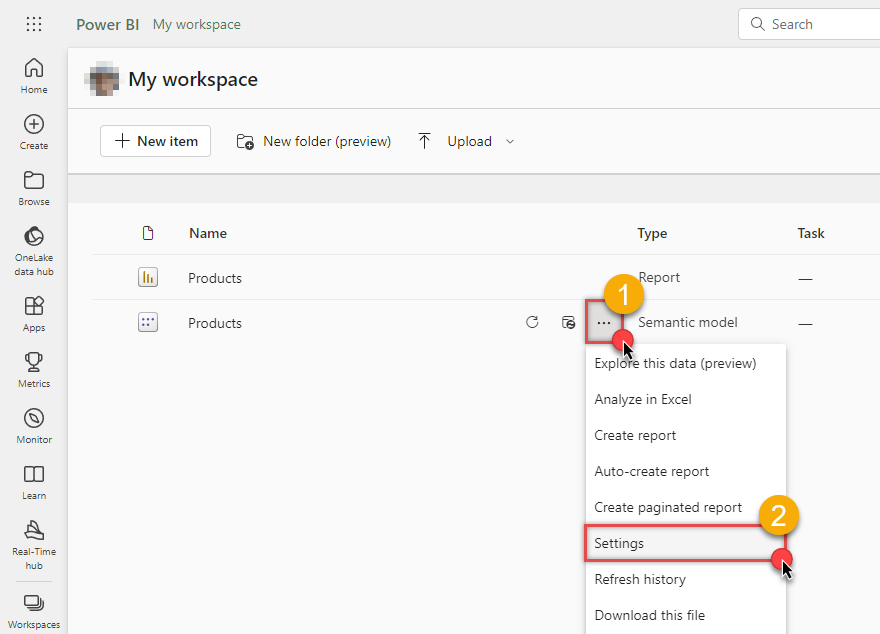
Go to Power BI My workspace, hover your mouse cursor on your semantic model and click Settings:
-
If you see this view, it means you have to install On-premises data gateway (standard mode):
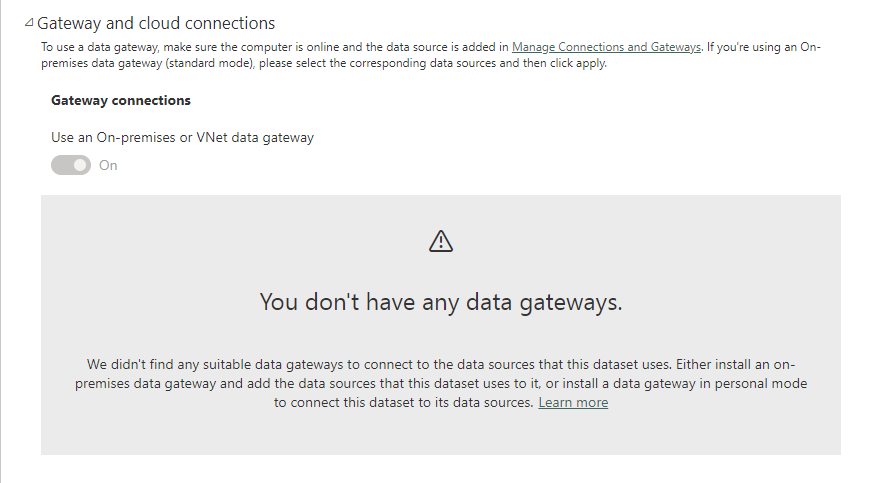
-
Install On-premises data gateway (standard mode) and sign-in:
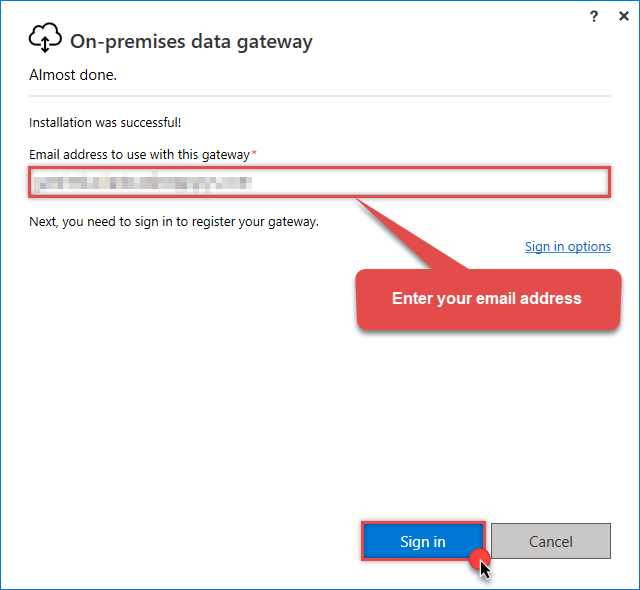 Use the same email address you use when logging in into your account.
 -
Register a new gateway (or migrate an existing one):
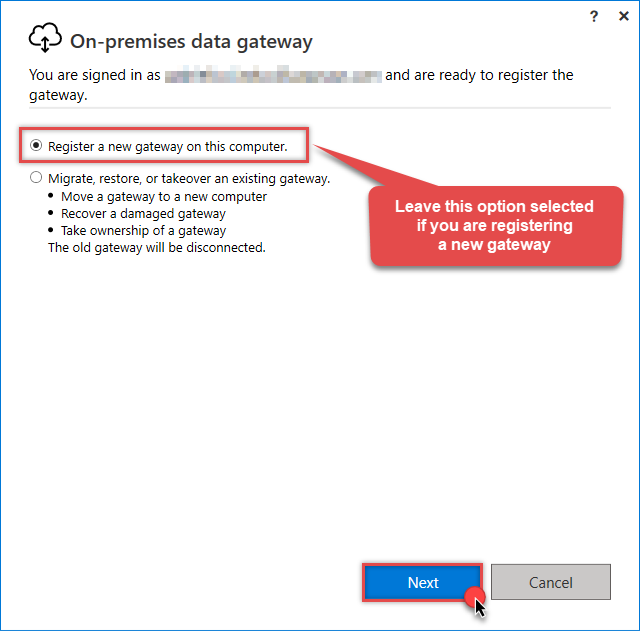
-
If you are creating a new gateway, name your gateway, enter a Recovery key, and click Configure button:
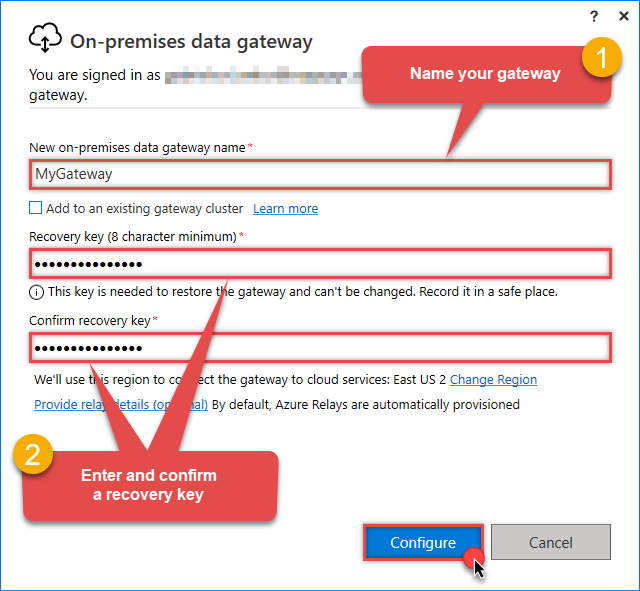
-
Once Microsoft gateway is installed, check if it registered correctly:
-
Go back to Power BI portal
-
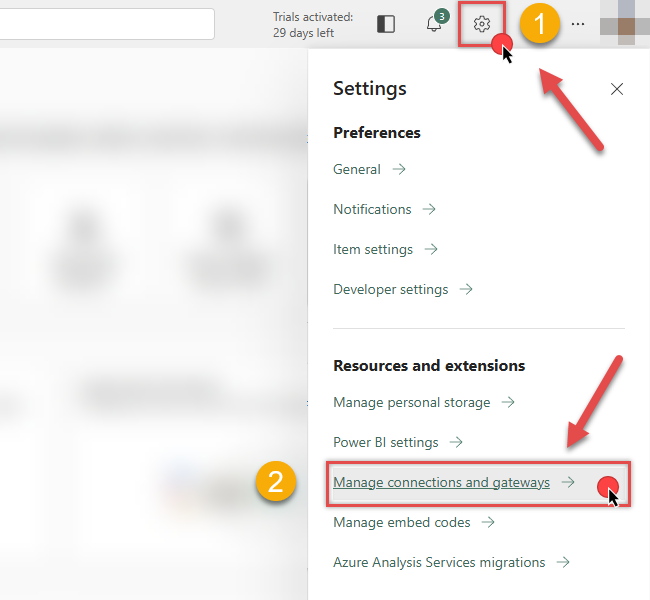
Click Gear icon on top-right
-
And then hit Manage connections and gateways menu item
-
-
Continue by clicking On-premises data gateway tab and select Standard mode gateways option from the dropdown:
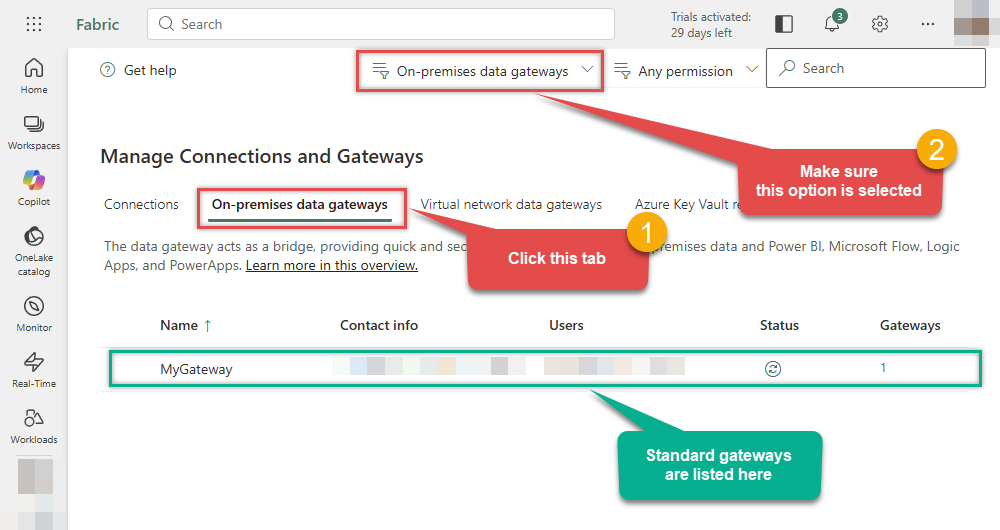
If your gateway is not listed, the registration may have failed. To resolve this:
- Wait a couple of minutes and refresh Power BI portal page
- Restart the machine where On-premises data gateway is installed
- Check firewall settings
-
Now, let's get back to your semantic model settings in Power BI portal. Refresh the page and you should see your newly created gateway. Click arrow icon and then click on Add to gateway link:
ODBC{"connectionstring":"dsn=SoapDSN"}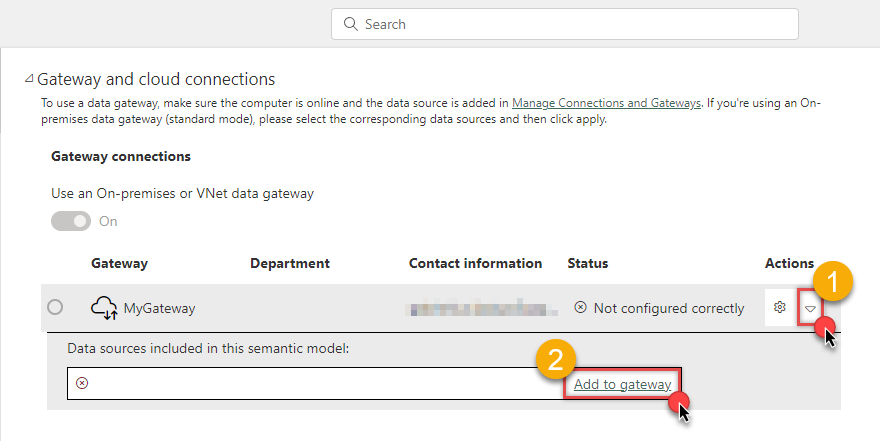
-
Once you do that, you will create a new gateway connection. Give it a name, set Authentication method, Privacy level, and click Create button:
dsn=SoapDSN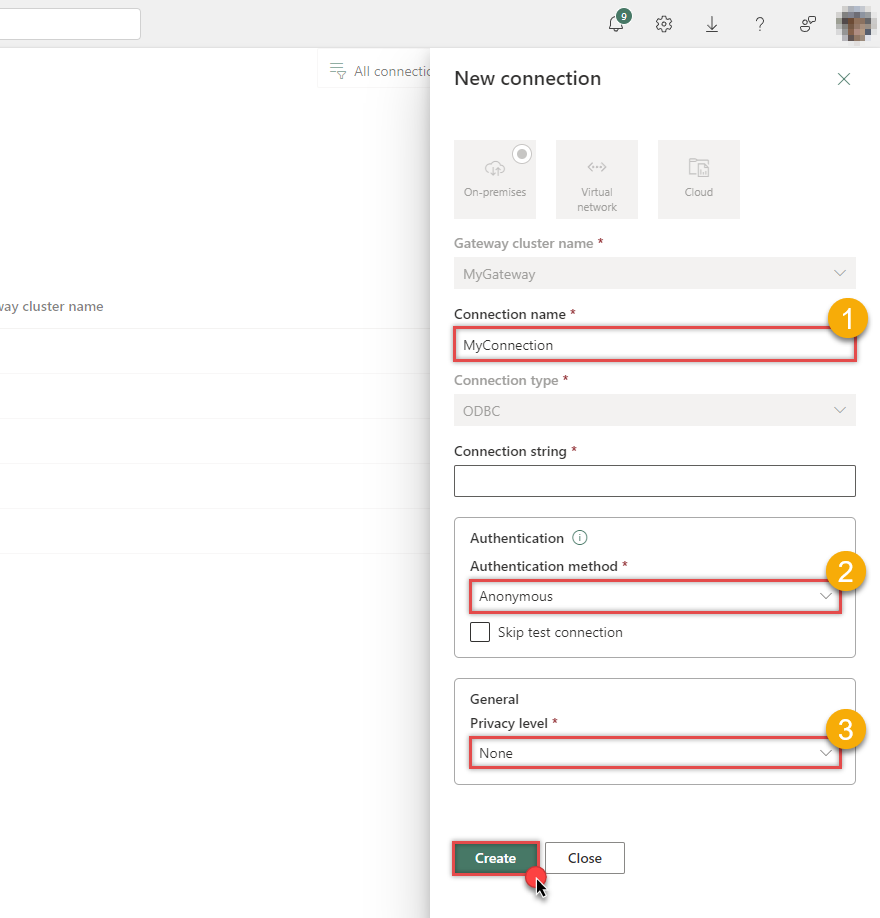 In this example, we used the least restrictive Privacy level.
If your connection uses a full connection string you may hit a length limitation when entering it into the field. To create the connection, you will need to shorten it manually. Check the section about the limitation of a full connection string on how to accomplish it.
On-premises data gateway (personal mode) does not have this limitation.
-
Proceed by choosing the newly created connection:
ODBC{"connectionstring":"dsn=SoapDSN"}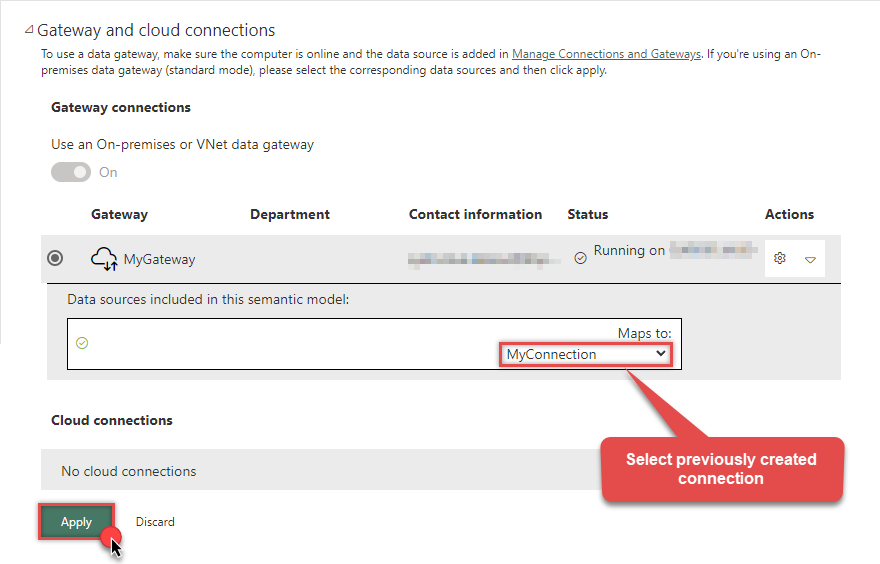
-
Finally, you are at the final step where you can refresh the semantic model:
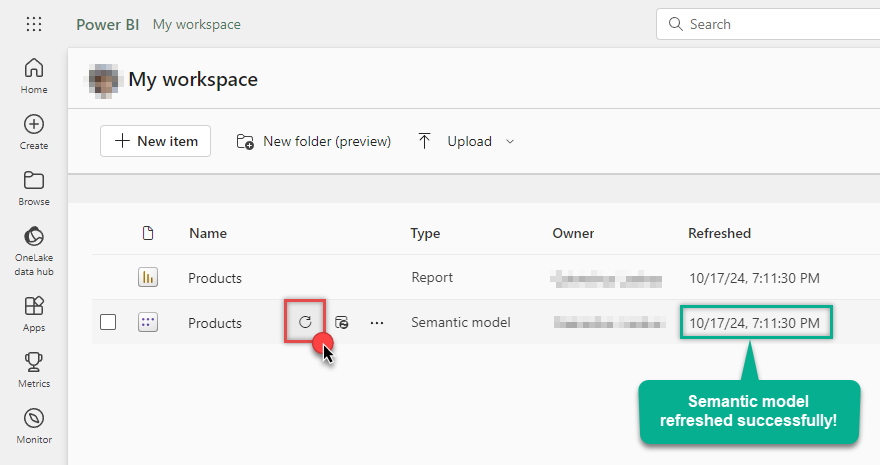
Refresh using On-premises data gateway (personal mode)
Here are the instructions on how to refresh a Power BI semantic model using On-premises data gateway (personal mode):
-
Go to Power BI My workspace, hover your mouse cursor on your semantic model and click Settings:

-
If you see this view, it means you have to install On-premises data gateway (personal mode):

-
Install On-premises data gateway (personal mode) and sign-in:
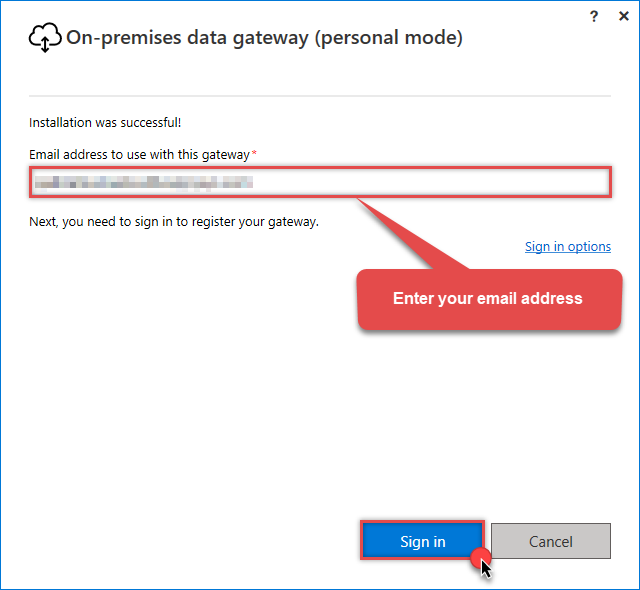 Use the same email address you use when logging in into your account.
 -
Once Microsoft gateway is installed, check if it registered correctly:
-
Go back to Power BI portal
-
Click Gear icon on top-right
-
And then hit Manage connections and gateways menu item

-
-
Continue by clicking On-premises data gateway tab and select Personal mode option from the dropdown:
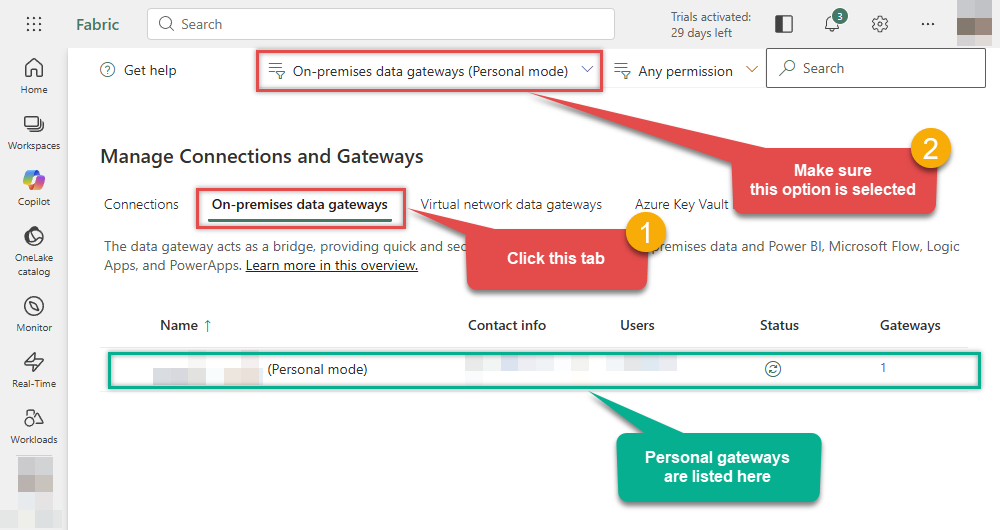
If your gateway is not listed, the registration may have failed. To resolve this:
- Wait a couple of minutes and refresh Power BI portal page
- Restart the machine where On-premises data gateway is installed
- Check firewall settings
-
Again, go to your semantic model Settings, expand Data source credentials, click Edit credentials, select Authentication method together with Privacy level, and then click Sign in button:
dsn=SoapDSN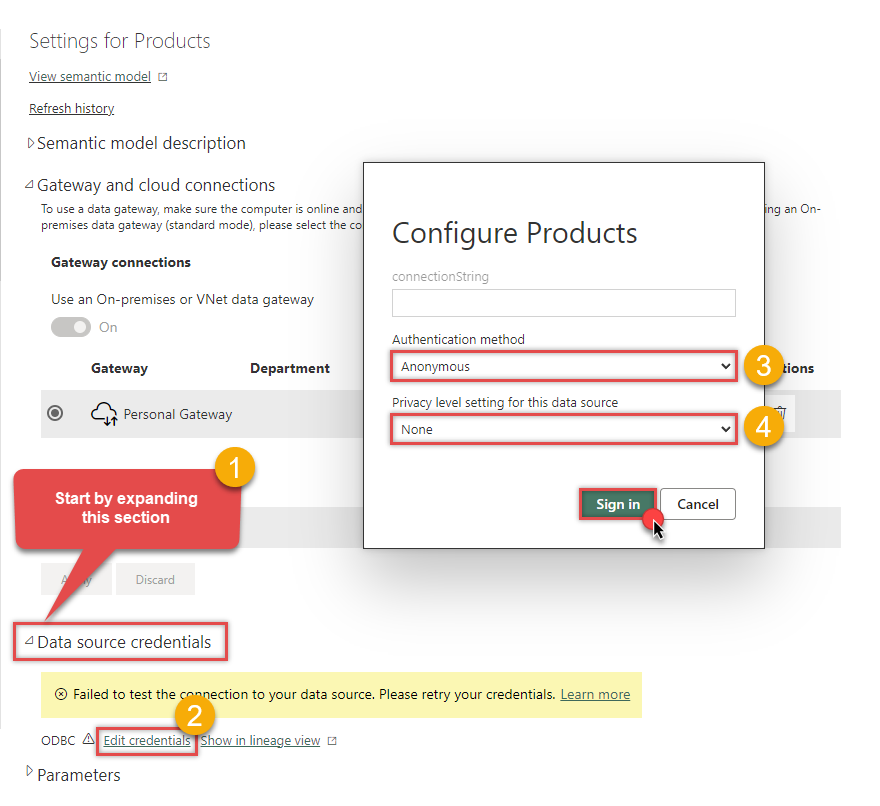
-
Finally, you are ready to refresh your semantic model:

Centralized data access via Data Gateway
In some situations, you may need to provide SOAP data access to multiple users or services. Configuring the data source on a Data Gateway creates a single, centralized connection point for this purpose.
This configuration provides two primary advantages:
-
Centralized data access
The data source is configured once on the gateway, eliminating the need to set it up individually on each user's machine or application. This significantly simplifies the management process.
-
Centralized access control
Since all connections route through the gateway, access can be governed or revoked from a single location for all users.
| Data Gateway |
Local ODBC
data source
|
|
|---|---|---|
| Simple configuration | ||
| Installation | Single machine | Per machine |
| Connectivity | Local and remote | Local only |
| Connections limit | Limited by License | Unlimited |
| Central data access | ||
| Central access control | ||
| More flexible cost |
If you need any of these requirements, you will have to create a data source in Data Gateway to connect to SOAP, and to create an ODBC data source to connect to Data Gateway in Power BI.
Let's not wait and get going!
Creating SOAP data source in Gateway
In this section we will create a data source for SOAP in Data Gateway. Let's follow these steps to accomplish that:
-
Search for
gatewayin Windows Start Menu and open ZappySys Data Gateway Configuration: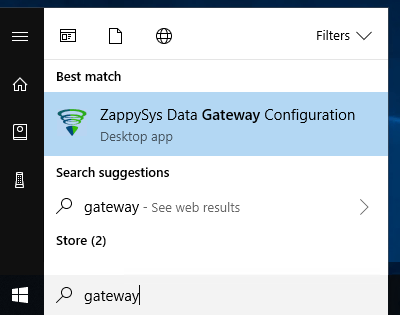
-
Go to Users tab and follow these steps to add a Data Gateway user:
- Click Add button
-
In Login field enter username, e.g.,
john - Then enter a Password
- Check Is Administrator checkbox
- Click OK to save
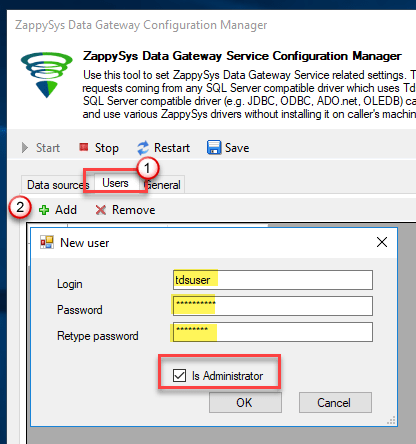
-
Now we are ready to add a data source:
- Click Add button
- Give Datasource a name (have it handy for later)
- Then select Native - ZappySys XML Driver
- Finally, click OK
SoapDSNZappySys XML Driver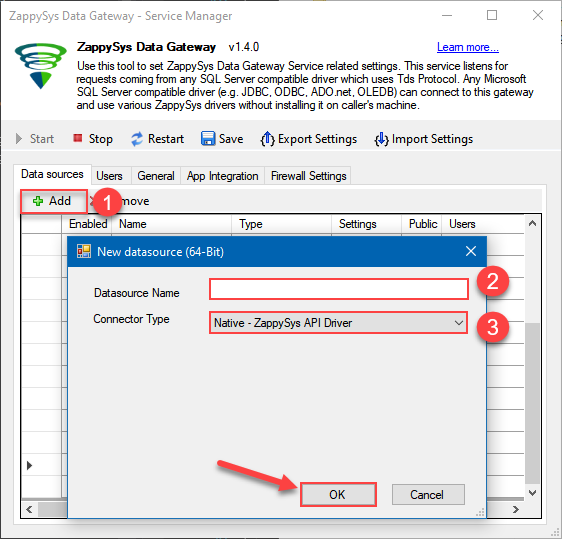
-
When the ZappySys XML Driver configuration window opens, configure the Data Source the same way you configured it in ODBC Data Sources (64-bit), in the beginning of this article.
-
Very important step. Now, after creating or modifying the data source make sure you:
- Click the Save button to persist your changes.
- Hit Yes, once asked if you want to restart the Data Gateway service.
This will ensure all changes are properly applied:
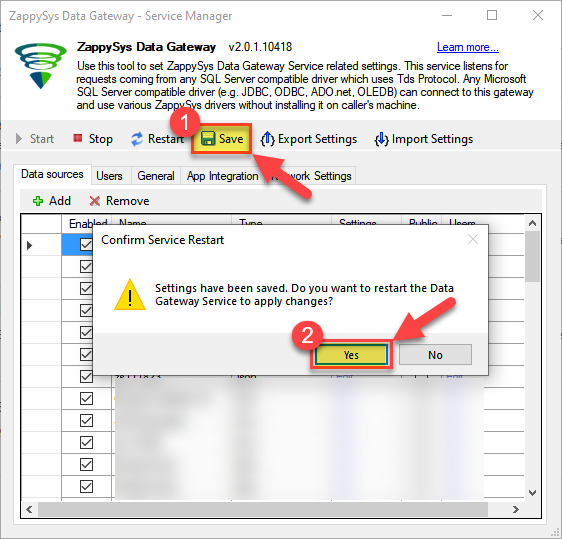 Skipping this step may result in the new settings not taking effect and, therefore you will not be able to connect to the data source.
Creating ODBC data source for Data Gateway
In this part we will create ODBC data source to connect to Data Gateway from Power BI. To achieve that, let's perform these steps:
-
Open ODBC Data Sources (x64):

-
Create a User data source (User DSN) based on ODBC Driver 17 for SQL Server:
ODBC Driver 17 for SQL Server If you don't see ODBC Driver 17 for SQL Server driver in the list, choose a similar version driver.
 -
Then set a Name of the data source (e.g.
Gateway) and the address of the Data Gateway:GatewayDSNlocalhost,5000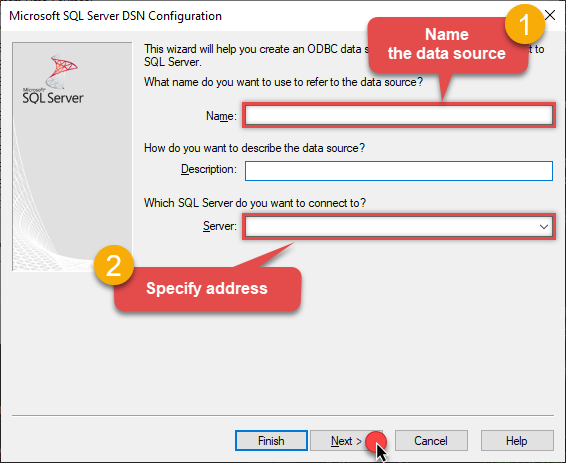 Make sure you separate the hostname and port with a comma, e.g.
localhost,5000. -
Proceed with authentication part:
- Select SQL Server authentication
-
In Login ID field enter the user name you used in Data Gateway, e.g.,
john - Set Password to the one you configured in Data Gateway
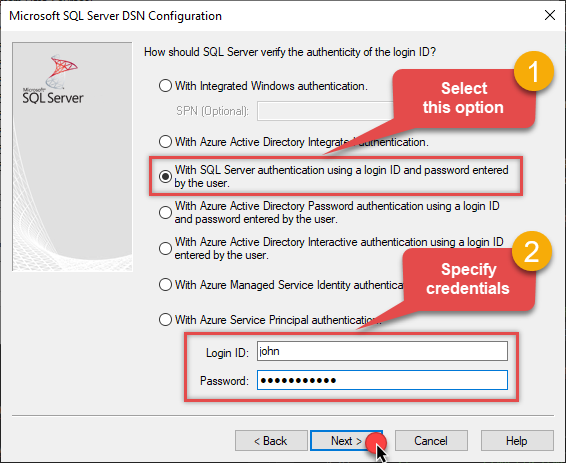
-
Then set the default database property to
SoapDSN(the one we used in Data Gateway):SoapDSN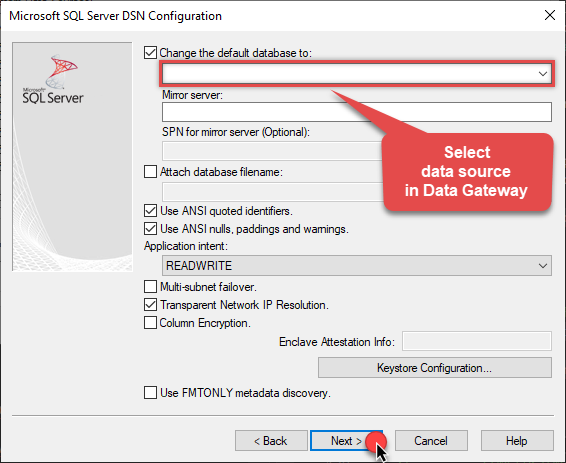
-
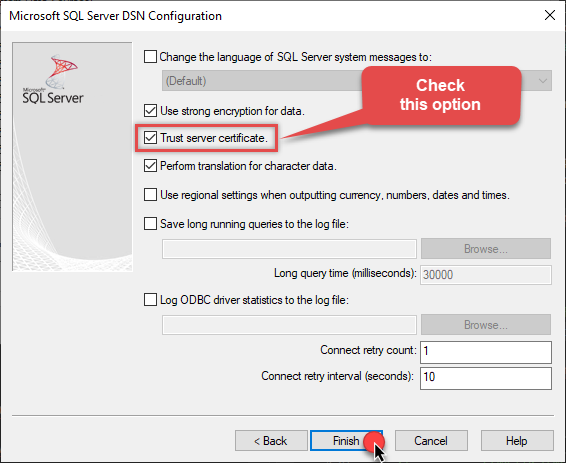
Continue by checking Trust server certificate option:
-
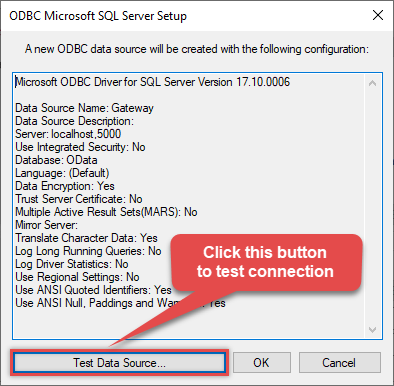
Once you do that, test the connection:
-
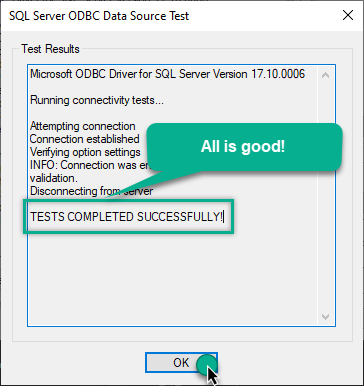
If connection is successful, everything is good:
-
Done!
We are ready to move to the final step. Let's do it!
Accessing data in Power BI via Data Gateway
Finally, we are ready to read data from SOAP in Power BI via Data Gateway. Follow these final steps:
-
Go back to Power BI.
-
Once you open Power BI Desktop click Get Data to get data from ODBC:

-
A window opens, and then search for "odbc" to get data from ODBC data source:

-
Another window opens and asks to select a Data Source we already created. Choose GatewayDSN and continue:
GatewayDSN
-
Read the data the same way we discussed at the beginning of this article.
-
That's it!
Now you can connect to SOAP data in Power BI via the Data Gateway.
john and your password.
Configuring pagination in the XML Driver
ZappySys XML Driver equips users with powerful tools for seamless data extraction and management from REST APIs, leveraging advanced pagination methods for enhanced efficiency. These options are designed to handle various types of pagination structures commonly used in APIs. Below are the detailed descriptions of these options:
Page-based Pagination: This method works by retrieving data in fixed-size pages from the Rest API. It allows you to specify the page size and navigate through the results by requesting different page numbers, ensuring that you can access all the data in a structured manner.
Offset-based Pagination: With this approach, you can extract data by specifying the starting point or offset from which to begin retrieving data. It allows you to define the number of records to skip and fetch subsequent data accordingly, providing precise control over the data extraction process.
Cursor-based Pagination: This technique involves using a cursor or a marker that points to a specific position in the dataset. It enables you to retrieve data starting from the position indicated by the cursor and proceed to subsequent segments, ensuring that you capture all the relevant information without missing any records.
Token-based Pagination: In this method, a token serves as a unique identifier for a specific data segment. It allows you to access the next set of data by using the token provided in the response from the previous request. This ensures that you can systematically retrieve all the data segments without duplication or omission.
Utilizing these comprehensive pagination features in the ZappySys XML Driver facilitates efficient data management and extraction from REST APIs, optimizing the integration and analysis of extensive datasets.
For more detailed steps, please refer to this link: How to do REST API Pagination in SSIS / ODBC Drivers
Authentication
ZappySys offers various authentication methods to securely access data from various sources. These authentication methods include OAuth, Basic Authentication, Token-based Authentication, and more, allowing users to connect to a wide range of data sources securely.
ZappySys Authentication is a robust system that facilitates secure access to data from a diverse range of sources. It includes a variety of authentication methods tailored to meet the specific requirements of different data platforms and services. These authentication methods may involve:
OAuth: ZappySys supports OAuth for authentication, which allows users to grant limited access to their data without revealing their credentials. It's commonly used for applications that require access to user account information.
Basic Authentication: This method involves sending a username and password with every request. ZappySys allows users to securely access data using this traditional authentication approach.
Token-based Authentication: ZappySys enables users to utilize tokens for authentication. This method involves exchanging a unique token with each request to authenticate the user's identity without revealing sensitive information.
By implementing these authentication methods, ZappySys ensures the secure and reliable retrieval of data from various sources, providing users with the necessary tools to access and integrate data securely and efficiently. For more comprehensive details on the authentication process, please refer to the official ZappySys documentation or reach out to their support team for further assistance.
For more details, please refer to this link: ZappySys Connections
Conclusion
In this article we showed you how to connect to SOAP in Power BI and integrate data without any coding, saving you time and effort.
We encourage you to download SOAP Connector for Power BI and see how easy it is to use it for yourself or your team.
If you have any questions, feel free to contact ZappySys support team. You can also open a live chat immediately by clicking on the chat icon below.
Download SOAP Connector for Power BI Documentation

