Reading data in SSIS
In this section we will learn how to configure and use Zoho SalesIQ Connector in API Source to extract data from Zoho SalesIQ.
Video tutorial
This video covers following and more so watch carefully. After watching this video follow the steps described in this article.
- How to download SSIS PowerPack for Zoho SalesIQ integration in SSIS
- How to configure connection for Zoho SalesIQ
- How to read data from Zoho SalesIQ
- Features about SSIS API Source
- Using Zoho SalesIQ Connector in SSIS
Step-by-step instructions
-
Open Visual Studio and click Create a new project.
-
Select Integration Services Project. Enter a name and location for your project, then click OK.
-
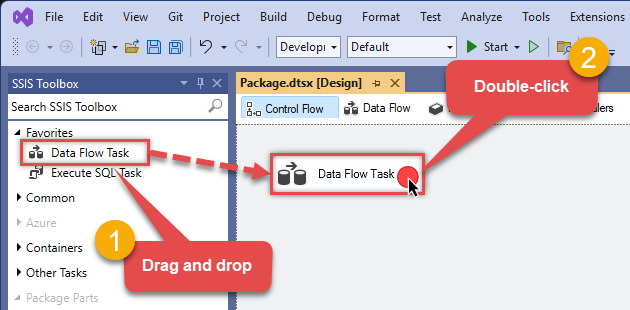
From the SSIS Toolbox, drag and drop a Data Flow Task onto the Control Flow surface, and double-click it:
-
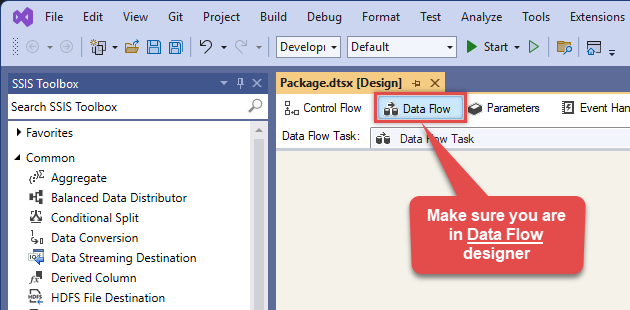
Make sure you are in the Data Flow Task designer:
-
From the SSIS toolbox drag and API Source (Predefined Templates) on the data flow designer surface, and double click on it to edit it:
 - Drag and Drop")
-
Select New Connection to create a new connection:

-
Use a preinstalled Zoho SalesIQ Connector from Popular Connector List or press Search Online radio button to download Zoho SalesIQ Connector. Once downloaded simply use it in the configuration:
Zoho SalesIQ
-
Select your authentication scenario below to expand connection configuration steps to:
- Configure the authentication in Zoho SalesIQ.
- Enter those details into the API Connection Manager configuration.
OAuth
Zoho SalesIQ authentication
OAuth Connection for Zoho CRM API [API reference]
To register custom App, perform the following steps (Detailed steps found in the help link at the end)- Go to Zoho API Console
- Click Add Client link
- Select Server-based Applications option
- Enter desired client name (Display purpose only)
- Enter some URL for Company homepage
- For Authorized Redirect URI enter https://zappysys.com/oauth (Or enter your own but we recommend using ZappySys one if possible). This URL must match on Zoho Connector UI.
- Click CREATE.
- Copy Client ID and Secret and paste on Zoho Connector UI.
API Connection Manager configuration
Just perform these simple steps to finish authentication configuration:
-
Set Authentication Type to
OAuth [OAuth] - Optional step. Modify API Base URL if needed (in most cases default will work).
- Fill in all the required parameters and set optional parameters if needed.
- Press Generate Token button to generate the tokens.
- Finally, hit OK button:
Zoho SalesIQOAuth [OAuth]https://salesiq.zoho.com/api/v2/[$Compnay$]Optional Parameters Company Screen Name for URL (e.g. mycompany) ClientId ClientSecret Permissions SalesIQ.operators.READ SalesIQ.conversations.READ SalesIQ.feedbacks.READ SalesIQ.departments.READ AccountUrl https://accounts.zoho.com RedirectUrl https://zappysys.com/oauth RetryMode RetryWhenStatusCodeMatch RetryStatusCodeList 429 RetryCountMax 5 RetryMultiplyWaitTime True  Find full details in the Zoho SalesIQ Connector authentication reference.
 -
Select the desired endpoint, change/pass the properties values, and click on Preview Data button to make the API call.
API Source - Zoho SalesIQRead and write Zoho SalesIQ data effortlessly. Integrate, manage, and automate chats and visits — almost no coding required.

-
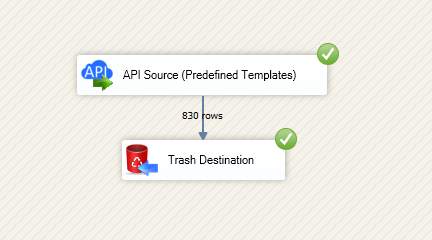
That's it! We are done! Just in a few clicks we configured the call to Zoho SalesIQ using Zoho SalesIQ Connector.
You can load the source data into your desired destination using the Upsert Destination , which supports SQL Server, PostgreSQL, and Amazon Redshift. We also offer other destinations such as CSV , Excel , Azure Table , Salesforce , and more . You can check out our SSIS PowerPack Tasks and components for more options. (*loaded in Trash Destination)