Zendesk Connector for Python
Zendesk Connector can be used to integrate Zendesk REST API in your App / BI Tools. You can read/write data about Tickets, Activity, Users, Organizations and more.
In this article you will learn how to quickly and efficiently integrate Zendesk data in Python. We will use high-performance Zendesk Connector to easily connect to Zendesk and then access the data inside Python.
Let's follow the steps below to see how we can accomplish that!
Zendesk Connector for Python is based on ZappySys API Driver which is part of ODBC PowerPack. It is a collection of high-performance ODBC drivers that enable you to integrate data in SQL Server, SSIS, a programming language, or any other ODBC-compatible application. ODBC PowerPack supports various file formats, sources and destinations, including REST/SOAP API, SFTP/FTP, storage services, and plain files, to mention a few.
Create ODBC Data Source (DSN) based on ZappySys API Driver
Step-by-step instructions
To get data from Zendesk using Python we first need to create a DSN (Data Source) which will access data from Zendesk. We will later be able to read data using Python. Perform these steps:
-
Download and install ODBC PowerPack.
-
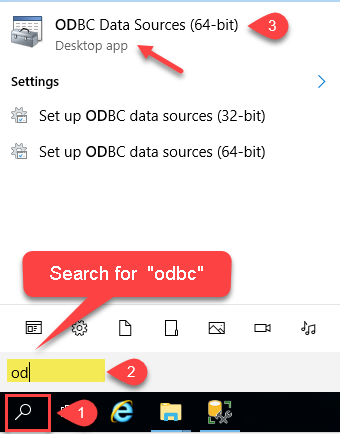
Open ODBC Data Sources (x64):
-
Create a User data source (User DSN) based on ZappySys API Driver:
ZappySys API Driver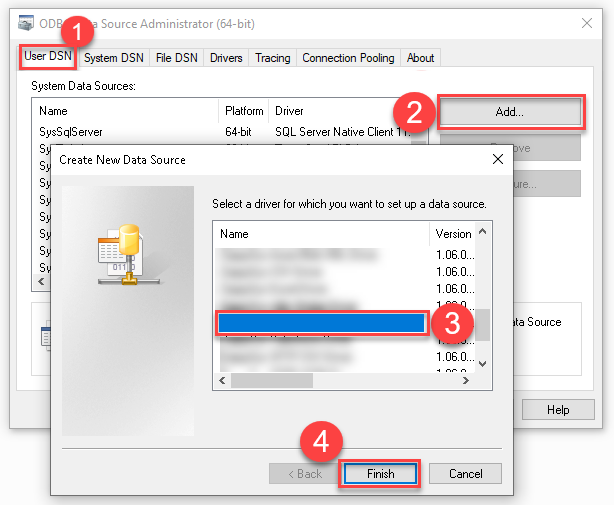
-
Create and use User DSN
if the client application is run under a User Account.
This is an ideal option
in design-time , when developing a solution, e.g. in Visual Studio 2019. Use it for both type of applications - 64-bit and 32-bit. -
Create and use System DSN
if the client application is launched under a System Account, e.g. as a Windows Service.
Usually, this is an ideal option to use
in a production environment . Use ODBC Data Source Administrator (32-bit), instead of 64-bit version, if Windows Service is a 32-bit application.
-
Create and use User DSN
if the client application is run under a User Account.
This is an ideal option
-
When the Configuration window appears give your data source a name if you haven't done that already, then select "Zendesk" from the list of Popular Connectors. If "Zendesk" is not present in the list, then click "Search Online" and download it. Then set the path to the location where you downloaded it. Finally, click Continue >> to proceed with configuring the DSN:
ZendeskDSNZendesk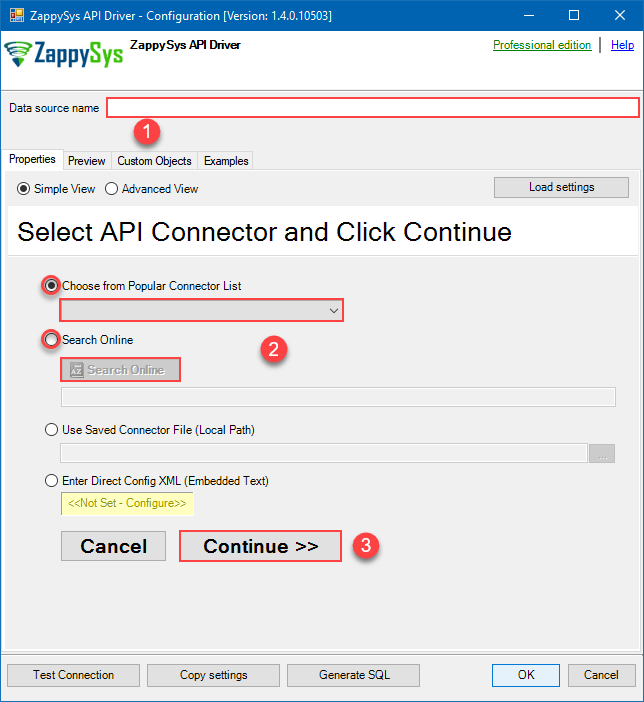
-
Now it's time to configure the Connection Manager. Select Authentication Type, e.g. Token Authentication. Then select API Base URL (in most cases, the default one is the right one). More info is available in the Authentication section.
Zendesk authentication
Authenticate using Static Token instead of userid / password ([Token Access] option must be enabled under Admin Console > Channel > API > Settings and then Click [ADD API Token] to generate new token. These settings typically found here https://YOUR-SUB-DOMAIN.zendesk.com/agent/admin/api/settings [API reference]
Please refer to external API reference
API Connection Manager configuration
Just perform these simple steps to finish authentication configuration:
-
Set Authentication Type to
Token Authentication [Http] - Optional step. Modify API Base URL if needed (in most cases default will work).
- Fill in all the required parameters and set optional parameters if needed.
- Finally, hit OK button:
ZendeskDSNZendeskToken Authentication [Http]https://[$Domain$].zendesk.com/api/v2Required Parameters Sub Domain (e.g. mycompany) Fill-in the parameter... UserId Fill-in the parameter... Token Fill-in the parameter... Optional Parameters RetryMode RetryWhenStatusCodeMatch RetryStatusCodeList 429 RetryCountMax 5 RetryMultiplyWaitTime True 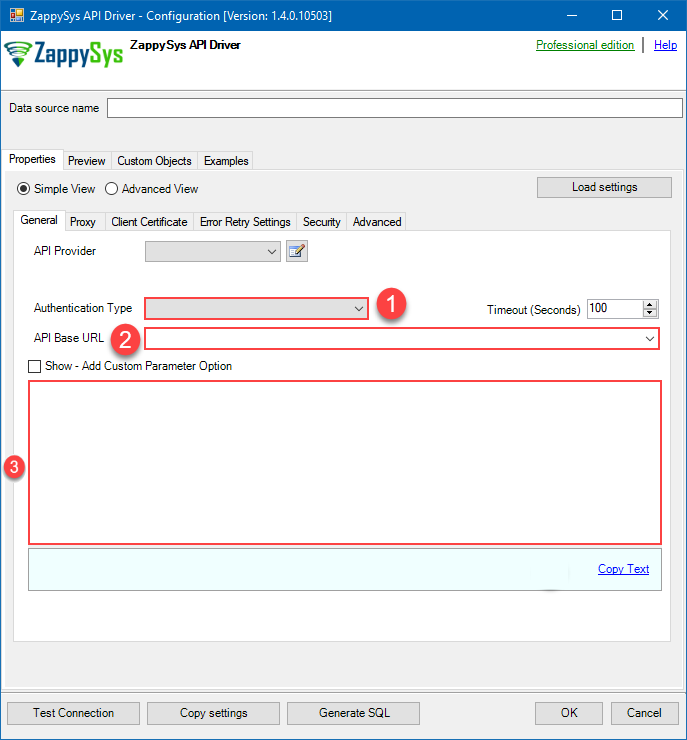
Zendesk authentication
OAuth App must be created under Admin Console > Channel > API > Settings. These settings typically found here https://YOUR-SUB-DOMAIN.zendesk.com/agent/admin/api/oauth_clients [API reference]
Please refer to external API reference
API Connection Manager configuration
Just perform these simple steps to finish authentication configuration:
-
Set Authentication Type to
OAuth Authentication [OAuth] - Optional step. Modify API Base URL if needed (in most cases default will work).
- Fill in all the required parameters and set optional parameters if needed.
- Press Generate Token button to generate the tokens.
- Finally, hit OK button:
ZendeskDSNZendeskOAuth Authentication [OAuth]https://[$Domain$].zendesk.com/api/v2Required Parameters Sub Domain (e.g. mycompany) Fill-in the parameter... ClientId Fill-in the parameter... ClientSecret Fill-in the parameter... Permissions Fill-in the parameter... RedirectUrl Fill-in the parameter... Optional Parameters RetryMode RetryWhenStatusCodeMatch RetryStatusCodeList 429 RetryCountMax 5 RetryMultiplyWaitTime True 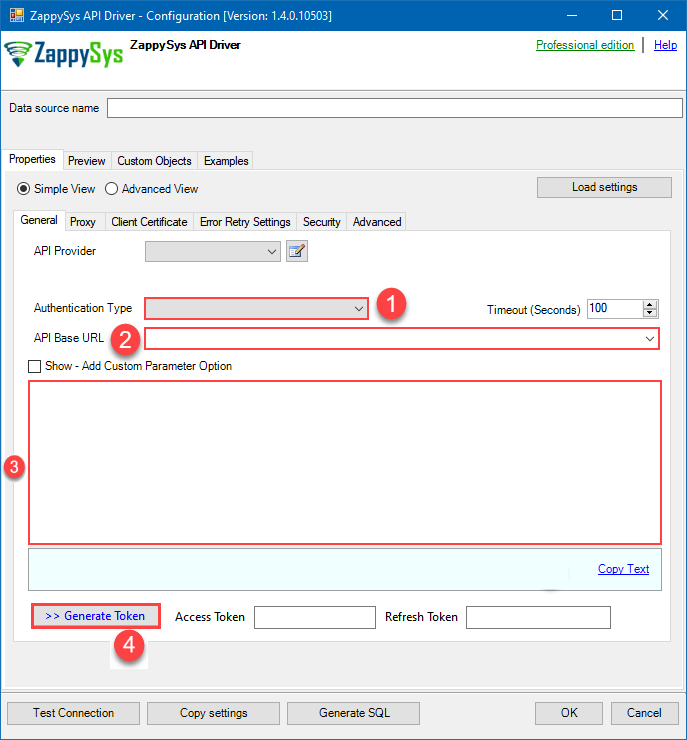
Zendesk authentication
Authenticate using your userid / password (2FA must be OFF and [Password Access] option must be enabled under Admin Console > Channel > API > Settings. These settings typically found here https://YOUR-SUB-DOMAIN.zendesk.com/agent/admin/api/settings [API reference]
Please refer to external API reference
API Connection Manager configuration
Just perform these simple steps to finish authentication configuration:
-
Set Authentication Type to
UserID/Password Authentication (2FA must be OFF) [Http] - Optional step. Modify API Base URL if needed (in most cases default will work).
- Fill in all the required parameters and set optional parameters if needed.
- Finally, hit OK button:
ZendeskDSNZendeskUserID/Password Authentication (2FA must be OFF) [Http]https://[$Domain$].zendesk.com/api/v2Required Parameters Sub Domain (e.g. mycompany) Fill-in the parameter... UserName (2FA Must be OFF) Fill-in the parameter... Password Fill-in the parameter... Optional Parameters RetryMode RetryWhenStatusCodeMatch RetryStatusCodeList 429 RetryCountMax 5 RetryMultiplyWaitTime True 
-
Set Authentication Type to
-
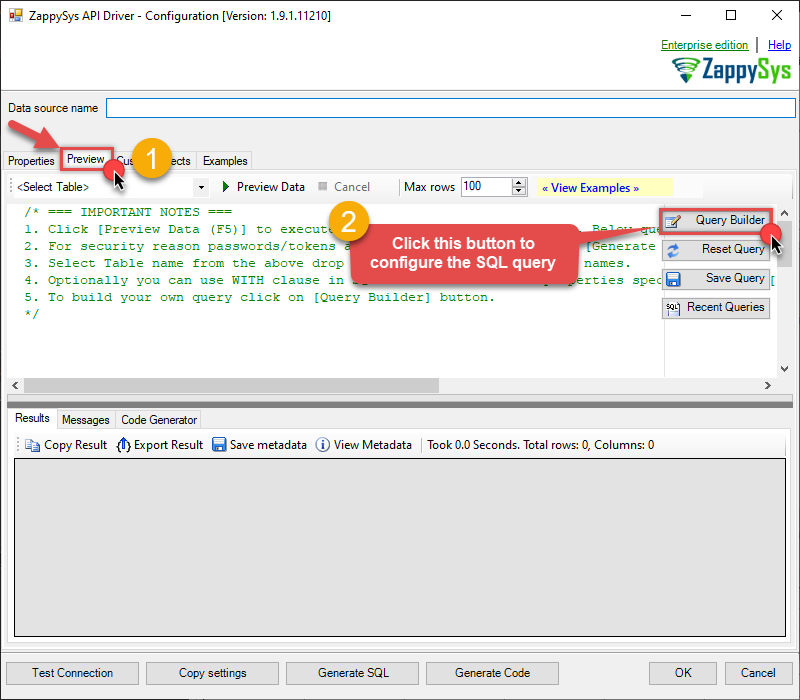
Once the data source connection has been configured, it's time to configure the SQL query. Select the Preview tab and then click Query Builder button to configure the SQL query:
 ZappySys API Driver - ZendeskZendesk Connector can be used to integrate Zendesk REST API in your App / BI Tools. You can read/write data about Tickets, Activity, Users, Organizations and more.ZendeskDSN
-
Start by selecting the Table or Endpoint you are interested in and then configure the parameters. This will generate a query that we will use in Python to retrieve data from Zendesk. Hit OK button to use this query in the next step.
SELECT * FROM Tickets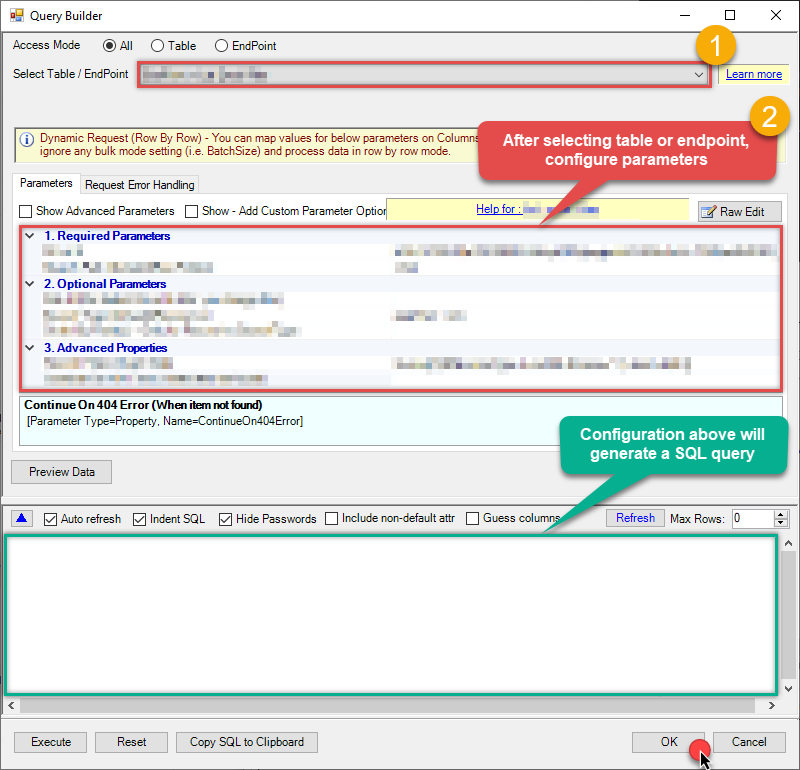 Some parameters configured in this window will be passed to the Zendesk API, e.g. filtering parameters. It means that filtering will be done on the server side (instead of the client side), enabling you to get only the meaningful data
much faster . -
Now hit Preview Data button to preview the data using the generated SQL query. If you are satisfied with the result, use this query in Python:
 ZappySys API Driver - ZendeskZendesk Connector can be used to integrate Zendesk REST API in your App / BI Tools. You can read/write data about Tickets, Activity, Users, Organizations and more.ZendeskDSN
SELECT * FROM Tickets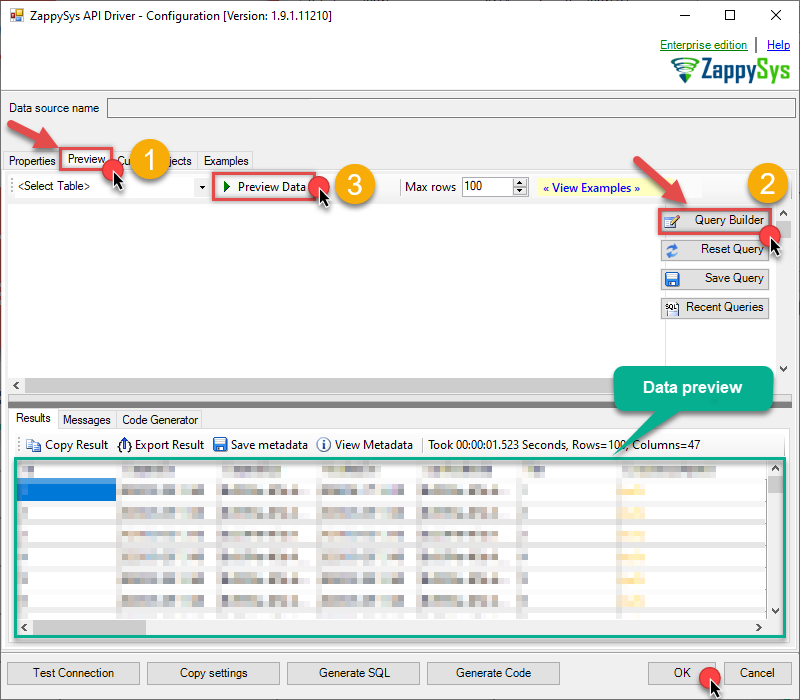 You can also access data quickly from the tables dropdown by selecting <Select table>.A
WHEREclause,LIMITkeyword will be performed on the client side, meaning that thewhole result set will be retrieved from the Zendesk API first, and only then the filtering will be applied to the data. If possible, it is recommended to use parameters in Query Builder to filter the data on the server side (in Zendesk servers). -
Click OK to finish creating the data source.
Video Tutorial
Read data in Python
Using ODBC DSN
-
Use this code snippet to read the data using
ZendeskDSNdata source:ZendeskDSN')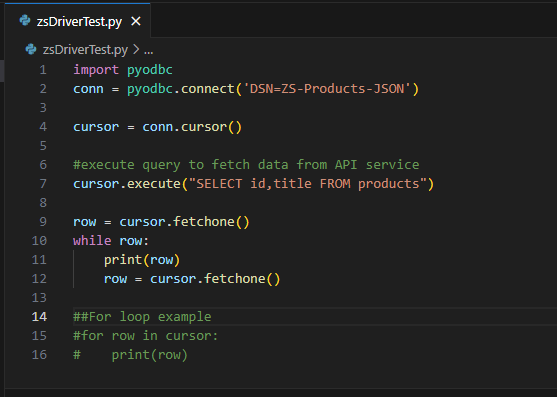
-
When you run the code it will make the API call and read the data:
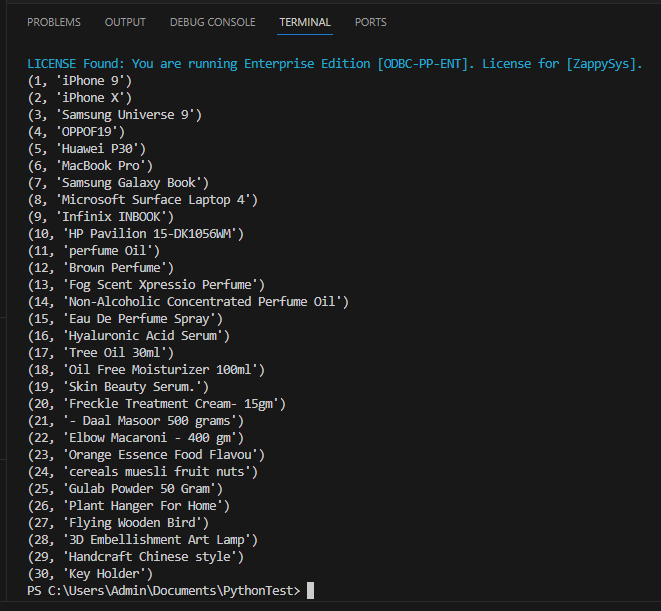
-
Here is Python program's code in text format:
    import pyodbc
    conn = pyodbc.connect('DSN=ZendeskDSN')

    cursor = conn.cursor()

    #execute query to fetch data from API service
    cursor.execute("SELECT id,title FROM products")

    row = cursor.fetchone()
    while row:
        print(row)
        row = cursor.fetchone()

    ##For loop example
    #for row in cursor:
    #    print(row)
Using a full ODBC connection string
If you want to avoid being dependent on a DSN and creating multiple DSNs for each platform (x86, x64), then you can use a fully qualified connection string. Simply go to your DSN and copy the Connection String:
-
Open ODBC data source configuration and click Copy settings:
 ZappySys API Driver - ZendeskZendesk Connector can be used to integrate Zendesk REST API in your App / BI Tools. You can read/write data about Tickets, Activity, Users, Organizations and more.ZendeskDSN
-
The window opens, telling us the connection string was successfully copied to the clipboard:

-
Then in your Python code use Connection String when initializing OdbcConnection object, for example:
conn = pyodbc.connect('DRIVER={ZappySys API Driver};ServiceUrl=https://yourservices.provider.com/api/xxxx....;AuthName=Http;')
How to install `pyodbc` in the Python?
You would need to install pyodbc in Python if you intend to establish connections to databases that support ODBC (Open Database Connectivity). This module facilitates communication between Python applications and various database management systems, enabling you to perform operations such as querying, retrieving data, and managing databases. Here's how you can install pyodbc in Python:
Installation Steps:
Ensure you have Python installed on your system. If not, download it from the official Python website and follow the installation instructions.
Open your terminal or command prompt.
-
Use the following command to install
pyodbcusing pip, the Python package installer:python -m pip install "pyodbc"Make sure you have a stable internet connection and the necessary permissions to install Python packages.
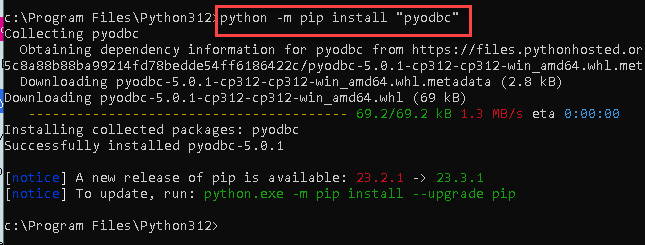
Reasons to Install:
- If pyodbc is not installed, your Python script will generate the following error:
"ModuleNotFoundError: No module named 'pyodbc'"
. Database Connectivity:
pyodbcallows Python to connect to various databases that support ODBC, such as Microsoft SQL Server, PostgreSQL, MySQL, and more.Data Operations: It facilitates the execution of SQL queries, retrieval of data, and other database operations from within Python scripts.
Cross-Platform Support:
pyodbcis designed to work across different operating systems, including Windows, macOS, and various Linux distributions.Simplicity and Efficiency: The module provides an intuitive interface for managing database transactions and connections, simplifying the process of working with databases in Python.
By installing pyodbc, you can seamlessly integrate your Python applications with a wide range of ODBC-supported databases, enabling efficient and effective data management and analysis.
Centralized data access via Data Gateway
In some situations, you may need to provide Zendesk data access to multiple users or services. Configuring the data source on a Data Gateway creates a single, centralized connection point for this purpose.
This configuration provides two primary advantages:
-
Centralized data access
The data source is configured once on the gateway, eliminating the need to set it up individually on each user's machine or application. This significantly simplifies the management process.
-
Centralized access control
Since all connections route through the gateway, access can be governed or revoked from a single location for all users.
| Data Gateway |
Local ODBC
data source
|
|
|---|---|---|
| Simple configuration | ||
| Installation | Single machine | Per machine |
| Connectivity | Local and remote | Local only |
| Connections limit | Limited by License | Unlimited |
| Central data access | ||
| Central access control | ||
| More flexible cost |
If you need any of these requirements, you will have to create a data source in Data Gateway to connect to Zendesk, and to create an ODBC data source to connect to Data Gateway in Python.
Let's not wait and get going!
Creating Zendesk data source in Gateway
In this section we will create a data source for Zendesk in Data Gateway. Let's follow these steps to accomplish that:
-
Search for
gatewayin Windows Start Menu and open ZappySys Data Gateway Configuration: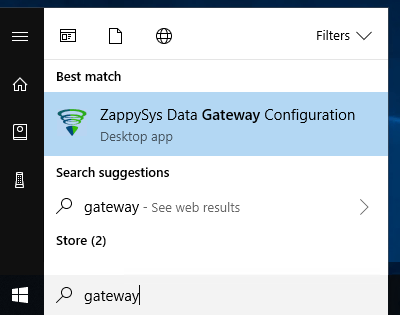
-
Go to Users tab and follow these steps to add a Data Gateway user:
- Click Add button
-
In Login field enter username, e.g.,
john - Then enter a Password
- Check Is Administrator checkbox
- Click OK to save
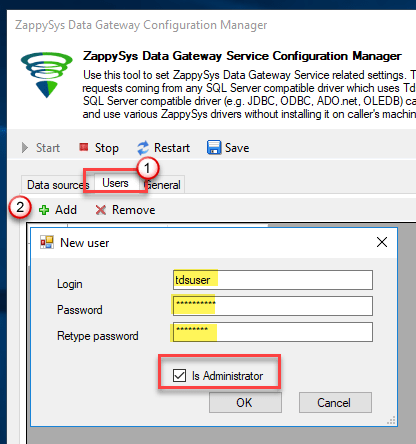
-
Now we are ready to add a data source:
- Click Add button
- Give Datasource a name (have it handy for later)
- Then select Native - ZappySys API Driver
- Finally, click OK
ZendeskDSNZappySys API Driver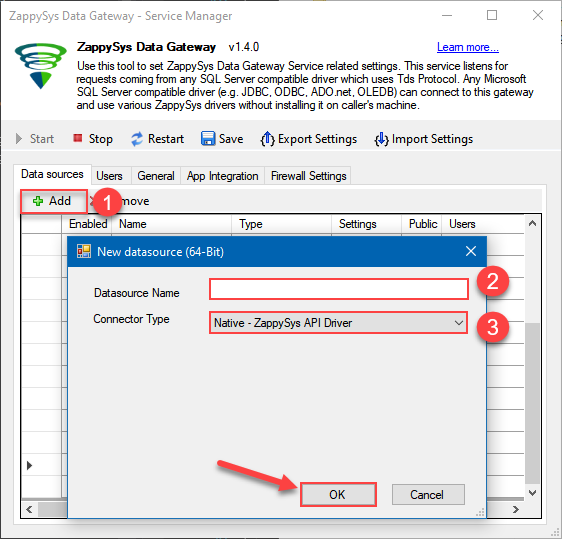
-
When the ZappySys API Driver configuration window opens, configure the Data Source the same way you configured it in ODBC Data Sources (64-bit), in the beginning of this article.
-
Very important step. Now, after creating or modifying the data source make sure you:
- Click the Save button to persist your changes.
- Hit Yes, once asked if you want to restart the Data Gateway service.
This will ensure all changes are properly applied:
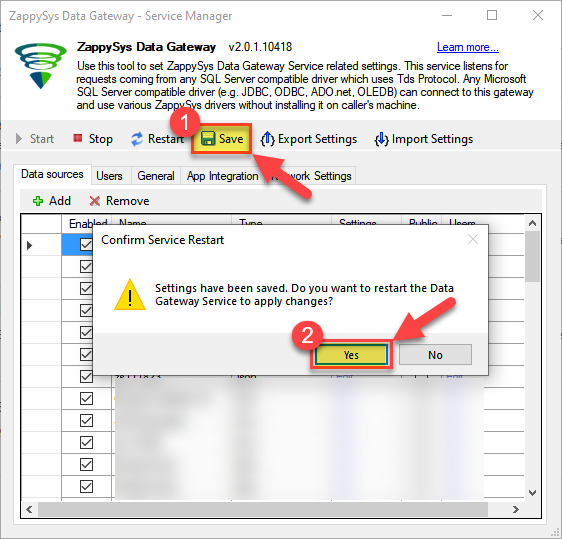 Skipping this step may result in the new settings not taking effect and, therefore you will not be able to connect to the data source.
Creating ODBC data source for Data Gateway
In this part we will create ODBC data source to connect to Data Gateway from Python. To achieve that, let's perform these steps:
-
Open ODBC Data Sources (x64):

-
Create a User data source (User DSN) based on ODBC Driver 17 for SQL Server:
ODBC Driver 17 for SQL Server If you don't see ODBC Driver 17 for SQL Server driver in the list, choose a similar version driver.
 -
Then set a Name of the data source (e.g.
Gateway) and the address of the Data Gateway:GatewayDSNlocalhost,5000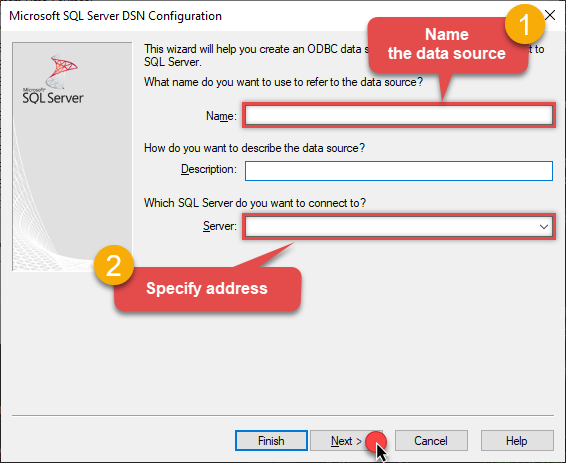 Make sure you separate the hostname and port with a comma, e.g.
localhost,5000. -
Proceed with authentication part:
- Select SQL Server authentication
-
In Login ID field enter the user name you used in Data Gateway, e.g.,
john - Set Password to the one you configured in Data Gateway
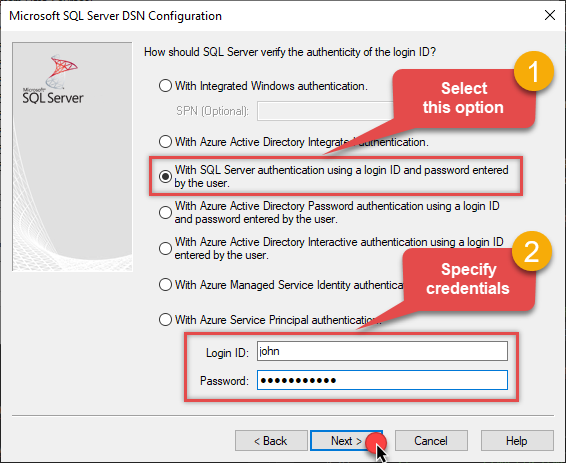
-
Then set the default database property to
ZendeskDSN(the one we used in Data Gateway):ZendeskDSN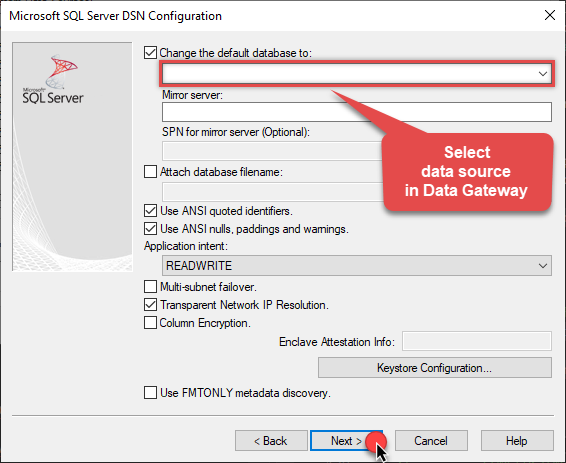
-
Continue by checking Trust server certificate option:
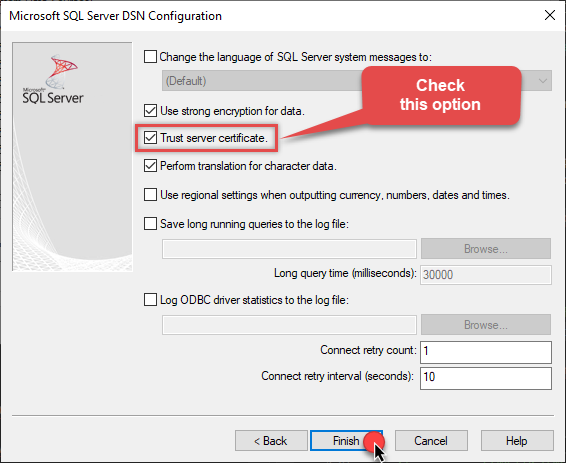
-
Once you do that, test the connection:
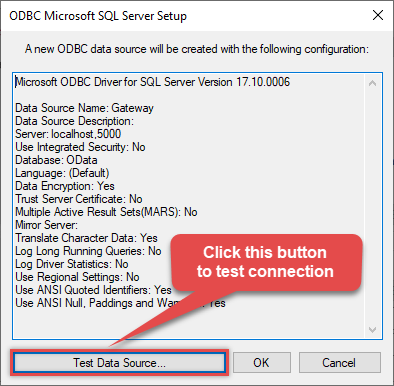
-
If connection is successful, everything is good:
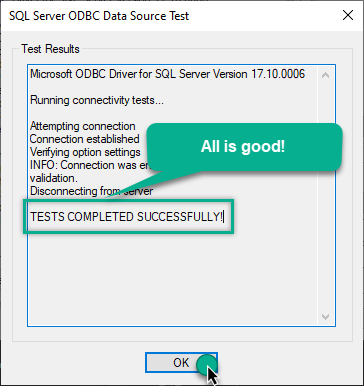
-
Done!
We are ready to move to the final step. Let's do it!
Accessing data in Python via Data Gateway
Finally, we are ready to read data from Zendesk in Python via Data Gateway. Follow these final steps:
-
Go back to Python.
-
Use this code snippet to read the data using
GatewayDSNdata source:GatewayDSN')
-
Read the data the same way we discussed at the beginning of this article.
-
That's it!
Now you can connect to Zendesk data in Python via the Data Gateway.
john and your password.
Actions supported by Zendesk Connector
Learn how to perform common Zendesk actions directly in Python with these how-to guides:
- Create Organization
- Create Ticket (Single)
- Create Tickets (Bulk)
- Create User
- Delete Attachment
- Delete Organization
- Delete Ticket
- Delete Tickets (Bulk)
- Delete Upload Session
- Delete User
- Read Attachment
- Read Brands
- Read Current User Info
- Read Groups
- Read Macros
- Read Organization Count
- Read Organization Fields
- Read Organization(s) by ID
- Read Organizations (All)
- Read Organizations (Incremental) changed after a specified date
- Read Requests
- Read Requests Search
- Read Sessions
- Read Tags
- Read Ticket ActivityStream
- Read Ticket ActivityStream Details
- Read Ticket Attachments
- Read Ticket Comments
- Read Ticket Events (Incremental) changed after a specified date
- Read Ticket Fields
- Read Ticket Forms
- Read Ticket Metric Events (Incremental) changed after a specified date
- Read Ticket Metrics
- Read Ticket(s) by ID
- Read Tickets (All)
- Read Tickets (Incremental) changed after a specified date
- Read Tickets (Recent)
- Read Tickets Count (All)
- Read Tickets Count (for Organization)
- Read Tickets for Organization
- Read Tickets for User (Assigned)
- Read Tickets for User (CCed)
- Read Tickets for User (Requested)
- Read User Fields
- Read User Sessions
- Read User(s) by ID
- Read Users (All)
- Read Users (Incremental) changed after a specified date
- Read Views
- Search Records - NO Sorting (Allows more than 1000 rows)
- Search Records - WITH Sorting and Extra Columns (Max 1000 rows)
- Update Organization
- Update Ticket (Single)
- Update Tickets (Bulk)
- Update User
- Upload Attachment (Single file)
- Upsert Organization - Create or Update
- Upsert User - Create or Update
- Upsert Users (Bulk) - Create or Update
- Make Generic API Request
- Make Generic API Request (Bulk Write)
Conclusion
In this article we showed you how to connect to Zendesk in Python and integrate data without any coding, saving you time and effort.
We encourage you to download Zendesk Connector for Python and see how easy it is to use it for yourself or your team.
If you have any questions, feel free to contact ZappySys support team. You can also open a live chat immediately by clicking on the chat icon below.
Download Zendesk Connector for Python Documentation


