
Prerequisites
Before we begin, make sure the following prerequisites are met:
- SQL Server Data Tools (SSDT) designer installed for Visual Studio.
- SQL Server Integration Services Projects 2022+ Visual Studio extension installed.
- SSIS PowerPack is installed.
Make generic REST API request in SSIS
-
Open Visual Studio and click Create a new project.
-
Select Integration Services Project. Enter a name and location for your project, then click OK.
-
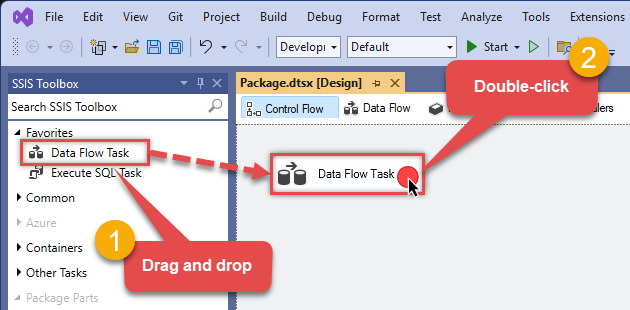
From the SSIS Toolbox, drag and drop a Data Flow Task onto the Control Flow surface, and double-click it:
-
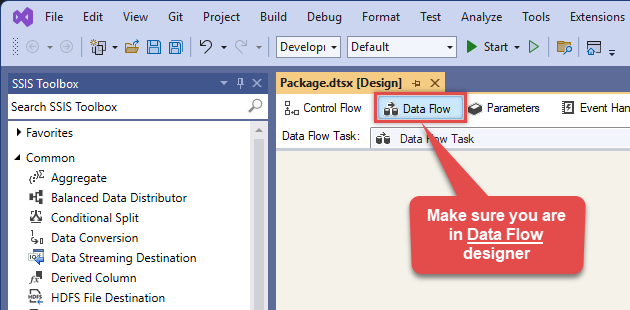
Make sure you are in the Data Flow Task designer:
-
From the SSIS toolbox drag and API Source (Predefined Templates) on the data flow designer surface, and double click on it to edit it:
 - Drag and Drop")
-
Select New Connection to create a new connection:

-
Use a preinstalled Mailchimp Connector from Popular Connector List or press Search Online radio button to download Mailchimp Connector. Once downloaded simply use it in the configuration:
Mailchimp
-
Select your authentication scenario below to expand connection configuration steps to:
- Configure the authentication in Mailchimp.
- Enter those details into the API Connection Manager configuration.
OAuth
Mailchimp authentication
To get the credentials you need in order to set up your OAuth workflow, you'll first need to register your application with Mailchimp:-
Login into your Mailchimp account, click on your Profile Icon, and hit Account & billing:

-
Navigate to the Registered Apps page in your Mailchimp account:

-
Click Register An App button:

-
Fill-in the Register An App form and click Create button:
 NOTE: For Redirect URI use Redirect URI (also called "Redirect URL" or "Callback URL") given by your IT administrator or just use
https://zappysys.com/oauth, if you don't have one. -
After successfully registering your application,
you'll see the Client ID and Client Secret,
record these values and store them securely:

-
Record your Mailchimp data center, since we will need it later.
The data center is located in your browser's address bar URL.
If the URL is
https://us21.admin.mailchimp.com/account/api, then your data center isus21. - Now go to SSIS package or ODBC data source OAuth authentication configuration.
- Proceed by entering the data center into the Data Center field that was recorded in the previous step.
- Then enter the Client ID value into the Client ID field that you recorded in the previous step.
- Enter the Client Secret value into the Client Secret field that was recorded in the previous step.
- Click Generate Token. If proper authentication occurs, you will see a confirmation notice. If you get an error, click Yes on the dialog box and then a large browser window will launch. Then log into your Mailchimp account and approve the use of the application.
- Finally, hit the Test Connection button at the bottom of the window to verify proper connectivity with your Mailchimp account.
- If the connection test succeeds, select OK.
- Done! Now you can use Mailchimp Connector!
API Connection Manager configuration
Just perform these simple steps to finish authentication configuration:
-
Set Authentication Type to
OAuth [OAuth] - Optional step. Modify API Base URL if needed (in most cases default will work).
- Fill in all the required parameters and set optional parameters if needed.
- Press Generate Token button to generate the tokens.
- Finally, hit OK button:
MailchimpOAuth [OAuth]https://[$DataCenter$].api.mailchimp.comRequired Parameters Data Center Fill-in the parameter... Client Id Fill-in the parameter... Client Secret Fill-in the parameter... Default List Id Fill-in the parameter... Optional Parameters RetryMode RetryWhenStatusCodeMatch RetryStatusCodeList 429 RetryCountMax 5 RetryMultiplyWaitTime True  Find full details in the Mailchimp Connector authentication reference.
ApiKey Auth
Mailchimp authentication
The simplest way to authenticate a request to the Mailchimp Marketing API is by using an API key (If you require access to Mailchimp on behalf of other Mailchimp users, you'll want to set up OAuth authentication instead)::-
Login into your Mailchimp account, click on your Profile Icon, and hit Account & billing:
-
Navigate to the API keys page in your Mailchimp account:

-
In the Your API keys section of the page, click Create A Key button:

-
Give your new key a descriptive name that will remind you which application it's used for:

-
Copy the API key immediately and store it in a secure location (you won't be able to see or copy the key once you finish generating it):

-
Record your Mailchimp data center, since we will need it later.
The data center is located in your browser's address bar URL.
If the URL is
https://us21.admin.mailchimp.com/account/api, then your data center isus21. - Now go to SSIS package or ODBC data source ApiKey Auth authentication configuration.
- Proceed by entering the data center into the Data Center field that was recorded in the previous step.
- Then enter the API key into the Api Key field that you copied earlier.
- Finally, click the Test Connection button at the bottom of the window to verify proper connectivity with your Mailchimp account.
- Done! Now you can use Mailchimp Connector!
API Connection Manager configuration
Just perform these simple steps to finish authentication configuration:
-
Set Authentication Type to
ApiKey Auth [Http] - Optional step. Modify API Base URL if needed (in most cases default will work).
- Fill in all the required parameters and set optional parameters if needed.
- Finally, hit OK button:
MailchimpApiKey Auth [Http]https://[$DataCenter$].api.mailchimp.comRequired Parameters Api Key Fill-in the parameter... Default List Id Fill-in the parameter... Optional Parameters Data Center RetryMode RetryWhenStatusCodeMatch RetryStatusCodeList 429 RetryCountMax 5 RetryMultiplyWaitTime True  Find full details in the Mailchimp Connector authentication reference.
 -
Select Generic Table (Bulk Read / Write) table from the dropdown and hit Preview Data:
 API Source - MailchimpRead and write Mailchimp data effortlessly. Integrate, manage, and automate campaigns, lists, members, and reports — almost no coding required.MailchimpGeneric Table (Bulk Read / Write)
Required Parameters HTTP - Url or File Path Fill-in the parameter... HTTP - Request Method Fill-in the parameter... Optional Parameters HTTP - Request Body HTTP - Is MultiPart Body (Pass File data/Mixed Key/value) HTTP - Request Format (Content-Type) ApplicationJson HTTP - Headers (e.g. hdr1:aaa || hdr2:bbb) Accept: */* || Cache-Control: no-cache Parser - Response Format (Default=Json) Default Parser - Filter (e.g. $.rows[*] ) Parser - Encoding Parser - CharacterSet Download - Enable reading binary data False Download - File overwrite mode AlwaysOverwrite Download - Save file path Download - Enable raw output mode as single row False Download - Raw output data RowTemplate {Status:'Downloaded'} Download - Request Timeout (Milliseconds) General - Enable Custom Search/Replace General - SearchFor (e.g. (\d)-(\d)--regex) General - ReplaceWith (e.g. $1-***) General - File Compression Type General - Date Format General - Enable Big Number Handling False General - Wait time (Ms) - Helps to slow down pagination (Use for throttling) 0 JSON/XML - ExcludedProperties (e.g. meta,info) JSON/XML - Flatten Small Array (Not preferred for more than 10 items) JSON/XML - Max Array Items To Flatten 10 JSON/XML - Array Transform Type JSON/XML - Array Transform Column Name Filter JSON/XML - Array Transform Row Value Filter JSON/XML - Array Transform Enable Custom Columns JSON/XML - Enable Pivot Transform JSON/XML - Array Transform Custom Columns JSON/XML - Pivot Path Replace With JSON/XML - Enable Pivot Path Search Replace False JSON/XML - Pivot Path Search For JSON/XML - Include Pivot Path False JSON/XML - Throw Error When No Match for Filter False JSON/XML - Parent Column Prefix JSON/XML - Include Parent When Child Null False Pagination - Mode Pagination - Attribute Name (e.g. page) Pagination - Increment By (e.g. 100) 1 Pagination - Expression for Next URL (e.g. $.nextUrl) Pagination - Wait time after each request (milliseconds) 0 Pagination - Max Rows Expr Pagination - Max Pages Expr Pagination - Max Rows DataPath Expr Pagination - Max Pages 0 Pagination - End Rules Pagination - Next URL Suffix Pagination - Next URL End Indicator Pagination - Stop Indicator Expr Pagination - Current Page Pagination - End Strategy Type DetectBasedOnRecordCount Pagination - Stop based on this Response StatusCode Pagination - When EndStrategy Condition Equals True Pagination - Max Response Bytes 0 Pagination - Min Response Bytes 0 Pagination - Error String Match Pagination - Enable Page Token in Body False Pagination - Placeholders (e.g. {page}) Pagination - Has Different NextPage Info False Pagination - First Page Body Part Pagination - Next Page Body Part Csv - Column Delimiter , Csv - Has Header Row True Csv - Throw error when column count mismatch False Csv - Throw error when no record found False Csv - Allow comments (i.e. line starts with # treat as comment and skip line) False Csv - Comment Character # Csv - Skip rows 0 Csv - Ignore Blank Lines True Csv - Skip Empty Records False Csv - Skip Header Comment Rows 0 Csv - Trim Headers False Csv - Trim Fields False Csv - Ignore Quotes False Csv - Treat Any Blank Value As Null False Xml - ElementsToTreatAsArray 
-
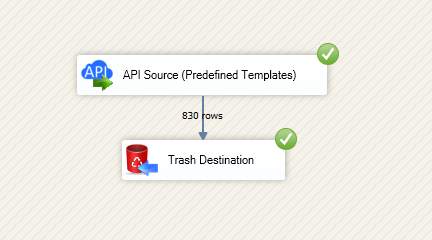
That's it! We are done! Just in a few clicks we configured the call to Mailchimp using Mailchimp Connector.
You can load the source data into your desired destination using the Upsert Destination , which supports SQL Server, PostgreSQL, and Amazon Redshift. We also offer other destinations such as CSV , Excel , Azure Table , Salesforce , and more . You can check out our SSIS PowerPack Tasks and components for more options. (*loaded in Trash Destination)
Deploy SSIS package to Azure Data Factory (ADF)
Once your SSIS package is complete,
deploy it to the
Azure-SSIS runtime
within Azure Data Factory.
The setup process requires you
to upload the
SSIS PowerPack
installer to Azure Blob Storage
and then customize the runtime configuration using the main.cmd file.
For a complete walkthrough of these steps,
see our detailed guide on the
Azure Data Factory (SSIS) and Mailchimp integration.
Mailchimp Connector actions
Need another use case? Pick the next Mailchimp action in Azure Data Factory (SSIS) below.
- Add New List
- Add New List Member
- Add New List Members in Bulk
- Add or Update Upsert List Members (Bulk Subscribe or Unsubscribe)
- Delete List
- Delete List Member (Archive)
- Delete List Member (Permanent delete)
- Get a Specific Member From All Lists
- Get All Members in All Lists
- Get Campaign Details
- Get List Details
- Get List Member Details
- Get List Members
- Get List of Campaigns
- Get Lists
- Get User Details
- Update List Details
- Update List Member Details
- Make Generic REST API Request (Bulk Write)
Conclusion
You now know how to make generic REST API request in Azure Data Factory (SSIS) without writing complex code. Mailchimp SSIS Connector handled pagination and authentication automatically.
Ready to get started? Download the trial or ping us via chat if you need help:


 Connector")


 Connector")


 Connector")


 Connector")


