
Prerequisites
Before we begin, make sure the following prerequisites are met:
- SQL Server Data Tools (SSDT) designer installed for Visual Studio.
- SQL Server Integration Services Projects 2022+ Visual Studio extension installed.
- SSIS PowerPack is installed.
Make generic REST API request in SSIS
-
Open Visual Studio and click Create a new project.
-
Select Integration Services Project. Enter a name and location for your project, then click OK.
-
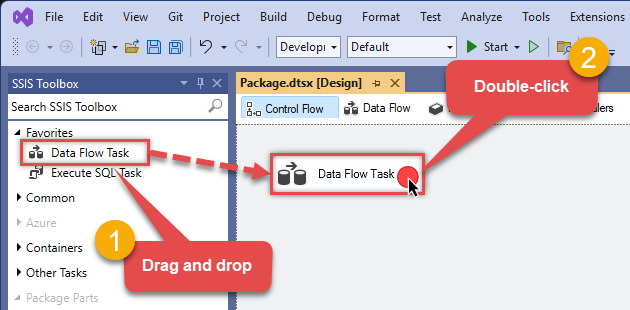
From the SSIS Toolbox, drag and drop a Data Flow Task onto the Control Flow surface, and double-click it:
-
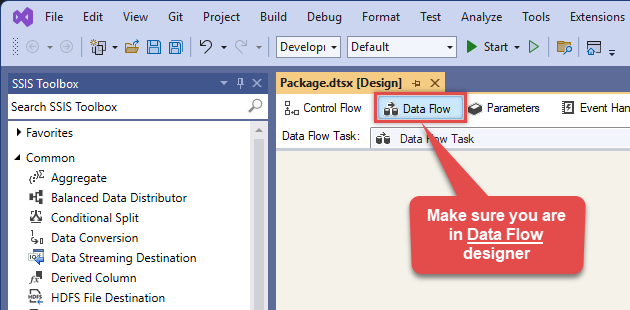
Make sure you are in the Data Flow Task designer:
-
From the SSIS toolbox drag and API Source (Predefined Templates) on the data flow designer surface, and double click on it to edit it:
 - Drag and Drop")
-
Select New Connection to create a new connection:

-
Use a preinstalled Smartsheet Connector from Popular Connector List or press Search Online radio button to download Smartsheet Connector. Once downloaded simply use it in the configuration:
Smartsheet
-
Select your authentication scenario below to expand connection configuration steps to:
- Configure the authentication in Smartsheet.
- Enter those details into the API Connection Manager configuration.
OAuth (Dynamic Token)
Smartsheet authentication
OAuth Walkthrough
Apps connect to Smartsheet using OAuth 2.0 to authenticate and authorize users. If you are building an app, this documentation will walk you through the steps you need to authenticate your users. The Smartsheet SDKs contain APIs for OAuth 2.0.
NOTE: For users of apps like AWS AppFabric, you will need a Tenant ID. You can find your Tenant ID in Admin Center under Security & Controls. There is a Smartsheet Tenant ID pane.
First Steps
Before you can start using OAuth 2.0 with your app, Smartsheet needs the following information:
- You must register with Smartsheet to get a developer account*. The developer account gives you access to "Developer Tools", which is where you manage your app.
- In "Developer Tools", complete any required fields in your developer profile.
- In "Developer Tools", register your app so Smartsheet can assign a client Id and a client secret to the app.
- Review the list of access scopes. You'll need to choose which ones your app needs to get to a user's Smartsheet data, and then ask the user to consent to that access.
- After you've worked through these steps, you'll be ready to implement the OAuth Flow.
Open Developer Tools
- Log in to Smartsheet with your developer account.
- Click the "Account" button in the lower-left corner of your Smartsheet screen, and then click "Developer Tools".
- Do one of the following:
- If you need to register an app, click "Create New App".
- If you need to manage an app, click "view/edit" for the app.
Register Your App Using Developer Tools
- Log in to Smartsheet with your developer account.
- Click the "Account" button in the upper-right corner of your Smartsheet screen, and then click "Developer Tools".
- In the "Create New App" form, provide the following information:
- Name: the name the user sees to identify your app
- Description: a brief description intended for the user
- URL: the URL to launch your app, or the landing page if not a web app
- Contact/support: support information for the user
- Redirect URL: also known as a callback URL. The URL within your application that will receive the OAuth 2.0 credentials After you click "Save", Smartsheet assigns a client Id and secret to your app. Make a note of these Ids for the next steps; however, you can always look them up again in "Developer Tools".
API Connection Manager configuration
Just perform these simple steps to finish authentication configuration:
-
Set Authentication Type to
OAuth (Dynamic Token) [OAuth] - Optional step. Modify API Base URL if needed (in most cases default will work).
- Fill in all the required parameters and set optional parameters if needed.
- Press Generate Token button to generate the tokens.
- Finally, hit OK button:
SmartsheetOAuth (Dynamic Token) [OAuth]https://api.smartsheet.com/2.0Required Parameters ClientId Fill-in the parameter... ClientSecret Fill-in the parameter... Scope Fill-in the parameter... Optional Parameters RetryMode RetryWhenStatusCodeMatch RetryStatusCodeList 429|503 RetryCountMax 5 RetryMultiplyWaitTime True  Find full details in the Smartsheet Connector authentication reference.
Static Token
Smartsheet authentication
Raw Token Requests
If you want to get started quickly, or are developing a standalone application that can run with your credentials, follow these instructions:
- Click the "Account" button in the lower-left corner of the Smartsheet screen, and then click "Personal Settings".
- Click the "API Access" tab.
- Click the "Generate new access token" button to obtain an access token.
The access token must be sent with every API call in an HTTP authorization header (except for therequests to Get Access Token or Refresh Access Token). Once you have an access token, include it in the Authorization header for every request you make:
Authorization: Bearer JKlMNOpQ12RStUVwxYZAbcde3F5g6hijklM789The header name is Authorization and the value of the header is Bearer JKlMNOpQ12RStUVwxYZAbcde3F5g6hijklM789. Since the access token is being transmitted in clear text, all API calls are done over HTTPS.
NOTE: A best practice is to use a shared account, such as ticket-processor@example.com, rather than your individual work account.
API Connection Manager configuration
Just perform these simple steps to finish authentication configuration:
-
Set Authentication Type to
Static Token [Http] - Optional step. Modify API Base URL if needed (in most cases default will work).
- Fill in all the required parameters and set optional parameters if needed.
- Finally, hit OK button:
SmartsheetStatic Token [Http]https://api.smartsheet.com/2.0Required Parameters Access Token Fill-in the parameter... Optional Parameters RetryMode RetryWhenStatusCodeMatch RetryStatusCodeList 429|503 RetryCountMax 5 RetryMultiplyWaitTime True  Find full details in the Smartsheet Connector authentication reference.
 -
Select Generic Table (Bulk Read / Write) table from the dropdown and hit Preview Data:
 API Source - SmartsheetRead and write Smartsheet data effortlessly. Integrate, manage, and automate sheets, rows, and reports — almost no coding required.SmartsheetGeneric Table (Bulk Read / Write)
Required Parameters HTTP - Url or File Path Fill-in the parameter... HTTP - Request Method Fill-in the parameter... Optional Parameters HTTP - Request Body HTTP - Is MultiPart Body (Pass File data/Mixed Key/value) HTTP - Request Format (Content-Type) ApplicationJson HTTP - Headers (e.g. hdr1:aaa || hdr2:bbb) Accept: */* || Cache-Control: no-cache Parser - Response Format (Default=Json) Default Parser - Filter (e.g. $.rows[*] ) Parser - Encoding Parser - CharacterSet Download - Enable reading binary data False Download - File overwrite mode AlwaysOverwrite Download - Save file path Download - Enable raw output mode as single row False Download - Raw output data RowTemplate {Status:'Downloaded'} Download - Request Timeout (Milliseconds) General - Enable Custom Search/Replace General - SearchFor (e.g. (\d)-(\d)--regex) General - ReplaceWith (e.g. $1-***) General - File Compression Type General - Date Format General - Enable Big Number Handling False General - Wait time (Ms) - Helps to slow down pagination (Use for throttling) 0 JSON/XML - ExcludedProperties (e.g. meta,info) JSON/XML - Flatten Small Array (Not preferred for more than 10 items) JSON/XML - Max Array Items To Flatten 10 JSON/XML - Array Transform Type JSON/XML - Array Transform Column Name Filter JSON/XML - Array Transform Row Value Filter JSON/XML - Array Transform Enable Custom Columns JSON/XML - Enable Pivot Transform JSON/XML - Array Transform Custom Columns JSON/XML - Pivot Path Replace With JSON/XML - Enable Pivot Path Search Replace False JSON/XML - Pivot Path Search For JSON/XML - Include Pivot Path False JSON/XML - Throw Error When No Match for Filter False JSON/XML - Parent Column Prefix JSON/XML - Include Parent When Child Null False Pagination - Mode Pagination - Attribute Name (e.g. page) Pagination - Increment By (e.g. 100) 1 Pagination - Expression for Next URL (e.g. $.nextUrl) Pagination - Wait time after each request (milliseconds) 0 Pagination - Max Rows Expr Pagination - Max Pages Expr Pagination - Max Rows DataPath Expr Pagination - Max Pages 0 Pagination - End Rules Pagination - Next URL Suffix Pagination - Next URL End Indicator Pagination - Stop Indicator Expr Pagination - Current Page Pagination - End Strategy Type DetectBasedOnRecordCount Pagination - Stop based on this Response StatusCode Pagination - When EndStrategy Condition Equals True Pagination - Max Response Bytes 0 Pagination - Min Response Bytes 0 Pagination - Error String Match Pagination - Enable Page Token in Body False Pagination - Placeholders (e.g. {page}) Pagination - Has Different NextPage Info False Pagination - First Page Body Part Pagination - Next Page Body Part Csv - Column Delimiter , Csv - Has Header Row True Csv - Throw error when column count mismatch False Csv - Throw error when no record found False Csv - Allow comments (i.e. line starts with # treat as comment and skip line) False Csv - Comment Character # Csv - Skip rows 0 Csv - Ignore Blank Lines True Csv - Skip Empty Records False Csv - Skip Header Comment Rows 0 Csv - Trim Headers False Csv - Trim Fields False Csv - Ignore Quotes False Csv - Treat Any Blank Value As Null False Xml - ElementsToTreatAsArray 
-
That's it! We are done! Just in a few clicks we configured the call to Smartsheet using Smartsheet Connector.
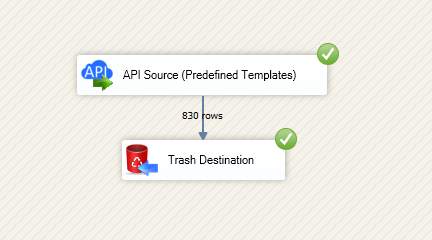
You can load the source data into your desired destination using the Upsert Destination , which supports SQL Server, PostgreSQL, and Amazon Redshift. We also offer other destinations such as CSV , Excel , Azure Table , Salesforce , and more . You can check out our SSIS PowerPack Tasks and components for more options. (*loaded in Trash Destination)
Deploy SSIS package to Azure Data Factory (ADF)
Once your SSIS package is complete,
deploy it to the
Azure-SSIS runtime
within Azure Data Factory.
The setup process requires you
to upload the
SSIS PowerPack
installer to Azure Blob Storage
and then customize the runtime configuration using the main.cmd file.
For a complete walkthrough of these steps,
see our detailed guide on the
Azure Data Factory (SSIS) and Smartsheet integration.
Smartsheet Connector actions
Need another use case? Pick the next Smartsheet action in Azure Data Factory (SSIS) below.
- Add Sheet Rows
- Delete Sheet Rows
- Export Report (to PDF, Excel, CSV file)
- Export Sheet (to PDF, Excel, CSV file)
- Get Contacts
- Get Sheet Fields
- Get Sheet Row by ID(s)
- Get Sheet Rows
- List Contacts
- List Groups
- List Reports
- List Sheets
- Search (cell data or other object types)
- Send Report Via Email Excel Pdf Or Pdf Gantt Format
- Send Sheet Via Email Excel Pdf Or Pdf Gantt Format
- Update Sheet Rows
- Make Generic REST API Request (Bulk Write)
Conclusion
You now know how to make generic REST API request in Azure Data Factory (SSIS) without writing complex code. Smartsheet SSIS Connector handled pagination and authentication automatically.
Ready to get started? Download the trial or ping us via chat if you need help:


 Connector")


 Connector")


 Connector")


 Connector")


