Introduction – SQL Server to Redshift Load
Before we talk data load from SQL Server to Redshift using SSIS lets talk what is Amazon Redshift (or sometimes referred as AWS Redshift). Amazon Redshift is a Cloud based Data warehouse service. This type of system also referred as MPP (Massively Parallel Processing). Amazon Redshift uses highly modified version of PostGrey SQL Engine behind the scene. Amazon Redshift provides advantage of Scale as you go, at very low cost compared to onsite dedicated hardware/software approach.
In this article we will try to learn how to load data from SQL Server to Amazon Redshift Data warehouse using SSIS. Techniques outlined in this article can be also applied while extracting data from other Relational Source (e.g. Loading Data from MySQL to Redshift, Oracle to Redshift etc). First we will discuss steps needed to load data into Amazon Redshift Data Warehouse, challenges and then we will simplify whole process using SSIS Task for Amazon Redshift Data Transfer.
Right way but hard way
If you are reading some of the guidelines published by Amazon regarding Redshift Data load then you will quickly realize that there is a lot to do under the cover to get it going right way. Here are few steps you will have to perform while loading data to Redshift from your On-Premise server (Data can be sitting in files or Relational source).
Steps for Amazon Redshift Data Load from On-Premise files or RDBMS (e.g. MySQL, SQL Server)
- Export local RDBMS data to flat files (Make sure you remove invalid characters, apply escape sequence during export)
- Split files into 10-15 MB each to get optimal performance during upload and final Data load
- Compress files to *.gz format so you don’t end up with $1000 surprise bill 🙂 .. In my case Text files were compressed 10-20 times
- List all file names to manifest file so when you issue COPY command to Redshift its treated as one unit of load
- Upload manifest file to Amazon S3 bucket
- Upload local *.gz files to Amazon S3 bucket
- Issue Redshift COPY command with different options
- Schedule file archiving from on-premises and S3 Staging area on AWS
- Capturing Errors, setting up restart ability if something fails
Doing it easy way
In next few sections we will describe how to setup your Redshift Cluster for Demo purpose and load Data from SQL Server to Redshift using SSIS.
Should I use SSIS to load Redshift
If you are curious which approach to use to load data then consider few facts
- Do you have existing ETL processes written in SSIS?
- Do you need more visual approach and better work flow management (what SSIS Provides)?
- Do you need connection string encryption and other goodies offered by SSIS such as native logging, passing parameters from SSIS environment
- Do you have expertise available for SSIS in-house or you better stay with command line scripts?
- Do you have need to create workflow which can run on any server where SSIS is not installed?
Command line approach for SQL Server to Redshift data load
Setup your Amazon Redshift Cluster
NOTE: Skip this step if you already setup you Redshift Cluster
- Login to your AWS Console and Click on Redshift icon. Or click here to land directly to redshift
- Click on Launch Cluster
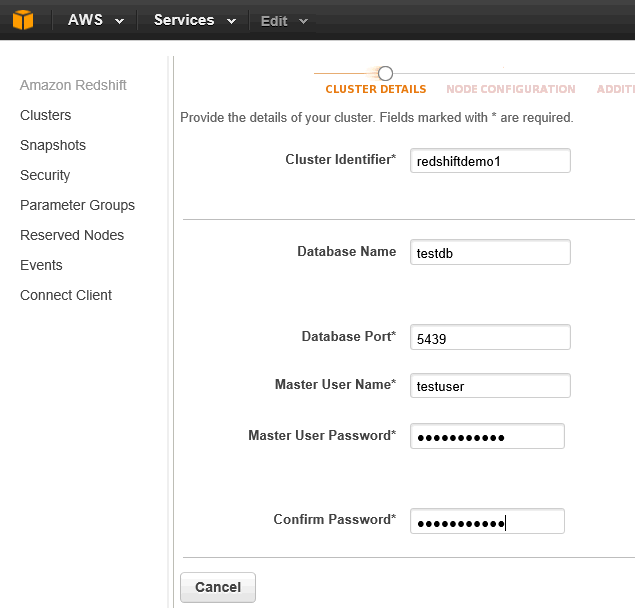
- On Cluster Detail Page specify Cluster Identifier, Database Name, Port, Master User and Password. Click Continue to go to next page
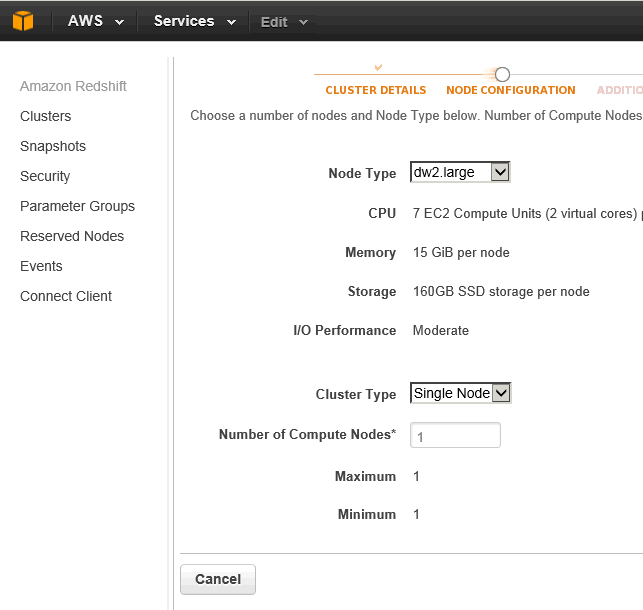
- On Node Configuration Page specify Node Type (This is VM Type), Cluster Type and Number of Node. If you are trying under Free Tire then select smallest Node possible (in this case it was dw2.large). Click Continue to go to next page
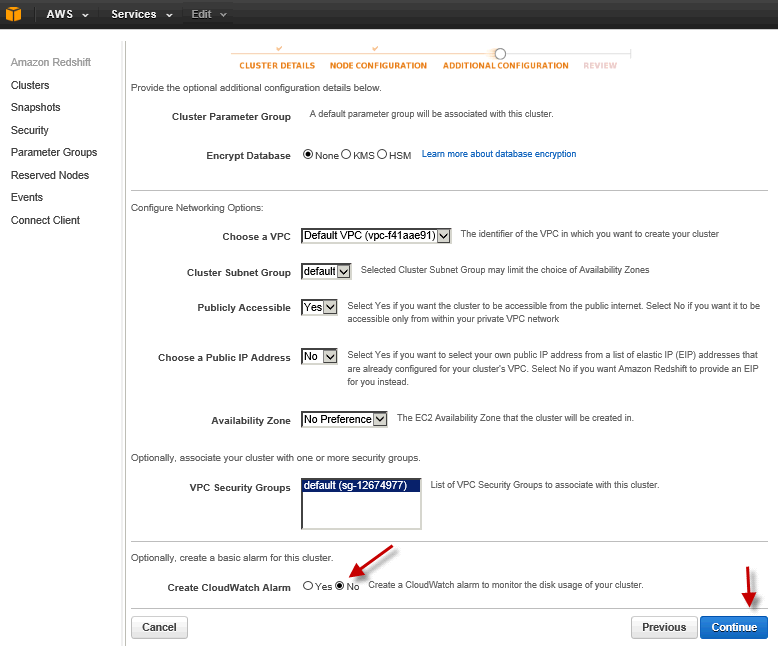
- On Additional Configuration Page you can pick VPC (virtual private connection), Security group for Cluster and other options for Encryption. For demo purpose select as below screenshot . Click Continue to review your settings and click Create Cluster
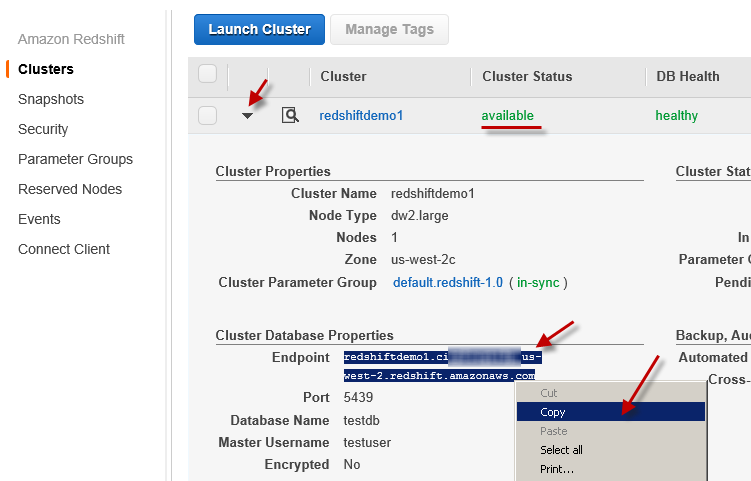
- Give it few mins while your cluster is being created. After few minutes (5-10 mins) you can go back to same page and review cluster Status and other properties as below. Copy Cluster Endpoint to somewhere because we will need it later.
Add inbound rule for Redshift Cluster
By default you cannot connect to Amazon Redshift cluster from outside AWS Network (e.g. from your On-Premises Machine). If you wish to connect then you must add inbound exception rule to allow your request to redshift cluster on specific port.
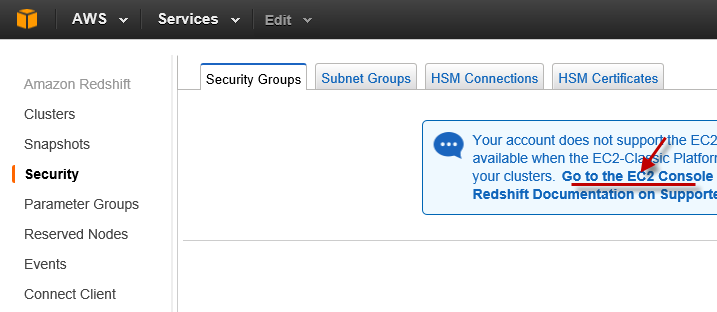
- Under Redshift home page click [Security] tab. You may see following Notice depending on which region you are. Click on [Go to the EC2 Console] link or you can direct go to EC2 by clicking Services -> EC2 menu at the top
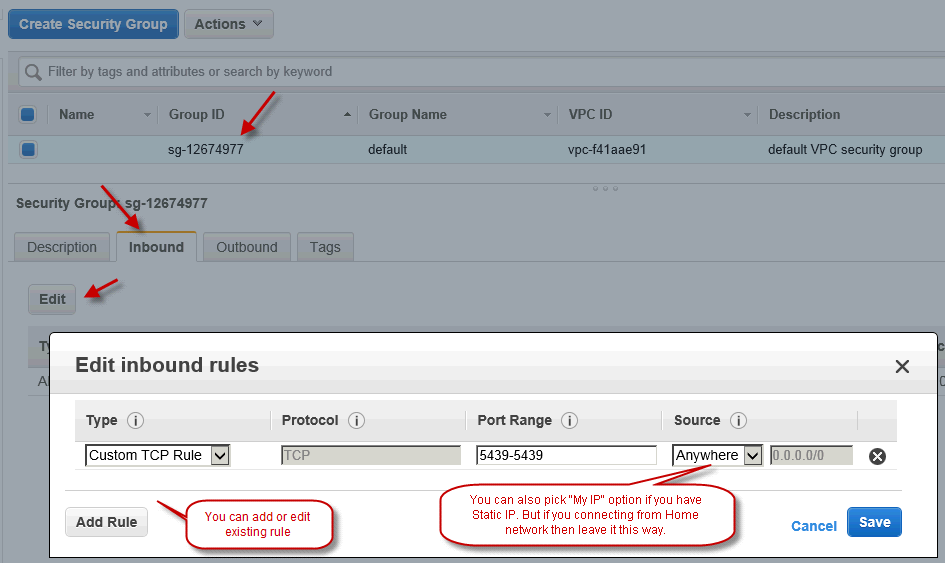
- On EC2 Security Groups Page select Security group attached with your Redshift Cluster and then in the bottom pane click on Inbound Tab
- On Inbound Tab click Edit option to modify default entry or you can add new Rule
- Click on Add rule if you wish to add new entry else edit as below and click save
Automate Redshift Cluster Creation
If you have need to automate Redshift Cluster Creation or any of the following things automatically then check Redshift Cluster management Task
- Automate Amazon Redshift Cluster Create Action in few clicks. You can also add Access Security Rule.
- Automate Amazon Redshift Cluster Delete Action
- Fetch Amazon Redshift Cluster Property to SSIS Variable (e.g. Fetch Cluster Status)
- Fetch all cluster and their properties as DataTable (Use ForEach Loop and iterate through all clusters)
- Automate Redshift Cluster Snapshot Creation
- Automate Redshift Cluster Snapshot Delete Action
- Support for Wait until Cluster operation is done
Create Sample table and data in Source – (in this example SQL Server)
For this demo we will use Free Northwind sample database supplied by Microsoft.
- Download Sample Database from here.
- Extract the zip file -> Open *.sql file and run it to create new database with sample tables and data.
Create Sample table in Amazon Redshift
You can use your own client tool such as SQL Workbench to create table in Redshift or use SSIS to execute CREATE TABLE script as below.
- Download and Install SSIS PowerPack. Here is the Download Link
- Open SSDT (or BIDS if using SSIS 2005/2008)
- Create new Integration Services Project
- In your toolbox you should see many new Icons starting with “ZS” (i.e. ZappySys). If you don’t see them then check this
- Drag Amazon Redshift ExecuteSQL Task on the designer surface.
- Double click on the task to see UI.
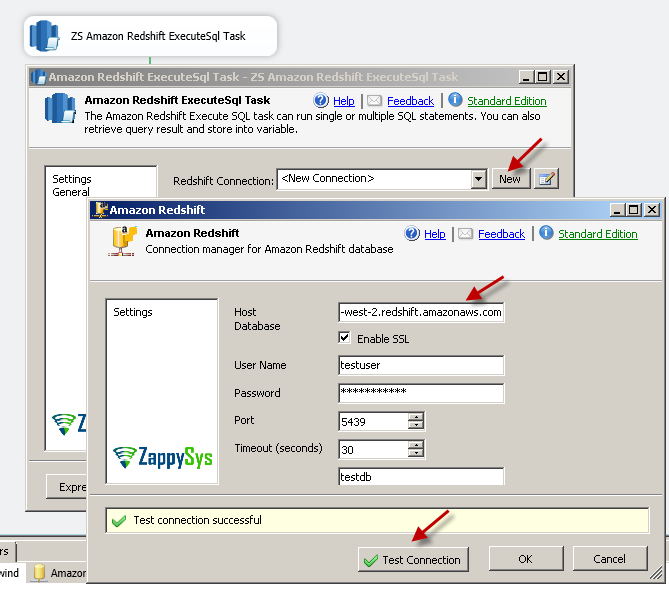
- Click on [New] Connection.
- Configure Redshift Connection properties and Click Test.
- Test connection is successful then Click OK to save connection detail.
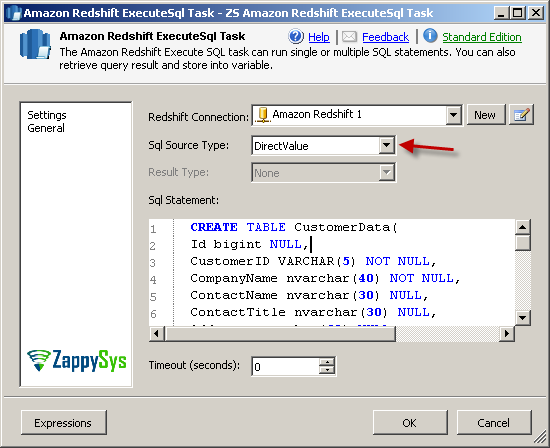
- Enter following Script in the SQL textbox and hit OK to save it.
CREATE TABLE CustomerData( Id bigint NULL, CustomerID VARCHAR(5) NOT NULL, CompanyName nvarchar(40) NOT NULL, ContactName nvarchar(30) NULL, ContactTitle nvarchar(30) NULL, Address nvarchar(60) NULL, City nvarchar(15) NULL, Region varchar(15) NULL, PostalCode nvarchar(10) NULL, Country nvarchar(15) NULL, Phone nvarchar(24) NULL, Fax nvarchar(24) NULL, ProductID integer NOT NULL, ProductName nvarchar(40) NOT NULL, SupplierID integer NULL, CategoryID integer NULL, QuantityPerUnit nvarchar(20) NULL, UnitPrice numeric(19,4) NULL, UnitsInStock integer NULL, UnitsOnOrder integer NULL, ReorderLevel integer NULL, Discontinued boolean NOT NULL, OrderID integer NOT NULL, OrderDate TIMESTAMP NULL, Freight numeric(19,4) NULL ) - Now right click on the task and execute. This should create new table in Redshift.
SQL Server to Redshift Data Load using SSIS
Once table is created now lets do real work to get data moving from SQL Server to Amazon Redshift. Perform the following steps to configure SSIS Amazon Redshift Data Transfer Task
- Drag Amazon Redshift Data Transfer Task on the SSIS designer surface.
- Double click on the task to edit properties.
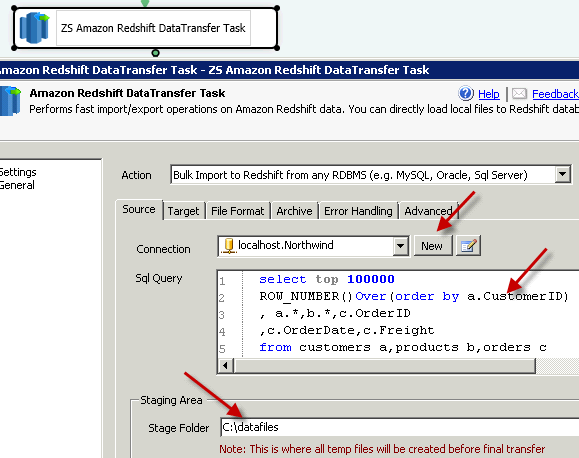
- Select Action: In the top Action drop down select Bulk Import to Redshift from any RDBMS (e.g. MySQL, Oracle, SQL Server)
option - Configure Source: On the Source tab click [New] next to connection dropdown and configure Source connection or pick existing connection. In our case we are extracting data from SQl Server database (Northwind) on local server.
Enter the following SQL Query to extract 100,000 rows from SQL Serverselect top 100000 ROW_NUMBER()Over(order by a.CustomerID) Id , a.*,b.*,c.OrderID ,c.OrderDate,c.Freight from customers a,products b,orders c
- Configure Source Staging Area: On the Source tab you have to enter folder location where staging files will be saved before we upload to Redshift (see above screen).
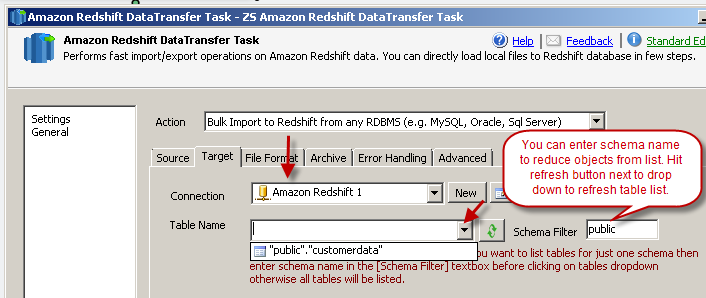
- Configure Target: On target tab select existing RedShift connection manager (or create new), Select target Table from the dropdown where you want to load data. If you have long list of tables then simply enter schema name in the Schema Filter text box and click refresh to reload Table dropdown with fewer items.
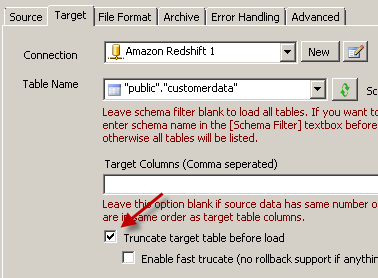
- Configure Reload option and Target Staging Area: On target tab check Truncate target table option if you want to reload each time execute this task else leave it unchecked to append records. We also have to specify Amazon S3 Staging areas where Redshift will look for files to load.
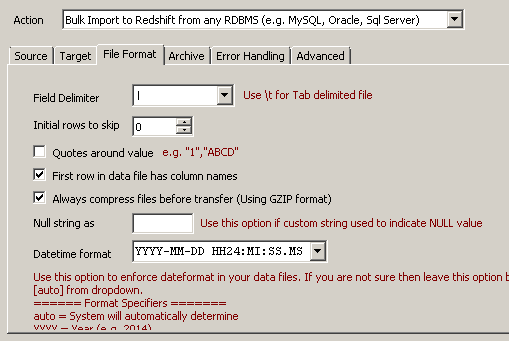
- Configure File Format: We are going to generate CSV files for Redshift load so make sure you select correct column delimiter. Also make sure you check Always Compress file option to reduce bandwidth.
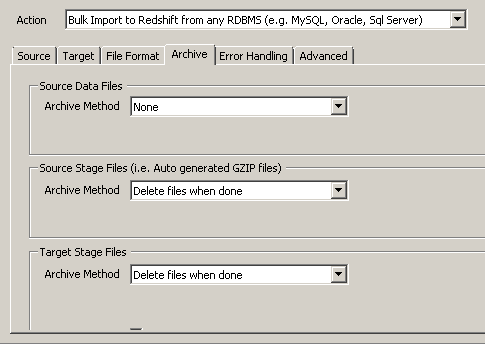
- Configure Archive Options: On Archive Tab we can specify how to archive Source and Target files we generated. Source files are CSV files and Source Stage files are *.gz files (If you select compression). Target stage files are either CSV or *.gz files.By default Source CSV files are kept and all other Stage files are deleted. See below screenshot
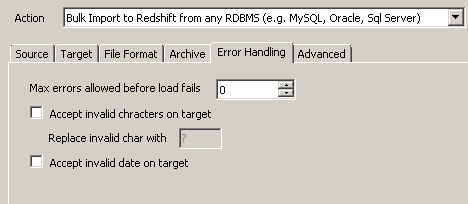
- Configure Error Handling Options: On Error Handling tab you can specify how many errors you want to ignore before failing entire load. You can also replace some invalid characters during your if you check [Allow invalid characters] option.
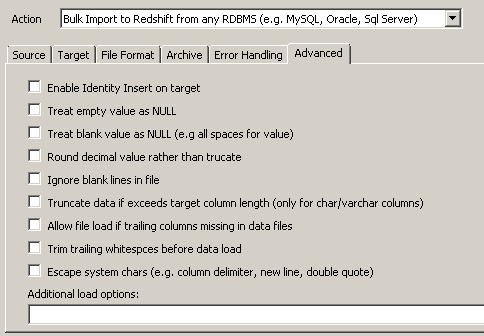
- Configure Advanced Options: On Advanced Options tab you fine tune load process such as how to handle NULL data, How to handle data truncation etc. Read help file for more info
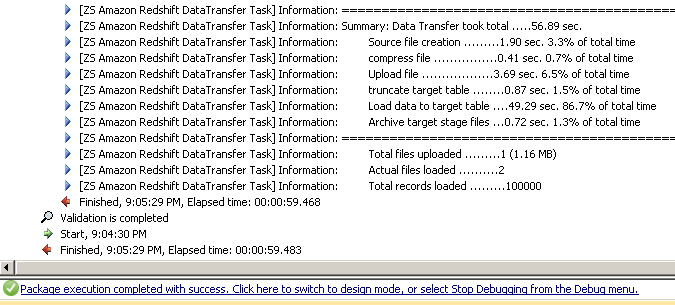
- Now finally we ready to execute our SSIS package. Once its done you can review log. Here is the sample execution log
Conclusion
Again this was just proof of concept but we encourage you to do your own benchmarking and research see which approach suites best for your need.

