
Reading data in SQL Server
This section covers steps for setting up Mailchimp Connector in the ZappySys Data Gateway data source (based on API Driver) to read Mailchimp data in SQL Server:
Create data source in Data Gateway based on ZappySys API Driver
In this section we will create a data source for Mailchimp in the Data Gateway. Let's follow these steps to accomplish that:
-
Download and install ODBC PowerPack (if you haven't already).
-
Search for
gatewayin the Windows Start Menu and open ZappySys Data Gateway Configuration:
-
Go to the Users tab and follow these steps to add a Data Gateway user:
- Click the Add button
-
In the Login field enter a username, e.g.,
john - Then enter a Password
- Check the Is Administrator checkbox
- Click OK to save

-
Now we are ready to add a data source:
- Click the Add button
- Give the Data source a name (have it handy for later)
- Then select Native - ZappySys API Driver
- Finally, click OK
MailchimpDSNZappySys API Driver
-
When the Configuration window appears give your data source a name if you haven't done that already, then select "Mailchimp" from the list of Popular Connectors. If "Mailchimp" is not present in the list, then click "Search Online" and download it. Then set the path to the location where you downloaded it. Finally, click Continue >> to proceed with configuring the DSN:
MailchimpDSNMailchimp
-
Select your authentication scenario below to expand connection configuration steps to:
- Configure the authentication in Mailchimp.
- Enter those details into the ZappySys API Driver data source configuration.
OAuth
Mailchimp authentication
To get the credentials you need in order to set up your OAuth workflow, you'll first need to register your application with Mailchimp:-
Login into your Mailchimp account, click on your Profile Icon, and hit Account & billing:

-
Navigate to the Registered Apps page in your Mailchimp account:

-
Click Register An App button:

-
Fill-in the Register An App form and click Create button:
 NOTE: For Redirect URI use Redirect URI (also called "Redirect URL" or "Callback URL") given by your IT administrator or just use
https://zappysys.com/oauth, if you don't have one. -
After successfully registering your application,
you'll see the Client ID and Client Secret,
record these values and store them securely:

-
Record your Mailchimp data center, since we will need it later.
The data center is located in your browser's address bar URL.
If the URL is
https://us21.admin.mailchimp.com/account/api, then your data center isus21. - Now go to SSIS package or ODBC data source OAuth authentication configuration.
- Proceed by entering the data center into the Data Center field that was recorded in the previous step.
- Then enter the Client ID value into the Client ID field that you recorded in the previous step.
- Enter the Client Secret value into the Client Secret field that was recorded in the previous step.
- Click Generate Token. If proper authentication occurs, you will see a confirmation notice. If you get an error, click Yes on the dialog box and then a large browser window will launch. Then log into your Mailchimp account and approve the use of the application.
- Finally, hit the Test Connection button at the bottom of the window to verify proper connectivity with your Mailchimp account.
- If the connection test succeeds, select OK.
- Done! Now you can use Mailchimp Connector!
API Connection Manager configuration
Just perform these simple steps to finish authentication configuration:
-
Set Authentication Type to
OAuth [OAuth] - Optional step. Modify API Base URL if needed (in most cases default will work).
- Fill in all the required parameters and set optional parameters if needed.
- Press Generate Token button to generate the tokens.
- Finally, hit OK button:
MailchimpDSNMailchimpOAuth [OAuth]https://[$DataCenter$].api.mailchimp.comRequired Parameters Data Center Fill-in the parameter... Client Id Fill-in the parameter... Client Secret Fill-in the parameter... Default List Id Fill-in the parameter... Optional Parameters RetryMode RetryWhenStatusCodeMatch RetryStatusCodeList 429 RetryCountMax 5 RetryMultiplyWaitTime True  Find full details in the Mailchimp Connector authentication reference.
ApiKey Auth
Mailchimp authentication
The simplest way to authenticate a request to the Mailchimp Marketing API is by using an API key (If you require access to Mailchimp on behalf of other Mailchimp users, you'll want to set up OAuth authentication instead)::-
Login into your Mailchimp account, click on your Profile Icon, and hit Account & billing:
-
Navigate to the API keys page in your Mailchimp account:

-
In the Your API keys section of the page, click Create A Key button:

-
Give your new key a descriptive name that will remind you which application it's used for:

-
Copy the API key immediately and store it in a secure location (you won't be able to see or copy the key once you finish generating it):

-
Record your Mailchimp data center, since we will need it later.
The data center is located in your browser's address bar URL.
If the URL is
https://us21.admin.mailchimp.com/account/api, then your data center isus21. - Now go to SSIS package or ODBC data source ApiKey Auth authentication configuration.
- Proceed by entering the data center into the Data Center field that was recorded in the previous step.
- Then enter the API key into the Api Key field that you copied earlier.
- Finally, click the Test Connection button at the bottom of the window to verify proper connectivity with your Mailchimp account.
- Done! Now you can use Mailchimp Connector!
API Connection Manager configuration
Just perform these simple steps to finish authentication configuration:
-
Set Authentication Type to
ApiKey Auth [Http] - Optional step. Modify API Base URL if needed (in most cases default will work).
- Fill in all the required parameters and set optional parameters if needed.
- Finally, hit OK button:
MailchimpDSNMailchimpApiKey Auth [Http]https://[$DataCenter$].api.mailchimp.comRequired Parameters Api Key Fill-in the parameter... Default List Id Fill-in the parameter... Optional Parameters Data Center RetryMode RetryWhenStatusCodeMatch RetryStatusCodeList 429 RetryCountMax 5 RetryMultiplyWaitTime True  Find full details in the Mailchimp Connector authentication reference.
 -
Once the data source connection has been configured, it's time to configure the SQL query. Select the Preview tab and then click Query Builder button to configure the SQL query:
 ZappySys API Driver - MailchimpRead and write Mailchimp data effortlessly. Integrate, manage, and automate campaigns, lists, members, and reports — almost no coding required.MailchimpDSN
-
Start by selecting the Table or Endpoint you are interested in and then configure the parameters. This will generate a query that we will use in SQL Server to retrieve data from Mailchimp. Hit OK button to use this query in the next step.
SELECT * FROM Campaigns Some parameters configured in this window will be passed to the Mailchimp API, e.g. filtering parameters. It means that filtering will be done on the server side (instead of the client side), enabling you to get only the meaningful data
much faster . -
Now hit Preview Data button to preview the data using the generated SQL query. If you are satisfied with the result, use this query in SQL Server:
ZappySys API Driver - MailchimpRead and write Mailchimp data effortlessly. Integrate, manage, and automate campaigns, lists, members, and reports — almost no coding required.MailchimpDSNSELECT * FROM Campaigns You can also access data quickly from the tables dropdown by selecting <Select table>.A
WHEREclause,LIMITkeyword will be performed on the client side, meaning that thewhole result set will be retrieved from the Mailchimp API first, and only then the filtering will be applied to the data. If possible, it is recommended to use parameters in Query Builder to filter the data on the server side (in Mailchimp servers). -
Click OK to finish creating the data source.
-
Once done, go to the Network Settings tab and Add a firewall rule for inbound traffic:
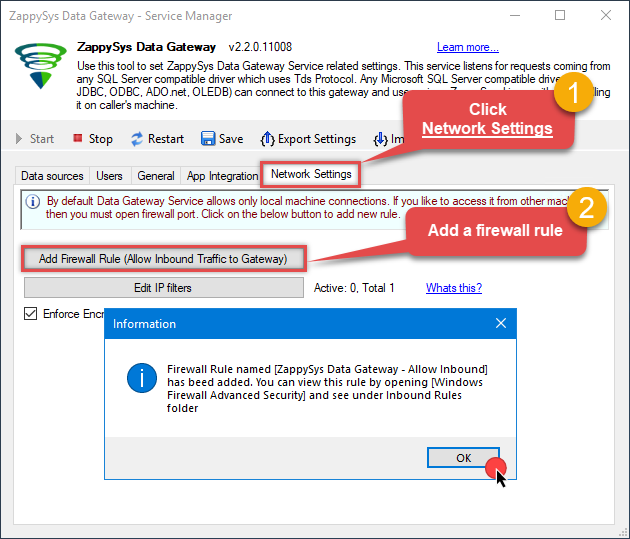
- This will initially allow all inbound traffic.
- Click Edit IP filters to restrict access to specific IP addresses or ranges.
-
Crucial Step: After creating or modifying the data source, you must:
- Click the Save button to persist your changes.
- Hit Yes when prompted to restart the Data Gateway service.
This ensures all changes are properly applied:
 Skipping this step may cause the new settings to fail, preventing you from connecting to the data source.
Read data in SQL Server via Data Gateway
After configuring your data source using the ZappySys ODBC Driver, the next mandatory step to read that data in SQL Server is to create a Linked Server. SQL Server requires a Linked Server definition to access any ODBC-based source through the ZappySys Data Gateway, allowing the source driver data to be queried using standard T-SQL.
There are two ways to create the Linked Server:- Method 1: Using a SQL Script automatically generated by the Data Gateway
- Method 2: Using SQL Server UI (SSMS) to manually configure the Linked Server
Method 1: Using a SQL Script automatically generated by the Data Gateway
The fastest and most reliable way to create the Linked Server is to use the SQL Script generated by the Data Gateway. This ensures all settings are applied correctly with minimal manual steps.
In the Data Gateway, open the App Integration tab.
Update the prefilled Linked Server Name if you want to use a custom name.
Select the MailchimpDSN data source which we created earlier as the Database.
-
Choose the correct SQL Server version for your environment.
- SQL 2019 or Lower (
@provider='SQLNCLI11') - SQL 2022 or Higher (
@provider='MSOLEDBSQL')
- SQL 2019 or Lower (
Click Generate Code.
-
In the generated script scroll down to 4. Attach Gateway login with linked server step, enter your Data Gateway admin username and password.
'LS_TO_MAILCHIMP_IN_GATEWAY'
-
Press Ctrl + A and Ctrl + C to copy the entire script.
LS_TO_MAILCHIMP_IN_GATEWAYMailchimpDSN
-
Paste the script into SQL Server Management Studio (SSMS) and run it.

That's it linked server is created in the SQL Server.
-
Finally, open a new query and execute a query we saved in one of the previous steps:
SELECT * FROM OPENQUERY([LS_TO_MAILCHIMP_IN_GATEWAY], 'SELECT * FROM Campaigns')
SELECT * FROM OPENQUERY([LS_TO_MAILCHIMP_IN_GATEWAY], 'SELECT * FROM Campaigns')
Sample SQL Script for Creating a Linked Server in SQL Server
USE [master]
GO
--///////////////////////////////////////////////////////////////////////////////////////
--Run below code in SSMS to create Linked Server and use ZappySys Drivers in SQL Server
--///////////////////////////////////////////////////////////////////////////////////////

-- Replace YOUR_GATEWAY_USER, YOUR_GATEWAY_PASSWORD
-- Replace localhost with IP/Machine name if ZappySys Gateway Running on different machine other than SQL Server
-- Replace Port 5000 if you configured gateway on a different port


--1. Configure your gateway service as per this article https://zappysys.com/links?id=10036

--2. Make sure you have SQL Server Installed. You can download FREE SQL Server Express Edition from here if you dont want to buy Paid version https://www.microsoft.com/en-us/sql-server/sql-server-editions-express

--Uncomment below if you like to drop linked server if it already exists
--EXEC master.dbo.sp_dropserver @server=N'LS_TO_MAILCHIMP_IN_GATEWAY', @droplogins='droplogins'

--3. Create new linked server

EXEC master.dbo.sp_addlinkedserver
    @server = N'LS_TO_MAILCHIMP_IN_GATEWAY'  --Linked server name (this will be used in OPENQUERY sql
, @srvproduct=N''
---- For MSSQL 2012, 2014, 2016, 2017, and 2019 use below (SQL Server Native Client 11.0)---
, @provider=N'SQLNCLI11'
---- For MSSQL 2022 or higher use below (Microsoft OLE DB Driver for SQL Server)---
--, @provider=N'MSOLEDBSQL'
, @datasrc=N'localhost,5000' --//Machine / Port where Gateway service is running
, @provstr=N'Network Library=DBMSSOCN;'
, @catalog=N'MailchimpDSN' --Data source name you gave on Gateway service settings

--4. Attach gateway login with linked server

EXEC master.dbo.sp_addlinkedsrvlogin
@rmtsrvname=N'LS_TO_MAILCHIMP_IN_GATEWAY'  --linked server name
, @useself=N'False'
, @locallogin=NULL
, @rmtuser=N'YOUR_GATEWAY_USER' --enter your Gateway user name
, @rmtpassword='YOUR_GATEWAY_PASSWORD'  --enter your Gateway user's password
GO

--5. Enable RPC OUT (This is Optional - Only needed if you plan to use EXEC(...) AT YourLinkedServerName rather than OPENQUERY
EXEC sp_serveroption 'LS_TO_MAILCHIMP_IN_GATEWAY', 'rpc', true;
EXEC sp_serveroption 'LS_TO_MAILCHIMP_IN_GATEWAY', 'rpc out', true;

--Disable MSDTC - Below needed to support INSERT INTO from EXEC AT statement
EXEC sp_serveroption 'LS_TO_MAILCHIMP_IN_GATEWAY', 'remote proc transaction promotion', false;

--Increase query timeout if query is going to take longer than 10 mins (Default timeout is 600 seconds)
--EXEC sp_serveroption 'LS_TO_MAILCHIMP_IN_GATEWAY', 'query timeout', 1200;
GO
Method 2: Using SQL Server UI (SSMS) to manually configure the Linked Server
You can also create the Linked Server manually through SSMS if you prefer a visual setup. This method lets you configure the provider, data source, and security interactively.
-
First, let's open SQL Server Management Studio, create a new Linked Server, and start configuring it:
LS_TO_MAILCHIMP_IN_GATEWAYMicrosoft OLE DB Driver for SQL Serverlocalhost,5000MailchimpDSNMailchimpDSN
- For SQL Server 2012, 2014, 2016, 2017, and 2019, choose SQL Server Native Client 11.0 as the provider.
- For SQL Server 2022 or higher, choose Microsoft OLE DB Driver for SQL Server as the provider.
-
Then click on Security option and configure username we created in ZappySys Data Gateway in one of the previous steps, e.g.
john:
-
Optional step. Under the Server Options, Enable RPC and RPC Out and Disable Promotion of Distributed Transactions(MSDTC).

You need to enable RPC Out if you plan to use
EXEC(...) AT [LS_TO_MAILCHIMP_IN_GATEWAY]rather than OPENQUERY.
If don't enabled it, you will encounter theServer 'LS_TO_MAILCHIMP_IN_GATEWAY' is not configured for RPCerror.Query Example:
DECLARE @MyQuery NVARCHAR(MAX) = 'SELECT * FROM Campaigns';

EXEC (@MyQuery) AT [LS_TO_MAILCHIMP_IN_GATEWAY];
If you plan to use
'INSERT INTO <TABLE> EXEC(...) AT [LS_TO_MAILCHIMP_IN_GATEWAY]'in that case you need to Disable Promotion of Distributed Transactions(MSDTC).
If don't disabled it, you will encounter theThe operation could not be performed because OLE DB provider "SQLNCLI11" for linked server "MY_LINKED_SERVER_NAME" was unable to begin a distributed transaction.error.Query Example:
INSERT INTO dbo.Products DECLARE @MyQuery NVARCHAR(MAX) = 'SELECT * FROM Campaigns'; EXEC (@MyQuery) AT [LS_TO_MAILCHIMP_IN_GATEWAY]; -
Finally, open a new query and execute a query we saved in one of the previous steps:
SELECT * FROM OPENQUERY([LS_TO_MAILCHIMP_IN_GATEWAY], 'SELECT * FROM Campaigns')
SELECT * FROM OPENQUERY([LS_TO_MAILCHIMP_IN_GATEWAY], 'SELECT * FROM Campaigns')
Mailchimp Connector Examples
The ZappySys API Driver is a user-friendly interface designed to facilitate the seamless integration of various applications with the Mailchimp API. With its intuitive design and robust functionality, the ZappySys API Driver simplifies the process of configuring specific API endpoints to efficiently read or write data from Mailchimp.
Click here to find more Mailchimp Connector examples designed for seamless integration with the ZappySys API ODBC Driver under ODBC Data Source (36/64) or ZappySys Data Gateway, enhancing your ability to connect and interact with Prebuilt Connectors effectively.
Consume Data inside your App / Programming Language
Once you know how to load data from Mailchimp Connector, you can click on one of the below links to learn the steps how to consume data inside your App / Programming Language from Mailchimp Connector.ODBC inside ETL / Reporting / BI Tools
- Power BI
- Tableau
- Excel
- Informatica PowerCenter
- QlikView
- SQL Server / Linked Server
- SSRS (SQL Server Reporting Services)
ODBC inside Programming Languages
Key features of the ZappySys API Driver include:
The API ODBC driver facilitates the reading and writing of data from numerous popular online services (refer to the complete list here) using familiar SQL language without learning complexity of REST API calls. The driver allows querying nested structure and output as a flat table. You can also create your own ODBC / Data Gateway API connector file and use it with this driver.
Intuitive Configuration: The interface is designed to be user-friendly, enabling users to easily set up the specific API endpoints within Mailchimp without requiring extensive technical expertise or programming knowledge.
Customizable Endpoint Setup: Users can conveniently configure the API endpoint settings, including the HTTP request method, endpoint URL, and any necessary parameters, to precisely target the desired data within Mailchimp.
Data Manipulation Capabilities: The ZappySys API Driver allows for seamless data retrieval and writing, enabling users to fetch data from Mailchimp and perform various data manipulation operations as needed, all through an intuitive and straightforward interface.
Secure Authentication Integration: The driver provides secure authentication integration, allowing users to securely connect to the Mailchimp API by inputting the necessary authentication credentials, such as API tokens or other authentication keys.
Error Handling Support: The interface is equipped with comprehensive error handling support, ensuring that any errors or exceptions encountered during the data retrieval or writing process are efficiently managed and appropriately communicated to users for prompt resolution.
Data Visualization and Reporting: The ZappySys API Driver facilitates the seamless processing and presentation of the retrieved data from Mailchimp, enabling users to generate comprehensive reports and visualizations for further analysis and decision-making purposes.
Overall, the ZappySys API Driver serves as a powerful tool for streamlining the integration of applications with Mailchimp, providing users with a convenient and efficient way to access and manage data, all through a user-friendly and intuitive interface.