Jira Connector for JAVA
Jira connector can be used to read, write, delete Issues, Users, Worklogs, Comments, Projects, Custom fileds and many other details
In this article you will learn how to quickly and efficiently integrate Jira data in JAVA. We will use high-performance Jira Connector to easily connect to Jira and then access the data inside JAVA.
Let's follow the steps below to see how we can accomplish that!
Jira Connector for JAVA is based on ZappySys API Driver which is part of ODBC PowerPack. It is a collection of high-performance ODBC drivers that enable you to integrate data in SQL Server, SSIS, a programming language, or any other ODBC-compatible application. ODBC PowerPack supports various file formats, sources and destinations, including REST/SOAP API, SFTP/FTP, storage services, and plain files, to mention a few.
Create Data Source in Data Gateway based on ZappySys API Driver
In this section we will create a data source for Jira in Data Gateway. Let's follow these steps to accomplish that:
-
Download and install ODBC PowerPack.
-
Search for
gatewayin Windows Start Menu and open ZappySys Data Gateway Configuration: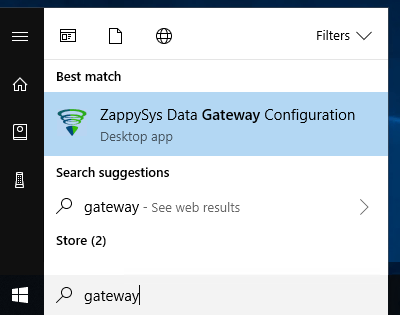
-
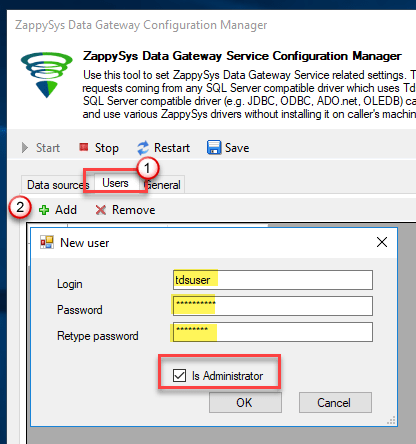
Go to Users tab and follow these steps to add a Data Gateway user:
- Click Add button
-
In Login field enter username, e.g.,
john - Then enter a Password
- Check Is Administrator checkbox
- Click OK to save
-
Now we are ready to add a data source:
- Click Add button
- Give Datasource a name (have it handy for later)
- Then select Native - ZappySys API Driver
- Finally, click OK
JiraDSNZappySys API Driver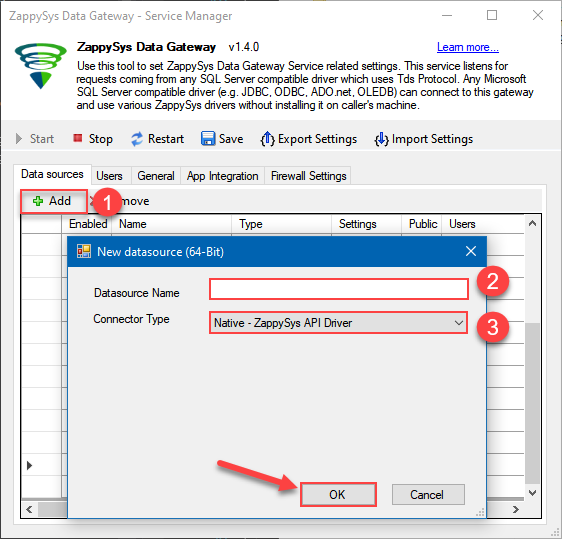
-
When the Configuration window appears give your data source a name if you haven't done that already, then select "Jira" from the list of Popular Connectors. If "Jira" is not present in the list, then click "Search Online" and download it. Then set the path to the location where you downloaded it. Finally, click Continue >> to proceed with configuring the DSN:
JiraDSNJira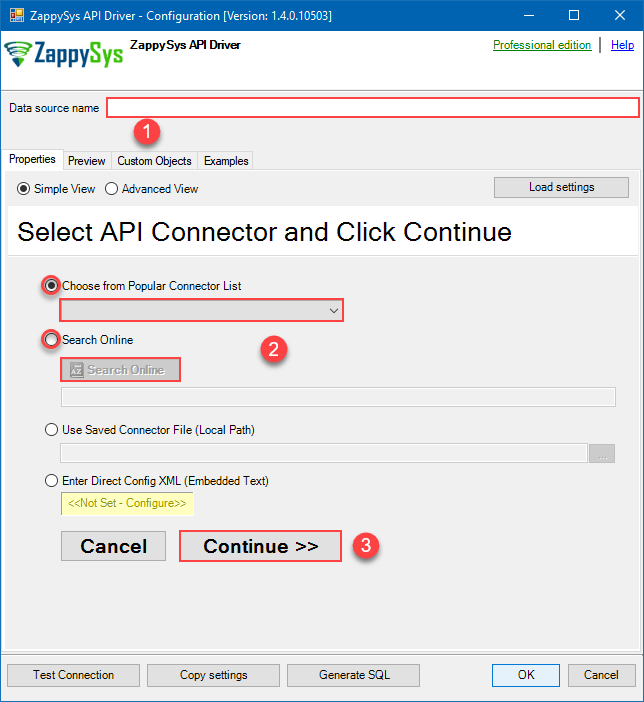
-
Now it's time to configure the Connection Manager. Select Authentication Type, e.g. Token Authentication. Then select API Base URL (in most cases, the default one is the right one). More info is available in the Authentication section.
Jira authentication
Firstly, login into your Atlassian account and then go to your Jira profile:- Go to Profile > Security.
- Click Create and manage API tokens.
- Then click Create API token button and give your token a label.
- When window appears with new API token, copy and use it in this connection manager.
- That's it!
API Connection Manager configuration
Just perform these simple steps to finish authentication configuration:
-
Set Authentication Type to
API Key based Authentication [Http] - Optional step. Modify API Base URL if needed (in most cases default will work).
- Fill in all the required parameters and set optional parameters if needed.
- Finally, hit OK button:
JiraDSNJiraAPI Key based Authentication [Http]https://[$Subdomain$].atlassian.net/rest/api/3Required Parameters Subdomain Fill-in the parameter... Atlassian User Name (email) Fill-in the parameter... API Key Fill-in the parameter... Optional Parameters CustomColumnsRegex 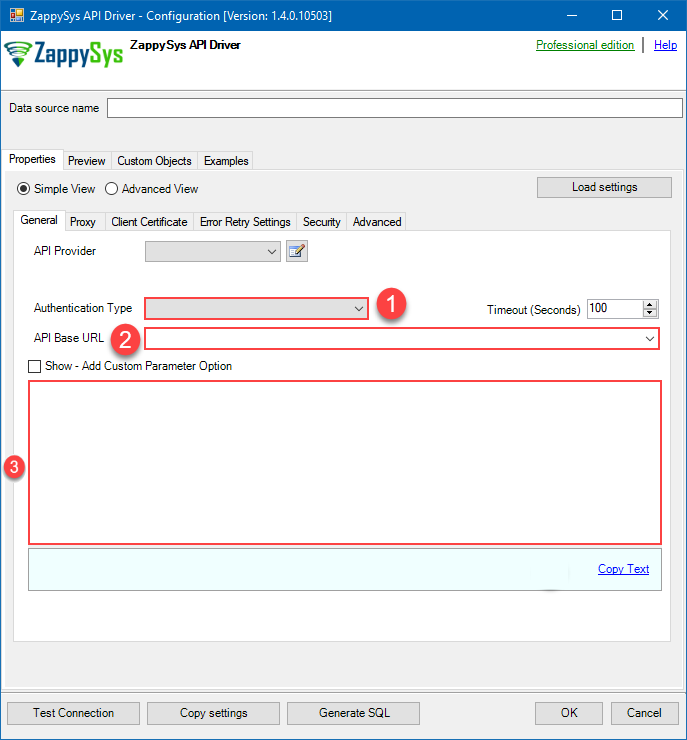
Jira authentication
Follow official Atlassian instructions on how to create a PAT (Personal Access Token) for JIRAAPI Connection Manager configuration
Just perform these simple steps to finish authentication configuration:
-
Set Authentication Type to
Personal Access Token (PAT) Authentication [Http] - Optional step. Modify API Base URL if needed (in most cases default will work).
- Fill in all the required parameters and set optional parameters if needed.
- Finally, hit OK button:
JiraDSNJiraPersonal Access Token (PAT) Authentication [Http]https://[$Subdomain$].atlassian.net/rest/api/3Required Parameters Subdomain Fill-in the parameter... Token (PAT Bearer Token) Fill-in the parameter... Optional Parameters CustomColumnsRegex 
Jira authentication
OAuth App must be created in Atlassian Developer Console. It is found at https://developer.atlassian.com/console/myapps/ [API reference]
Firstly, login into your Atlassian account and then create Jira application:- Go to Atlassian Developer area.
-
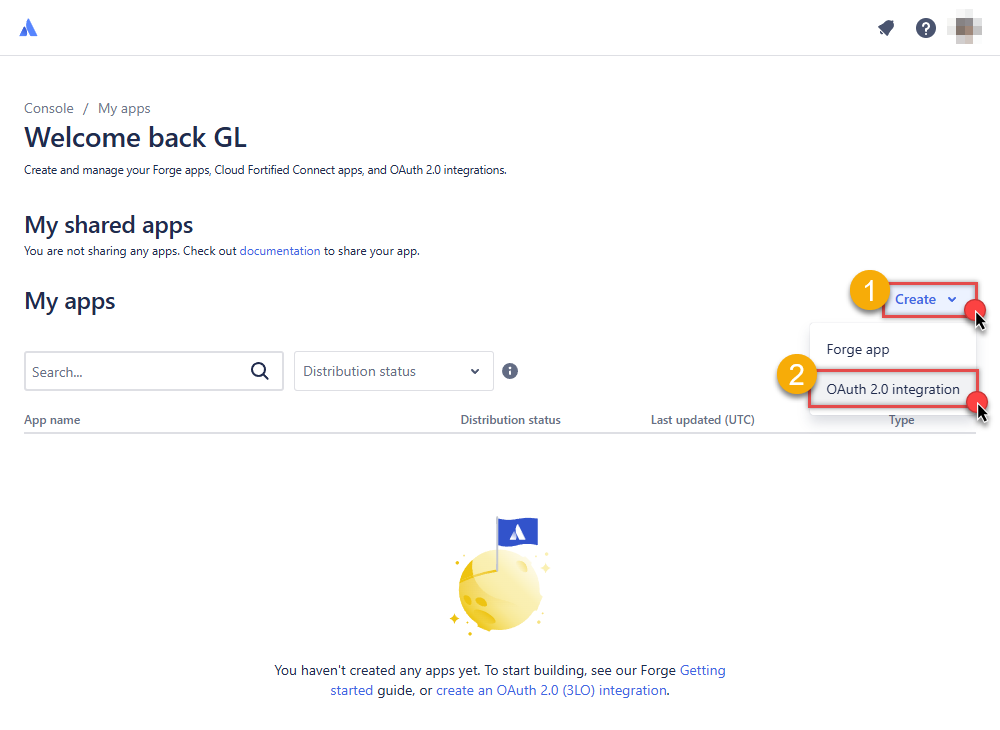
Click Create and select OAuth 2.0 integration item to create an OAuth app:
-
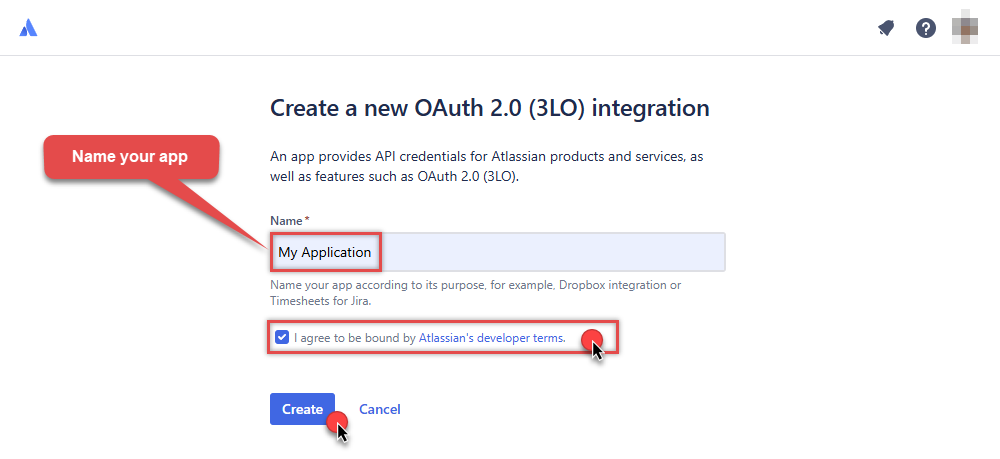
Give your app a name, accept the terms and hit Create:
-
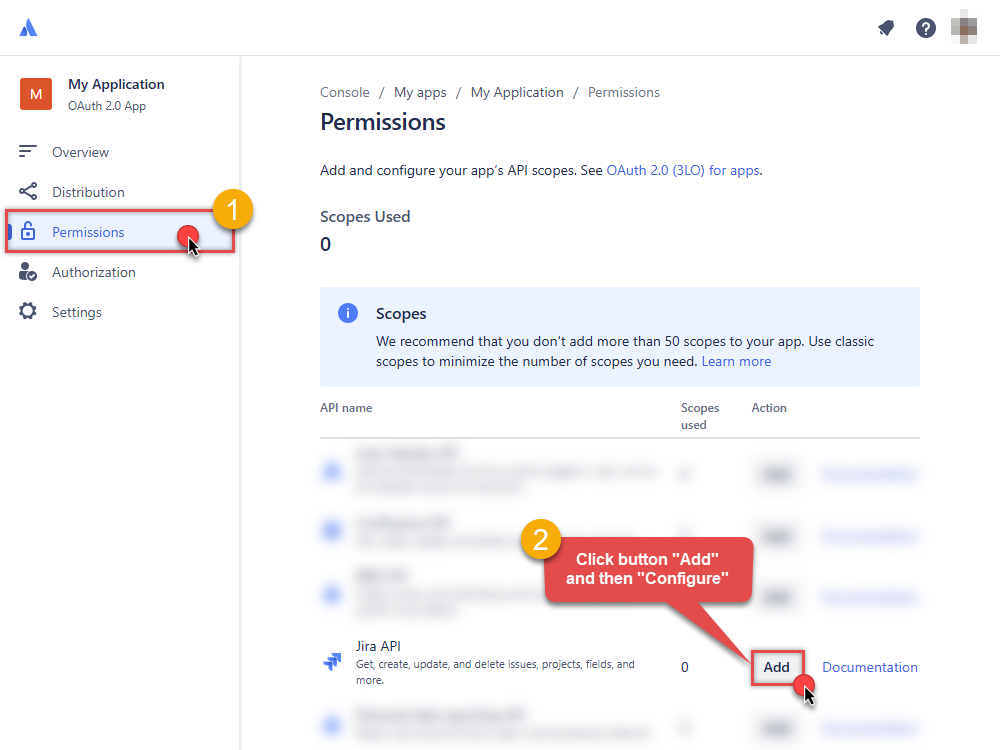
To enable permissions/scopes for your application, click Permissions tab, then hit Add button, and click Configure button, once it appears:
-
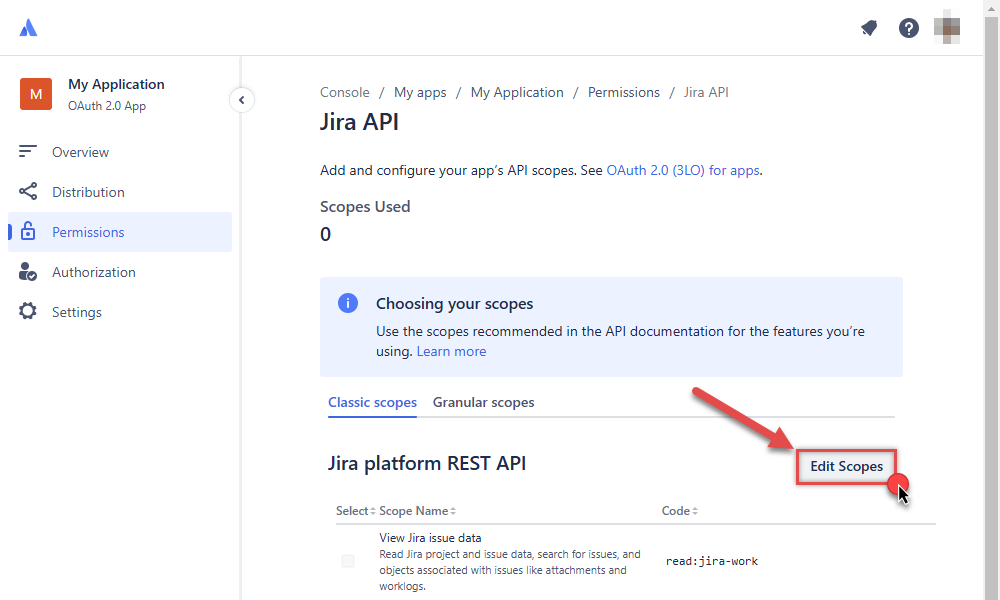
Continue by hitting Edit Scopes button to assign scopes for the application:
-
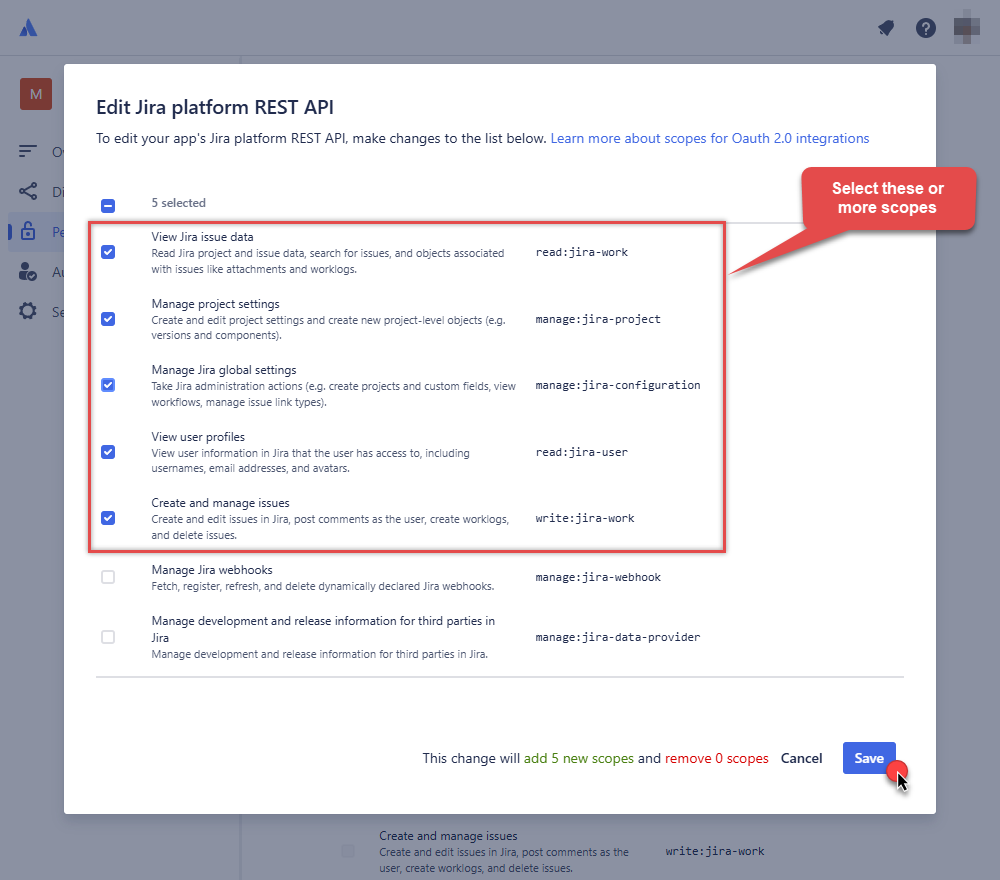
Select these scopes or all of them:
-
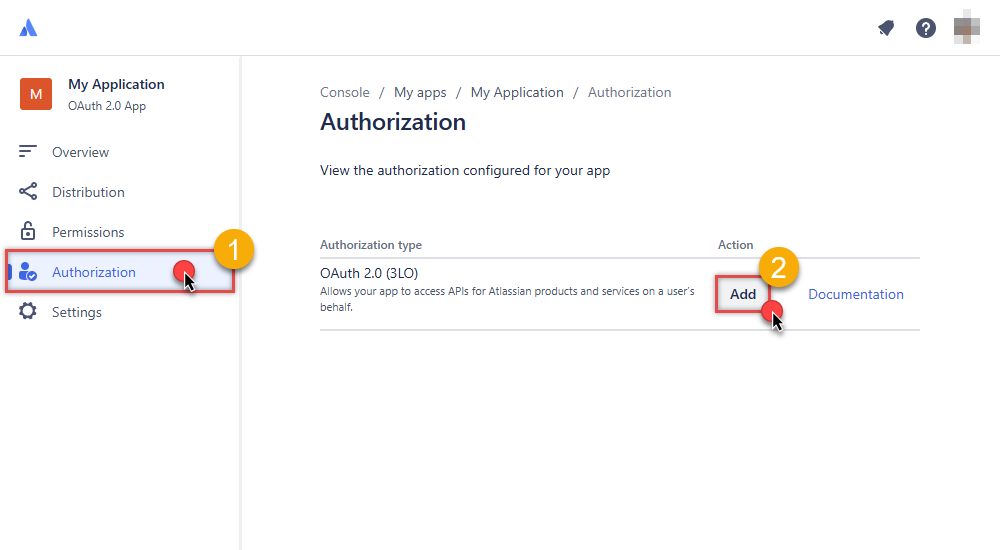
Then click Authorization option on the left and click Add button:
-
Enter your own Callback URL (Redirect URL) or simply enter
https://zappysys.com/oauth, if you don't have one: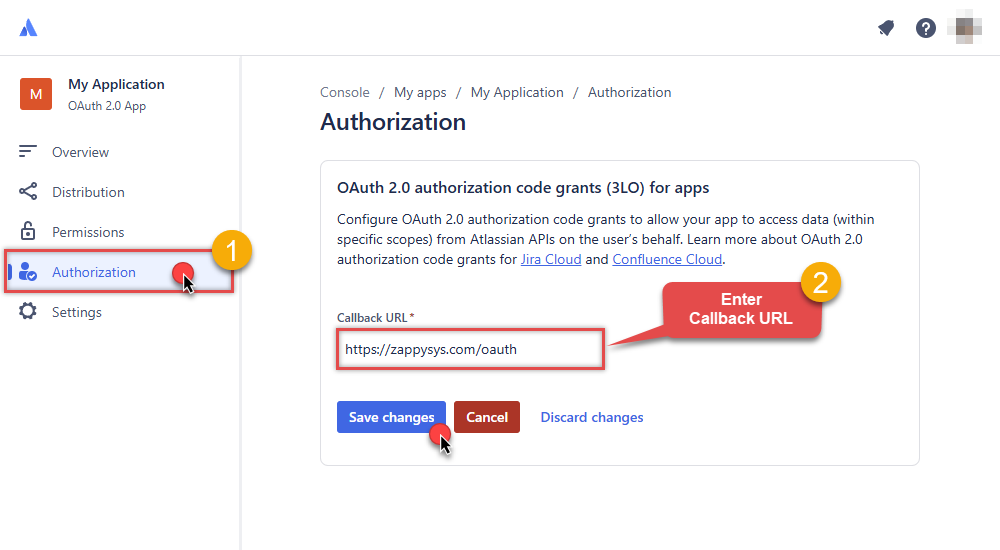
-
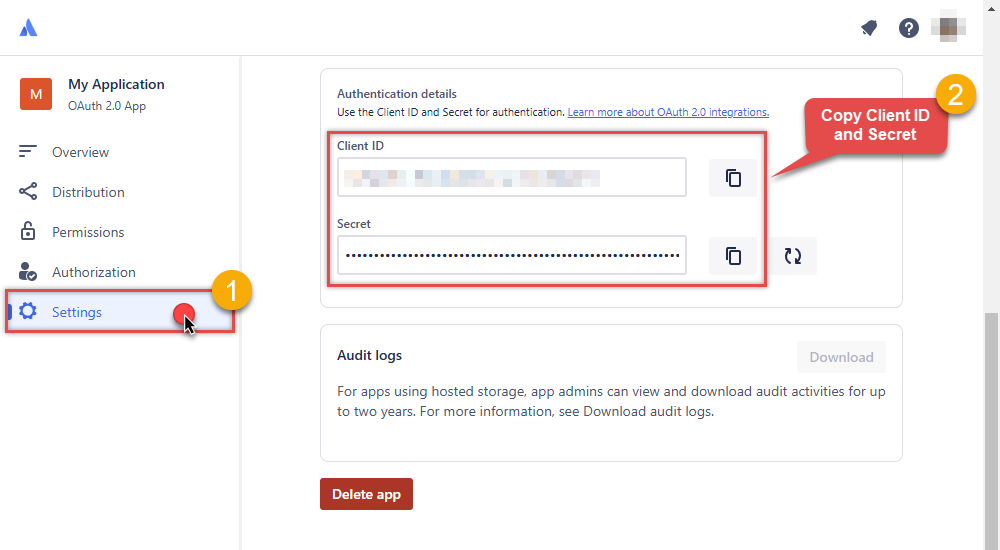
Then hit Settings option and copy Client ID and Secret into your favorite text editor (we will need them in the next step):
-
Now go to SSIS package or ODBC data source and in OAuth authentication set these parameters:
- For ClientId parameter use Client ID value from the previous steps.
- For ClientSecret parameter use Secret value from the previous steps.
- For Scope parameter use the Scopes you set previously (specify them all here):
- offline_access (a must)
- read:jira-user
- read:jira-work
- write:jira-work
- manage:jira-project
- manage:jira-configuration
NOTE: A full list of available scopes is available in Atlassian documentation. -
For Subdomain parameter use your Atlassian subdomain value
(e.g.
mycompany, if full host name ismycompany.atlassian.net).
- Click Generate Token to generate tokens.
- Finally, select Organization Id from the drop down.
- That's it! You can now use Jira Connector!
API Connection Manager configuration
Just perform these simple steps to finish authentication configuration:
-
Set Authentication Type to
OAuth (**Must change API Base URL to V3 OAuth**) [OAuth] - Optional step. Modify API Base URL if needed (in most cases default will work).
- Fill in all the required parameters and set optional parameters if needed.
- Press Generate Token button to generate the tokens.
- Finally, hit OK button:
JiraDSNJiraOAuth (**Must change API Base URL to V3 OAuth**) [OAuth]https://[$Subdomain$].atlassian.net/rest/api/3Required Parameters ClientId Fill-in the parameter... ClientSecret Fill-in the parameter... Scope Fill-in the parameter... ReturnUrl Fill-in the parameter... Organization Id (Select after clicking [Generate Token]) Fill-in the parameter... Optional Parameters Custom Columns for output (Select after clicking [Generate Token]) 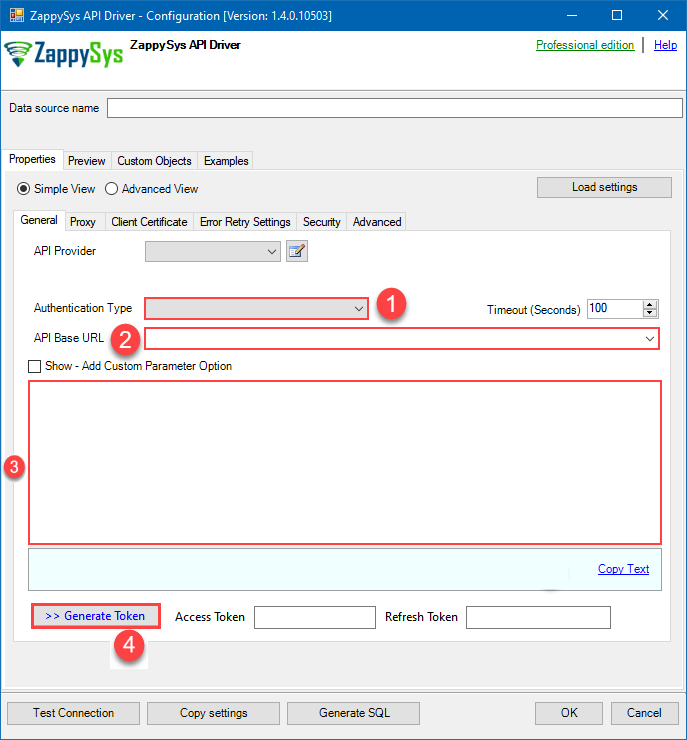
-
Once the data source connection has been configured, it's time to configure the SQL query. Select the Preview tab and then click Query Builder button to configure the SQL query:
ZappySys API Driver - JiraJira connector can be used to read, write, delete Issues, Users, Worklogs, Comments, Projects, Custom fileds and many other detailsJiraDSN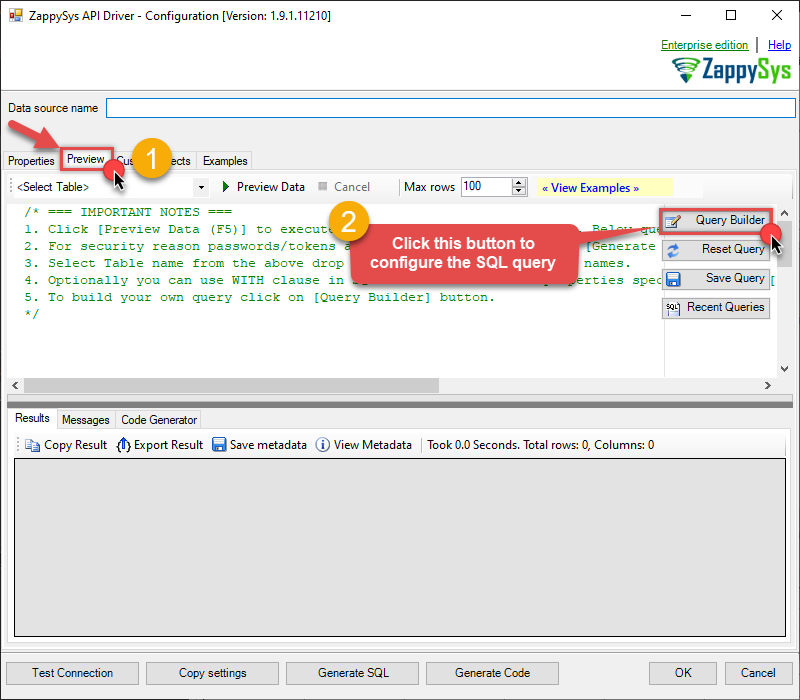
-
Start by selecting the Table or Endpoint you are interested in and then configure the parameters. This will generate a query that we will use in JAVA to retrieve data from Jira. Hit OK button to use this query in the next step.
SELECT * FROM Issues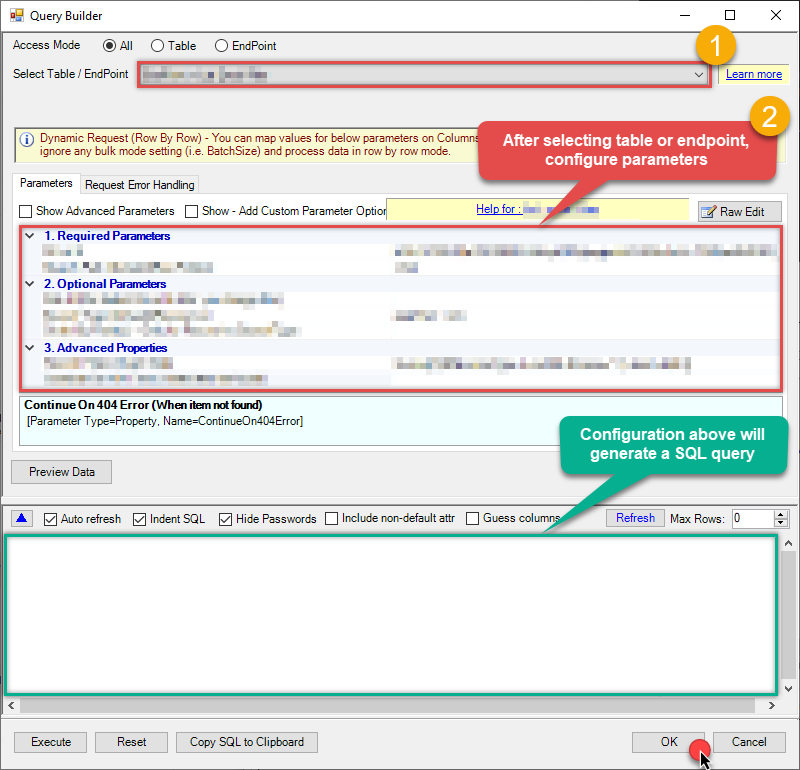 Some parameters configured in this window will be passed to the Jira API, e.g. filtering parameters. It means that filtering will be done on the server side (instead of the client side), enabling you to get only the meaningful data
much faster . -
Now hit Preview Data button to preview the data using the generated SQL query. If you are satisfied with the result, use this query in JAVA:
ZappySys API Driver - JiraJira connector can be used to read, write, delete Issues, Users, Worklogs, Comments, Projects, Custom fileds and many other detailsJiraDSNSELECT * FROM Issues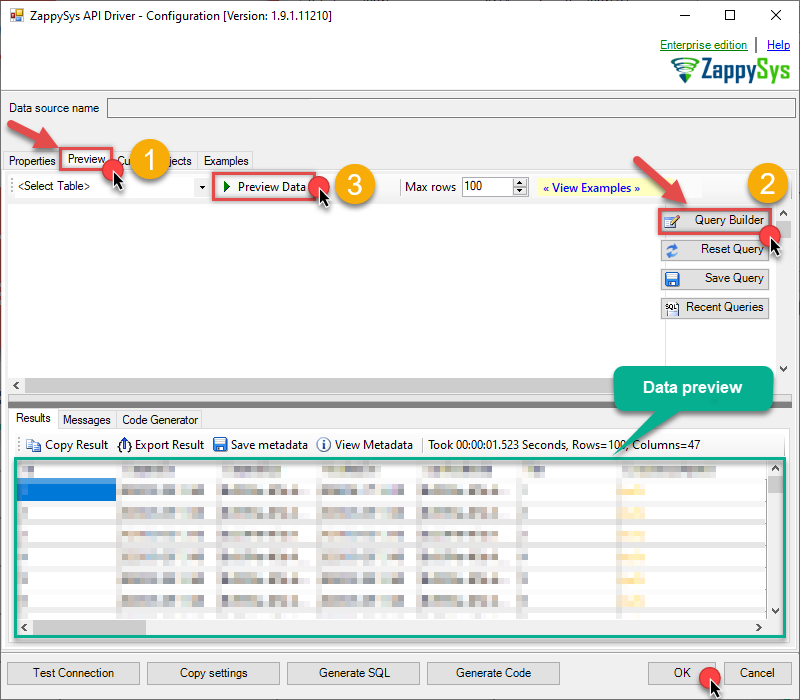 You can also access data quickly from the tables dropdown by selecting <Select table>.A
WHEREclause,LIMITkeyword will be performed on the client side, meaning that thewhole result set will be retrieved from the Jira API first, and only then the filtering will be applied to the data. If possible, it is recommended to use parameters in Query Builder to filter the data on the server side (in Jira servers). -
Click OK to finish creating the data source.
-
Very important step. Now, after creating or modifying the data source make sure you:
- Click the Save button to persist your changes.
- Hit Yes, once asked if you want to restart the Data Gateway service.
This will ensure all changes are properly applied:
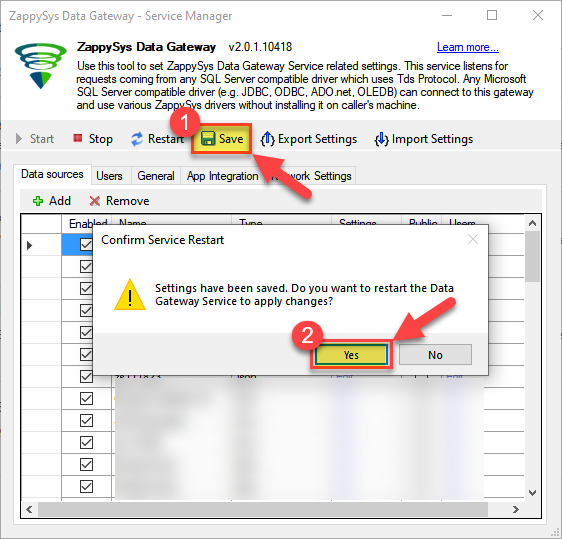 Skipping this step may result in the new settings not taking effect and, therefore you will not be able to connect to the data source.
Read data in Java from the DSN
-
Java code to get the data:
"jdbc:sqlserver://localhost:5000;databasename=JiraDSN;user=john;password=test"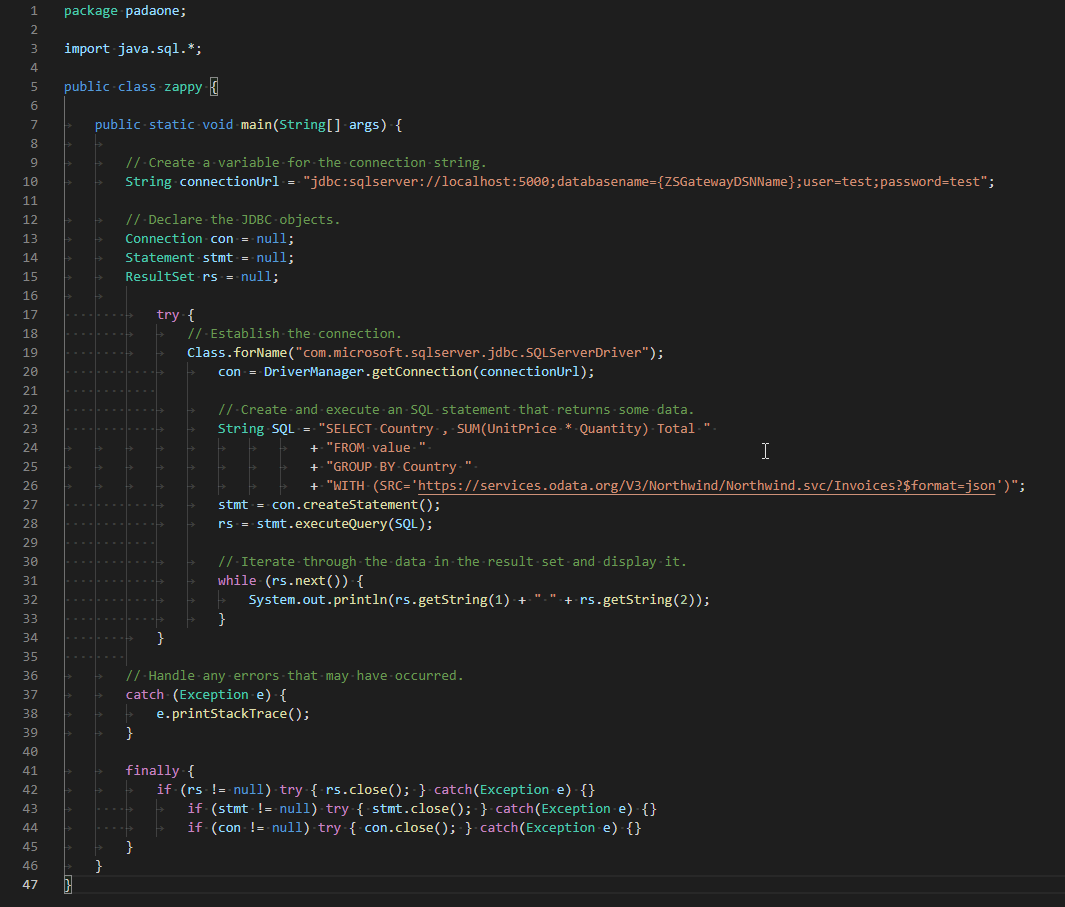
-
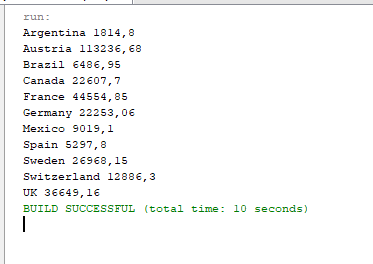
When you run the code it will make the API call and read the data:
-
Here is Java program's code in text format:
//Step-1: Install ZappySys ODBC PowerPack and Configure Data Gateway

//Step-2:Assuming the Microsoft SQL Server JDBC Driver is in below folder
//C:\Program Files\Microsoft Jdbc Driver 6.0 for SQL Server\sqljdbc_6.0\enu\auth\x64
package padaone;

import java.sql.*;

public class zappy {

    public static void main(String[] args) {

        // Create a variable for the connection string.
        String connectionUrl = "jdbc:sqlserver://localhost:5000;databasename=JiraDSN;user=test;password=test";

        // Declare the JDBC objects.
        Connection con = null;
        Statement stmt = null;
        ResultSet rs = null;

            try {
                // Establish the connection.
                Class.forName("com.microsoft.sqlserver.jdbc.SQLServerDriver");
                con = DriverManager.getConnection(connectionUrl);

                // Create and execute an SQL statement that returns some data.
                String SQL = "SELECT Country , SUM(UnitPrice * Quantity) Total "
                           + "FROM value "
                           + "GROUP BY Country "
                           + "WITH (SRC='https://services.odata.org/V3/Northwind/Northwind.svc/Invoices?$format=json')";
                stmt = con.createStatement();
                rs = stmt.executeQuery(SQL);

                // Iterate through the data in the result set and display it.
                while (rs.next()) {
                    System.out.println(rs.getString(1) + " " + rs.getString(2));
                }
            }

        // Handle any errors that may have occurred.
        catch (Exception e) {
            e.printStackTrace();
        }

        finally {
            if (rs != null) try { rs.close(); } catch (Exception e) {}
            if (stmt != null) try { stmt.close(); } catch (Exception e) {}
            if (con != null) try { con.close(); } catch (Exception e) {}
        }
    }
}
Actions supported by Jira Connector
Learn how to perform common Jira actions directly in JAVA with these how-to guides:
- Create Issue Comment
- Create Issues
- Create Project
- Create User
- Create Worklog
- Delete Issue
- Delete Issue Comment
- Delete Project
- Delete User
- Delete Worklog
- Get custom field context options
- Get custom field contexts
- Read Application Roles
- Read Changelog Details
- Read Changelogs
- Read Changelogs by IDs
- Read Comments
- Read Custom Fields
- Read Fields
- Read Groups
- Read Issue Types
- Read Issues
- Read Projects
- Read Resources
- Read Users
- Read Worklogs
- Read Worklogs modified after a specified date
- Update Issue
- Update Issue Comment
- Update Worklog
- Upsert Project
- Make Generic API Request
- Make Generic API Request (Bulk Write)
Conclusion
In this article we showed you how to connect to Jira in JAVA and integrate data without any coding, saving you time and effort.
We encourage you to download Jira Connector for JAVA and see how easy it is to use it for yourself or your team.
If you have any questions, feel free to contact ZappySys support team. You can also open a live chat immediately by clicking on the chat icon below.
Download Jira Connector for JAVA Documentation


