Prerequisites
Before we begin, make sure the following prerequisites are met:
- SQL Server Data Tools (SSDT) designer installed for Visual Studio.
- SQL Server Integration Services Projects 2022+ Visual Studio extension installed.
- SSIS PowerPack is installed.
Make generic REST API request in SSIS
-
Open Visual Studio and click Create a new project.
-
Select Integration Services Project. Enter a name and location for your project, then click OK.
-
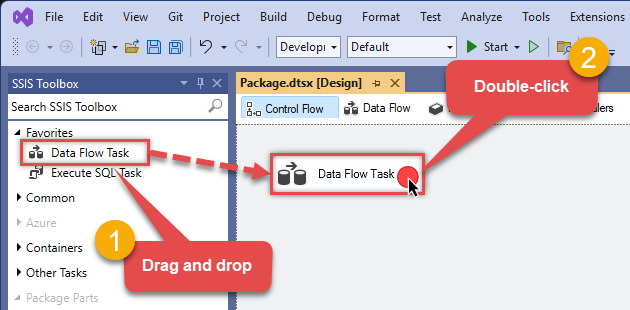
From the SSIS Toolbox, drag and drop a Data Flow Task onto the Control Flow surface, and double-click it:
-
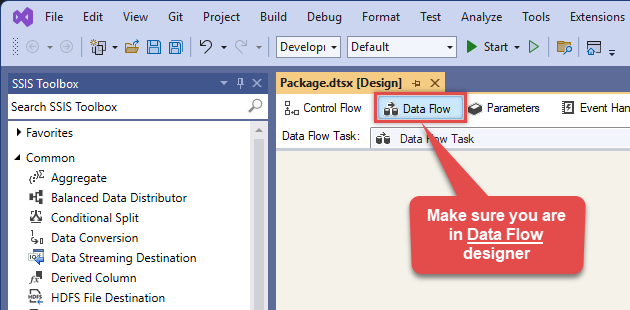
Make sure you are in the Data Flow Task designer:
-
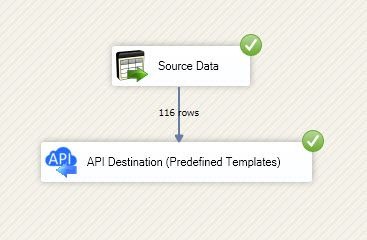
Read the data from the source, using any desired source component. You can even make an API call using the ZappySys JSON/XML/API Source and read data from there. In this example, we will use an OLE DB Source component to read real-time data from a SQL Server database.
-
From the SSIS Toolbox drag and drop API Destination (Predefined Templates) on the Data Flow Designer surface and connect source component with it, and double click to edit it.
 - Drag and Drop")
-
Select New Connection to create a new connection:
API Destination - ZoomRead and write Zoom data effortlessly. Integrate, manage, and automate meetings, users, accounts, and invitations — almost no coding required.

-
To configure the Zoom connector, choose one of the following methods:
- Choose from Popular Connector List: Select a pre-installed service directly from the dropdown menu.
- Search Online: Use this to find and download a new connector file to your computer.
- Use Saved/Downloaded File: Once the file is downloaded, browse your local drive to load it into the configuration.
After that, just click Continue >>:
Zoom
-
Proceed with selecting the desired Authentication Type. Then select API Base URL (in most cases default one is the right one). Finally, fill in all the required parameters and set optional parameters if needed. You may press a link Steps to Configure which will help set certain parameters. More info is available in Authentication section.
User Credentials (Access Your Data)
Zoom authentication
OAuth App must be created under Admin Console > Channel > API > Settings. [API reference]
Follow the steps below to create a Zoom OAuth app and obtain the required credentials (Client ID and Client Secret):
- Go to the Zoom App Marketplace and sign in with your Zoom account.
- From the top navigation bar, open the Develop dropdown and select Build App.
- In the What kind of app are you creating window, select General App, click the Create button.
- Enter a name for your app and select the app type.
(E.g. Zoom-General App) - Click Create to continue.
- In the Redirect URL for OAuth field, enter the following URI and add it to the allow list:
https://zappysys.com/oauth/ - Copy your Client ID and Client Secret, then paste them into the ZappySys API Component/Driver UI under the required parameters.
- From the Scopes window, please add the appropriate Granular scopes. You can search for the scopes listed below and enable them as needed.
Scope Levels:- User-Level: Grants access only to the authenticated user’s data. Suitable for apps where users connect with their own Zoom account.
- Admin-Level: Grants access to data across all users in the account, provided the user has admin permissions. Best for organization-wide apps.
- Master-Level: Grants access at the highest level, typically for apps that need full account control (including sub-accounts). Requires Master Account credentials.
Recommended Scopes:
User-Level- user:read:settings
- meeting:read:list_meetings
- meeting:read:meeting
- meeting:read:list_registrants
- meeting:read:past_meeting
- meeting:read:list_registration_questions
- webinar:read:list_webinars
- webinar:read:webinar
- webinar:read:list_registrants
- report:read:user
- user:read:settings:admin
- user:write:user:admin
- meeting:read:list_meetings:admin
- meeting:read:meeting:admin
- meeting:read:list_registrants:admin
- meeting:read:past_meeting:admin
- meeting:read:list_registration_questions:admin
- user:read:list_users:admin
- webinar:read:list_webinars:admin
- webinar:read:webinar:admin
- webinar:read:list_registrants:admin
- report:read:user:admin
- user:read:settings:master
- meeting:read:list_meetings:master
- meeting:read:meeting:master
- meeting:read:list_registrants:master
- user:read:list_users:master
- webinar:read:list_webinars:master
- webinar:read:webinar:master
- webinar:read:list_registrants:master
- report:read:user:master
- That’s it! After adding the scopes, click Continue to complete the process.
- In the ZappySys API Component/Driver UI, enter your Zoom app Client ID and Client Secret, then click Generate Token to obtain the access tokens.
- You’re done!
API Connection Manager configuration
Just perform these simple steps to finish authentication configuration:
-
Set Authentication Type to
User Credentials (Access Your Data) [OAuth] - Optional step. Modify API Base URL if needed (in most cases default will work).
- Fill in all the required parameters and set optional parameters if needed.
- Press Generate Token button to generate the tokens.
- Finally, hit OK button:
ZoomUser Credentials (Access Your Data) [OAuth]https://api.zoom.us/v2Required Parameters Client Id Fill-in the parameter... Client Secret Fill-in the parameter... Redirect Url Fill-in the parameter... Token Url Fill-in the parameter... Authorization Url Fill-in the parameter... Optional Parameters Retry Mode RetryWhenStatusCodeMatch Retry Status Code 429 Retry Count Max 5 Retry Multiply Wait Time True  Find full details in the Zoom Connector authentication reference.
App Credentials (Access Account Level Data)
Zoom authentication
Server-to-Server OAuth authentication method that lets applications access the Zoom API directly without user login or consent, using a Client ID and Secret to generate short-lived tokens. [API reference]
Follow the steps below to create a Zoom OAuth app and obtain the required credentials (Client ID and Client Secret):
- Go to the Zoom App Marketplace and sign in with your Zoom account.
- From the top navigation bar, open the Develop dropdown and select Build App.
- In the What kind of app are you creating window, select Server to Server OAuth App, click the Create button.
- Enter a name for your app and select the app type.
(E.g. Basic OAuth App) - Click Create to continue.
- Copy your Account ID, Client ID, and Client Secret, then paste them into the ZappySys API Component/Driver UI under the required parameters.
- In the Information window, enter the company name, developer name, and email address, then click Continue.
- From the Scopes window, please add the appropriate Granular scopes. You can search for the scopes listed below and enable them as needed.
Scope Levels:- Admin-Level: Grants access to data across all users in the account, provided the user has admin permissions. Best for organization-wide apps.
- Master-Level: Grants access at the highest level, typically for apps that need full account control (including sub-accounts). Requires Master Account credentials.
Recommended Scopes:
Admin-Level- user:read:settings:admin
- user:write:user:admin
- meeting:read:list_meetings:admin
- meeting:read:meeting:admin
- meeting:read:list_registrants:admin
- meeting:read:past_meeting:admin
- meeting:read:list_registration_questions:admin
- user:read:list_users:admin
- webinar:read:list_webinars:admin
- webinar:read:webinar:admin
- webinar:read:list_registrants:admin
- report:read:user:admin
- user:read:settings:master
- meeting:read:list_meetings:master
- meeting:read:meeting:master
- meeting:read:list_registrants:master
- user:read:list_users:master
- webinar:read:list_webinars:master
- webinar:read:webinar:master
- webinar:read:list_registrants:master
- report:read:user:master
- That’s it! After adding the scopes, click Continue to complete the process.
- In the ZappySys API Component/Driver UI, enter your Zoom app Account ID, Client ID, and Client Secret, then click Test Connection.
- You’re done!
API Connection Manager configuration
Just perform these simple steps to finish authentication configuration:
-
Set Authentication Type to
App Credentials (Access Account Level Data) [OAuth] - Optional step. Modify API Base URL if needed (in most cases default will work).
- Fill in all the required parameters and set optional parameters if needed.
- Finally, hit OK button:
ZoomApp Credentials (Access Account Level Data) [OAuth]https://api.zoom.us/v2Required Parameters Account Id Fill-in the parameter... Client Id Fill-in the parameter... Client Secret Fill-in the parameter... Token Url Fill-in the parameter... Optional Parameters Retry Mode RetryWhenStatusCodeMatch Retry Status Code 429 Retry Count Max 5 Retry Multiply Wait Time True  Find full details in the Zoom Connector authentication reference.
User Credentials (Access Your Data) - With Legacy Scopes
Zoom authentication
OAuth App must be created under Admin Console > Channel > API > Settings. [API reference]
Perform the following steps to get the Zoom OAuth credentials (i.e. Client ID and Client Secret)
- Go to Zoom Marketplace Portal and sign in there.
- Once you successfully login then select "Build App" option from Develop dropdown from top left on the page.
- Click on Create button of OAuth panel section of page.
- Enter the name for your application and choose app type (Recommneded "Account-Level App") option for your API
- Then proceed with clicking Create button.
- In Redirect URL for OAuth enter this https://zappysys.com/oauth/ as Redirect URI and add it to allow lists.
- Copy Client ID and Client Secret here and paste it into Connection Manager Required Paramters section in respective place holders
- Add appropiate scopes from the Scopes menu option to the right side of page for your API as below :
NOTE: If you need to read/write data for all users (not just 'me') then add
:adminsuffix in the scope (e.g.meeting:read:admin)- meeting:read
- meeting:write
- user:read
- user:write
- user_info:read
- meeting:read
- chat_channel:read
- chat_channel:write
- chat_contact:read
- chat_message:read
- chat_message:write
- contact:read
- pac:read
- pac:write
- phone:read
- phone:write
- phone_call_control:read
- phone_call_control:write
- phone_call_log:read
- phone_call_log:write
- phone_e911:read
- phone_recording:read
- phone_recording:write
- phone_sms:read
- phone_sms:write
- phone_voicemail:read
- phone_voicemail:write
- recording:read
- recording:write
- tsp:read
- tsp:write
- user:read
- user:write
- user_info:read
- user_zak:read
- webinar:read
- webinar:write
- report:read:user
- Click Generate Token button on Connection Manager UI to generate tokens.
- That's it!
API Connection Manager configuration
Just perform these simple steps to finish authentication configuration:
-
Set Authentication Type to
User Credentials (Access Your Data) - With Legacy Scopes [OAuth] - Optional step. Modify API Base URL if needed (in most cases default will work).
- Fill in all the required parameters and set optional parameters if needed.
- Press Generate Token button to generate the tokens.
- Finally, hit OK button:
ZoomUser Credentials (Access Your Data) - With Legacy Scopes [OAuth]https://api.zoom.us/v2Required Parameters ClientId Fill-in the parameter... ClientSecret Fill-in the parameter... RedirectUrl Fill-in the parameter... TokenUrl Fill-in the parameter... AuthorizationUrl Fill-in the parameter... Optional Parameters Scope RetryMode RetryWhenStatusCodeMatch RetryStatusCodeList 429 RetryCountMax 5 RetryMultiplyWaitTime True
Find full details in the Zoom Connector authentication reference. -
Select Generic Table (Bulk Read / Write) table from the dropdown, then select Insert, Update as operation, and hit Preview Data:
 API Destination - ZoomRead and write Zoom data effortlessly. Integrate, manage, and automate meetings, users, accounts, and invitations — almost no coding required.ZoomGeneric Table (Bulk Read / Write)Insert, Update
Required Parameters Url Fill-in the parameter... Request Method Fill-in the parameter... Optional Parameters IsMultiPart Filter Request Format (Content-Type) Default Body {$rows$} JsonOutputFormat Multicontent DoNotOutputNullProperty Batch Size (Default=1) 1 Meta Detection Order StaticDynamicVirtual Input Columns - For Mapping (e.g. MyCol1:string(10); MyCol2:int32 ...) - Use bool, int32, int64, datetime, decimal, double Output Columns (e.g. MyCol1:string(10); MyCol2:int32 ...) - Use bool, int32, int64, datetime, decimal, double Request Format Response Format Default Headers Accept: */* || Cache-Control: no-cache Csv - Column Delimiter , Csv - Row Delimiter {NEWLINE} Csv - Quote Around Value True Csv - Always Quote regardless type Encoding CharacterSet Writer DateTime Format Csv - Has Header Row True Xml - ElementsToTreatAsArray Layout Map <?xml version="1.0" encoding="utf-8"?> <!-- Example#1: Output all columns --> <settings> <dataset id="root" main="True" readfrominput="True" /> <map src="*" /> </settings> <!-- Example#2: Records under array <?xml version="1.0" encoding="utf-8"?> <settings singledataset="True"> <dataset id="root" main="True" readfrominput="True" /> <map name="MyArray" dataset="root" maptype="DocArray"> <map src="OrderID" name="OrderID" /> <map src="OrderDate" name="OrderDate" /> </map> </settings> --> <!-- Example#3: Records under nested section <?xml version="1.0" encoding="utf-8"?> <settings> <dataset id="dsRoot" main="True" readfrominput="True" /> <map name="NestedSection"> <map src="OrderID" name="OrderID_MyLabel" /> <map src="OrderDate" name="OrderDate_MyLabel" /> </map> </settings> --> 
-
Finally, map the desired columns:
API Destination - ZoomRead and write Zoom data effortlessly. Integrate, manage, and automate meetings, users, accounts, and invitations — almost no coding required.

-
That's it; we successfully configured the POST API Call. In a few clicks we configured the Zoom API call using ZappySys Zoom Connector
Deploy SSIS package to Azure Data Factory (ADF)
Once your SSIS package is complete,
deploy it to the
Azure-SSIS runtime
within Azure Data Factory.
The setup process requires you
to upload the
SSIS PowerPack
installer to Azure Blob Storage
and then customize the runtime configuration using the main.cmd file.
For a complete walkthrough of these steps,
see our detailed guide on the
Azure Data Factory (SSIS) and Zoom integration.
Zoom Connector actions
Need another use case? Pick the next Zoom action in Azure Data Factory (SSIS) below.
- GET Current User (Me)
- Get Meeting By Id
- GET Settings
- Get Webinar Settings
- Get Webinar Settings By Id
- List Meeting Registrants
- List Meetings
- List Meetings (All Users)
- List Past Meetings (All Users)
- List Registration Questions
- List Users
- List Webinar Registrants
- List Webinars
- Past Meeting
- Make Generic REST API Request
Conclusion
You now know how to make generic REST API request (bulk write) in Azure Data Factory (SSIS) without writing complex code. Zoom SSIS Connector handled pagination and authentication automatically.
Ready to get started? Download the trial or ping us via chat if you need help:


 Connector")


 Connector")


 Connector")


 Connector")


