
Introduction
You can connect to your CSV data from SQL Server via the high-performance CSV ODBC Driver. We'll walk you through the entire setup.
Let's not waste time and get started!
Create data source in ZappySys Data Gateway
In this section we will create a data source for CSV in the Data Gateway. Let's follow these steps to accomplish that:
-
Download and install ODBC PowerPack (if you haven't already).
-
Search for
gatewayin the Windows Start Menu and open ZappySys Data Gateway Configuration:
-
Go to the Users tab and follow these steps to add a Data Gateway user:
- Click the Add button
-
In the Login field enter a username, e.g.,
john - Then enter a Password
- Check the Is Administrator checkbox
- Click OK to save

-
Now we are ready to add a data source:
- Click the Add button
- Give the Data source a name (have it handy for later)
- Then select Native - ZappySys CSV Driver
- Finally, click OK
CsvDSNZappySys CSV Driver
-
Select Url or File.
Read CSV API in SQL Server
-
Paste the following Url. In this example, We are using Zip format CSV File URL, but you need to refer your CSV File/URL.
https://zappysys.com/downloads/files/test/cust-1.csv.zipClick on Test Connection button to view whether the Test Connection is SUCCESSFUL or Not.
Read CSV File in SQL Server
-
You can use pass single file or multiple file path using wildcard pattern in path and you can use select single file by clicking [...] path button or multiple file using wildcard pattern in path.
Note: If you want to operation with multiple files then use wild card pattern as below
(when you use wild card pattern in source path then system will treat target path as folder regardless you end with slash)

C:\SSIS\Test\reponse.csv (will read only single reponse.csv file)
C:\SSIS\Test\j*.csv (all files starting with file name j)
C:\SSIS\Test\*.csv (all files with .csv Extension and located under folder subfolder)
Click on Test Connection button to view whether the Test Connection is SUCCESSFUL or Not.
-
-
Once you configured a data source, you can preview data. Hit Preview tab, and use similar settings to preview data:

-
Click OK to finish creating the data source
-
That's it; we are done. In a few clicks we configured the read the CSV data using ZappySys CSV Connector.
-
Once done, go to the Network Settings tab and Add a firewall rule for inbound traffic:
- This will initially allow all inbound traffic.
- Click Edit IP filters to restrict access to specific IP addresses or ranges.
-
Crucial Step: After creating or modifying the data source, you must:
- Click the Save button to persist your changes.
- Hit Yes when prompted to restart the Data Gateway service.
This ensures all changes are properly applied:
 Skipping this step may cause the new settings to fail, preventing you from connecting to the data source.
Read data in SQL Server via Data Gateway
After configuring your data source using the ZappySys ODBC Driver, the next mandatory step to read that data in SQL Server is to create a Linked Server. SQL Server requires a Linked Server definition to access any ODBC-based source through the ZappySys Data Gateway, allowing the source driver data to be queried using standard T-SQL.
There are two ways to create the Linked Server:- Method 1: Using a SQL Script automatically generated by the Data Gateway
- Method 2: Using SQL Server UI (SSMS) to manually configure the Linked Server
Method 1: Using a SQL Script automatically generated by the Data Gateway
The fastest and most reliable way to create the Linked Server is to use the SQL Script generated by the Data Gateway. This ensures all settings are applied correctly with minimal manual steps.
In the Data Gateway, open the App Integration tab.
Update the prefilled Linked Server Name if you want to use a custom name.
Select the CsvDSN data source which we created earlier as the Database.
-
Choose the correct SQL Server version for your environment.
- SQL 2019 or Lower (
@provider='SQLNCLI11') - SQL 2022 or Higher (
@provider='MSOLEDBSQL')
- SQL 2019 or Lower (
Click Generate Code.
-
In the generated script scroll down to 4. Attach Gateway login with linked server step, enter your Data Gateway admin username and password.
'LS_TO_CSV_IN_GATEWAY'
-
Press Ctrl + A and Ctrl + C to copy the entire script.
LS_TO_CSV_IN_GATEWAYCsvDSN
-
Paste the script into SQL Server Management Studio (SSMS) and run it.

That's it linked server is created in the SQL Server.
-
Finally, open a new query and execute a query we saved in one of the previous steps:
SELECT * FROM OPENQUERY([LS_TO_CSV_IN_GATEWAY], 'SELECT * FROM Orders')
SELECT * FROM OPENQUERY([LS_TO_CSV_IN_GATEWAY], 'SELECT * FROM Orders')
Sample SQL Script for Creating a Linked Server in SQL Server
USE [master]
GO
--///////////////////////////////////////////////////////////////////////////////////////
--Run below code in SSMS to create Linked Server and use ZappySys Drivers in SQL Server
--///////////////////////////////////////////////////////////////////////////////////////

-- Replace YOUR_GATEWAY_USER, YOUR_GATEWAY_PASSWORD
-- Replace localhost with IP/Machine name if ZappySys Gateway Running on different machine other than SQL Server
-- Replace Port 5000 if you configured gateway on a different port


--1. Configure your gateway service as per this article https://zappysys.com/links?id=10036

--2. Make sure you have SQL Server Installed. You can download FREE SQL Server Express Edition from here if you dont want to buy Paid version https://www.microsoft.com/en-us/sql-server/sql-server-editions-express

--Uncomment below if you like to drop linked server if it already exists
--EXEC master.dbo.sp_dropserver @server=N'LS_TO_CSV_IN_GATEWAY', @droplogins='droplogins'

--3. Create new linked server

EXEC master.dbo.sp_addlinkedserver
    @server = N'LS_TO_CSV_IN_GATEWAY'  --Linked server name (this will be used in OPENQUERY sql
, @srvproduct=N''
---- For MSSQL 2012, 2014, 2016, 2017, and 2019 use below (SQL Server Native Client 11.0)---
, @provider=N'SQLNCLI11'
---- For MSSQL 2022 or higher use below (Microsoft OLE DB Driver for SQL Server)---
--, @provider=N'MSOLEDBSQL'
, @datasrc=N'localhost,5000' --//Machine / Port where Gateway service is running
, @provstr=N'Network Library=DBMSSOCN;'
, @catalog=N'CsvDSN' --Data source name you gave on Gateway service settings

--4. Attach gateway login with linked server

EXEC master.dbo.sp_addlinkedsrvlogin
@rmtsrvname=N'LS_TO_CSV_IN_GATEWAY'  --linked server name
, @useself=N'False'
, @locallogin=NULL
, @rmtuser=N'YOUR_GATEWAY_USER' --enter your Gateway user name
, @rmtpassword='YOUR_GATEWAY_PASSWORD'  --enter your Gateway user's password
GO

--5. Enable RPC OUT (This is Optional - Only needed if you plan to use EXEC(...) AT YourLinkedServerName rather than OPENQUERY
EXEC sp_serveroption 'LS_TO_CSV_IN_GATEWAY', 'rpc', true;
EXEC sp_serveroption 'LS_TO_CSV_IN_GATEWAY', 'rpc out', true;

--Disable MSDTC - Below needed to support INSERT INTO from EXEC AT statement
EXEC sp_serveroption 'LS_TO_CSV_IN_GATEWAY', 'remote proc transaction promotion', false;

--Increase query timeout if query is going to take longer than 10 mins (Default timeout is 600 seconds)
--EXEC sp_serveroption 'LS_TO_CSV_IN_GATEWAY', 'query timeout', 1200;
GO
Method 2: Using SQL Server UI (SSMS) to manually configure the Linked Server
You can also create the Linked Server manually through SSMS if you prefer a visual setup. This method lets you configure the provider, data source, and security interactively.
-
First, let's open SQL Server Management Studio, create a new Linked Server, and start configuring it:
LS_TO_CSV_IN_GATEWAYMicrosoft OLE DB Driver for SQL Serverlocalhost,5000CsvDSNCsvDSN
- For SQL Server 2012, 2014, 2016, 2017, and 2019, choose SQL Server Native Client 11.0 as the provider.
- For SQL Server 2022 or higher, choose Microsoft OLE DB Driver for SQL Server as the provider.
-
Then click on Security option and configure username we created in ZappySys Data Gateway in one of the previous steps, e.g.
john:
-
Optional step. Under the Server Options, Enable RPC and RPC Out and Disable Promotion of Distributed Transactions(MSDTC).

You need to enable RPC Out if you plan to use
EXEC(...) AT [LS_TO_CSV_IN_GATEWAY]rather than OPENQUERY.
If don't enabled it, you will encounter theServer 'LS_TO_CSV_IN_GATEWAY' is not configured for RPCerror.Query Example:
DECLARE @MyQuery NVARCHAR(MAX) = 'SELECT * FROM Orders';

EXEC (@MyQuery) AT [LS_TO_CSV_IN_GATEWAY];
If you plan to use
'INSERT INTO <TABLE> EXEC(...) AT [LS_TO_CSV_IN_GATEWAY]'in that case you need to Disable Promotion of Distributed Transactions(MSDTC).
If don't disabled it, you will encounter theThe operation could not be performed because OLE DB provider "SQLNCLI11" for linked server "MY_LINKED_SERVER_NAME" was unable to begin a distributed transaction.error.Query Example:
INSERT INTO dbo.Products DECLARE @MyQuery NVARCHAR(MAX) = 'SELECT * FROM Orders'; EXEC (@MyQuery) AT [LS_TO_CSV_IN_GATEWAY]; -
Finally, open a new query and execute a query we saved in one of the previous steps:
SELECT * FROM OPENQUERY([LS_TO_CSV_IN_GATEWAY], 'SELECT * FROM Orders')
SELECT * FROM OPENQUERY([LS_TO_CSV_IN_GATEWAY], 'SELECT * FROM Orders')
Firewall settings
So far we have assumed that Gateway is running on the same machine as SQL Server. However there will be a case when ZappySys ODBC PowerPack is installed on a different machine than SQL Server. In such case you may have to perform additional Firewall configurations. On most computers firewall settings wont allow outside traffic to ZappySys Data Gateway. In such case perform following steps to allow other machines to connect to Gateway.
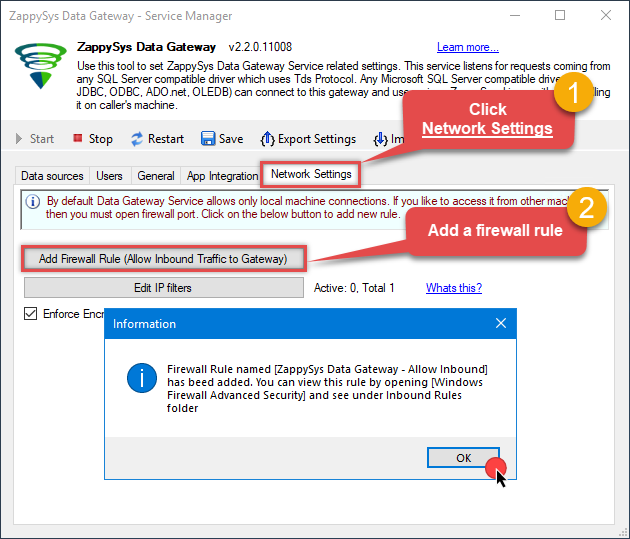
Method-1 (Preferred)If you are using newer version of ZappySys Data Gateway then adding firewall rule is just a single click.
- Search for gateway in start menu and open ZappySys Data Gateway.
-
Go to Firewall Tab and click Add Firewall Rule button like below. This will create Firewall rule to all Inbound Traffic on Port 5000 (Unless you changed it).

Here is another way to add / edit Inbound Traffic rule in windows firewall. Use below method if you choose to customize your rule (for advanced users).
- Search for Windows Firewall Advanced Security in start menu.
- Under Inbound Rules > Right click and click [New Rule] >> Click Next
- Select Port on Rule Type >> Click Next
- Click on TCP and enter port number under specified local port as 5000 (use different one if you changed Default port) >> Click Next
- Select Profile (i.e. Private, Public) >> Click Next
- Enter Rule name [i.e. ZappySys Data Gateway – Allow Inbound ] >> Click Next
- Click OK to save the rule

OPENQUERY vs EXEC (handling larger SQL text)
So far we have seen examples of using OPENQUERY. It allows us to send pass-through query at remote server. The biggest limitation of OPENQUERY is it doesn't allow you to use variables inside SQL so often we have to use unpleasant looking dynamic SQL (Lots of tick, tick …. and escape hell). Well there is good news. With SQL 2005 and later you can use EXEC(your_sql) AT your_linked_server syntax .
Disadvantage of EXEC AT is you cannot do SELECT INTO like OPENQUERY. Also you cannot perform JOIN like below in EXEC AT
SELECT a.*
FROM OPENQUERY([LS_TO_CSV_IN_GATEWAY],'SELECT * FROM Customers') AS A
JOIN OPENQUERY([LS_TO_CSV_IN_GATEWAY],'SELECT * FROM Orders') AS B
ON A.CustomerId = B.CustomerId;INSERT INTO SomeTable EXEC(…) AT your_linked_server. So table must exists when you do that way.
Here is how to use it. To use EXEC(..) AT {linked-server} you must turn on RPC OUT option. Notice how we used variable in SQL to make it dynamic. This is much cleaner than previous approach we saw.
USE [master]
GO
--Replace YOUR_GATEWAY_USER, YOUR_GATEWAY_PASSWORD
--Replace localhost with IP/Machine name if ZappySys Gateway Running on different machine other than SQL Server

--Create new linked server
EXEC master.dbo.sp_addlinkedserver
@server = N'LS_TO_CSV_IN_GATEWAY'  --Linked server name (this will be used in OPENQUERY sql)
, @srvproduct=N''
---- For MSSQL 2012, 2014, 2016, 2017, and 2019 use below (SQL Server Native Client 11.0)---
, @provider=N'SQLNCLI11'
---- For MSSQL 2022 or higher use below (Microsoft OLE DB Driver for SQL Server)---
--, @provider=N'MSOLEDBSQL'
, @datasrc=N'localhost,5000' --//Machine / Port where Gateway service is running
, @provstr=N'Network Library=DBMSSOCN;'
, @catalog=N'CsvDSN' --Data source name you gave on Gateway service settings

--Attach gateway login with linked server
EXEC master.dbo.sp_addlinkedsrvlogin
@rmtsrvname=N'LS_TO_CSV_IN_GATEWAY'  --linked server name
, @useself=N'False'
, @locallogin=NULL
, @rmtuser=N'YOUR_GATEWAY_USER' --enter your Gateway user name
, @rmtpassword='YOUR_GATEWAY_PASSWORD'  --enter your Gateway user's password
GO

--5. Enable RPC OUT (This is Optional - Only needed if you plan to use EXEC(...) AT YourLinkedServerName rather than OPENQUERY
EXEC sp_serveroption 'LS_TO_CSV_IN_GATEWAY', 'rpc', true;
EXEC sp_serveroption 'LS_TO_CSV_IN_GATEWAY', 'rpc out', true;
--Disable MSDTC - Below needed to support INSERT INTO from EXEC AT statement
EXEC sp_serveroption 'LS_TO_CSV_IN_GATEWAY', 'remote proc transaction promotion', false;
--Increase query timeout if query is going to take longer than 10 mins (Default timeout is 600 seconds)
--EXEC sp_serveroption 'LS_TO_CSV_IN_GATEWAY', 'query timeout', 1200;
GO
Fetching Tables / Columns using metadata stored procs
ZappySys Data Gateway emulates certains system procs you might find in real SQL Server. You can call using below syntax using 4-Parts syntaxEXEC [LS_TO_CSV_IN_GATEWAY].[CsvDSN].[DATA].sp_tablesEXEC [LS_TO_CSV_IN_GATEWAY].[CsvDSN].[DATA].sp_columns_90 N'your-table-name'-- List all tables
EXEC [LS_TO_CSV_IN_GATEWAY].[CsvDSN].[DATA].sp_tables
-- List all columns and its type for specified table
EXEC [LS_TO_CSV_IN_GATEWAY].[CsvDSN].[DATA].sp_columns_90 N'Account'Known Issues
Let's explore some common problems that can occur when using OPENQUERY or Data Gateway connectivity.
SQL Native Client 11.0 not visible in the Providers dropdown (Linked Server Creation)
If you are following some screenshots / steps from our article it might say use SQL Native Client to create Linked Server to ZappySys Gateway but for some users they dont see that driver entry in the dropdown. This is due to the fact that Microsoft has deprecated SQL Native Client OLEDB Driver (SQLNCLI and SQLNCLI11) going forward after SQL 2022. So you need to use [Microsoft OLE DB Driver for SQL Server] instead (MSOLEDBSQL). Please follow all other instructions except the driver type selection, use new suggested driver instead if you dont see SQL Native Client.
Error: The data is invalid
There will be a time when, you may encounter unexpected errors like the ones listed below. These can include:
OLE DB provider "SQLNCLI11" for linked server "Zs_Csv" returned message "Deferred prepare could not be completed.".
OLE DB provider "SQLNCLI11" for linked server "Zs_Csv" returned message "Communication link failure".
Msg 13, Level 16, State 1, Line 0

Session Provider: The data is invalid.
Possible Cause:
There are few reasons for such error but below are two main reasons
-
If the query length exceeds 2000 characters, as shown below, you might encounter this error.
SELECT * FROM OPENQUERY(LS, '--some really long text more than 2000 chars--') -
If a query contains multiple OPENQUERY statements for JOINs or UNIONs, as shown below, it might fail due to a MARS compatibility issue where the gateway doesn't support parallel queries on a single connection.
SELECT a.id, b.name from OPENQUERY(LS, 'select * from tbl1') a join OPENQUERY(LS, 'select * from tbl2') b on a.id=b.id
Possible Fix:
There are few ways to fix above error based on reason why you getting this error (i.e. Query Length issue OR JOIN/UNION in the same statement)
-
If your query has long SQL (more than 2000 chars ) then reduce SQL length using different techniques
- e.g. use SELECT * FROM MyTable rather than SELECT col1,col2… FROM MyTable
- Use Meta Option in WITH clause if you must use column name. (e.g. SELECT * FROM MyTable WITH(META=’c:\meta.txt’) this way you can define column in Meta file rather than SELECT query. Check this article
- Consider using EXECT (….) AT [Linked_Server_name] option rather than OPENQUERY so you can use very long SQL (See next section on EXEC..AT usecase)
-
Consider
using Virtual Table / Stored Proc
to wrap long SQL so your call is very small (where usp_GetOrdersByYear is custom proc created on ZappySys Driver UI)
SELECT * FROM OPENQUERY(LS, 'EXEC usp_GetOrdersByYear 2021')
-
If your query uses JOIN / UNION with multiple OPENQUERY in same SQL then use multiple Linked servers (one for each OPENQUERY clause) as below.
select a.id, b.name from OPENQUERY(LS_1, 'select * from tbl1') a join OPENQUERY(LS_2, 'select * from tbl2') b on a.id=b.id
Error: Unable to begin a distributed transaction (When INSERT + EXEC used)
If you try to use the EXEC statement to insert data into a table, as shown below, you might encounter the following error unless the MSDTC option is turned off.
INSERT INTO MyTable EXEC('select * from tbl') AT MyLinkedServer"Protocol error in TDS stream" The operation could not be performed because OLE DB provider "SQLNCLI11" for linked server "ls_Json2" was unable to begin a distributed transaction. --OR-- The operation could not be performed because OLE DB provider "MSOLEDBSQL" for linked server "ls_Json" was unable to begin a distributed transaction.
Method-1: Go to linked server properties | Server Options | Enable Promotion of Distributed Transaction | Change to false (Default is true)
Now your try your INSERT with EXEC AT and it should work
Method-2: Run the below command if you dont want to use UI
EXEC master.dbo.sp_serveroption @server=N'My_Linked_Server', @optname=N'remote proc transaction promotion', @optvalue=N'false'Linked Server: "Unable to open a logical session" for Non-Admin users
While Linked Servers work seamlessly for SysAdmin roles, regular Non-Admin users or service accounts often encounter a connection failure.
Error: OLE DB provider "SQLNCLI11" for linked server "ZappySysLink" returned message "Unable to open a logical session".
SMux Provider: Physical connection is not usable [xFFFFFFFF].
OR
Error:
Msg 7416, Level 16, State 2, Line 1
Access to the remote server is denied because no login-mapping exists.
This occurs because SQL Server does not automatically pass the security context of a non-admin local login to the remote ZappySys Data Gateway. You must explicitly map the local login to a valid Gateway account.
Use the following script to map the local Windows/SQL login to your ZappySys Data Gateway User credentials (found in the "Users" tab of the Gateway Configuration tool).
-- Map local user to ZappySys Gateway credentials
EXEC sp_addlinkedsrvlogin
@rmtsrvname  = 'YourLinkedServerName', -- e.g. ZappySysLink
@useself     = 'false',                -- Force use of remote credentials
@locallogin  = 'MyDomain\User1',       -- The Non-Admin local user
@rmtuser     = 'gateway_Admin',        -- Gateway User Login
@rmtpassword = 'gateway_pass123';      -- Gateway User Password
For a detailed step-by-step guide, read our full article: Fixing 'Unable to open a logical session' Linked Server Errors for Non-Admin Users .
Error: Cannot use OPENQUERY with JOIN / UNION
When you perform a JOIN or UNION ALL on the same Linked Server, it may fail to process sometimes because the Data Gateway doesn't support parallel query requests on the same connection. A workaround for that would be to create multiple linked servers for the same data source. Refer to the section above for the same workaround.
Error: Truncation errors due to data length mismatch
Many times, you may encounter truncation errors if a table column's length is less than the actual column size from the query column. To solve this issue, use the new version of Data Gateway and check the 'Use nvarchar(max) for string options' option found on the General Tab.
Performance Tips
Now, let's look at a few performance tips in this section.
Use INSERT INTO rather than SELECT INTO to avoid extra META request
We discussed some Pros and Cons of OPENQUERY vs EXEC (…) AT in previous section. One obvious advantage of EXEC (….) AT is it reduces number of requests to driver (It sends pass through query). With EXEC you cannot load data dynamically like SELECT INTO tmp FROM OPENQUERY. Table must exist before hand if you use EXEC.
INSERT INTO tmp_API_Report_Load(col1,col2)
EXEC('select col1,col2 from some_api_table') AT [API-LINKED-SERVER]
--OR--
INSERT INTO tmp_API_Report_Load(col1,col2)
select col1,col2 from OPENQUERY([API-LINKED-SERVER], 'select col1,col2 from some_api_table')
The advantage of this method is that your query speed will increase because the system only calls the API once when you use EXEC AT. In contrast, with OPENROWSET, the query needs to be called twice: once to obtain metadata and once to retrieve the data.
Use Cached Metadata if possible
By default, most SQL queries sent to the Data Gateway need to invoke two phases: first, to get metadata, and second, to fetch data. However, you can bypass the metadata API call by supplying static metadata. Use the META property in the WITH clause, as explained in this article , to speed up your SQL queries.Configuring pagination in the CSV Driver
ZappySys CSV Driver equips users with powerful tools for seamless data extraction and management from REST APIs, leveraging advanced pagination methods for enhanced efficiency. These options are designed to handle various types of pagination structures commonly used in APIs. Below are the detailed descriptions of these options:
Page-based Pagination: This method works by retrieving data in fixed-size pages from the Rest API. It allows you to specify the page size and navigate through the results by requesting different page numbers, ensuring that you can access all the data in a structured manner.
Offset-based Pagination: With this approach, you can extract data by specifying the starting point or offset from which to begin retrieving data. It allows you to define the number of records to skip and fetch subsequent data accordingly, providing precise control over the data extraction process.
Cursor-based Pagination: This technique involves using a cursor or a marker that points to a specific position in the dataset. It enables you to retrieve data starting from the position indicated by the cursor and proceed to subsequent segments, ensuring that you capture all the relevant information without missing any records.
Token-based Pagination: In this method, a token serves as a unique identifier for a specific data segment. It allows you to access the next set of data by using the token provided in the response from the previous request. This ensures that you can systematically retrieve all the data segments without duplication or omission.
Utilizing these comprehensive pagination features in the ZappySys CSV Driver facilitates efficient data management and extraction from REST APIs, optimizing the integration and analysis of extensive datasets.
For more detailed steps, please refer to this link: How to do REST API Pagination in SSIS / ODBC Drivers
Authentication
ZappySys offers various authentication methods to securely access data from various sources. These authentication methods include OAuth, Basic Authentication, Token-based Authentication, and more, allowing users to connect to a wide range of data sources securely.
ZappySys Authentication is a robust system that facilitates secure access to data from a diverse range of sources. It includes a variety of authentication methods tailored to meet the specific requirements of different data platforms and services. These authentication methods may involve:
OAuth: ZappySys supports OAuth for authentication, which allows users to grant limited access to their data without revealing their credentials. It's commonly used for applications that require access to user account information.
Basic Authentication: This method involves sending a username and password with every request. ZappySys allows users to securely access data using this traditional authentication approach.
Token-based Authentication: ZappySys enables users to utilize tokens for authentication. This method involves exchanging a unique token with each request to authenticate the user's identity without revealing sensitive information.
By implementing these authentication methods, ZappySys ensures the secure and reliable retrieval of data from various sources, providing users with the necessary tools to access and integrate data securely and efficiently. For more comprehensive details on the authentication process, please refer to the official ZappySys documentation or reach out to their support team for further assistance.
For more details, please refer to this link: ZappySys Connections
Conclusion
In this guide, we demonstrated how to connect to CSV in SQL Server and integrate your data — all without writing complex code.
Ready to get started? Download ODBC PowerPack now or ping us via chat if you still need help:


 Connector")


 Connector")


 Connector")


 Connector")


