
Introduction
You can connect to your Smartsheet data from SAP Crystal Reports via the high-performance Smartsheet ODBC Driver. We'll walk you through the entire setup.
Let's not waste time and get started!
Create data source using Smartsheet ODBC Driver
Video instructions
Watch this quick walkthrough to see how to configure your Smartsheet ODBC data source, or scroll down for the step-by-step written guide.
Step-by-step instructions
To get data from Smartsheet using SAP Crystal Reports, we first need to create an ODBC data source. We will later read this data in SAP Crystal Reports. Perform these steps:
-
Download and install ODBC PowerPack (if you haven't already).
-
Search for
odbcand open the ODBC Data Sources (64-bit):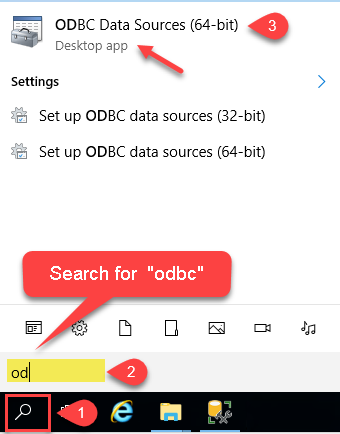
-
Create a User data source (User DSN) based on the ZappySys API Driver driver:
ZappySys API Driver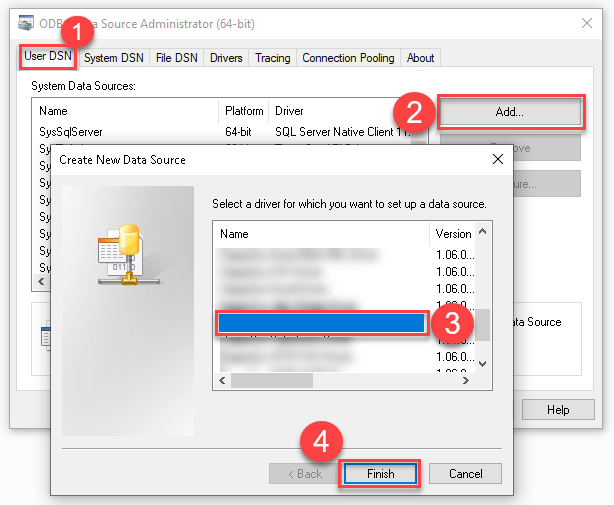
- Create and use a User DSN if the client application runs under a User Account. This is the ideal option at design time (e.g., when developing in Visual Studio). Use it for both types of applications (64-bit and 32-bit).
- Create and use a System DSN if the client application runs under a System Account (e.g., as a Windows Service). This is usually the required option in a production environment. If your Windows Service is a 32-bit application, you must use the 32-bit ODBC Data Source Administrator to configure this
-
When the Configuration window appears give your data source a name if you haven't done that already, then select "Smartsheet" from the list of Popular Connectors. If "Smartsheet" is not present in the list, then click "Search Online" and download it. Then set the path to the location where you downloaded it. Finally, click Continue >> to proceed with configuring the DSN:
SmartsheetDSNSmartsheet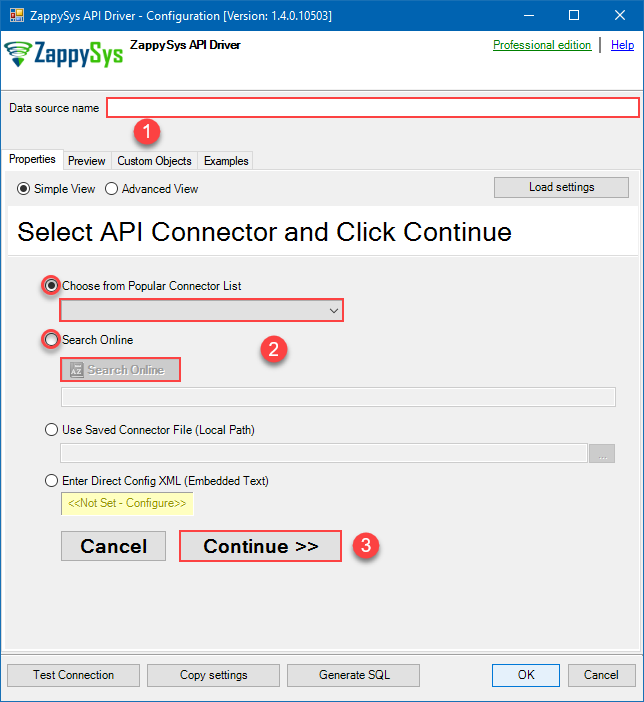
-
Select your authentication scenario below to expand connection configuration steps to:
- Configure the authentication in Smartsheet.
- Enter those details into the ZappySys API Driver data source configuration.
OAuth (Dynamic Token)
Smartsheet authentication
OAuth Walkthrough
Apps connect to Smartsheet using OAuth 2.0 to authenticate and authorize users. If you are building an app, this documentation will walk you through the steps you need to authenticate your users. The Smartsheet SDKs contain APIs for OAuth 2.0.
NOTE: For users of apps like AWS AppFabric, you will need a Tenant ID. You can find your Tenant ID in Admin Center under Security & Controls. There is a Smartsheet Tenant ID pane.
First Steps
Before you can start using OAuth 2.0 with your app, Smartsheet needs the following information:
- You must register with Smartsheet to get a developer account*. The developer account gives you access to "Developer Tools", which is where you manage your app.
- In "Developer Tools", complete any required fields in your developer profile.
- In "Developer Tools", register your app so Smartsheet can assign a client Id and a client secret to the app.
- Review the list of access scopes. You'll need to choose which ones your app needs to get to a user's Smartsheet data, and then ask the user to consent to that access.
- After you've worked through these steps, you'll be ready to implement the OAuth Flow.
Open Developer Tools
- Log in to Smartsheet with your developer account.
- Click the "Account" button in the lower-left corner of your Smartsheet screen, and then click "Developer Tools".
- Do one of the following:
- If you need to register an app, click "Create New App".
- If you need to manage an app, click "view/edit" for the app.
Register Your App Using Developer Tools
- Log in to Smartsheet with your developer account.
- Click the "Account" button in the upper-right corner of your Smartsheet screen, and then click "Developer Tools".
- In the "Create New App" form, provide the following information:
- Name: the name the user sees to identify your app
- Description: a brief description intended for the user
- URL: the URL to launch your app, or the landing page if not a web app
- Contact/support: support information for the user
- Redirect URL: also known as a callback URL. The URL within your application that will receive the OAuth 2.0 credentials After you click "Save", Smartsheet assigns a client Id and secret to your app. Make a note of these Ids for the next steps; however, you can always look them up again in "Developer Tools".
API Connection Manager configuration
Just perform these simple steps to finish authentication configuration:
-
Set Authentication Type to
OAuth (Dynamic Token) [OAuth] - Optional step. Modify API Base URL if needed (in most cases default will work).
- Fill in all the required parameters and set optional parameters if needed.
- Press Generate Token button to generate the tokens.
- Finally, hit OK button:
SmartsheetDSNSmartsheetOAuth (Dynamic Token) [OAuth]https://api.smartsheet.com/2.0Required Parameters ClientId Fill-in the parameter... ClientSecret Fill-in the parameter... Scope Fill-in the parameter... Optional Parameters RetryMode RetryWhenStatusCodeMatch RetryStatusCodeList 429|503 RetryCountMax 5 RetryMultiplyWaitTime True 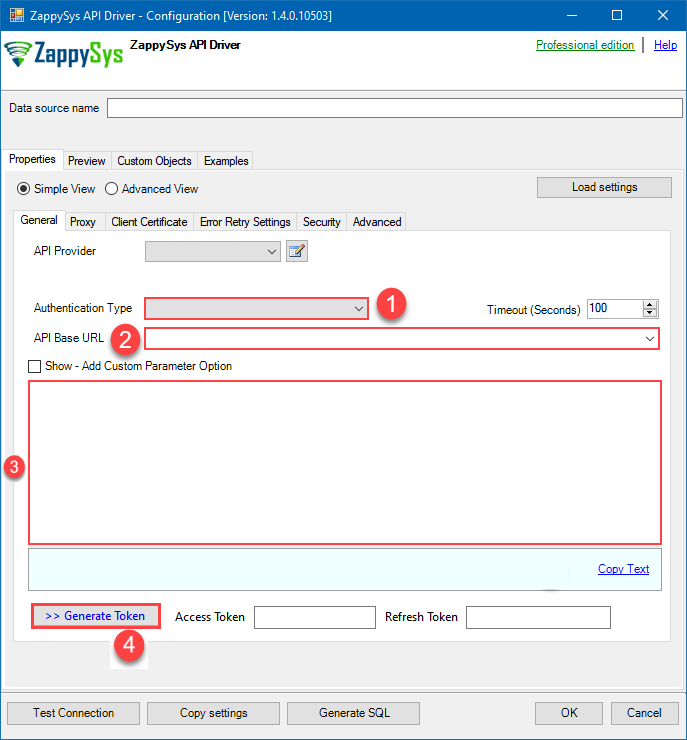 Find full details in the Smartsheet Connector authentication reference.
Static Token
Smartsheet authentication
Raw Token Requests
If you want to get started quickly, or are developing a standalone application that can run with your credentials, follow these instructions:
- Click the "Account" button in the lower-left corner of the Smartsheet screen, and then click "Personal Settings".
- Click the "API Access" tab.
- Click the "Generate new access token" button to obtain an access token.
The access token must be sent with every API call in an HTTP authorization header (except for therequests to Get Access Token or Refresh Access Token). Once you have an access token, include it in the Authorization header for every request you make:
Authorization: Bearer JKlMNOpQ12RStUVwxYZAbcde3F5g6hijklM789The header name is Authorization and the value of the header is Bearer JKlMNOpQ12RStUVwxYZAbcde3F5g6hijklM789. Since the access token is being transmitted in clear text, all API calls are done over HTTPS.
NOTE: A best practice is to use a shared account, such as ticket-processor@example.com, rather than your individual work account.
API Connection Manager configuration
Just perform these simple steps to finish authentication configuration:
-
Set Authentication Type to
Static Token [Http] - Optional step. Modify API Base URL if needed (in most cases default will work).
- Fill in all the required parameters and set optional parameters if needed.
- Finally, hit OK button:
SmartsheetDSNSmartsheetStatic Token [Http]https://api.smartsheet.com/2.0Required Parameters Access Token Fill-in the parameter... Optional Parameters RetryMode RetryWhenStatusCodeMatch RetryStatusCodeList 429|503 RetryCountMax 5 RetryMultiplyWaitTime True 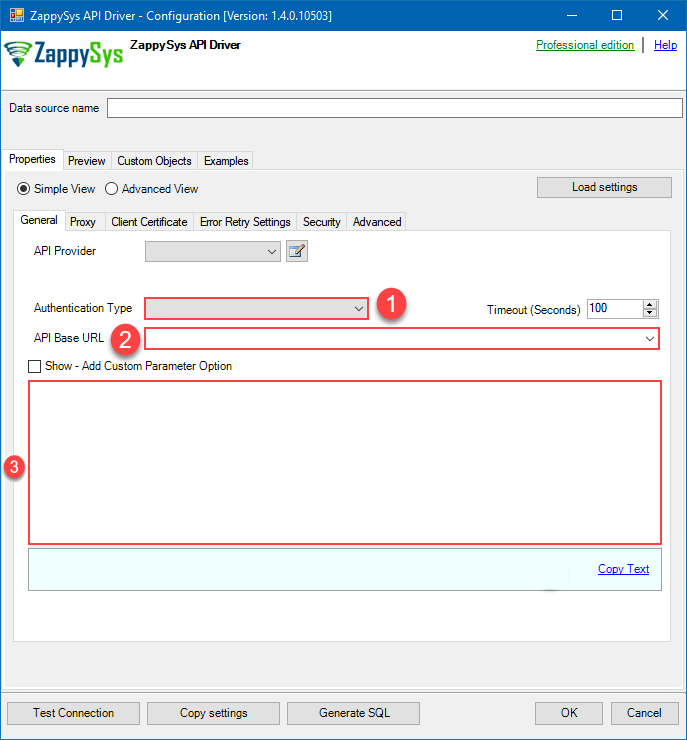 Find full details in the Smartsheet Connector authentication reference.
-
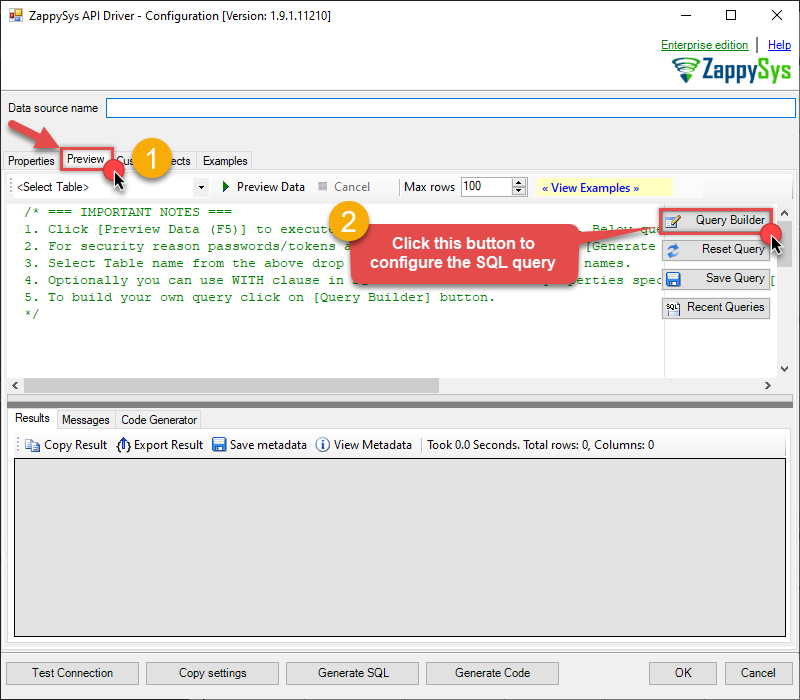
Once the data source connection has been configured, it's time to configure the SQL query. Select the Preview tab and then click Query Builder button to configure the SQL query:
 ZappySys API Driver - SmartsheetRead and write Smartsheet data effortlessly. Integrate, manage, and automate sheets, rows, and reports — almost no coding required.SmartsheetDSN
-
Start by selecting the Table or Endpoint you are interested in and then configure the parameters. This will generate a query that we will use in SAP Crystal Reports to retrieve data from Smartsheet. Hit OK button to use this query in the next step.
SELECT * FROM Sheets --Where Id='5815807987847055'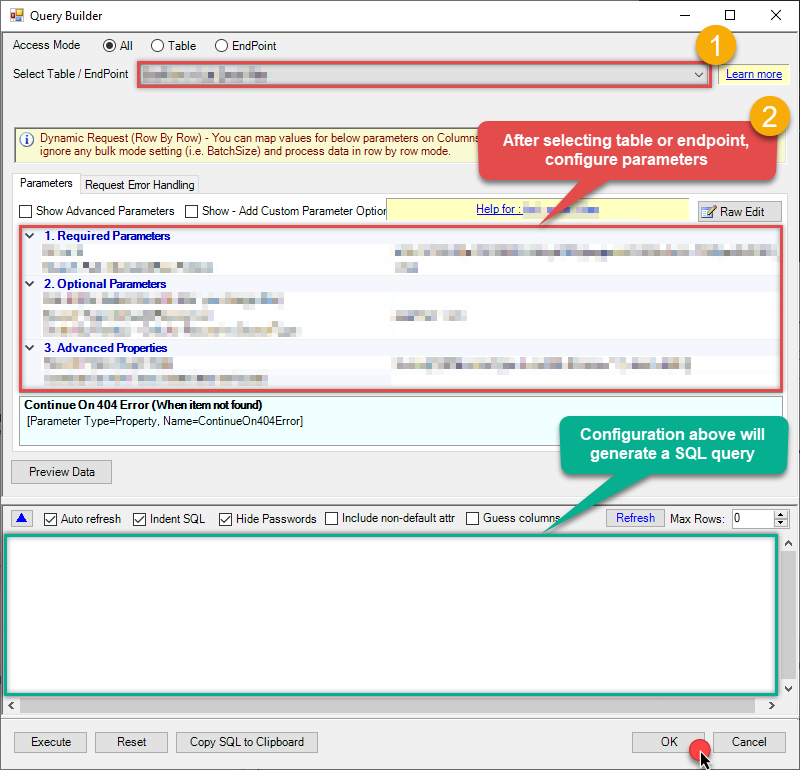 Some parameters configured in this window will be passed to the Smartsheet API, e.g. filtering parameters. It means that filtering will be done on the server side (instead of the client side), enabling you to get only the meaningful data
much faster . -
Now hit Preview Data button to preview the data using the generated SQL query. If you are satisfied with the result, use this query in SAP Crystal Reports:
ZappySys API Driver - SmartsheetRead and write Smartsheet data effortlessly. Integrate, manage, and automate sheets, rows, and reports — almost no coding required.SmartsheetDSNSELECT * FROM Sheets --Where Id='5815807987847055'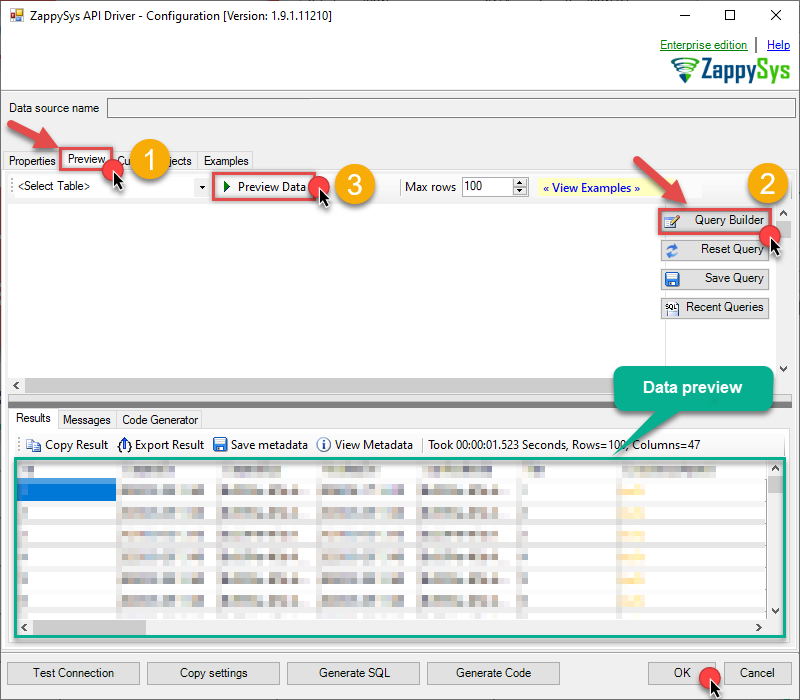 You can also access data quickly from the tables dropdown by selecting <Select table>.A
WHEREclause,LIMITkeyword will be performed on the client side, meaning that thewhole result set will be retrieved from the Smartsheet API first, and only then the filtering will be applied to the data. If possible, it is recommended to use parameters in Query Builder to filter the data on the server side (in Smartsheet servers). -
Click OK to finish creating the data source.
Read data in SAP Crystal Reports from the ODBC data source
-
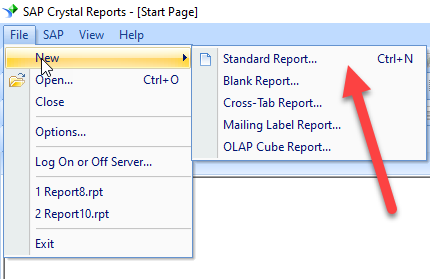
First of all, open SAP Crystal Reports and create the new Crystal Report.
-
And it will open the new data source selection window. Under ODBC(RDO) double click on the Make New Connection and Select the desired ODBC DSN, in our case we need to select SmartsheetDSN which we created in upper section. And Click on Next.
SmartsheetDSN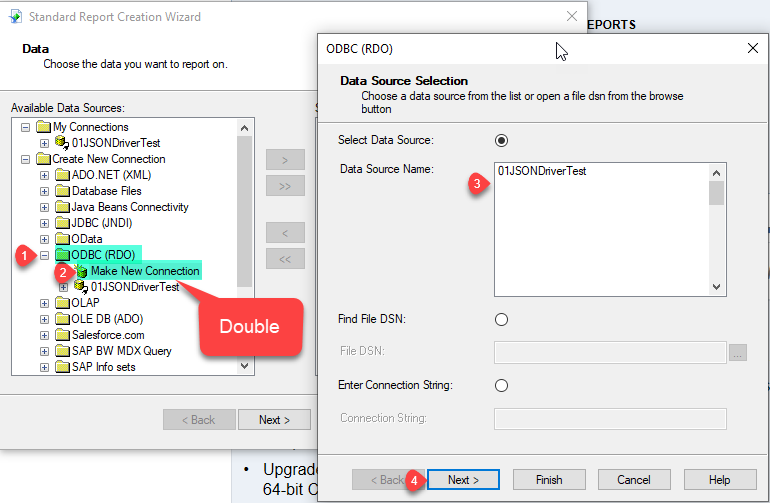
-
Expand the Connection and under the data select the desired table(s) or view(s) and click Add > button and click on Next. The list also shows the custom views (virtual tables, named
vt__...) you created in the SmartsheetDSN data source, so you can select a saved SQL query just like a table. To type a SQL query instead, double click Add Command under the connection.Tip: Save frequently used SQL queries as custom views on the Custom Objects tab of the SmartsheetDSN data source. Each view appears here as a separate object, so one DSN can serve many API endpoints (e.g./restaurants,/users) and every report reuses the same query instead of keeping its own Add Command SQL. See ODBC Drivers Custom Objects feature.SmartsheetDSNSmartsheetDSN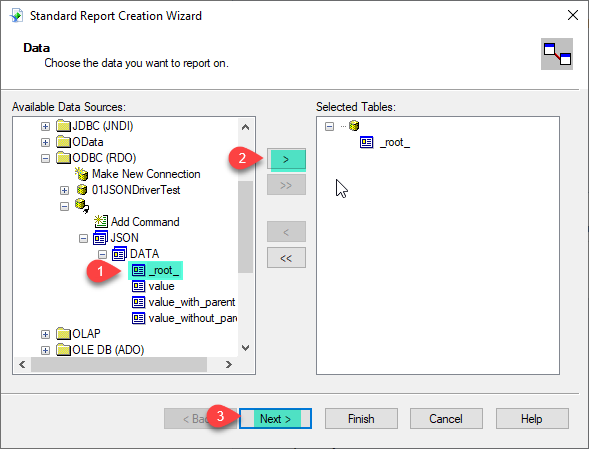
-
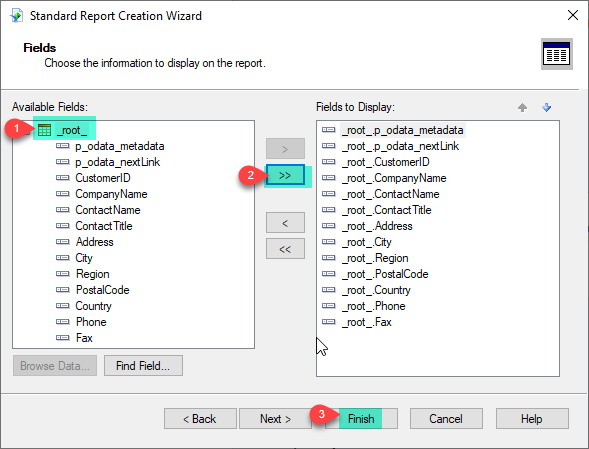
Add the desired Fields to Display in the Reports. Here we are adding all fields and click on Finish.
-
That's it and you will be able to load the data in the Report.
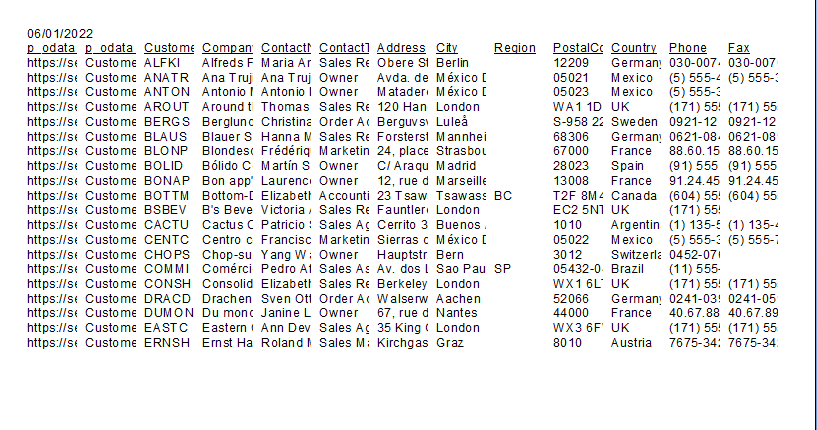
Add SmartsheetDSN data to an existing Crystal Report
The steps above use the new report wizard. To use the SmartsheetDSN data source in a report you already have, add it with the Database Expert:
-
Open the report and go to Database > Database Expert...
-
Under Available Data Sources expand Create New Connection > ODBC (RDO), select the SmartsheetDSN DSN, click Next and then Finish. If you used this DSN before, it is listed under My Connections instead.
-
Expand the connection and select the table(s), custom view(s) (
vt__...) or Add Command for a SQL query, then click the > button to move them to Selected Tables and click OK. -
If the report already has other tables, Crystal Reports opens the Links tab. Link the new object to the existing tables on a common column (or remove the suggested links if they are not related).
-
Open View > Field Explorer, expand Database Fields and drag the new fields onto the report.
Point an existing table to the SmartsheetDSN data source
To switch a table the report already uses (e.g. one from another DSN) to an object of SmartsheetDSN without rebuilding the report, go to Database > Set Datasource Location..., select the table in Current Data Source, select the new table or custom view under the SmartsheetDSN connection in Replace with and click Update. Then run Database > Verify Database to refresh the field list.
Create SQL view in ODBC data source
ZappySys API Drivers support flexible Query language so you can override Default Properties you configured on Data Source such as URL, Body. This way you don't have to create multiple Data Sources if you like to read data from multiple EndPoints. However not every application support supplying custom SQL to driver so you can only select Table from list returned from driver.
If you're dealing with Microsoft Access and need to import data from an SQL query, it's important to note that Access doesn't allow direct import of SQL queries. Instead, you can create custom objects (Virtual Tables) to handle the import process.
Many applications like MS Access, Informatica Designer wont give you option to specify custom SQL when you import Objects. In such case Virtual Table is very useful. You can create many Virtual Tables on the same Data Source (e.g. If you have 50 URLs with slight variations you can create virtual tables with just URL as Parameter setting.
-
Go to Custom Objects Tab and Click on Add button and Select Add Table:
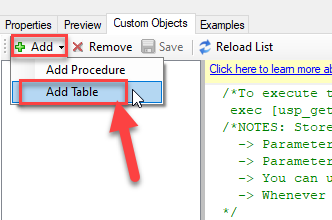
-
Enter the desired Table name and click on OK:
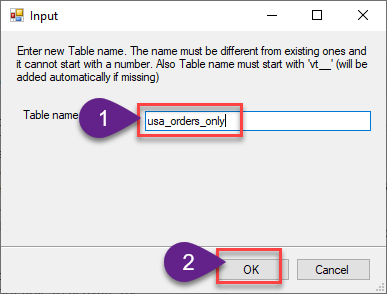
-
And it will open the New Query Window Click on Cancel to close that window and go to Custom Objects Tab.
-
Select the created table, Select Text Type AS SQL and write the your desired SQL Query and Save it and it will create the custom table in the ZappySys Driver:
Here is an example SQL query for ZappySys Driver. You can insert Placeholders also. Read more about placeholders here
SELECT
  "ShipCountry",
  "OrderID",
  "CustomerID",
  "EmployeeID",
  "OrderDate",
  "RequiredDate",
  "ShippedDate",
  "ShipVia",
  "Freight",
  "ShipName",
  "ShipAddress",
  "ShipCity",
  "ShipRegion",
  "ShipPostalCode"
FROM "Orders"
Where "ShipCountry"='USA'
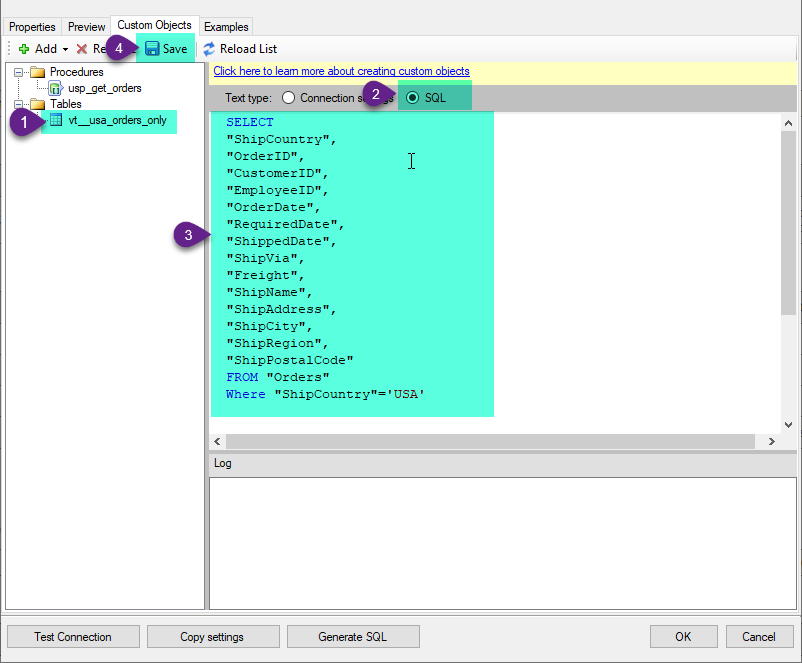
-
That's it now go to Preview Tab and Execute your custom virtual table query. In this example it will extract the orders for the USA Shipping Country only:
SELECT * FROM "vt__usa_orders_only"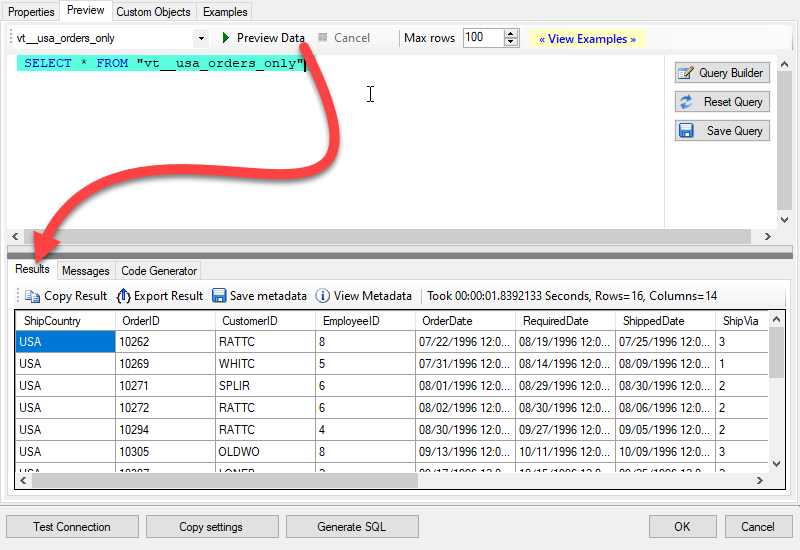
Using ZappySys Driver Custom Views and Stored Procedure in SAP Crystal Report
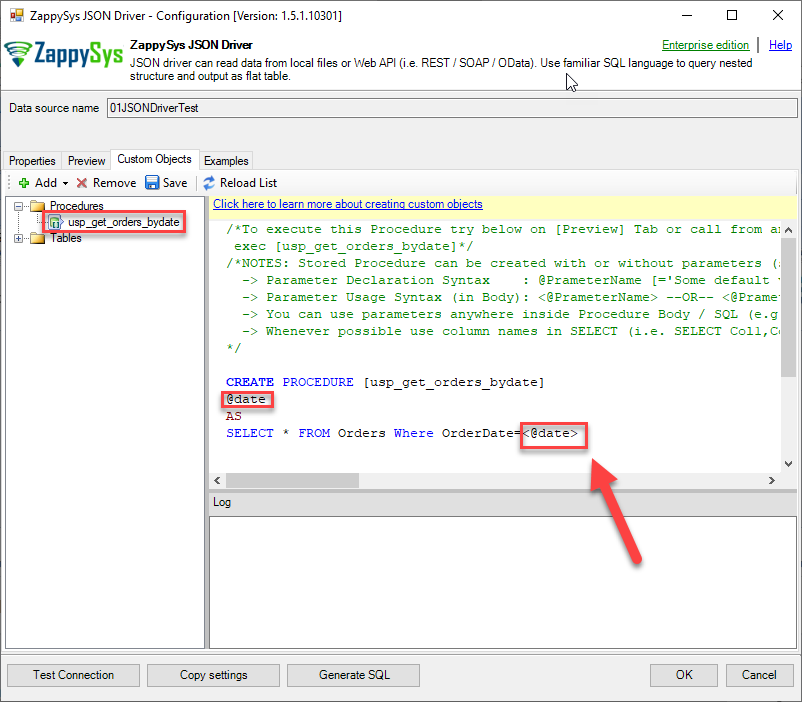
You can create parameterized Stored Procedure and Virtual Tables on the same Data Source (ODBC DSN or Data Gateway Data Source). Please refer to this article for the same. You can create procedures to encapsulate custom logic and then only pass handful parameters rather than long SQL to execute your API call.Using Custom Views in the SAP Crystal Report
After establishing the connection with SmartsheetDSN Data Source you can use the custom view in SQL Crystal Report. Custom views are listed next to the regular tables, both in the new report wizard and in Database Expert of an existing report.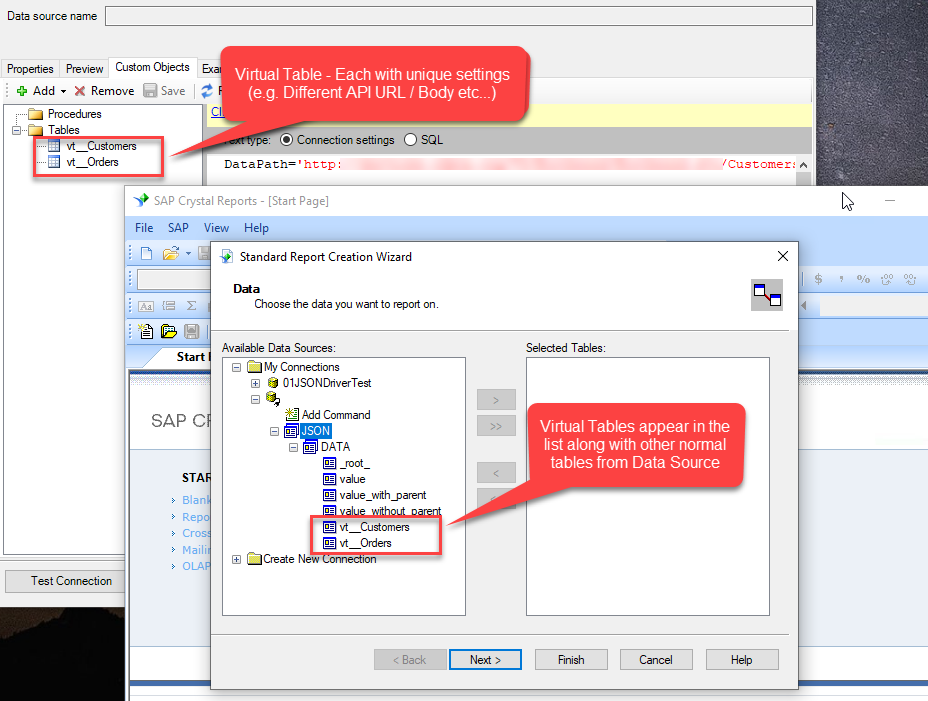
Using Custom Stored Procedure in the SAP Crystal Report
-
First of all, create the custom stored procedure in the ZappySys Driver. Please refer to this article to create the custom stored procedure.
-
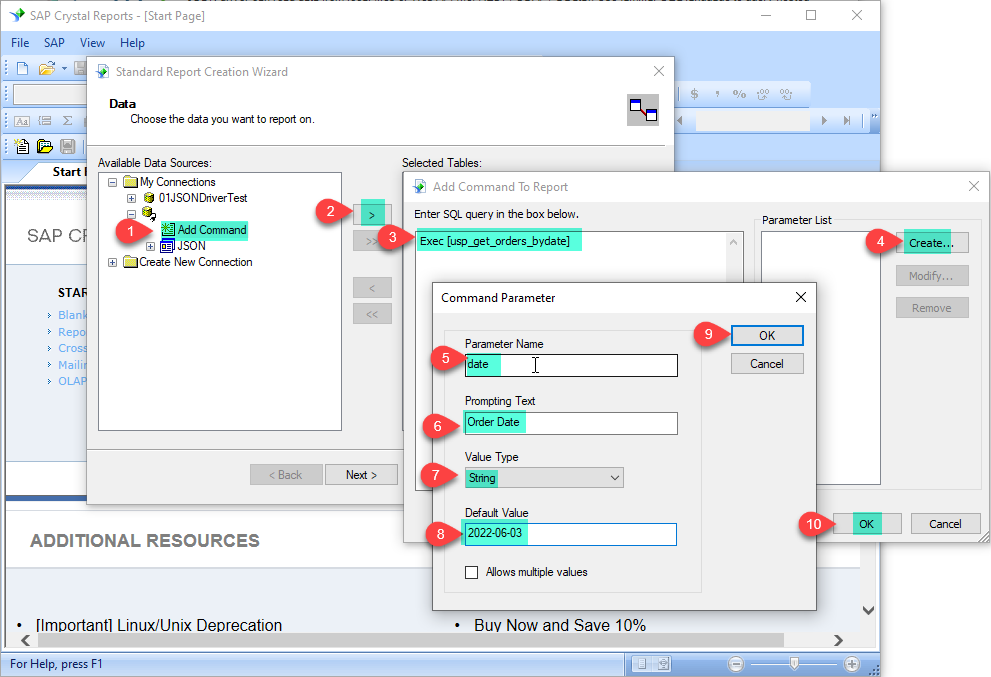
After establishing the connection with SmartsheetDSN Data Source you can use the custom Stored Procedure in SQL Crystal Report. Same way you can write custom queries also in the query box.
SmartsheetDSN
Smartsheet Connector actions
Got a specific use case in mind? We've mapped out exactly how to perform a variety of essential Smartsheet operations directly in SAP Crystal Reports, so you don't have to figure out the setup from scratch. Check out the step-by-step guides below:
- Search (cell data or other object types)
- List Sheets
- Get Sheet Fields
- Get Sheet Rows
- Get Sheet Row by ID(s)
- Delete Sheet Rows
- Add Sheet Rows
- Update Sheet Rows
- Export Sheet (to PDF, Excel, CSV file)
- Export Report (to PDF, Excel, CSV file)
- Send Report Via Email Excel Pdf Or Pdf Gantt Format
- Send Sheet Via Email Excel Pdf Or Pdf Gantt Format
- List Reports
- List Contacts
- List Groups
- Get Contacts
- Make Generic REST API Request
- Make Generic REST API Request (Bulk Write)
Optional: Centralized data access via ZappySys Data Gateway
In some situations, you may need to provide Smartsheet data access to multiple users or services. Configuring the data source on a Data Gateway creates a single, centralized connection point for this purpose.
This configuration provides two primary advantages:
-
Centralized data access
The data source is configured once on the gateway, eliminating the need to set it up individually on each user's machine or application. This significantly simplifies the management process.
-
Centralized access control
Since all connections route through the gateway, access can be governed or revoked from a single location for all users.
| Data Gateway |
Local ODBC
data source
|
|
|---|---|---|
| Simple configuration | ||
| Installation | Single machine | Per machine |
| Connectivity | Local and remote | Local only |
| Connections limit | Limited by License | Unlimited |
| Central data access | ||
| Central access control | ||
| More flexible cost |
To achieve this, you must first create a data source in the Data Gateway (server-side) and then create an ODBC data source in SAP Crystal Reports (client-side) to connect to it.
Let's not wait and get going!
Create Smartsheet data source in the gateway
In this section we will create a data source for Smartsheet in the Data Gateway. Let's follow these steps to accomplish that:
-
Search for
gatewayin the Windows Start Menu and open ZappySys Data Gateway Configuration: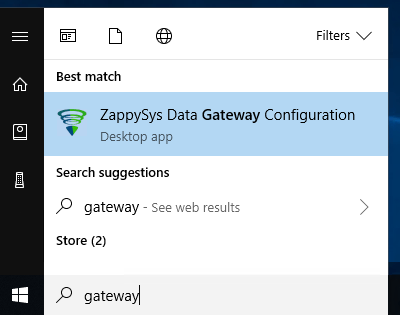
-
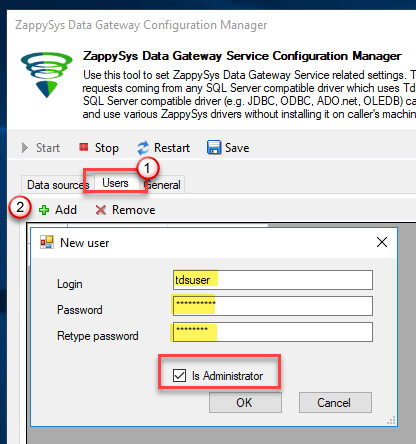
Go to the Users tab and follow these steps to add a Data Gateway user:
- Click the Add button
-
In the Login field enter a username, e.g.,
john - Then enter a Password
- Check the Is Administrator checkbox
- Click OK to save
-
Now we are ready to add a data source:
- Click the Add button
- Give the Data source a name (have it handy for later)
- Then select Native - ZappySys API Driver
- Finally, click OK
SmartsheetDSNZappySys API Driver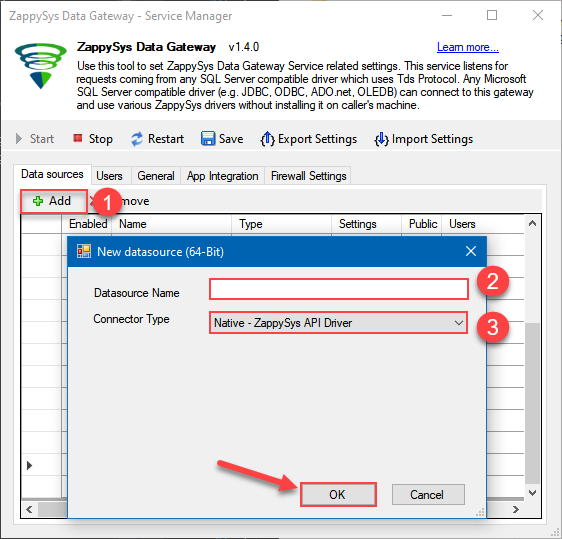
-
When the ZappySys API Driver configuration window opens, go back to ODBC Data Source Administrator where you already have the Smartsheet ODBC data source created and configured, and follow these steps on how to Import data source configuration into the Gateway:
-
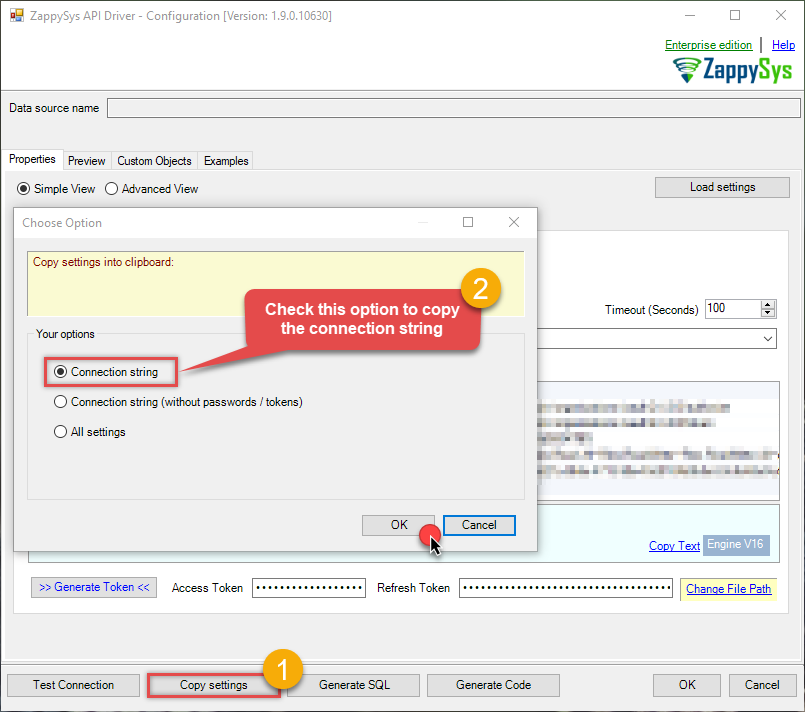
Open ODBC data source configuration and click Copy settings:
 ZappySys API Driver - SmartsheetRead and write Smartsheet data effortlessly. Integrate, manage, and automate sheets, rows, and reports — almost no coding required.SmartsheetDSN
-
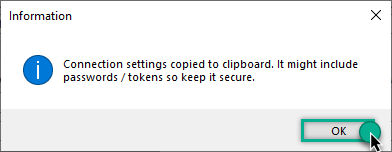
The window opens, telling us the connection string was successfully copied to the clipboard:
-
Then go to Data Gateway configuration and in data source configuration window click Load settings:
SmartsheetDSN
ZappySys API Driver - Configuration [Version: 2.0.1.10418]ZappySys API Driver - SmartsheetRead and write Smartsheet data effortlessly. Integrate, manage, and automate sheets, rows, and reports — almost no coding required.SmartsheetDSN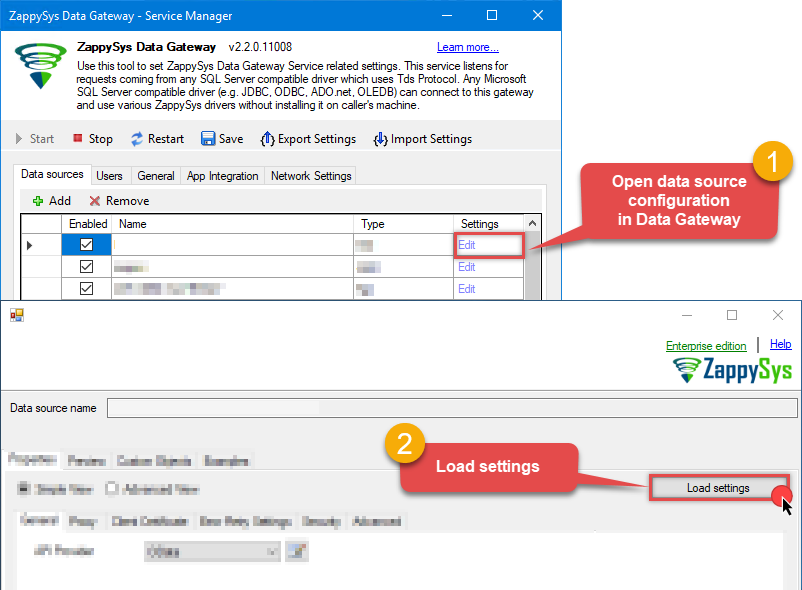
-
Once a window opens, just paste the settings by pressing
CTRL+Vor by clicking right mouse button and then Paste option.
-
Open ODBC data source configuration and click Copy settings:
-
Once done, go to the Network Settings tab and Add a firewall rule for inbound traffic:
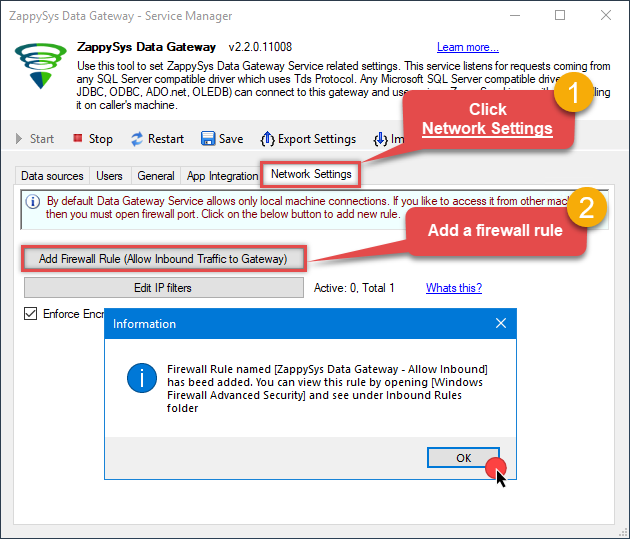
- This will initially allow all inbound traffic.
- Click Edit IP filters to restrict access to specific IP addresses or ranges.
-
Crucial Step: After creating or modifying the data source, you must:
- Click the Save button to persist your changes.
- Hit Yes when prompted to restart the Data Gateway service.
This ensures all changes are properly applied:
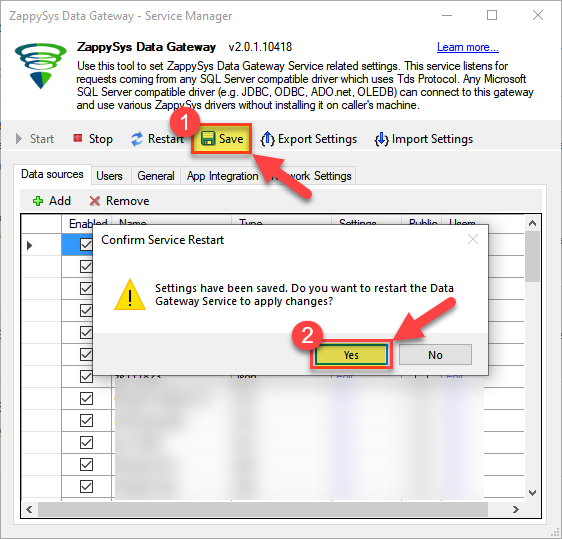 Skipping this step may cause the new settings to fail, preventing you from connecting to the data source.
Create ODBC data source to connect to the gateway
In this part we will create an ODBC data source to connect to the ZappySys Data Gateway from SAP Crystal Reports. To achieve that, let's perform these steps:
-
Search for
odbcand open the ODBC Data Sources (64-bit):
-
Create a User data source (User DSN) based on the ODBC Driver 17 for SQL Server driver:
ODBC Driver 17 for SQL Server
If you don't see the ODBC Driver 17 for SQL Server driver in the list, choose a similar version. -
Then set a Name for the data source (e.g.
Gateway) and the address of the Data Gateway:ZappySysGatewayDSNlocalhost,5000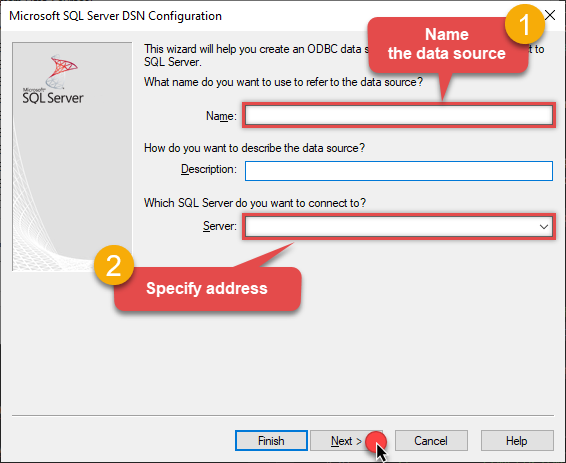 Make sure you separate the hostname and port with a comma, e.g.
localhost,5000. -
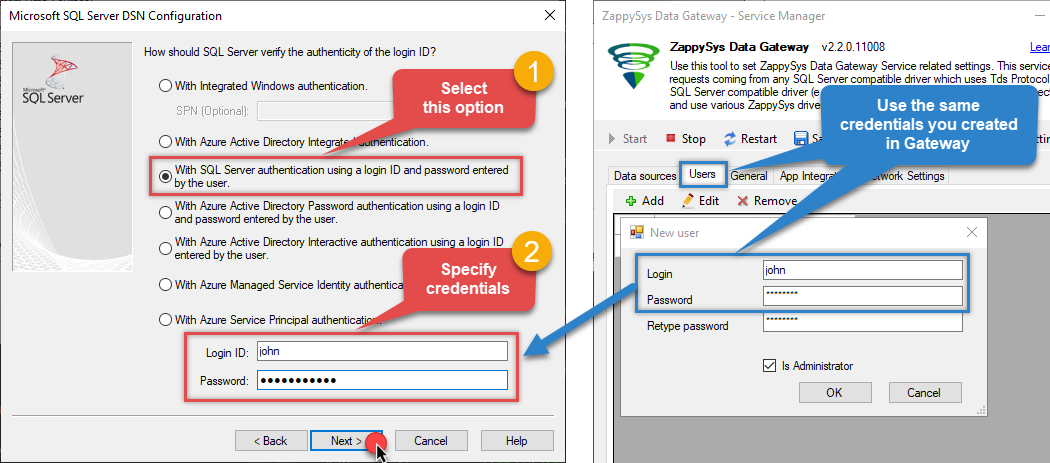
Proceed with the authentication part:
- Select SQL Server authentication
-
In the Login ID field enter the user name you created in the Data Gateway, e.g.,
john - Set Password to the one you configured in the Data Gateway
-
Then set the default database property to
SmartsheetDSN(the one we used in the Data Gateway):SmartsheetDSNSmartsheetDSN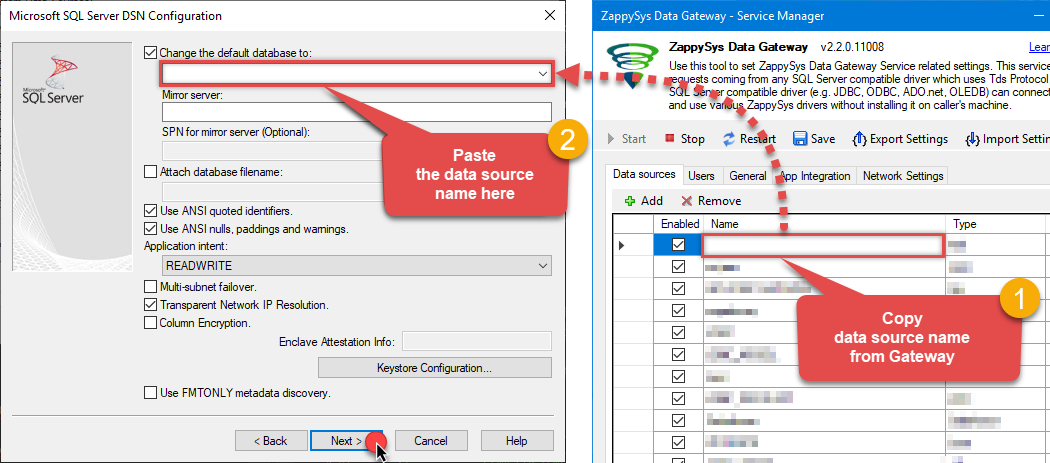 Make sure to type the data source name manually or copy/paste it directly into the field. Using the dropdown might fail because the Trust server certificate option is not enabled yet (next step).
-
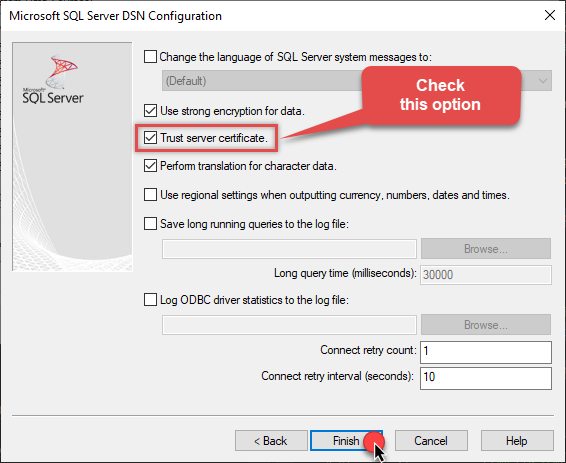
Continue by checking the Trust server certificate option:
-
Once you do that, test the connection:
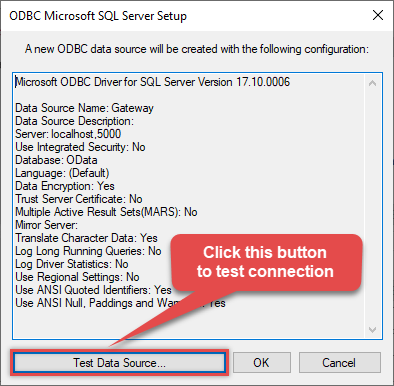
-
If the connection is successful, everything is good:
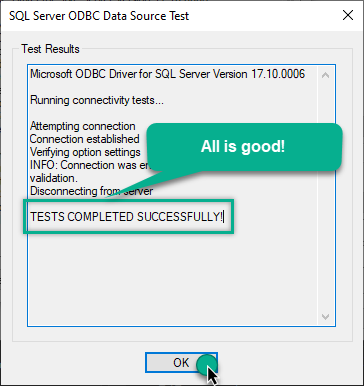
-
Done!
We are ready to move to the final step. Let's do it!
Access data in SAP Crystal Reports via the gateway
Finally, we are ready to read data from Smartsheet in SAP Crystal Reports via the Data Gateway. Follow these final steps:
-
Go back to SAP Crystal Reports.
-
First of all, open SAP Crystal Reports and create the new Crystal Report.
-
And it will open the new data source selection window. Under ODBC(RDO) double click on the Make New Connection and Select the desired ODBC DSN, in our case we need to select ZappySysGatewayDSN which we created in upper section. And Click on Next.
ZappySysGatewayDSN
-
Read the data the same way we discussed at the beginning of this article.
-
That's it!
Now you can connect to Smartsheet data in SAP Crystal Reports via the ZappySys Data Gateway.
john and your password.
Conclusion
In this guide, we demonstrated how to connect to Smartsheet in SAP Crystal Reports and integrate your data — all without writing complex code.
Ready to get started? Download ODBC PowerPack now or ping us via chat if you still need help: