Authentication Application Credentials with Certificate (Sign JWT with Private Key)
Description
Similar to Assplication-only access but with JWT sign with Private Key [API reference]
Instructions
Follow these simple steps below to create Microsoft Entra ID application with application access permissions. Using following steps, you can grant very granular app permissions to access File(s). Choose permission based on your need.
Create OAuth app
- Navigate to the Azure Portal and log in using your credentials.
- Access Microsoft Entra ID.
-
Register a new application by going to
App registrations
and clicking on New registration button:
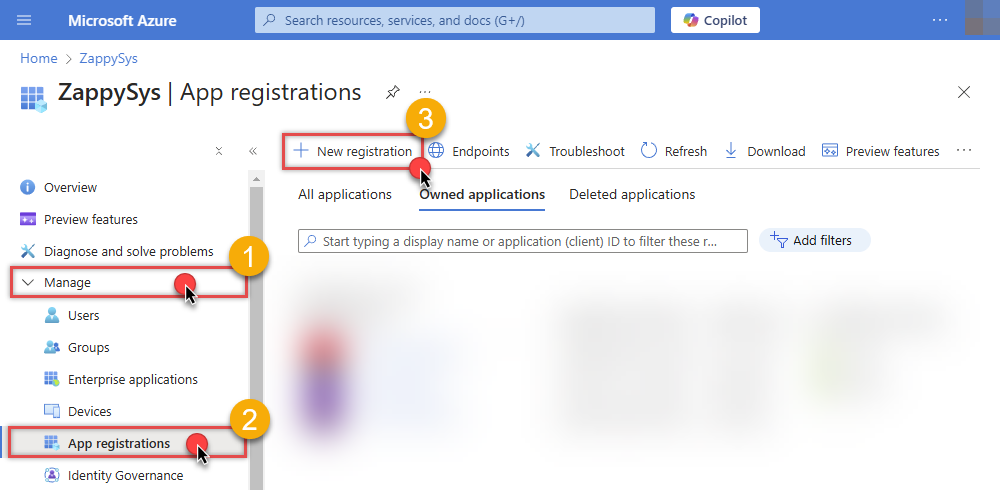 INFO: Find more information on how to register an application in Graph API reference.
 -
When configuration window opens, configure these fields:
-
Supported account type
- e.g. select
Accounts in this organizational directory onlyif you need access to data in your organization only.
- e.g. select
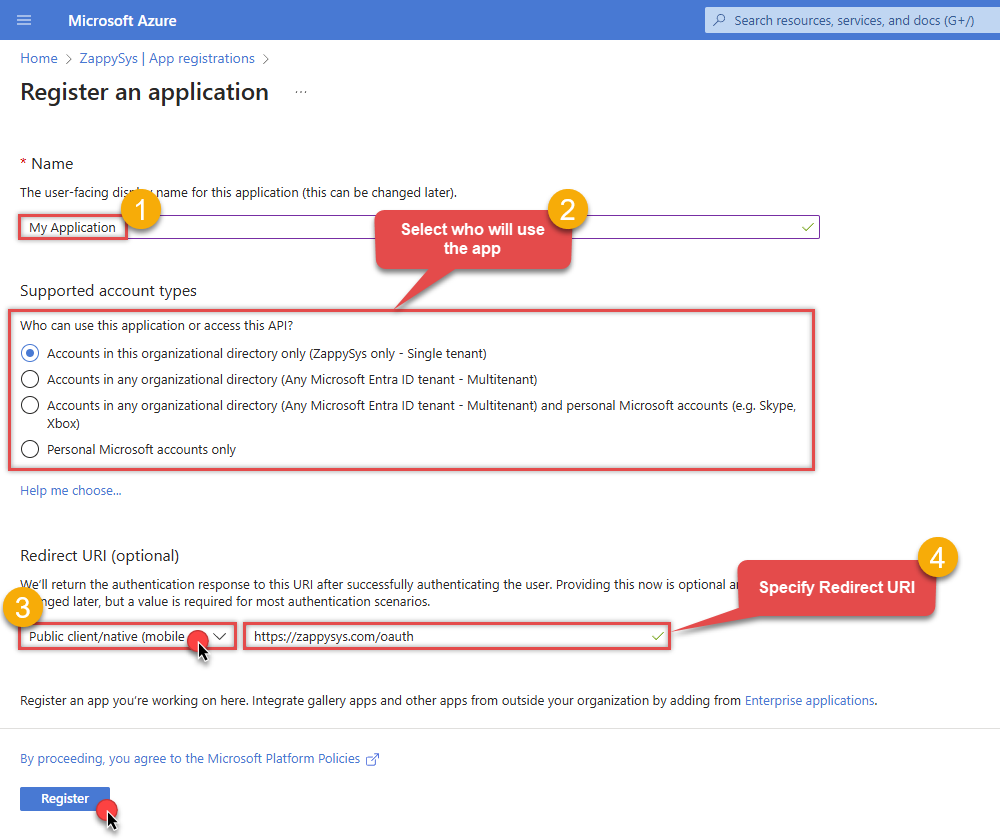
-
Supported account type
-
After registering the app, copy the Application (client) ID for later:
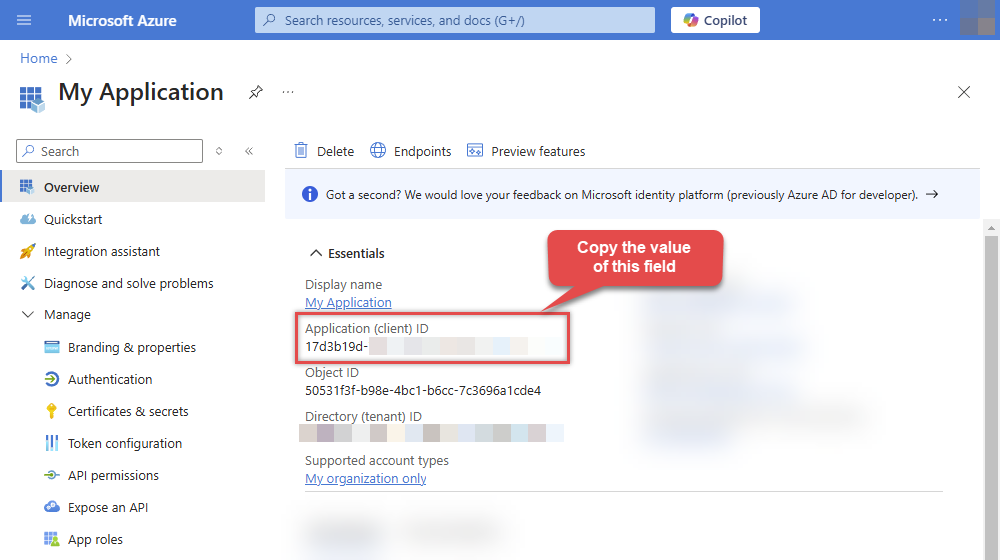
-
Then copy OAuth authorization endpoint (v2) & OAuth token endpoint (v2) URLs:
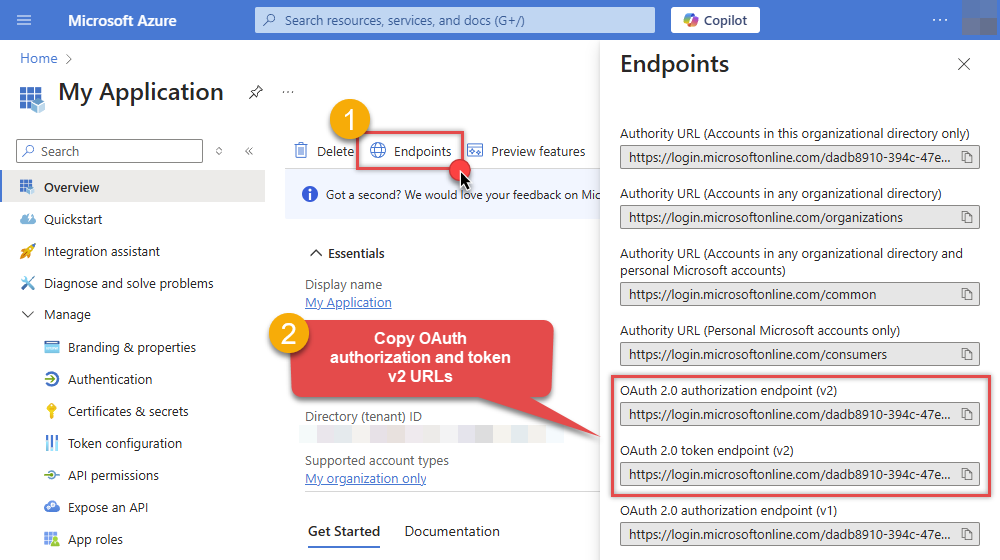
Configure App Permissions
-
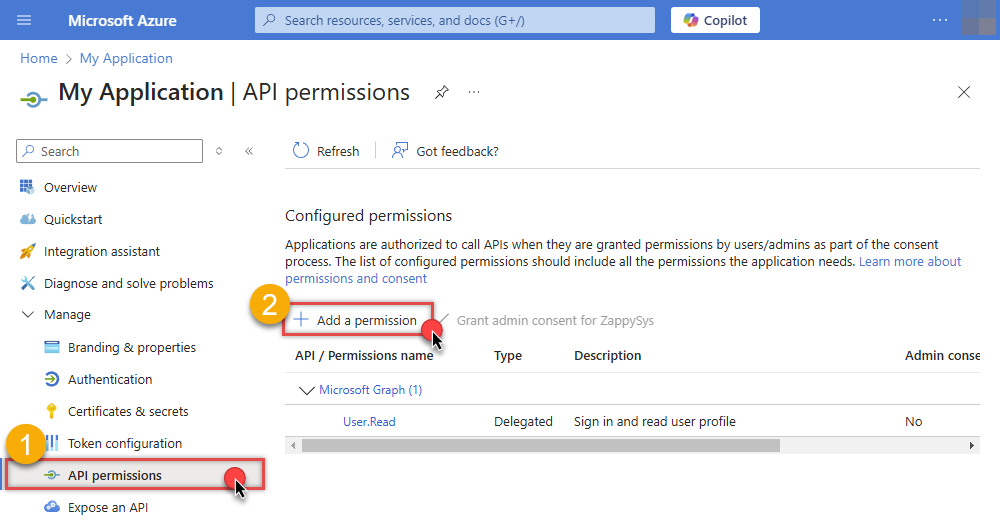
Continue by adding permissions for the app by going to the API permissions section, and clicking on Add a permission:
-
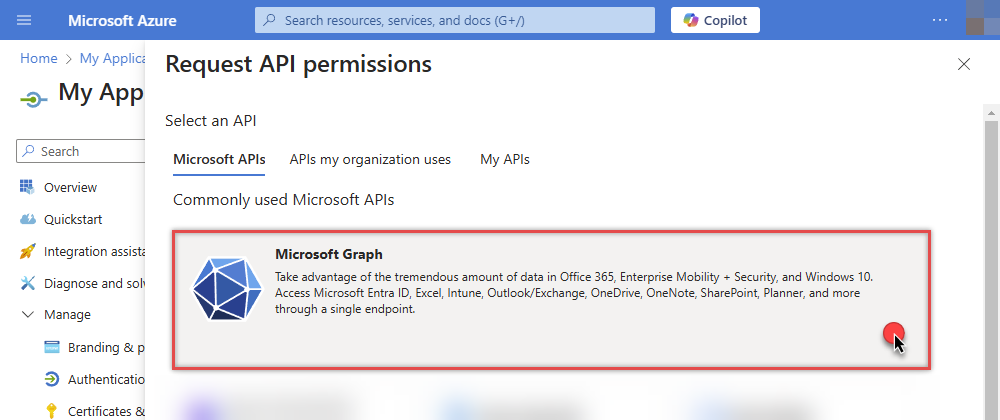
Select Microsoft Graph:
-
Then choose Application permissions option:

-
Continue by adding these Files (OneDrive) permissions (Just search for "Files" and then select desired permissions):

-
Finish by clicking Add permissions button:

-
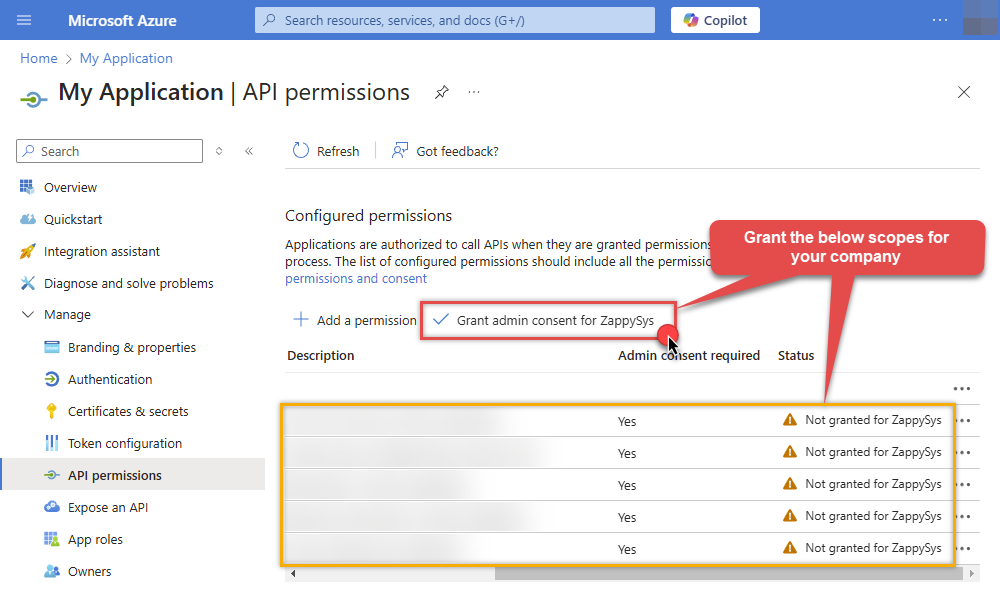
Now it's time to Grant admin consent for your application:
-
Confirm all the permissions are granted:

Generate a Self-Signed Certificate
Now let's go through setting up a certificate-based authentication flow for Microsoft Graph or other Azure AD protected APIs using client credentials and a JWT.
You can use OpenSSL or any other way to generate Certificate file but to make it simple we will use below example PowerShell script.
Open PowerShell and execute code listed in below steps.
# Run this in PowerShell
#Change .AddYears(1) to desired number. By default it expires certificate in one year as per below code.

$cert = New-SelfSignedCertificate `
  -Subject "CN=MyClientAppCert" `
  -KeySpec Signature `
  -KeyExportPolicy Exportable `
  -KeyLength 2048 `
  -CertStoreLocation "Cert:\CurrentUser\My" `
  -KeyAlgorithm RSA `
  -HashAlgorithm SHA256 `
  -NotAfter (Get-Date).AddYears(1) `
  -Provider "Microsoft Enhanced RSA and AES Cryptographic Provider"

# Export private key (.pfx)  - Keep this with you to make API calls (SECRET KEY - DONOT SHARE)
$pfxPath = "$env:USERPROFILE\Desktop\private_key.pfx"
$pwd = ConvertTo-SecureString -String "yourStrongPassword123" -Force -AsPlainText
Export-PfxCertificate -Cert $cert -FilePath $pfxPath -Password $pwd

# Export public certificate (.cer) - UPLOAD this to Azure Portal
$cerPath = "$env:USERPROFILE\Desktop\public_key.cer"
Export-Certificate -Cert $cert -FilePath $cerPath
Upload the Certificate (i.e. Public Key *.cer)
Once we have certificate file generated.- In your App Registration, go to Certificates & secrets
- Under Certificates, click Upload certificate
- Select the
.cerfile (public certificate)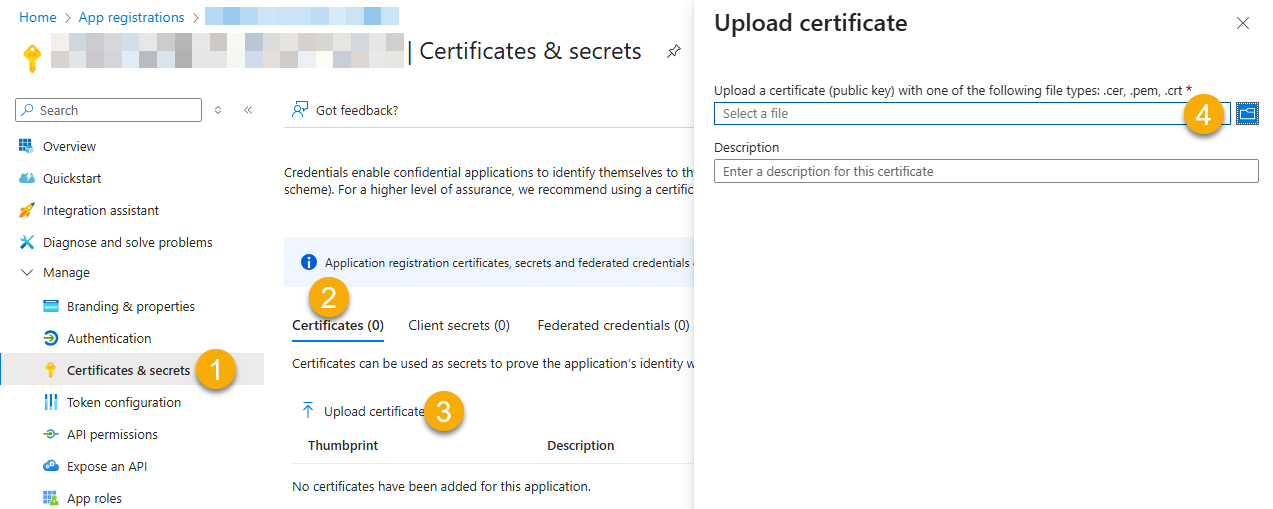
- Click Select a file (Browse button)
- Select public key file (*.cer) from local machine and click OK to upload
Configure ZappySys Connection - Use private key (i.e. *.pfx or *.pem)
Now its time to use certificate pfx file (private key) generated in the previous step (NOTE: PFX file contains both private key and public key).-
Go to SSIS package or ODBC data source and use the copied values in Application Credentials authentication configuration:
- In the Token URL field paste the OAuth token endpoint (v2) URL value you copied in the previous step.
- In the Client ID field paste the Application (client) ID value you copied in the previous step.
- Configure private key
- go to
Certificate Tab - Change Storage Mode to
Disk File: *.pfx format (PKCS#12).NOTE: You can also useStored In LocalMachinemode if PFX file already imported in the Local Certificate Storage Area - User Store OR Machine Store. If you used OpenSSL to generate key pair then useDisk File: *.pem format (PKCS#8 or PKCS#1)Mode for Cert Store Location. - Supply the key file path
- Supply the certificate password (same password used in earlier PowerShell script)
- go to
- Now go back to General Tab, choose Default Group / User Id and Default Drive Id from the drop down menu.
- Click Test connection see everything is good
Parameters
| Parameter | Required | Default value | Options | ||||||||
|---|---|---|---|---|---|---|---|---|---|---|---|
|
Name:
Label: Token URL |
YES |
|
|||||||||
|
Name:
Label: Client ID |
YES | ||||||||||
|
Name:
Label: Certificate: *** Configure [Client Certificate] Tab *** |
YES |
|
|||||||||
|
Name:
Label: Default Group or User Id (additional Scopes needed to list - If fails enter manually) To list all users and groups from your organizations you need additional scopes. See connection UI - Choose User.Read.All and Group.Read.All Scopes and regenerate token. You can manually type value too if you know Group or User Id. Format is /users/{id} OR /groups/{id} |
YES |
|
|||||||||
|
Name:
Label: Default Drive Id |
YES | ||||||||||
|
Name:
Label: RetryMode |
RetryWhenStatusCodeMatch
|
|
|||||||||
|
Name:
Label: RetryStatusCodeList 429 is API limit reached, 423 is File locked |
429|503|423
|
||||||||||
|
Name:
Label: RetryCountMax |
5
|
||||||||||
|
Name:
Label: RetryMultiplyWaitTime |
True
|
||||||||||
|
Name:
Label: Search Option For Non-Indexed Fields (Default=Blank - Search Only Indexed) If you wish to do certain operations e.g. search / order by on non-indexed fields then you have to set this option to HonorNonIndexedQueriesWarningMayFailRandomly. By default filter / orderby on non-indexed fields not allowed. |
|
||||||||||
|
Name:
Label: Extra Headers (e.g. Header1:AAA||Header2:BBB) |
|
||||||||||
|
Name:
Label: IsAppCred For internal use only |
1
|
