Cosmos DB Connector for SSIS How to Upsert a document in the container
Prerequisites
Before we begin, make sure the following prerequisites are met:
- SSIS designer installed. Sometimes it is referred as BIDS or SSDT (download it from Microsoft).
- Basic knowledge of SSIS package development using Microsoft SQL Server Integration Services.
- SSIS PowerPack is installed (if you are new to SSIS PowerPack, then get started!).
Upsert a document in the container in SSIS
-
Begin with opening Visual Studio and Create a New Project.
-
Select Integration Service Project and in new project window set the appropriate name and location for project. And click OK.
In the new SSIS project screen you will find the following:
- SSIS ToolBox on left side bar
- Solution Explorer and Property Window on right bar
- Control flow, data flow, event Handlers, Package Explorer in tab windows
- Connection Manager Window in the bottom
 Note: If you don't see ZappySys SSIS PowerPack Task or Components in SSIS Toolbox, please refer to this help link.
 -
Now, Drag and Drop SSIS Data Flow Task from SSIS Toolbox. Double click on the Data Flow Task to see Data Flow designer.

-
Read the data from the source, using any desired source component. You can even make an API call using the ZappySys JSON/XML/API Source and read data from there. In this example, we will use an OLE DB Source component to read real-time data from a SQL Server database.
-
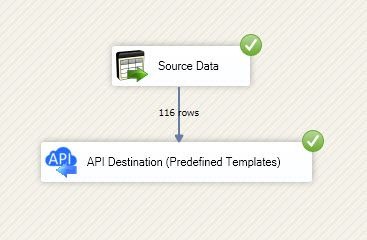
From the SSIS Toolbox drag and drop API Destination (Predefined Templates) on the Data Flow Designer surface and connect source component with it, and double click to edit it.
 - Drag and Drop")
-
Select New Connection to create a new connection:
API Destination - Cosmos DBConnect to your Azure Cosmos DB databases to read, query, create, update, and delete documents and more!

-
To configure the Cosmos DB connector, choose one of the following methods:
- Choose from Popular Connector List: Select a pre-installed service directly from the dropdown menu.
- Search Online: Use this to find and download a new connector file to your computer.
- Use Saved/Downloaded File: Once the file is downloaded, browse your local drive to load it into the configuration.
After that, just click Continue >>:
Cosmos DB
-
Proceed with selecting the desired Authentication Type. Then select API Base URL (in most cases default one is the right one). Finally, fill in all the required parameters and set optional parameters if needed. You may press a link Steps to Configure which will help set certain parameters. More info is available in Authentication section.
Cosmos DB authentication
Connecting to your Azure Cosmos DB data requires you to authenticate your REST API access. Follow the instructions below:- Go to your Azure portal homepage: https://portal.azure.com/.
- In the search bar at the top of the homepage, enter Azure Cosmos DB. In the dropdown that appears, select Azure Cosmos DB.
- Click on the name of the database account you want to connect to (also copy and paste the name of the database account for later use).
-
On the next page where you can see all of the database account information, look along the left side and select Keys:

- On the Keys page, you will have two tabs: Read-write Keys and Read-only Keys. If you are going to write data to your database, you need to remain on the Read-write Keys tab. If you are only going to read data from your database, you should select the Read-only Keys tab.
- On the Keys page, copy the PRIMARY KEY value and paste it somewhere for later use (the SECONDARY KEY value may also be copied and used).
- Now go to SSIS package or ODBC data source and use this PRIMARY KEY in API Key authentication configuration.
- Enter the primary or secondary key you recorded in step 6 into the Primary or Secondary Key field.
- Then enter the database account you recorded in step 3 into the Database Account field.
- Next, enter or select the default database you want to connect to using the Defualt Database field.
- Continue by entering or selecting the default table (i.e. container/collection) you want to connect to using the Default Table (Container/Collection) field.
- Select the Test Connection button at the bottom of the window to verify proper connectivity with your Azure Devops account.
- If the connection test succeeds, select OK.
- Done! Now you are ready to use Asana Connector!
API Connection Manager configuration
Just perform these simple steps to finish authentication configuration:
-
Set Authentication Type to
API Key [Http] - Optional step. Modify API Base URL if needed (in most cases default will work).
- Fill in all the required parameters and set optional parameters if needed.
- Finally, hit OK button:
Cosmos DBAPI Key [Http]https://[$Account$].documents.azure.comRequired Parameters Primary or Secondary Key Fill-in the parameter... Account Name (Case-Sensitive) Fill-in the parameter... Database Name (keep blank to use default) Case-Sensitive Fill-in the parameter... API Version Fill-in the parameter... Optional Parameters Default Table (needed to invoke #DirectSQL) 
-
Select [Dynamic Table] table from the dropdown, then select Upsert as operation, and hit Preview Data:
 API Destination - Cosmos DBConnect to your Azure Cosmos DB databases to read, query, create, update, and delete documents and more!Cosmos DB[Dynamic Table]Upsert
Optional Parameters Upsert true 
-
Finally, map the desired columns:
API Destination - Cosmos DBConnect to your Azure Cosmos DB databases to read, query, create, update, and delete documents and more!

-
That's it; we successfully configured the POST API Call. In a few clicks we configured the Cosmos DB API call using ZappySys Cosmos DB Connector
More actions supported by Cosmos DB Connector
Learn how to perform other actions directly in SSIS with these how-to guides:
- Create a document in the container
- Create Permission Token for a User (One Table)
- Create User for Database
- Delete a Document by Id
- Get All Documents for a Table
- Get All Users for a Database
- Get Database Information by Id or Name
- Get Document by Id
- Get List of Databases
- Get List of Tables
- Get table information by Id or Name
- Get table partition key ranges
- Get User by Id or Name
- Query documents using Cosmos DB SQL query language
- Update Document in the Container
- Make Generic API Request
- Make Generic API Request (Bulk Write)