Writing data in SSIS
In this section we will learn how to configure and use Shopify Connector in the API Destination to write data to Shopify.
Video tutorial
This video covers following and more so watch carefully. After watching this video follow the steps described in this article.
- How to download SSIS PowerPack for Shopify integration in SSIS
- How to configure connection for Shopify
- How to write or lookup data to Shopify
- Features about SSIS API Destination
- Using Shopify Connector in SSIS
Step-by-step instructions
In upper section we learned how to read data, now in this section we will learn how to configure Shopify in the API Source to POST data to the Shopify.
-
Open Visual Studio and click Create a new project.
-
Select Integration Services Project. Enter a name and location for your project, then click OK.
-
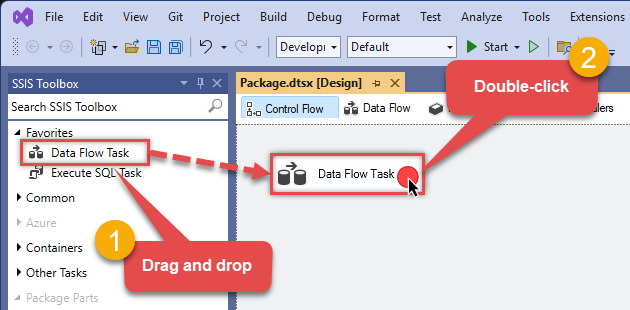
From the SSIS Toolbox, drag and drop a Data Flow Task onto the Control Flow surface, and double-click it:
-
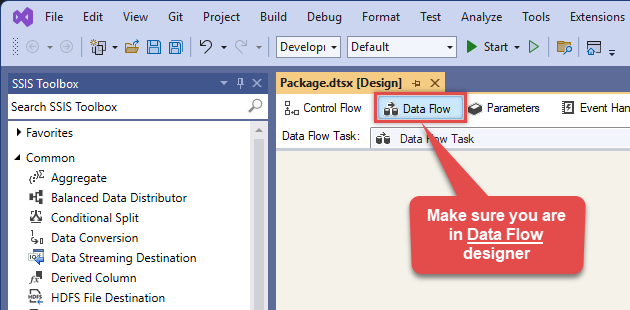
Make sure you are in the Data Flow Task designer:
-
Read the data from the source, using any desired source component. You can even make an API call using the ZappySys JSON/XML/API Source and read data from there. In this example, we will use an OLE DB Source component to read real-time data from a SQL Server database.
-
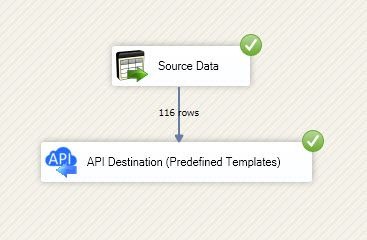
From the SSIS Toolbox drag and drop API Destination (Predefined Templates) on the Data Flow Designer surface and connect source component with it, and double click to edit it.
 - Drag and Drop")
-
Select New Connection to create a new connection:
API Destination - ShopifyRead and write Shopify data effortlessly. Integrate, manage, and automate customers, orders, products, and inventory — almost no coding required.

-
To configure the Shopify connector, choose one of the following methods:
- Choose from Popular Connector List: Select a pre-installed service directly from the dropdown menu.
- Search Online: Use this to find and download a new connector file to your computer.
- Use Saved/Downloaded File: Once the file is downloaded, browse your local drive to load it into the configuration.
After that, just click Continue >>:
Shopify
-
Proceed with selecting the desired Authentication Type. Then select API Base URL (in most cases default one is the right one). Finally, fill in all the required parameters and set optional parameters if needed. You may press a link Steps to Configure which will help set certain parameters. More info is available in Authentication section.
Admin Access Token (Custom App)
Shopify authentication
Method: Admin API Access Token (Recommended for Single-Store Connections)
This method uses a permanent Admin API Access Token generated from a "Custom App" within your Shopify Admin. This is the simplest way to connect if you are only integrating with your own store.
Quick Setup Summary:
- Log in to your Shopify Admin and click Settings (the gear icon in the bottom left).
- Select Apps from the left-side settings menu.
- Click the Develop apps button at the top right of the page.
- Open your app (or create a new one) and configure the necessary Admin API access scopes.
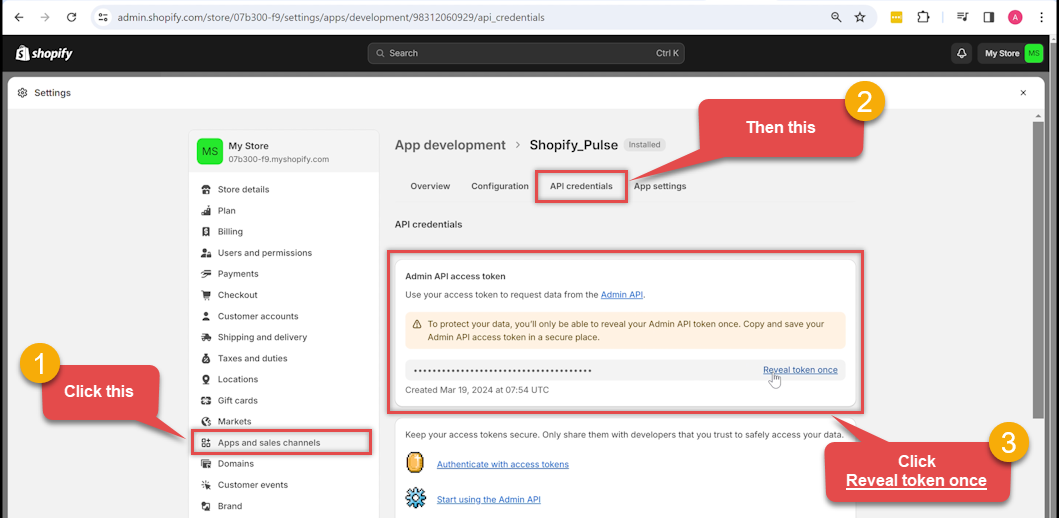
- Click Install app. Once installed, navigate to the API credentials tab.
Important: Your Admin API access token (shpat_xxx) is only revealed once. Please copy and store it securely immediately after clicking "Reveal token once."
Note: If you are using the Shopify Dev Dashboard (via a Partner Account), you must use the OAuth Authorization Code Grant method, as those apps do not issue permanent 'shpat' tokens.
Video Tutorial: How to Get Admin API Access Token in Shopify?
Part 1: Create and Configure the Shopify App
- Visit https://accounts.shopify.com and log into your Shopify store account.
- After logging in, select the store you wish to connect to.
- Select Settings (gear icon in the lower-left corner) to launch the Settings screen.
- On the left menu panel, select Apps. (Note: Sales channels are now managed in a separate menu item).
- On the Apps page, select Develop apps (near the top right of the screen).
Note: If this is your first time accessing this section, you may need to click "Allow custom app development" to proceed. - On the App development screen, select Create an app.
- Give the app a name (e.g., "ZappySys Connector"), select the appropriate developer from the drop-down, and select Create app.
- Click Configure Admin API scopes.
- In the Admin API access scopes screen, select the checkboxes based on which features you plan to use:
- For Customers:
read_customers,write_customers - For Orders:
read_orders,write_orders - For Products:
read_products,write_products - For Inventory:
read_inventory,write_inventory - For Locations:
read_locations - For Payouts/Analytics:
read_all_ordersorread_analytics
Important: If you select fewer scopes than required, some connector features will not work. To ensure full functionality, select both read and write permissions for the resources you need to access.
- For Customers:
- After selecting your scopes, click Save at the top or bottom of the page.
- Install the app by clicking the Install app button (upper-right corner). If prompted, confirm by selecting Install.
Part 2: Get Admin API Access Token
- Once the app is installed, you will be taken to the API credentials tab.
- Look for the Admin API access token section. Select Reveal token once to show the token (it starts with
shpat_). IMPORTANT: Copy and save this token immediately in a secure location. You cannot view it again after leaving this page.
Note: You may also see an API Key or Secret Key in this section; these are not required for this specific authentication method. Use only the Admin API access token.
Part 3: Configure the ZappySys Connector
- Open the ZappySys connector configuration screen.
- Enter Subdomain: Enter the unique subdomain of your Shopify store into the Subdomain parameter textbox.
How to find your Subdomain:
If you use a custom domain (e.g.,
www.my-store.com), you must still use your internal Shopify subdomain:- Method 1 (Admin URL): While logged into Shopify, check your browser address bar.
- If the URL is
admin.shopify.com/store/my-unique-slug, your subdomain is my-unique-slug. - If the URL is
my-unique-slug.myshopify.com/admin, your subdomain is my-unique-slug.
- If the URL is
- Method 2 (Domains Setting): Go to Settings > Domains. Look for the "Primary domain for the online store" or the fallback domain ending in
.myshopify.com. The part before the dots is your subdomain.
- Method 1 (Admin URL): While logged into Shopify, check your browser address bar.
- Enter Access Token: Paste the
shpat_xxxtoken you saved in Step 14 into the Admin API Access Token textbox.
Tip: Click the ellipses (...) button inside the textbox to open a larger dialog for easier pasting. - Click Test Connection to verify the settings.
- If the test is successful, click OK to save the configuration.
API Connection Manager configuration
Just perform these simple steps to finish authentication configuration:
-
Set Authentication Type to
Admin Access Token (Custom App) [Http] - Optional step. Modify API Base URL if needed (in most cases default will work).
- Fill in all the required parameters and set optional parameters if needed.
- Finally, hit OK button:
ShopifyAdmin Access Token (Custom App) [Http]https://[$Subdomain$].myshopify.com/admin/api/2025-01Required Parameters Sub-domain Fill-in the parameter... Admin API Access Token Fill-in the parameter... Optional Parameters RetryMode RetryWhenStatusCodeMatch RetryStatusCodeList 429 RetryCountMax 5 RetryMultiplyWaitTime True  Find full details in the Shopify Connector authentication reference.
OAuth Authorization Code Grant (3-legged) - RECOMMENDED
Shopify authentication
Authenticate using OAuth 2.0 Authorization Code Flow (3-legged). Use this for apps built in the Dev Dashboard (https://dev.shopify.com). This is the primary OAuth flow supported for public apps and apps created in the Dev Dashboard.
Method: OAuth Authorization Code Grant (3-Legged)
This method is for apps built in the Shopify Dev Dashboard. Use this if you are a Partner or developer building a multi-store integration.
Note: If you are connecting to your own single store, the Admin Access Token method is significantly simpler. Use this OAuth method only if your integration specifically requires a Client ID and Secret.
Part 1: Create and Configure App in Dev Dashboard
- Log in to the Shopify Dev Dashboard using your Partner account.
- Click Apps in the left menu, then click Create app.
- Select Start from Dev Dashboard (manual setup) and give your app a name.
- Step 1: Configure Scopes and URLs via "Versions"
- Click the Versions tab at the top of the app screen.
- Click Create version (or edit the Draft).
- In the URLs section, enter
https://zappysys.com/oauthinto Allowed redirection URL(s). - Select your Admin API scopes based on which features you plan to use:
- For Customers:
read_customers,write_customers - For Orders:
read_orders,write_orders - For Products:
read_products,write_products - For Inventory:
read_inventory,write_inventory - For Locations:
read_locations - For Payouts/Analytics:
read_all_ordersorread_analytics
Important: If you select fewer scopes than required, some connector features will not work. To ensure full functionality, select both read and write permissions for the resources you need to access.
- For Customers:
- Click Release (top right). Note: Settings only become active once a version is Released.
- Step 2: Set Distribution Method
- Click Distribution in the left-side menu.
- Select Custom Distribution.
- Enter your Shopify store URL (e.g.,
your-store.myshopify.com) and click Generate link. - Action Required: Copy the generated install link, open it in your browser, and follow the prompts to install/unlock the app for your store. You must complete this step before testing the connection in ZappySys.
Part 2: Get Client Credentials
- Click on Settings in the left-side navigation of your app.
- In the Client credentials section, copy the Client ID and Client Secret (click the eye icon to reveal).
Part 3: Configure the ZappySys Connector
- Open the ZappySys connector and select OAuth Authorization Code Grant (3-legged).
- Subdomain: Enter your store handle (the part before
.myshopify.com). - Client ID / Secret: Paste the credentials from Steps 6 and 7.
- Redirect URI: Enter
https://zappysys.com/oauth. - Click Test Connection. You will be prompted to authorize the app in your browser.
Note on Tokens: Successful authorization generates an "Offline" Access Token (starting with
shpca_). This token does not expire and does not require a refresh token.Troubleshooting: If you see "App no longer available," ensure you have completed the Distribution step and followed the Install Link in Step 5 to unlock the app for your store.
API Connection Manager configuration
Just perform these simple steps to finish authentication configuration:
-
Set Authentication Type to
OAuth Authorization Code Grant (3-legged) - RECOMMENDED [OAuth] - Optional step. Modify API Base URL if needed (in most cases default will work).
- Fill in all the required parameters and set optional parameters if needed.
- Press Generate Token button to generate the tokens.
- Finally, hit OK button:
ShopifyOAuth Authorization Code Grant (3-legged) - RECOMMENDED [OAuth]https://[$Subdomain$].myshopify.com/admin/api/2025-01Required Parameters Redirect URI (***Must match App Settings***) Fill-in the parameter...  Find full details in the Shopify Connector authentication reference.
 -
Select the desired endpoint, change/pass the properties values, and go to the Mappings tab to map the columns.
API Destination - ShopifyRead and write Shopify data effortlessly. Integrate, manage, and automate customers, orders, products, and inventory — almost no coding required.

-
Finally, map the desired columns:
API Destination - ShopifyRead and write Shopify data effortlessly. Integrate, manage, and automate customers, orders, products, and inventory — almost no coding required.

-
That's it; we successfully configured the POST API Call. In a few clicks we configured the Shopify API call using ZappySys Shopify Connector