| Property Name |
Description |
| LoggingMode |
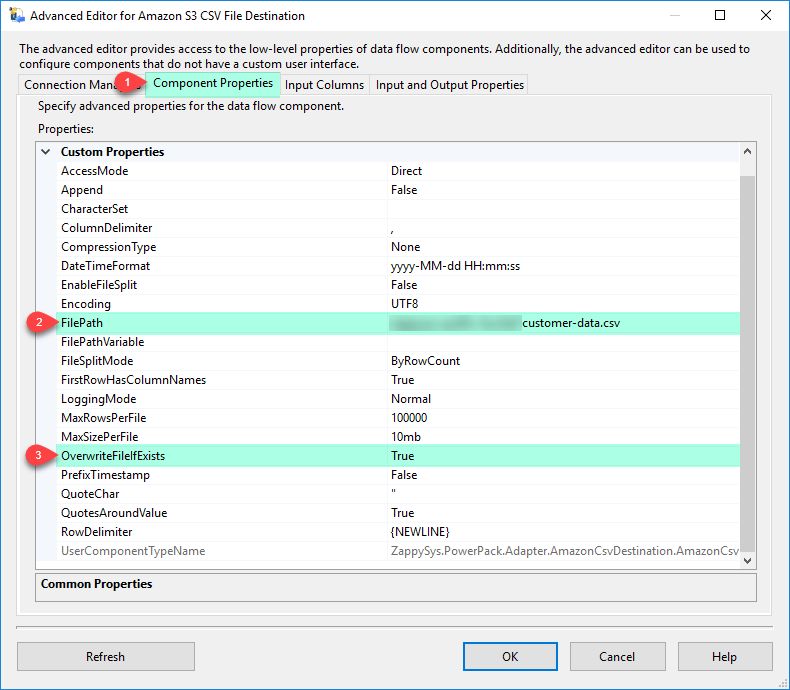
LoggingMode determines how much information is logged during Package Execution. Set Logging mode to Debugging for maximum log.
Available Options (Use numeric value listed in bracket if you have to define expression on this property (for dynamic behavior).
| Option |
Description |
| Normal [0] |
Normal |
| Medium [1] |
Medium |
| Detailed [2] |
Detailed |
| Debugging [3] |
Debugging |
|
| PrefixTimestamp |
When you enable this property it will prefix timestamp before Log messages. |
| AccessMode |
File path access mode (e.g. direct or variable)
Available Options (Use numeric value listed in bracket if you have to define expression on this property (for dynamic behavior).
| Option |
Description |
| Direct [0] |
Direct |
| Variable [1] |
Variable |
|
| FilePathVariable |
Variable name which holds file path where you want to write data |
| CompressionType |
Compression format for source file (e.g. gzip, zip). If you compress files then add correct extension to file path manually (e.g. *.gz or *.zip).
Available Options (Use numeric value listed in bracket if you have to define expression on this property (for dynamic behavior).
| Option |
Description |
| None [0] |
None |
| GZip [1] |
GZip |
| Zip [2] |
Zip |
| TarGZip [3] |
TarGZip |
|
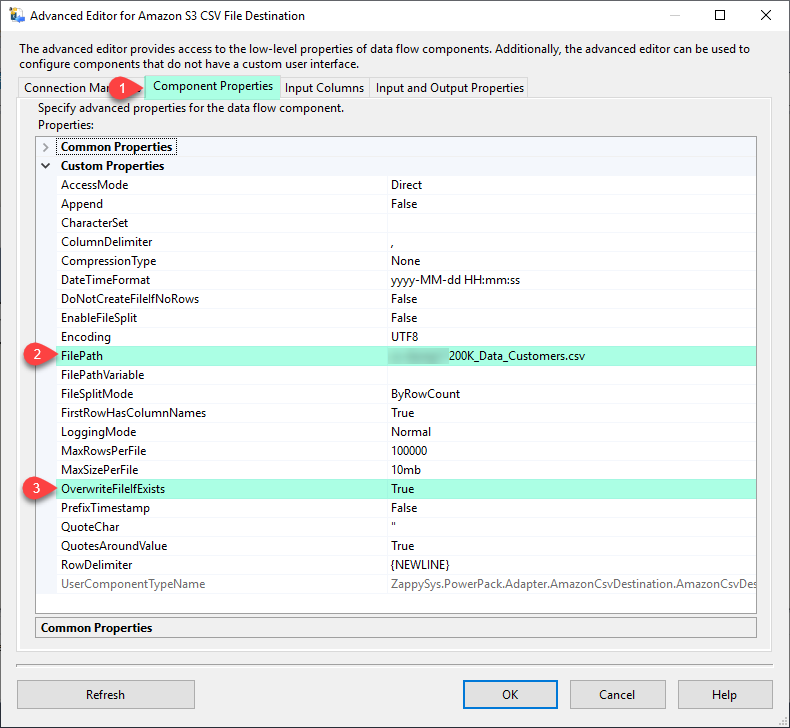
| FilePath |
File path where you want to write data. You can also use variable placeholders anywhere in the path. Example: myroot/folder/{{User::FileName}} --OR-- myroot/folder/file_{{System::StartTime,yyyyMMdd}}.dat |
| Append |
Append data to file |
| RowDelimiter |
Row separator for data files (If this is not specified then New line is used). (NOTE: use \t for tab, \r\n for new line (This is default), \r for carriage return, \n for new line). You can type any string here including special values such as {SPACE}, {NEWLINE}, {TAB}, {CR}, {LF}, {CRLF}. To use Hex code for seperator you may use \xNN (for ascii) or \xNNNN (for unicode charcter). For example \x221E will use infinity symbol as column seperator. |
| OverwriteFileIfExists |
Indicates whether you want to overwrite target file if exists. This setting is ignored if Append=true |
| ColumnDelimiter |
Field separator for data files. (NOTE: use \t for tab, \r\n for new line (This is default), \r for carriage return, \n for new line). You can type any string here including special values such as {SPACE}, {NEWLINE}, {TAB}, {CR}, {LF}, {CRLF}. To use Hex code for seperator you may use \xNN (for ascii) or \xNNNN (for unicode charcter). For example \x221E will use infinity symbol as column seperator. |
| FirstRowHasColumnNames |
Indicates whether first row has column names (Default is true) |
| QuotesAroundValue |
Wrap quotes around value in data files |
| QuoteChar |
Character for quote indicator around value |
| DateTimeFormat |
Date time format string for any column with DT_DBDATETIME, DT_DBDATETIME2 or DB_DATE format |
| EnableFileSplit |
Enable splitting large file into multiple files (see FileSplitMode to configure splitting mode). |
| FileSplitMode |
Specifies file splitting method (i.e. split by row count).
Available Options (Use numeric value listed in bracket if you have to define expression on this property (for dynamic behavior).
| Option |
Description |
| ByRowCount [0] |
ByRowCount |
| BySize [1] |
BySize |
|
| MaxRowsPerFile |
Specifies maximum rows per file when FileSplitMethod is set to ByRowCount. When this row count is reached data is written to new file. |
| MaxSizePerFile |
Specifies maximum size per file when FileSplitMethod is set to BySize. Enter size in following size format specifier allowed bytes, kb, mb, gb, tb (e.g. 100mb) |
| Encoding |
Specifies encoding for data. If you set CharacterSet property then Encoing is ignored.
Available Options (Use numeric value listed in bracket if you have to define expression on this property (for dynamic behavior).
| Option |
Description |
| Default [0] |
Default |
| ASCII [1] |
ASCII |
| UTF8 [2] |
UTF-8 |
| UTF16 [3] |
UTF-16 LE (i.e. Unicode Little Endian) |
| UTF32 [4] |
UTF-32 |
| UTF8WithoutBOM [5] |
UTF-8 Without BOM |
| UTF32WithoutBOM [6] |
UTF-32 Without BOM |
| UTF7 [7] |
UTF-7 |
| UTF7WithoutBOM [8] |
UTF-7 Without BOM |
| UTF16WithoutBOM [9] |
UTF-16 Without BOM |
| BigEndian [10] |
UTF-16 BE (i.e. Unicode Big Endian) |
| BigEndianWithoutBOM [11] |
UTF-16 BE Without BOM |
|
| CharacterSet |
Character set name (i.e. ISO-8859-1) or code page number. If you set this property then Encoding property will be ignored. To output without BOM set this property to blank and use Encoding instead. |
| DoNotCreateFileIfNoRows |
Indicates if empty file should be created or not if no input records found. This option is ignored if you enabled Append option (some destination i.e. S3 may not support append). By default empty file is created if zero input records. Set this to true if you do not want empty file on zero records. |
| DisableMultiPart |
Indicates if empty file should be created or not if no input records found. This option is ignored if you enabled Append option (some destination i.e. S3 may not support append). By default empty file is created if zero input records. Set this to true if you do not want empty file on zero records. |
| EnableCustomEscapeSequence |
Enable this option to define custom replacement rules (See also CustomEscapeSequenceRule). Replacement rule should contain key=value pairs separated by semicolon. You can hard code character directly or use designated keyword (e.g. supported keywords are {doublequote} {semicolon} {tab}, {cr}, {lf}, {null}). You can also use Hex chars to search (e.g. \xff44=something). Use blank value in the second part to replace with blank. Example: {null}=\0;"="";{semicolon}=\{semicolon};{cr}=\r;{lf}=\n;{tab}=\t;{columndelimiter}=\{columndelimiter};\xff32=;\xff31=;{null}=; |
| CustomEscapeSequenceRule |
Define custom replacement rules to search and replace certain characters. This option is only valid when EnableCustomEscapeSequence=true. Replacement rule should contain key=value pairs separated by semicolon (i.e. ; ). In the key=value pairs, left side you have to define character to be searched and on the right side replacement value. You can hard code character directly or use designated keyword (e.g. supported keywords are {doublequote} {semicolon} {tab}, {cr}, {lf}, {null}). You can also use Hex chars to search (e.g. \xff44=something). Use blank value in the second part to replace with blank. Example: {null}=\0;"="";{semicolon}=\{semicolon};{cr}=\r;{lf}=\n;{tab}=\t;{columndelimiter}=\{columndelimiter};\xff32=;\xff31=;{null}=; |


