Writing data in SSIS
In this section we will learn how to configure and use OData Connector in the API Destination to write data to OData.
Video tutorial
This video covers following and more so watch carefully. After watching this video follow the steps described in this article.
- How to download SSIS PowerPack for OData integration in SSIS
- How to configure connection for OData
- How to write or lookup data to OData
- Features about SSIS API Destination
- Using OData Connector in SSIS
Step-by-step instructions
In upper section we learned how to read data, now in this section we will learn how to configure OData in the API Source to POST data to the OData.
-
Open Visual Studio and click Create a new project.
-
Select Integration Services Project. Enter a name and location for your project, then click OK.
-
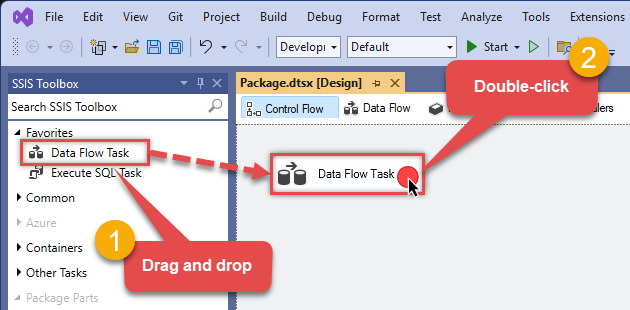
From the SSIS Toolbox, drag and drop a Data Flow Task onto the Control Flow surface, and double-click it:
-
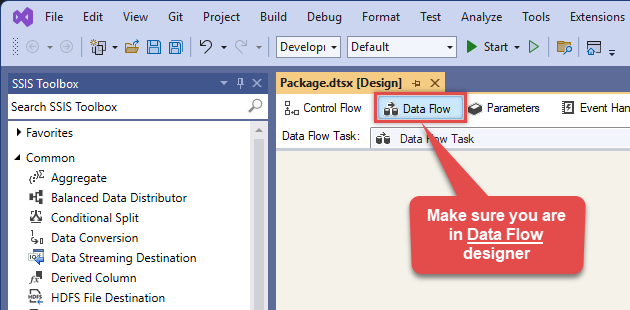
Make sure you are in the Data Flow Task designer:
-
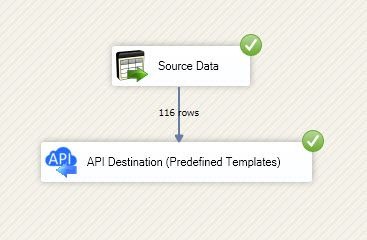
Read the data from the source, using any desired source component. You can even make an API call using the ZappySys JSON/XML/API Source and read data from there. In this example, we will use an OLE DB Source component to read real-time data from a SQL Server database.
-
From the SSIS Toolbox drag and drop API Destination (Predefined Templates) on the Data Flow Designer surface and connect source component with it, and double click to edit it.
 - Drag and Drop")
-
Select New Connection to create a new connection:
API Destination - ODataRead and write OData API data effortlessly. Query, integrate, and manage entities and feeds — almost no coding required.

-
To configure the OData connector, choose one of the following methods:
- Choose from Popular Connector List: Select a pre-installed service directly from the dropdown menu.
- Search Online: Use this to find and download a new connector file to your computer.
- Use Saved/Downloaded File: Once the file is downloaded, browse your local drive to load it into the configuration.
After that, just click Continue >>:
OData
-
Proceed with selecting the desired Authentication Type. Then select API Base URL (in most cases default one is the right one). Finally, fill in all the required parameters and set optional parameters if needed. You may press a link Steps to Configure which will help set certain parameters. More info is available in Authentication section.
No Authentication
OData authentication
No instructions available.
API Connection Manager configuration
Just perform these simple steps to finish authentication configuration:
-
Set Authentication Type to
No Authentication [Http] - Optional step. Modify API Base URL if needed (in most cases default will work).
- Fill in all the required parameters and set optional parameters if needed.
- Finally, hit OK button:
ODataNo Authentication [Http]https://services.odata.org/V3/Northwind/Northwind.svcOptional Parameters RetryMode RetryWhenStatusCodeMatch RetryStatusCodeList 429 RetryCountMax 5 RetryMultiplyWaitTime True IgnoreSSLCertificateErrors SslVersion  Find full details in the OData Connector authentication reference.
Windows Authentication
OData authentication
No instructions available.
API Connection Manager configuration
Just perform these simple steps to finish authentication configuration:
-
Set Authentication Type to
Windows Authentication [Http] - Optional step. Modify API Base URL if needed (in most cases default will work).
- Fill in all the required parameters and set optional parameters if needed.
- Finally, hit OK button:
ODataWindows Authentication [Http]https://services.odata.org/V3/Northwind/Northwind.svcThere are no parameters to configure.
Find full details in the OData Connector authentication reference.Basic Authentication
OData authentication
No instructions available.
API Connection Manager configuration
Just perform these simple steps to finish authentication configuration:
-
Set Authentication Type to
Basic Authentication [Http] - Optional step. Modify API Base URL if needed (in most cases default will work).
- Fill in all the required parameters and set optional parameters if needed.
- Finally, hit OK button:
ODataBasic Authentication [Http]https://services.odata.org/V3/Northwind/Northwind.svcRequired Parameters UserName Fill-in the parameter... Password Fill-in the parameter... Optional Parameters RetryMode RetryWhenStatusCodeMatch RetryStatusCodeList 429 RetryCountMax 5 RetryMultiplyWaitTime True IgnoreSSLCertificateErrors SslVersion
Find full details in the OData Connector authentication reference.NTLM Authentication
OData authentication
No instructions available.
API Connection Manager configuration
Just perform these simple steps to finish authentication configuration:
-
Set Authentication Type to
NTLM Authentication [Http] - Optional step. Modify API Base URL if needed (in most cases default will work).
- Fill in all the required parameters and set optional parameters if needed.
- Finally, hit OK button:
ODataNTLM Authentication [Http]https://services.odata.org/V3/Northwind/Northwind.svcRequired Parameters UserName (i.e. Domain\UserName) Fill-in the parameter... Password Fill-in the parameter... Optional Parameters RetryMode RetryWhenStatusCodeMatch RetryStatusCodeList 429 RetryCountMax 5 RetryMultiplyWaitTime True IgnoreSSLCertificateErrors SslVersion
Find full details in the OData Connector authentication reference.Token Authentication
OData authentication
No instructions available.
API Connection Manager configuration
Just perform these simple steps to finish authentication configuration:
-
Set Authentication Type to
Token Authentication [Http] - Optional step. Modify API Base URL if needed (in most cases default will work).
- Fill in all the required parameters and set optional parameters if needed.
- Finally, hit OK button:
ODataToken Authentication [Http]https://services.odata.org/V3/Northwind/Northwind.svcRequired Parameters Token Fill-in the parameter... Optional Parameters AuthScheme Bearer AuthHeader Authorization RetryMode RetryWhenStatusCodeMatch RetryStatusCodeList 429 RetryCountMax 5 RetryMultiplyWaitTime True IgnoreSSLCertificateErrors SslVersion
Find full details in the OData Connector authentication reference.OAuth Connection for OData API
OData authentication
No instructions available.
API Connection Manager configuration
Just perform these simple steps to finish authentication configuration:
-
Set Authentication Type to
OAuth Connection for OData API [OAuth] - Optional step. Modify API Base URL if needed (in most cases default will work).
- Fill in all the required parameters and set optional parameters if needed.
- Press Generate Token button to generate the tokens.
- Finally, hit OK button:
ODataOAuth Connection for OData API [OAuth]https://services.odata.org/V3/Northwind/Northwind.svcOptional Parameters GrantType Default OAuthVersion Default ClientId ClientSecret UserName Password Scope AuthUrl https://some-domain.com/api/auth TokenUrl https://some-domain.com/api/token ReturnUrl https://zappysys.com/oauth ExtraAttributesForTokenRequest ExtraAttributesForAuthRequest DoNotIncludeCredentialsInHeader DoNotIncludeCredentialsInBody RenewBeforeSec ExtraHeaders (e.g. x-hdr1:AAA||x-hdr2:BBB) ContentType EnableCodeVerifier RemoveAuthHeader CustomAuthHeader CustomTokenPrefix RetryMode RetryWhenStatusCodeMatch RetryStatusCodeList 429 RetryCountMax 5 RetryMultiplyWaitTime True IgnoreSSLCertificateErrors SslVersion  Find full details in the OData Connector authentication reference.
 -
Set Authentication Type to
-
Select the desired endpoint, change/pass the properties values, and go to the Mappings tab to map the columns.
API Destination - ODataRead and write OData API data effortlessly. Query, integrate, and manage entities and feeds — almost no coding required.

-
Finally, map the desired columns:
API Destination - ODataRead and write OData API data effortlessly. Query, integrate, and manage entities and feeds — almost no coding required.

-
That's it; we successfully configured the POST API Call. In a few clicks we configured the OData API call using ZappySys OData Connector