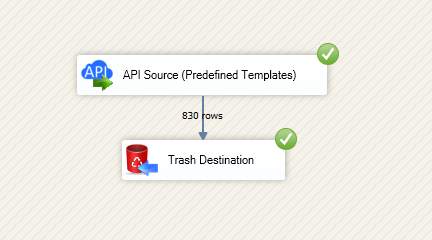
Reading data in SSIS
In this section we will learn how to configure and use Google BigQuery Connector in API Source to extract data from Google BigQuery.
Video tutorial
This video covers following and more so watch carefully. After watching this video follow the steps described in this article.
- How to download SSIS PowerPack for Google BigQuery integration in SSIS
- How to configure connection for Google BigQuery
- How to read data from Google BigQuery
- Features about SSIS API Source
- Using Google BigQuery Connector in SSIS
Step-by-step instructions
-
Begin with opening Visual Studio and Create a New Project.
-
Select Integration Service Project and in new project window set the appropriate name and location for project. And click OK.
In the new SSIS project screen you will find the following:
- SSIS ToolBox on left side bar
- Solution Explorer and Property Window on right bar
- Control flow, data flow, event Handlers, Package Explorer in tab windows
- Connection Manager Window in the bottom
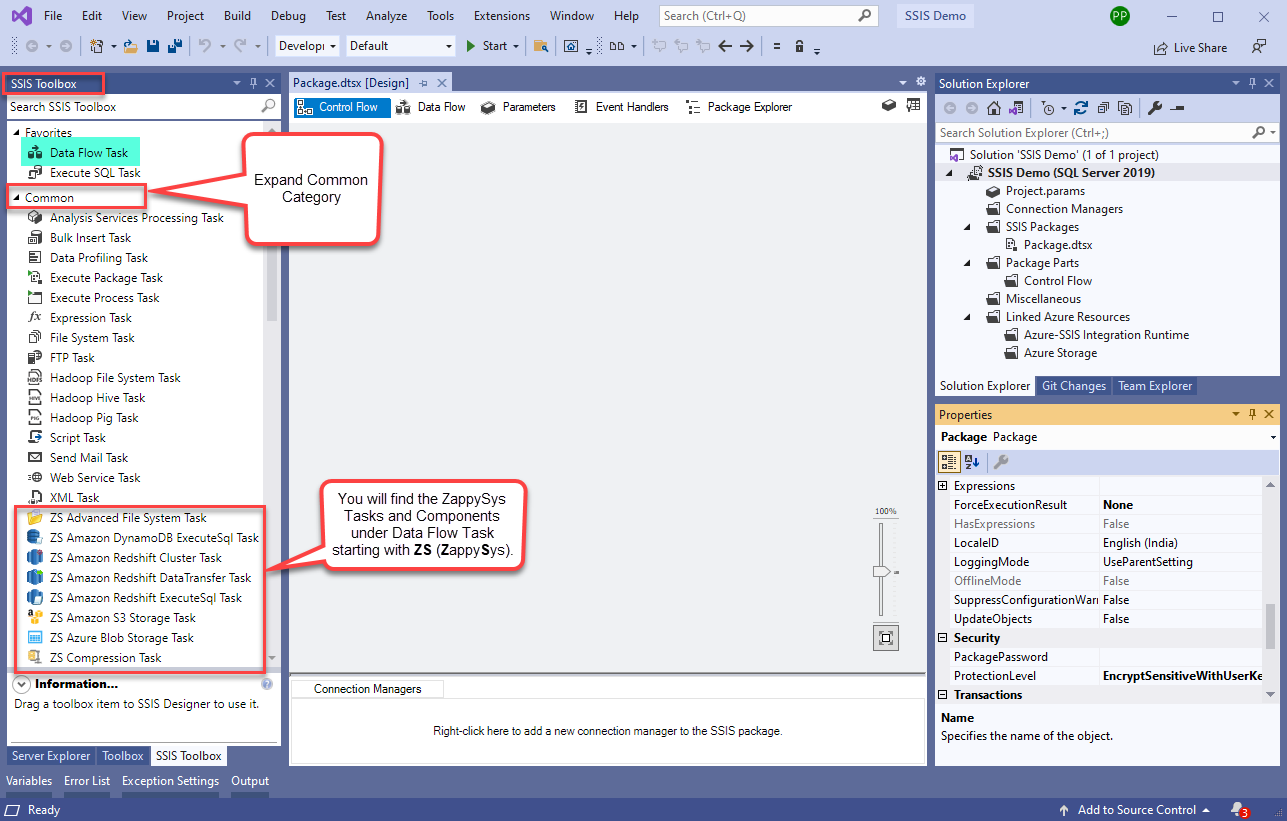 Note: If you don't see ZappySys SSIS PowerPack Task or Components in SSIS Toolbox, please refer to this help link.
 -
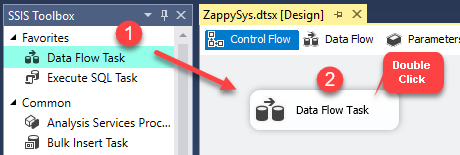
Now, Drag and Drop SSIS Data Flow Task from SSIS Toolbox. Double click on the Data Flow Task to see Data Flow designer.
-
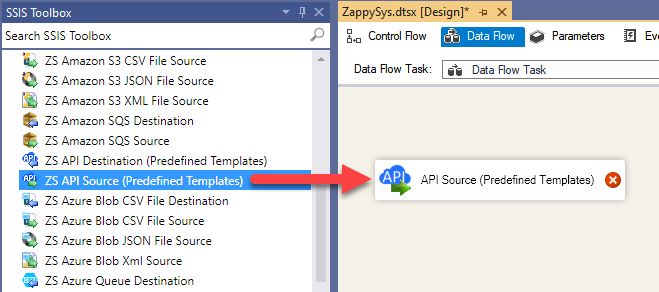
From the SSIS toolbox drag and API Source (Predefined Templates) on the data flow designer surface, and double click on it to edit it:
-
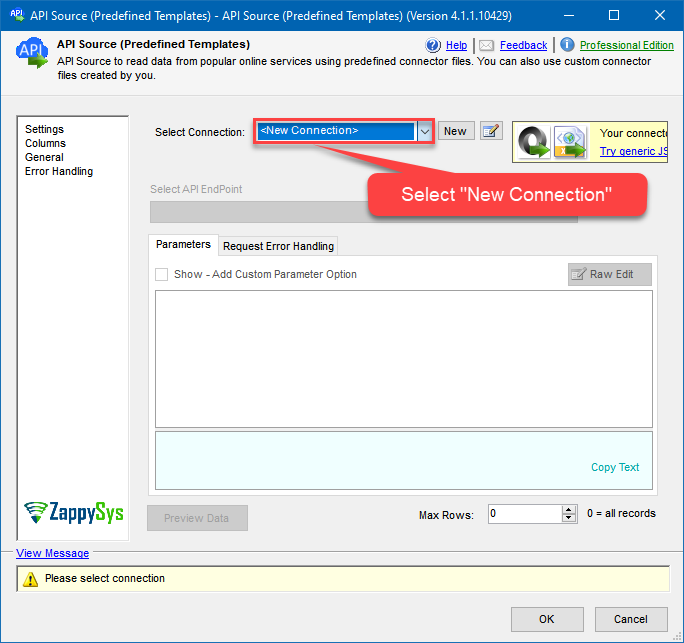
Select New Connection to create a new connection:
-
Use a preinstalled Google BigQuery Connector from Popular Connector List or press Search Online radio button to download Google BigQuery Connector. Once downloaded simply use it in the configuration:
Google BigQuery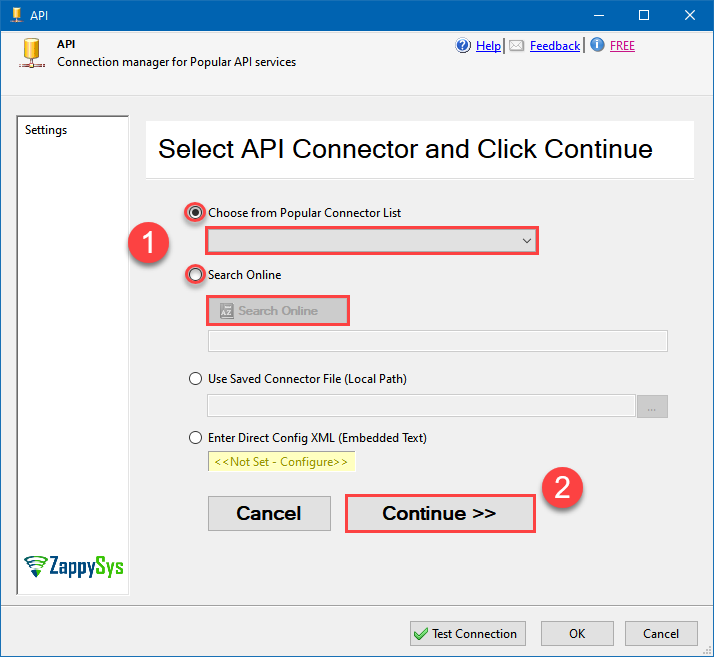
-
Now it's time to configure authentication. Firstly, configure authentication settings in Google BigQuery service and then proceed by configuring API Connection Manager. Start by expanding an authentication type:
Google BigQuery authentication
User accounts represent a developer, administrator, or any other person who interacts with Google APIs and services. User accounts are managed as Google Accounts, either with Google Workspace or Cloud Identity. They can also be user accounts that are managed by a third-party identity provider and federated with Workforce Identity Federation. [API reference]
Follow these steps on how to create Client Credentials (User Account principle) to authenticate and access BigQuery API in SSIS package or ODBC data source:
WARNING: If you are planning to automate processes, we recommend that you use a Service Account authentication method. In case, you still need to use User Account, then make sure you use a system/generic account (e.g.automation@my-company.com). When you use a personal account which is tied to a specific employee profile and that employee leaves the company, the token may become invalid and any automated processes using that token will start to fail.Step-1: Create project
This step is optional, if you already have a project in Google Cloud and can use it. However, if you don't, proceed with these simple steps to create one:
-
First of all, go to Google API Console.
-
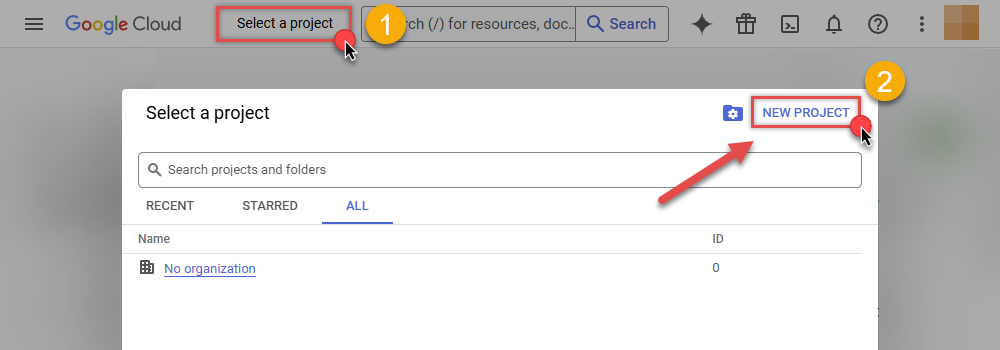
Then click Select a project button and then click NEW PROJECT button:
-
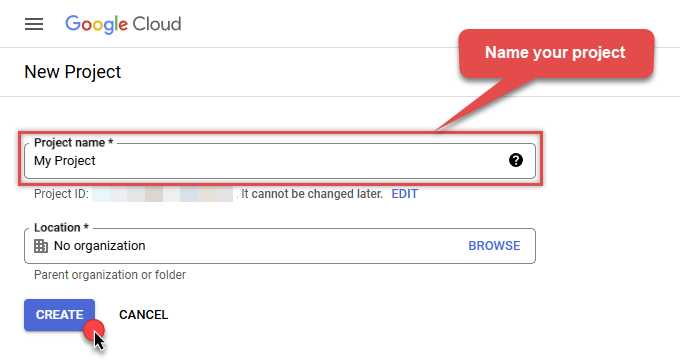
Name your project and click CREATE button:
-
Wait until the project is created:
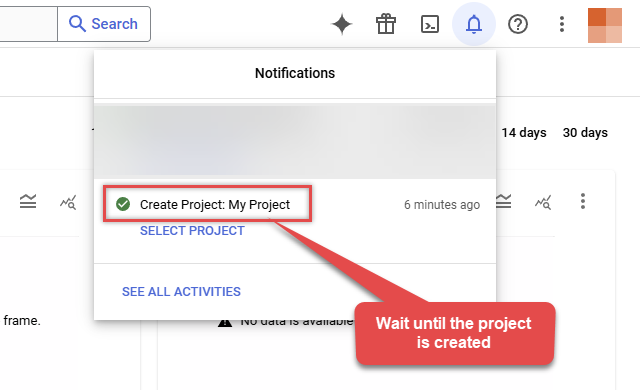
- Done! Let's proceed to the next step.
Step-2: Enable Google Cloud APIs
In this step we will enable BigQuery API and Cloud Resource Manager API:
-
Select your project on the top bar:
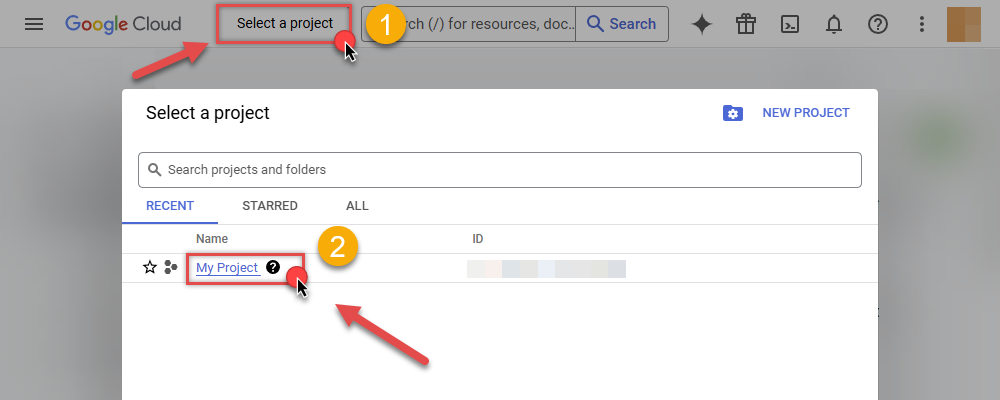
-
Then click the "hamburger" icon on the top left and access APIs & Services:
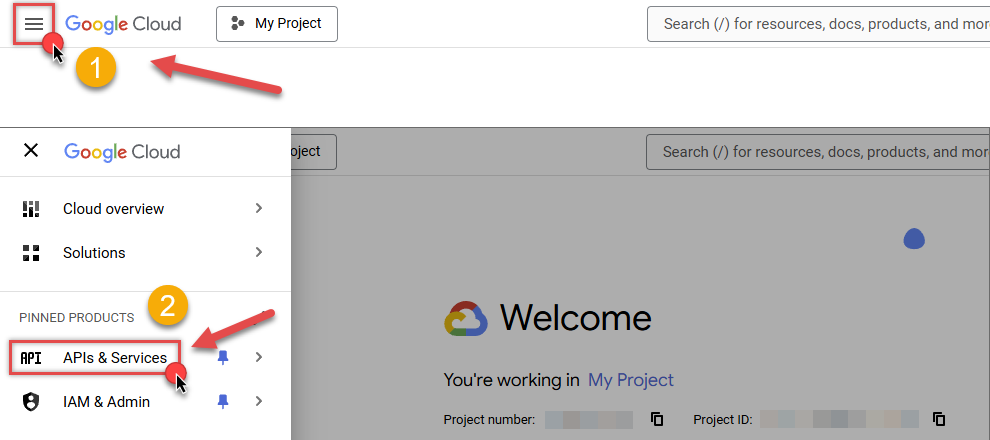
-
Now let's enable several APIs by clicking ENABLE APIS AND SERVICES button:
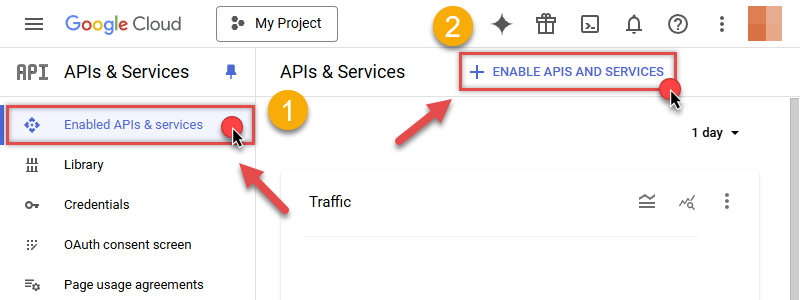
-
In the search bar search for
bigquery apiand then locate and select BigQuery API: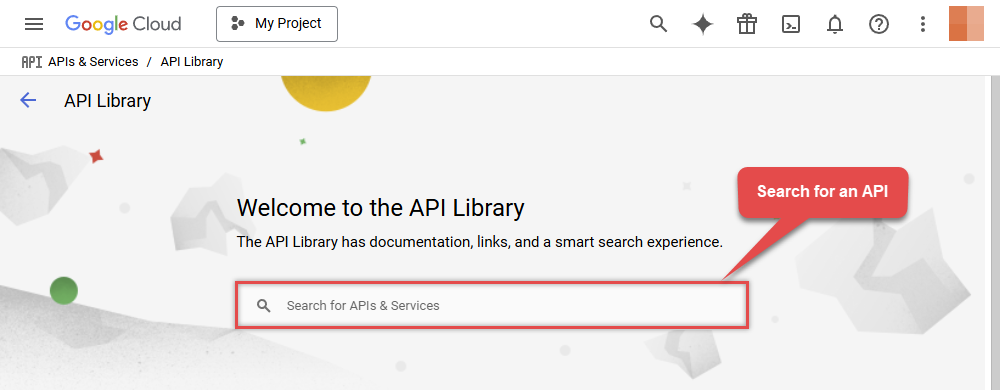
-
If BigQuery API is not enabled, enable it:
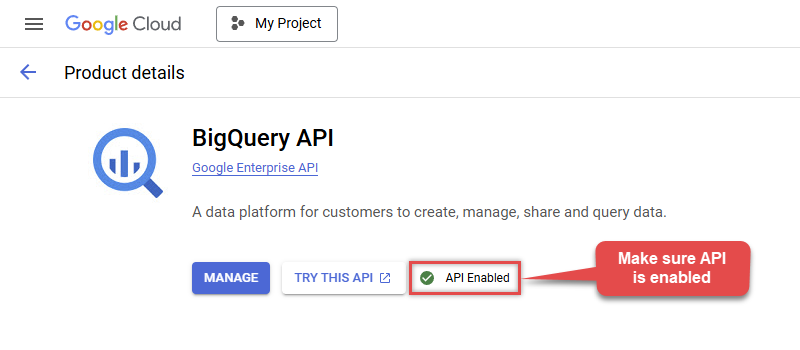
-
Then repeat the step and enable Cloud Resource Manager API as well:
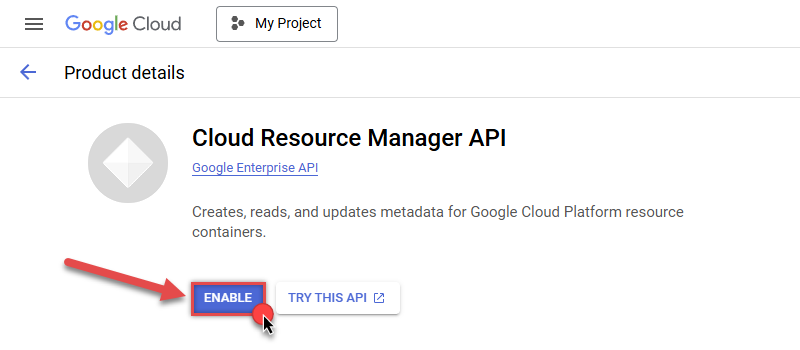
- Done! Let's proceed to the next step.
Step-3: Create OAuth application
-
First of all, click the "hamburger" icon on the top left and then hit VIEW ALL PRODUCTS:
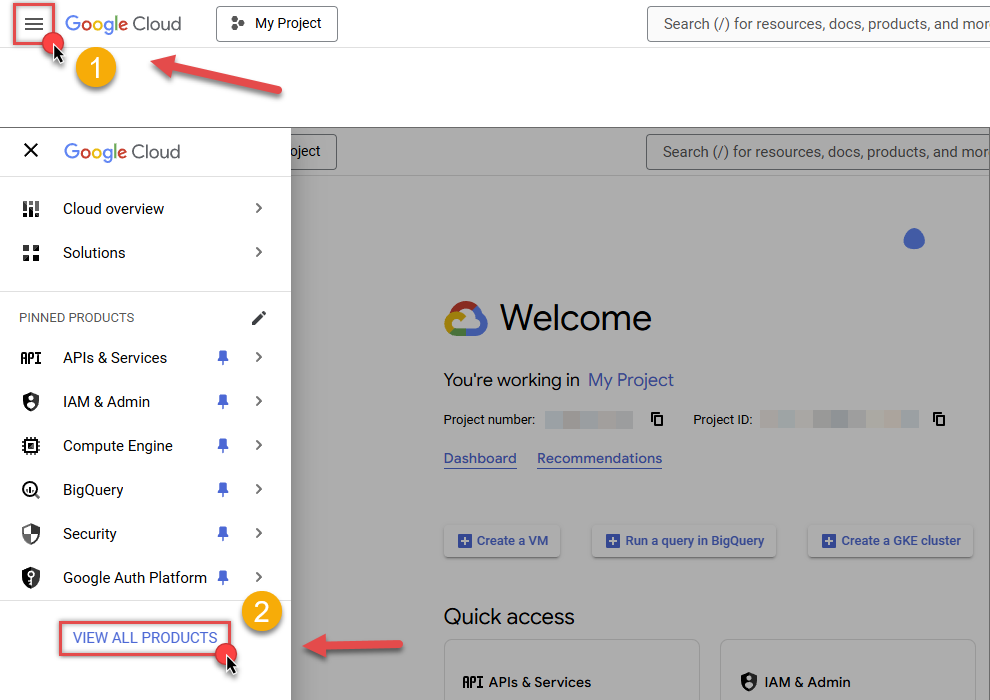
-
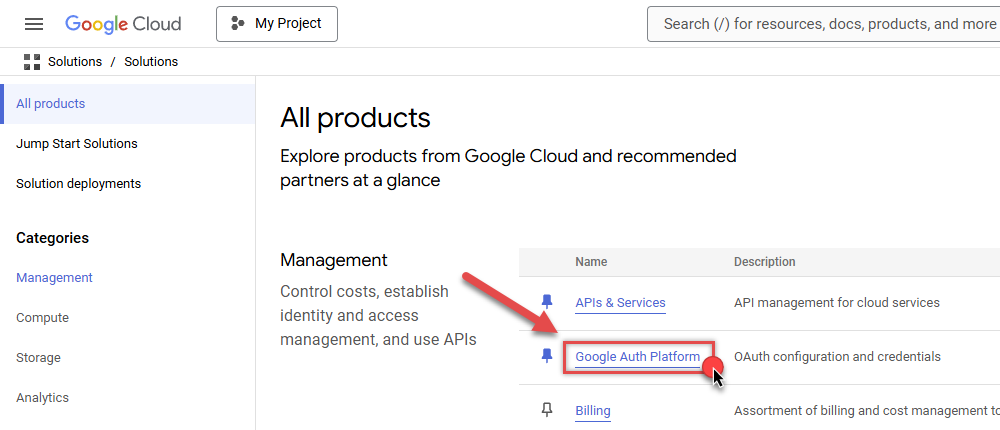
Then access Google Auth Platform to start creating an OAuth application:
-
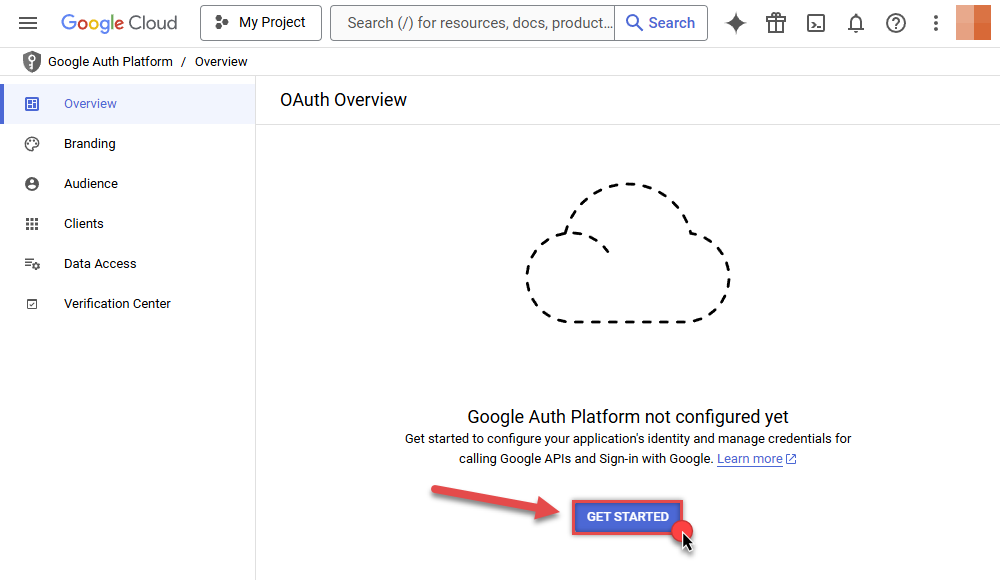
Start by pressing GET STARTED button:
-
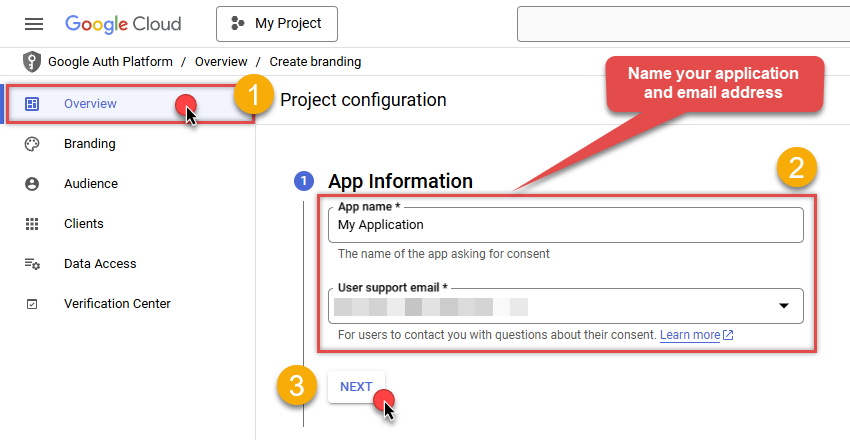
Next, continue by filling in App name and User support email fields:
-
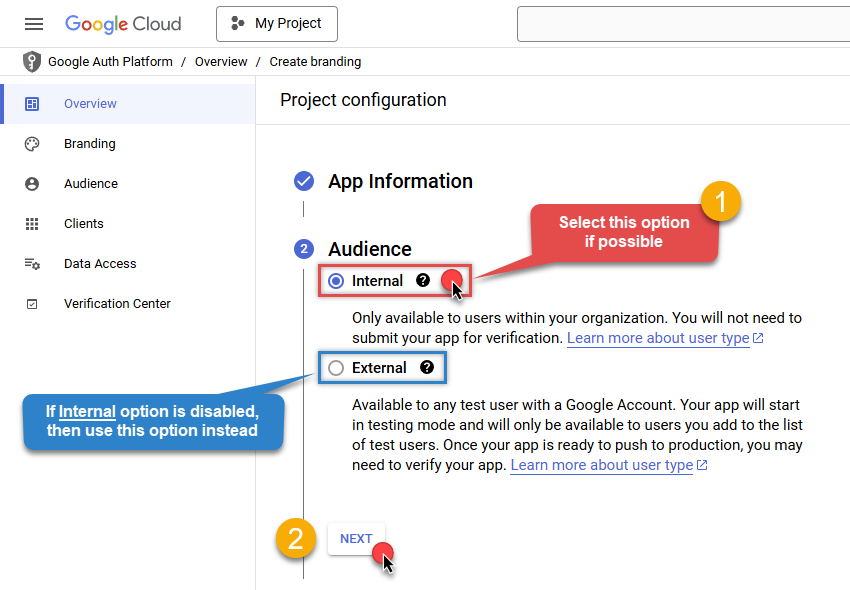
Choose Internal option, if it's enabled, otherwise select External:
-
Optional step if you used
Internaloption in the previous step. Nevertheless, if you had to useExternaloption, then click ADD USERS to add a user: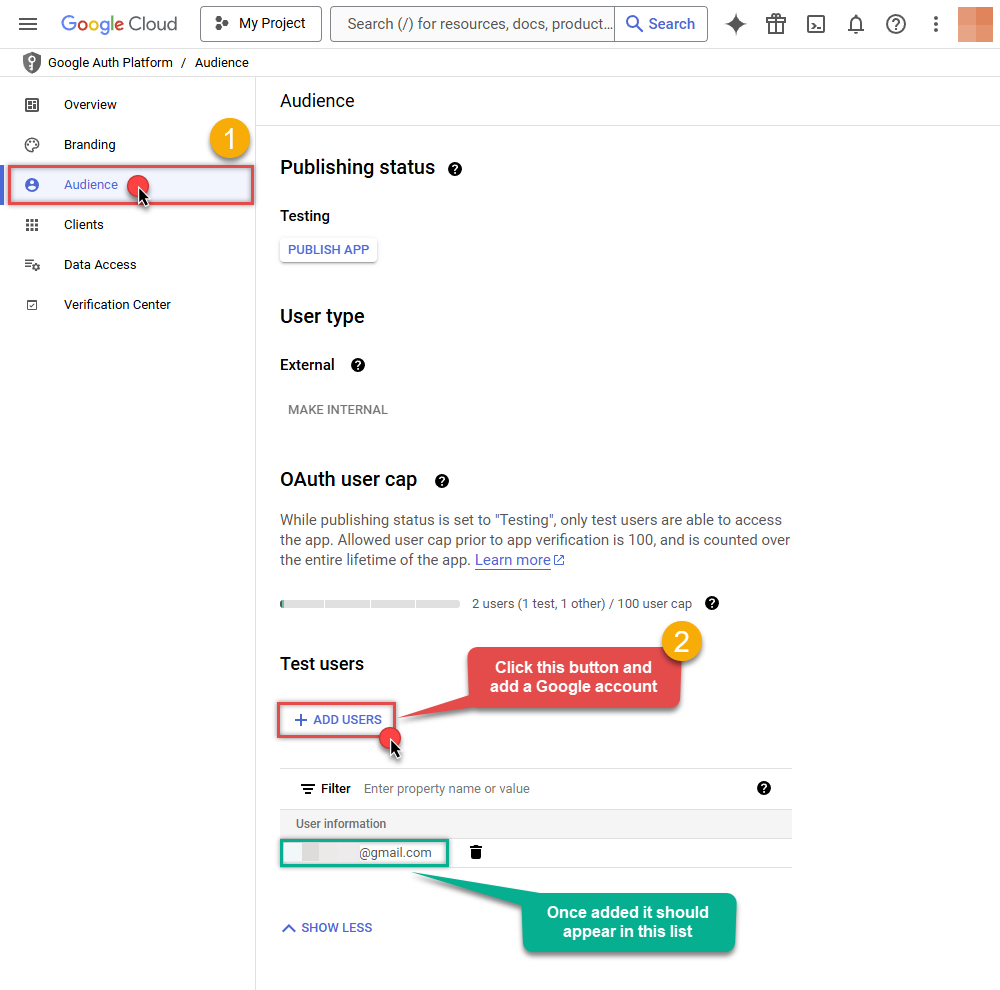
-
Then add your contact Email address:
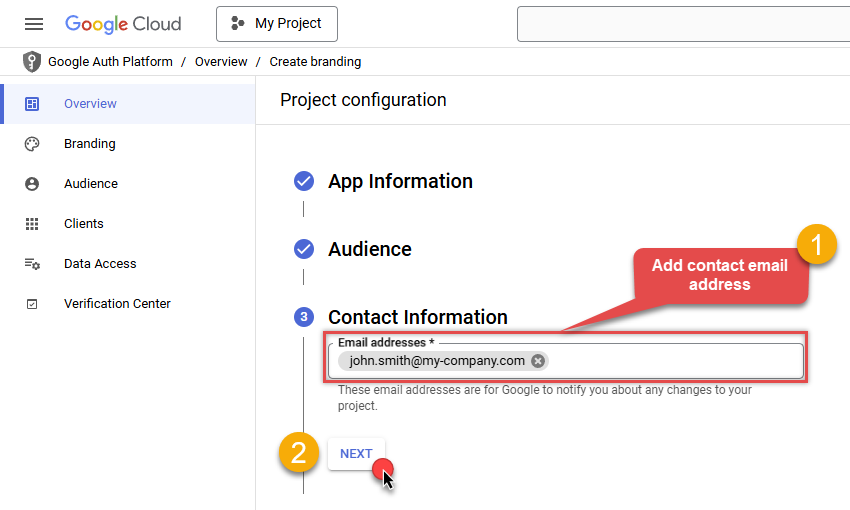
-
Finally, check the checkbox and click CREATE button:
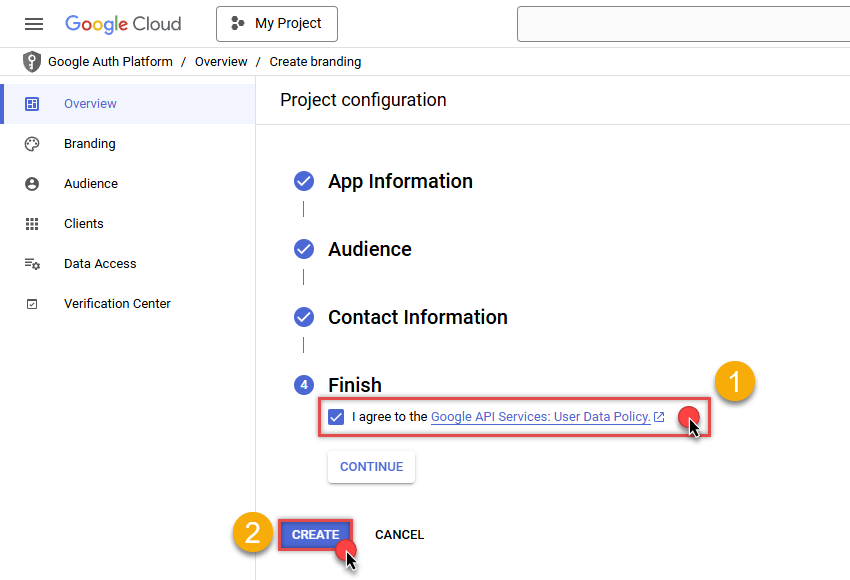
- Done! Let's create Client Credentials in the next step.
Step-4: Create Client Credentials
-
In Google Auth Platform, select Clients menu item and click CREATE CLIENT button:
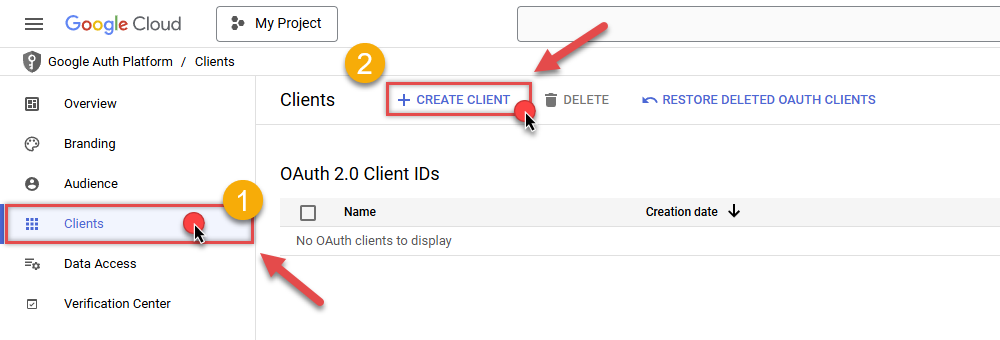
-
Choose
Desktop appas Application type and name your credentials: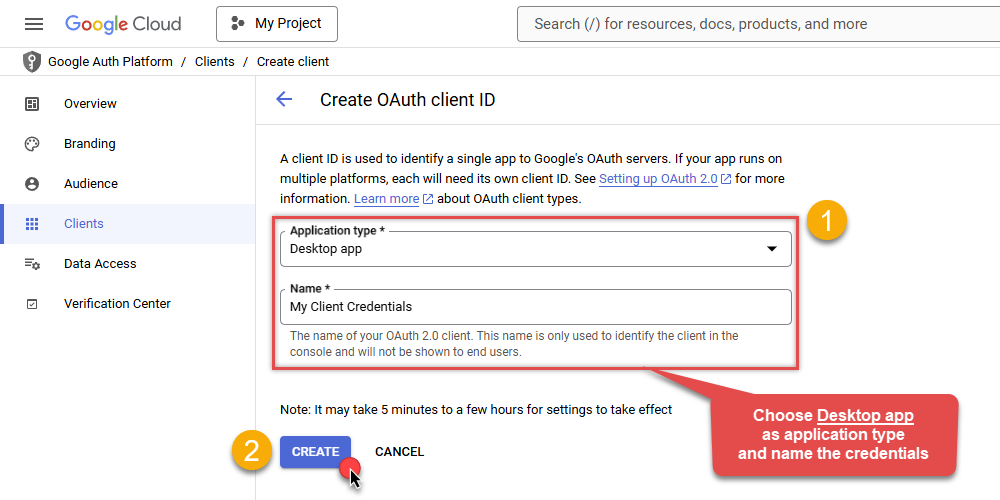
-
Continue by opening the created credentials:
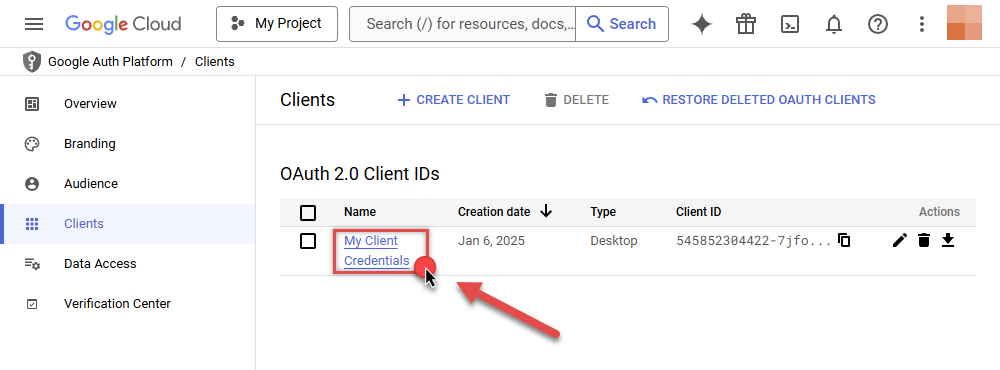
-
Finally, copy Client ID and Client secret for the later step:
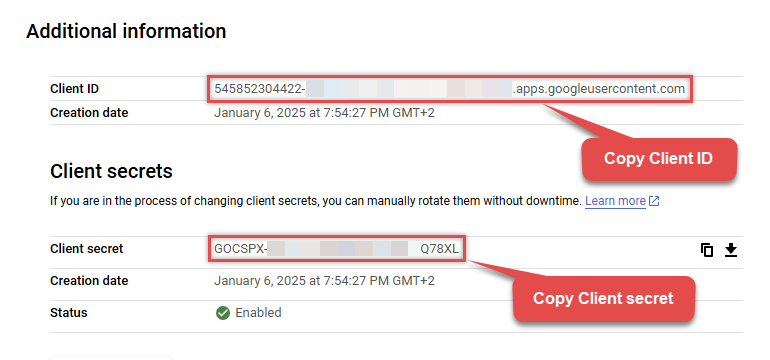
-
Done! We have all the data needed for authentication, let's proceed to the last step!
Step-5: Configure connection
-
Now go to SSIS package or ODBC data source and use previously copied values in User Account authentication configuration:
- In the ClientId field paste the Client ID value.
- In the ClientSecret field paste the Client secret value.
-
Press Generate Token button to generate Access and Refresh Tokens.
-
Then choose ProjectId from the drop down menu.
-
Continue by choosing DatasetId from the drop down menu.
-
Finally, click Test Connection to confirm the connection is working.
-
Done! Now you are ready to use Google BigQuery Connector!
API Connection Manager configuration
Just perform these simple steps to finish authentication configuration:
-
Set Authentication Type to
User Account [OAuth] - Optional step. Modify API Base URL if needed (in most cases default will work).
- Fill in all the required parameters and set optional parameters if needed.
- Press Generate Token button to generate the tokens.
- Finally, hit OK button:
Google BigQueryUser Account [OAuth]https://www.googleapis.com/bigquery/v2Required Parameters UseCustomApp Fill-in the parameter... ProjectId (Choose after [Generate Token] clicked) Fill-in the parameter... DatasetId (Choose after [Generate Token] clicked and ProjectId selected) Fill-in the parameter... Optional Parameters ClientId ClientSecret Scope https://www.googleapis.com/auth/bigquery https://www.googleapis.com/auth/bigquery.insertdata https://www.googleapis.com/auth/cloud-platform https://www.googleapis.com/auth/cloud-platform.read-only https://www.googleapis.com/auth/devstorage.full_control https://www.googleapis.com/auth/devstorage.read_only https://www.googleapis.com/auth/devstorage.read_write RetryMode RetryWhenStatusCodeMatch RetryStatusCodeList 429|503 RetryCountMax 5 RetryMultiplyWaitTime True Job Location Redirect URL (Only for Web App) 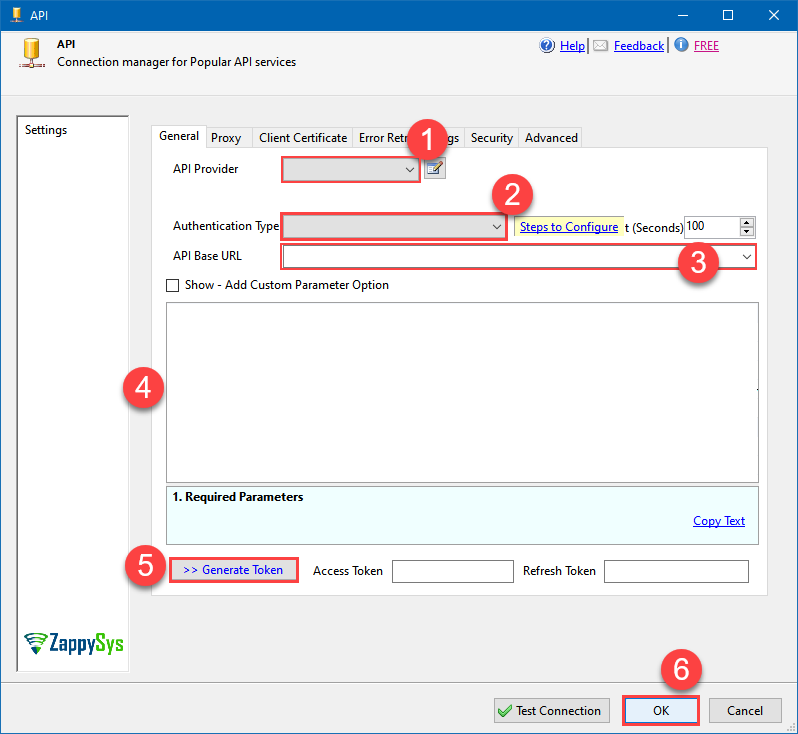
Google BigQuery authentication
Service accounts are accounts that do not represent a human user. They provide a way to manage authentication and authorization when a human is not directly involved, such as when an application needs to access Google Cloud resources. Service accounts are managed by IAM. [API reference]
Follow these steps on how to create Service Account to authenticate and access BigQuery API in SSIS package or ODBC data source:
Step-1: Create project
This step is optional, if you already have a project in Google Cloud and can use it. However, if you don't, proceed with these simple steps to create one:
-
First of all, go to Google API Console.
-
Then click Select a project button and then click NEW PROJECT button:

-
Name your project and click CREATE button:

-
Wait until the project is created:

- Done! Let's proceed to the next step.
Step-2: Enable Google Cloud APIs
In this step we will enable BigQuery API and Cloud Resource Manager API:
-
Select your project on the top bar:

-
Then click the "hamburger" icon on the top left and access APIs & Services:

-
Now let's enable several APIs by clicking ENABLE APIS AND SERVICES button:

-
In the search bar search for
bigquery apiand then locate and select BigQuery API:
-
If BigQuery API is not enabled, enable it:

-
Then repeat the step and enable Cloud Resource Manager API as well:

- Done! Let's proceed to the next step and create a service account.
Step-3: Create Service Account
Use the steps below to create a Service Account in Google Cloud:
-
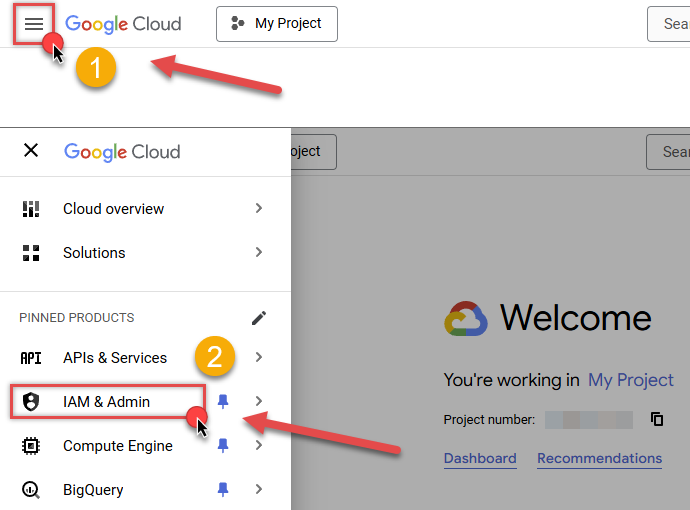
First of all, go to IAM & Admin in Google Cloud console:
-
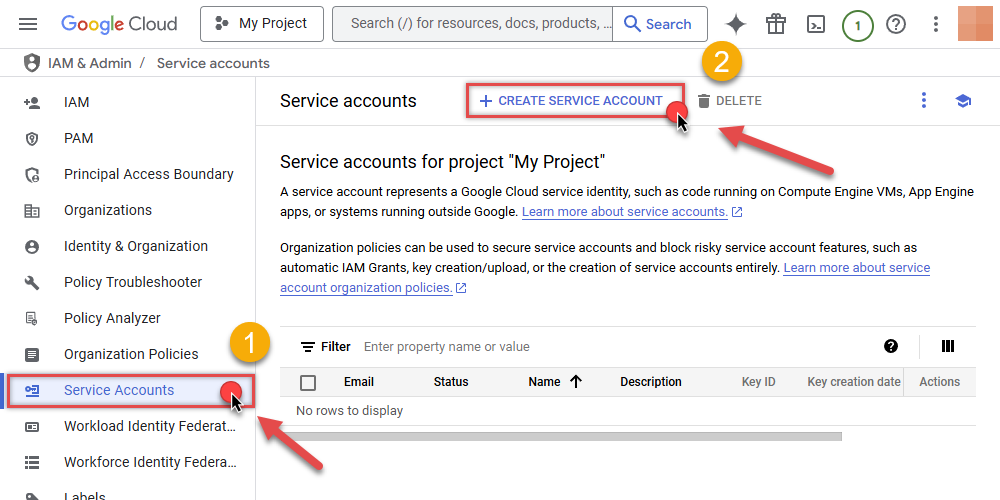
Once you do that, click Service Accounts on the left side and click CREATE SERVICE ACCOUNT button:
-
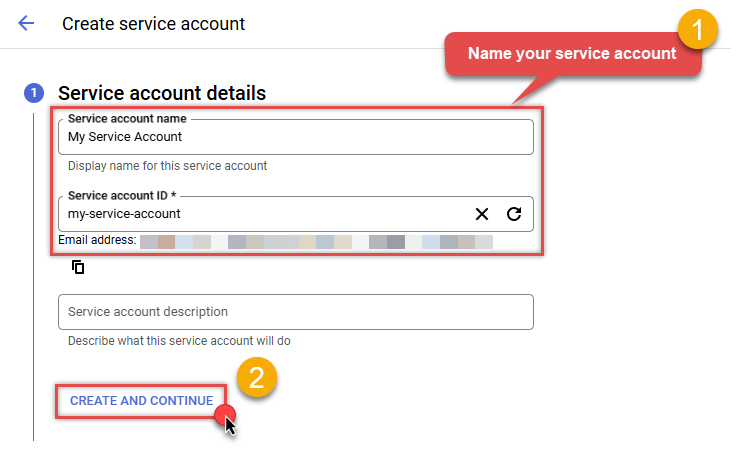
Then name your service account and click CREATE AND CONTINUE button:
-
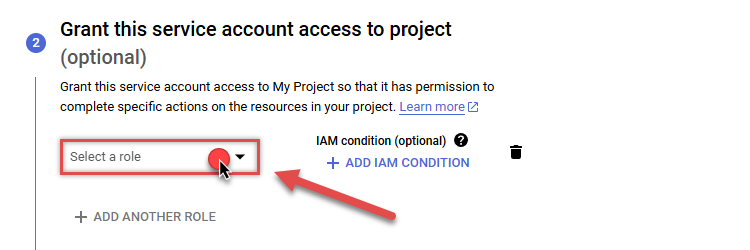
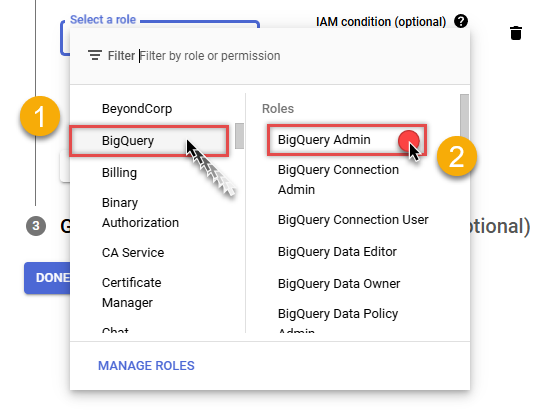
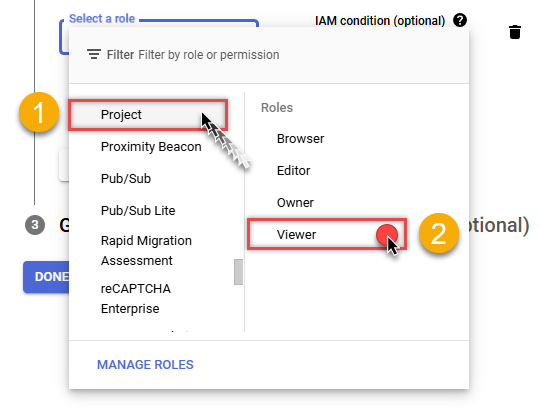
Continue by clicking Select a role dropdown and start granting service account BigQuery Admin and Project Viewer roles:
-
Find BigQuery group on the left and then click on BigQuery Admin role on the right:
-
Then click ADD ANOTHER ROLE button, find Project group and select Viewer role:
-
Finish adding roles by clicking CONTINUE button:
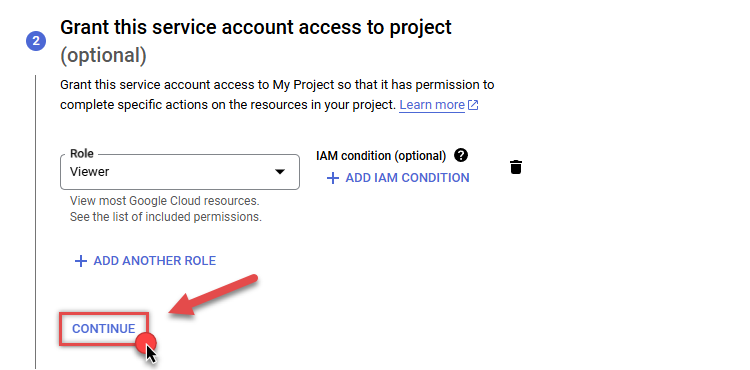 You can always add or modify permissions later in IAM & Admin.
 -
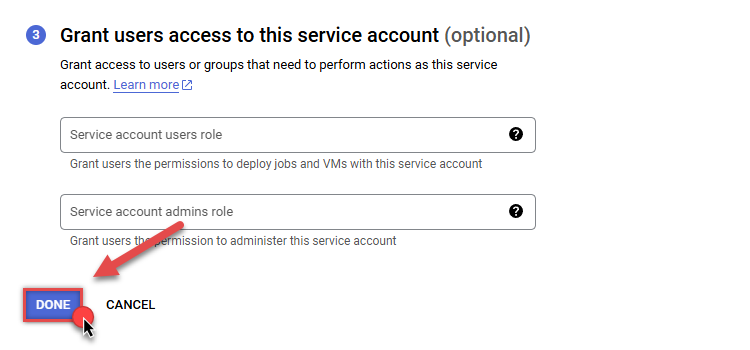
Finally, in the last step, just click button DONE:
-
Done! We are ready to add a Key to this service account in the next step.
Step-4: Add Key to Service Account
We are ready to add a Key (JSON or P12 key file) to the created Service Account:
-
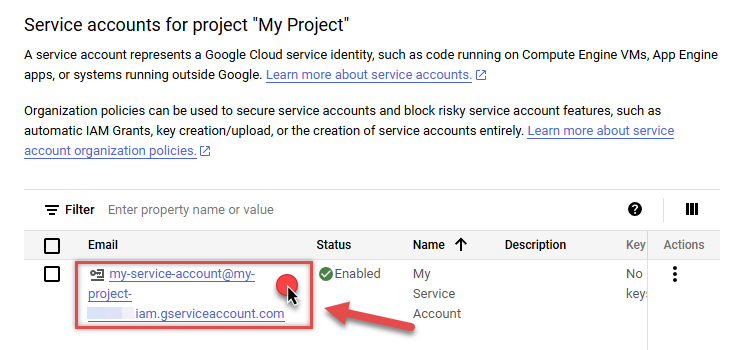
In Service Accounts open newly created service account:
-
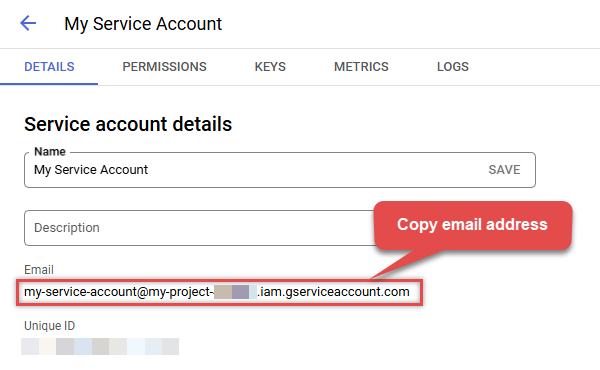
Next, copy email address of your service account for the later step:
-
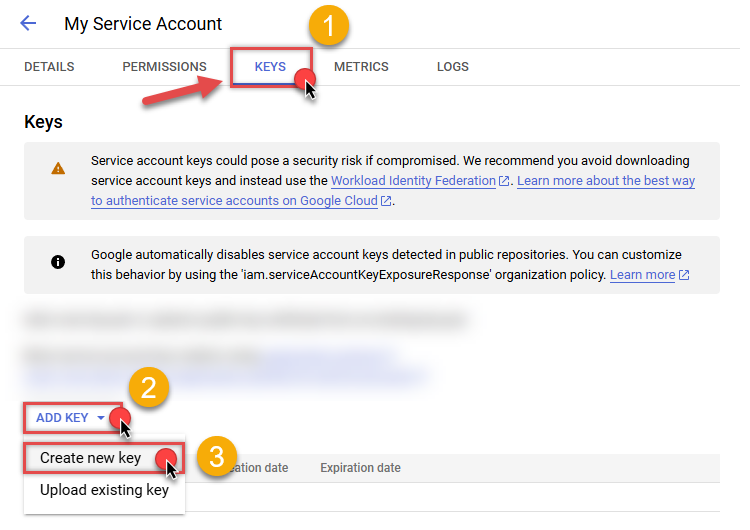
Continue by selecting KEYS tab, then press ADD KEY dropdown, and click Create new key menu item:
-
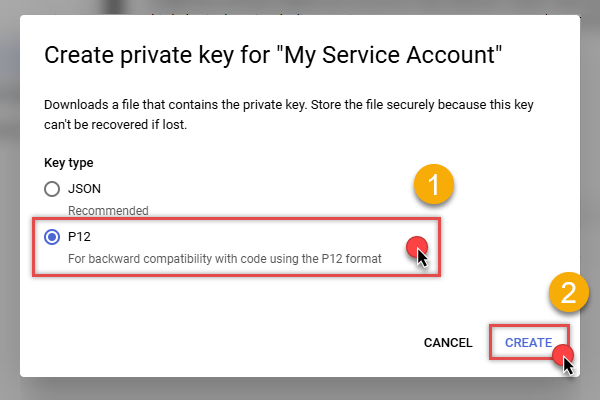
Finally, select JSON (Engine v19+) or P12 option and hit CREATE button:
- Key file downloads into your machine. We have all the data needed for authentication, let's proceed to the last step!
Step-5: Configure connection
-
Now go to SSIS package or ODBC data source and configure these fields in Service Account authentication configuration:
- In the Service Account Email field paste the service account Email address value you copied in the previous step.
- In the Service Account Private Key Path (i.e. *.json OR *.p12) field use downloaded certificate's file path.
- Done! Now you are ready to use Google BigQuery Connector!
API Connection Manager configuration
Just perform these simple steps to finish authentication configuration:
-
Set Authentication Type to
Service Account (Using *.json OR *.p12 key file) [OAuth] - Optional step. Modify API Base URL if needed (in most cases default will work).
- Fill in all the required parameters and set optional parameters if needed.
- Finally, hit OK button:
Google BigQueryService Account (Using *.json OR *.p12 key file) [OAuth]https://www.googleapis.com/bigquery/v2Required Parameters Service Account Email Fill-in the parameter... Service Account Private Key Path (i.e. *.json OR *.p12) Fill-in the parameter... ProjectId Fill-in the parameter... DatasetId (Choose after ProjectId) Fill-in the parameter... Optional Parameters Scope https://www.googleapis.com/auth/bigquery https://www.googleapis.com/auth/bigquery.insertdata https://www.googleapis.com/auth/cloud-platform https://www.googleapis.com/auth/cloud-platform.read-only https://www.googleapis.com/auth/devstorage.full_control https://www.googleapis.com/auth/devstorage.read_only https://www.googleapis.com/auth/devstorage.read_write RetryMode RetryWhenStatusCodeMatch RetryStatusCodeList 429 RetryCountMax 5 RetryMultiplyWaitTime True Job Location Impersonate As (Enter Email Id) 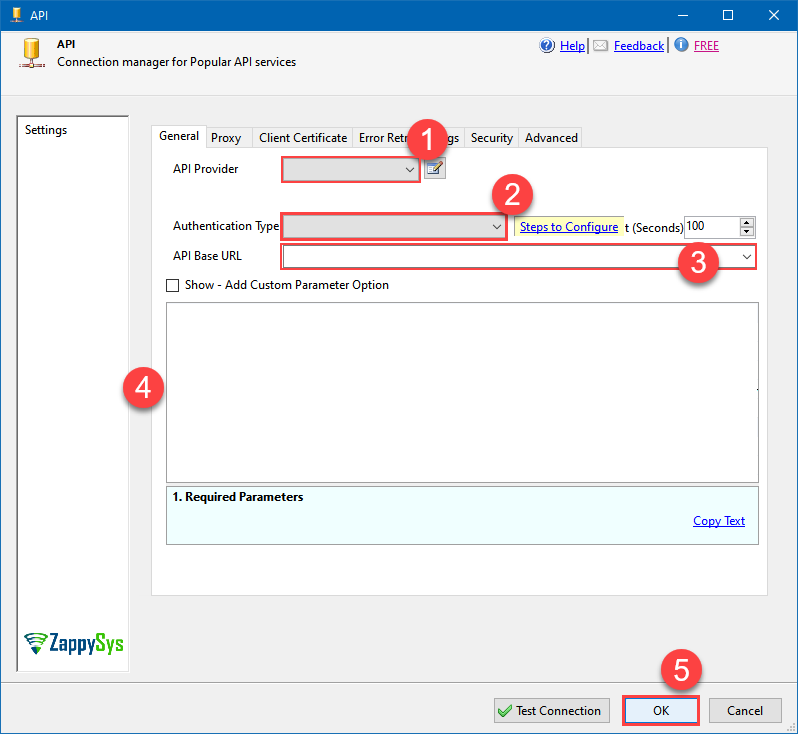
-
-
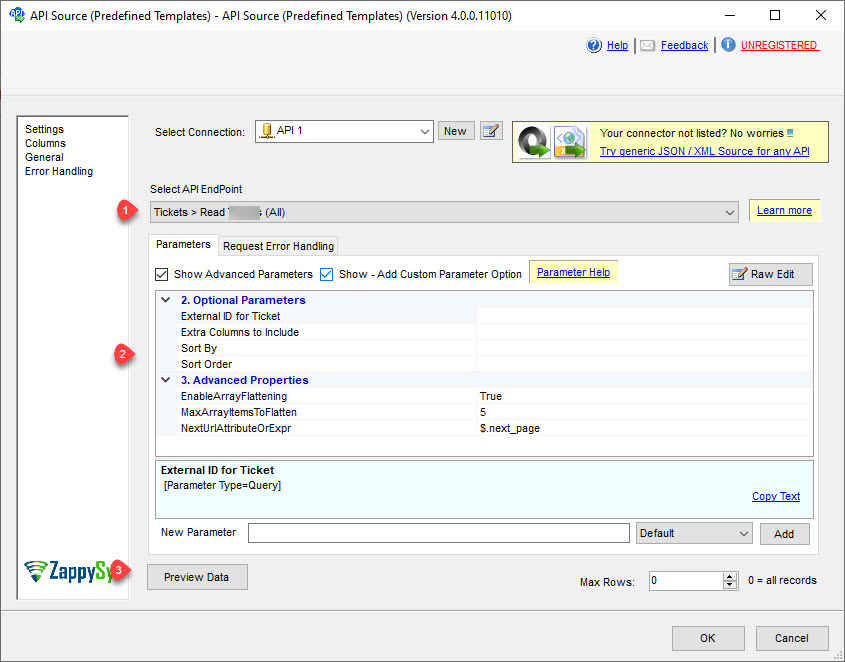
Select the desired endpoint, change/pass the properties values, and click on Preview Data button to make the API call.
API Source - Google BigQueryRead / write Google BigQuery data inside your app without coding using easy to use high performance API Connector
-
That's it! We are done! Just in a few clicks we configured the call to Google BigQuery using Google BigQuery Connector.
You can load the source data into your desired destination using the Upsert Destination , which supports SQL Server, PostgreSQL, and Amazon Redshift. We also offer other destinations such as CSV , Excel , Azure Table , Salesforce , and more . You can check out our SSIS PowerPack Tasks and components for more options. (*loaded in Trash Destination)
