
|
SSIS Dynamics CRM Destination can be used to perform bulk insert, update, delete and upsert operation on Microsoft Dynamics CRM Service such as Dynamics 365 Online or On-Premises installation.

|
Step-By-Step
In this tutorial we will learn how to import data into DynamicsCRM using ZS DynamicsCRM Destination(In this case its from OLE DB Source).
Check this article for step-by-step instruction (Bulk Insert, Update, Delete, Upsert).
-
Firstly, You need to Download and Install SSIS ZappySys PowerPack.
-
Once you finished first step, Open Visual Studio and Create New SSIS Package Project.
-
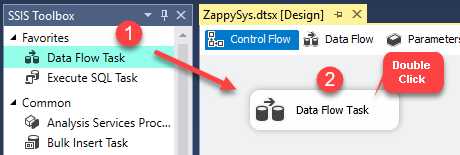
Now, Drag and Drop SSIS Data Flow Task from SSIS Toolbox.
-
Double click on the Data Flow task to see Data Flow designer surface.
-
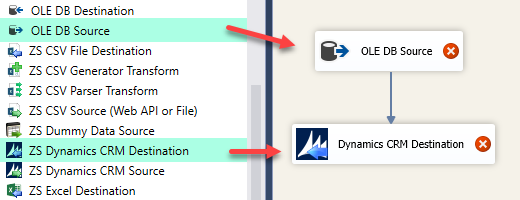
Here, In Visual Studio, drag and drop the OLE DB Source and ZS DynamicsCRM Destination in the design surface and join the components with the blue arrow.
-
Lets create connection OLE DB Connection and DynamicsCRM Connection.
How to create OLE DB Connection.
-
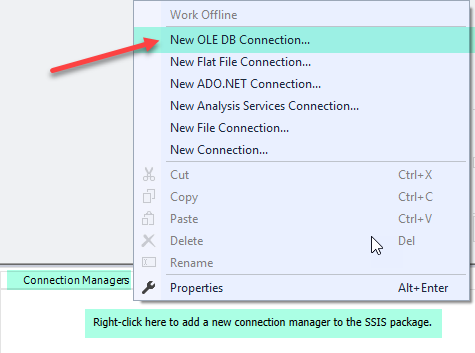
Let's, Right click on Connection Managers Panel to Create OLEDB Connection, so you can use Source and Context Menu will appear, Select New OLEDB Connection from the Context Menu.
-
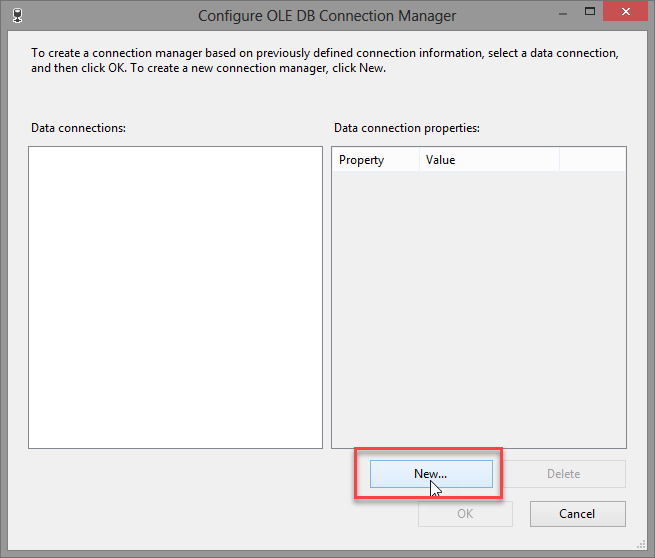
Now, click on New Button for create Connection.
-
Let's Configure Connection Manager, just Follow steps one by one as we have created.
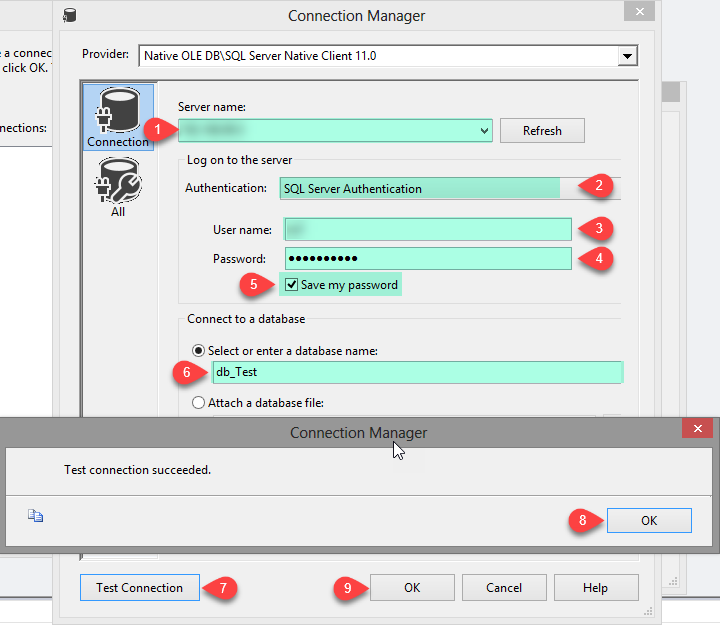
How to Bulk Insert data into DynamicsCRM using DynamicsCRM Destination.
-
Now, create table and insert couple of data for practice it use following text. You can replace table name.
CREATE TABLE [dbo].[tbl_CRM_Accounts](
	[AccountNumber] [varchar](50) NULL,
	[AccountName] [varchar](50) NULL,
	[City] [varchar](50) NULL,
	[Country] [varchar](50) NULL
) ON [PRIMARY]

INSERT INTO [dbo].[tbl_CRM_Accounts]([AccountNumber],[AccountName],[City],[Country])
VALUES('10000001','TestAccount1','New York','USA')
INSERT INTO [dbo].[tbl_CRM_Accounts]([AccountNumber],[AccountName],[City],[Country])
VALUES('10000002','TestAccount2','Mumbai','India')
INSERT INTO [dbo].[tbl_CRM_Accounts]([AccountNumber],[AccountName],[City],[Country])
VALUES('10000003','TestAccount3','London','UK')
INSERT INTO [dbo].[tbl_CRM_Accounts]([AccountNumber],[AccountName],[City],[Country])
VALUES('10000004','TestAccount4','Sydeny','Australia')
INSERT INTO [dbo].[tbl_CRM_Accounts]([AccountNumber],[AccountName],[City],[Country])
VALUES('10000005','TestAccount5','Paris','USA')
-
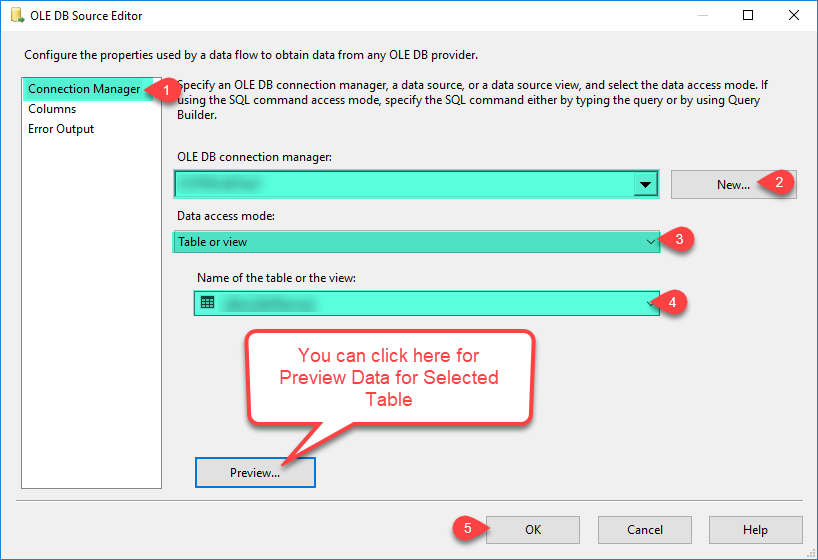
Double click on OLE DB Source to configure it.
-
Lets Configure in Connection Manager, just follow below image steps.
-
Click OK to Save OLEDB Source Editor UI Settings.
-
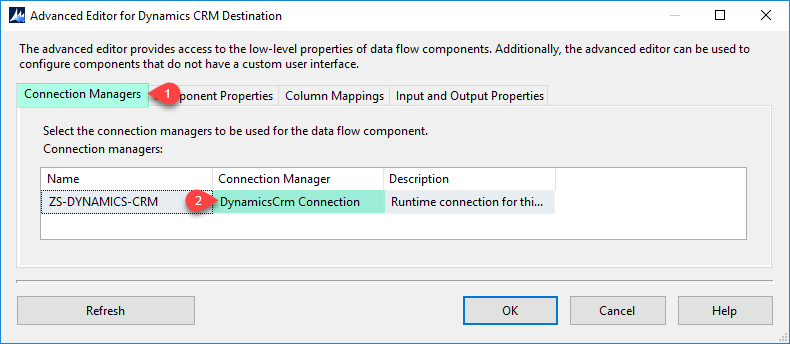
Now, double click on DynamicsCRM Destination for configure it.
-
In the connection manager select DynamicsCRM Connection we have created before.
-
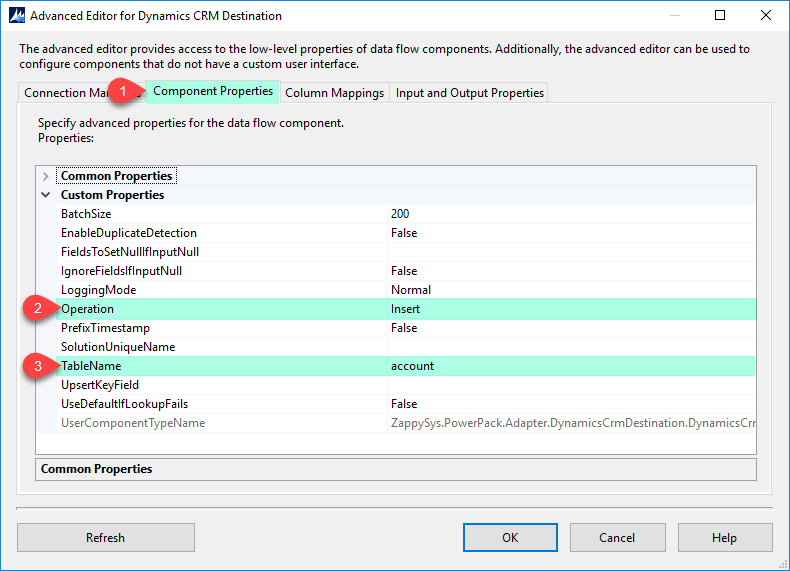
Here, in the Component Properties, set Operation to Insert and select TableName.
-
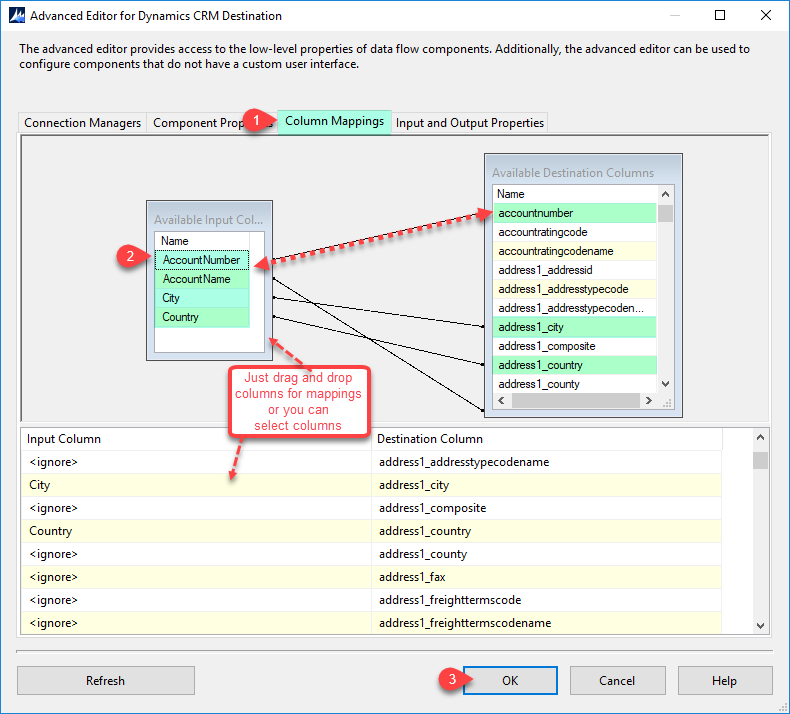
In the Column Mappings, map columns you want write data into DynamicsCRM Table.
-
Click on OK button to save DynamicsCRM Destination configure setting UI.
-
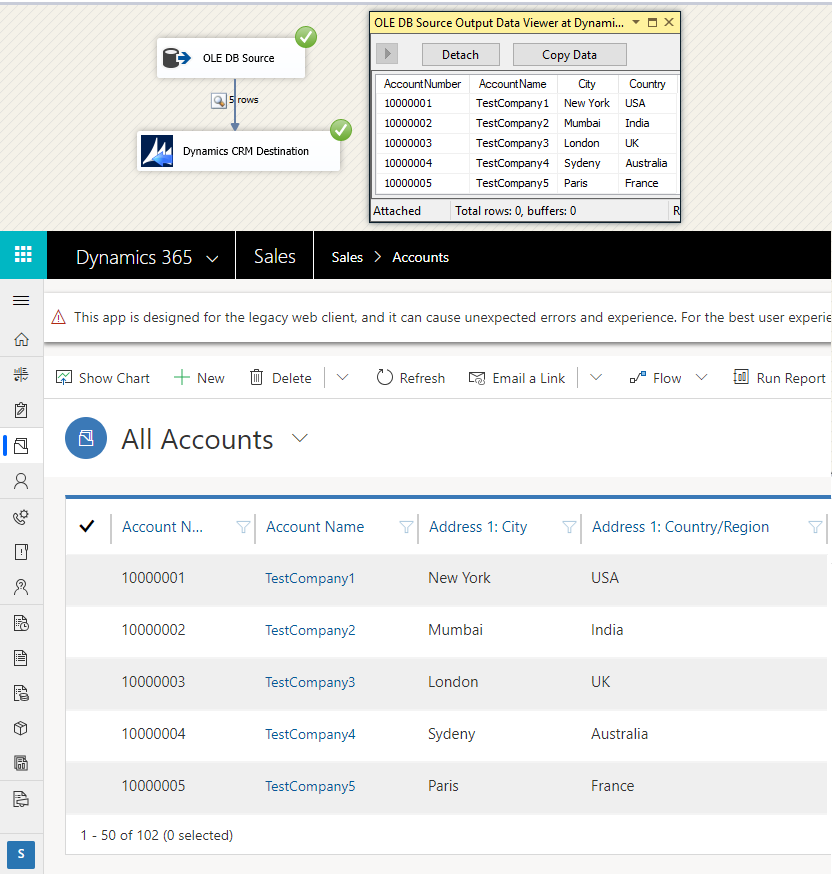
Right click on blue arrow to Enable Data Viewer.
-
Thats all, you can run or execute your package project and verify your data.
How to Bulk Upsert(Update or Insert) data into DynamicsCRM using DynamicsCRM Destination.
-
Double click on DynamicsCRM Destination for configure it.
-
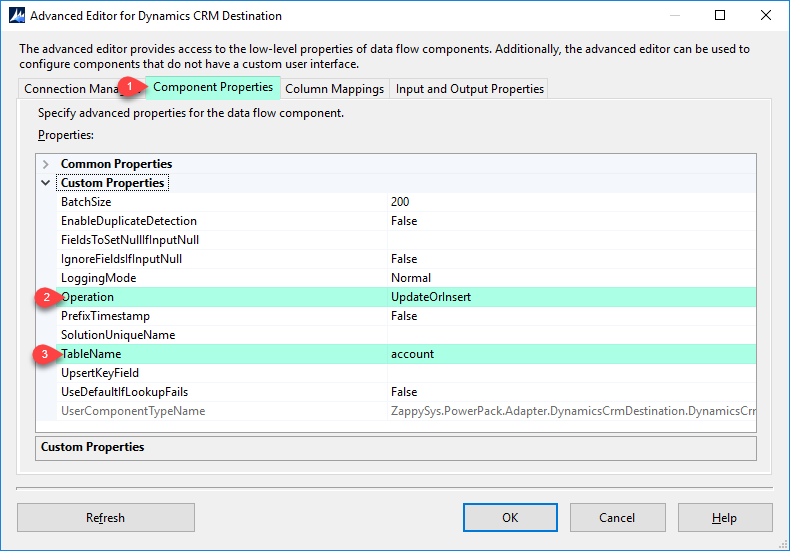
Here, in the Component Properties, set Operation to UpdateOrInsert and select TableName.
-
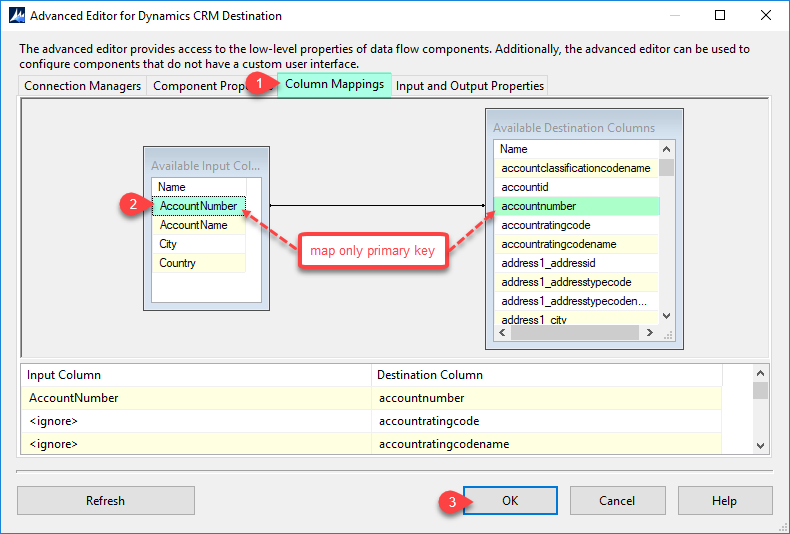
In the Column Mappings, map columns you want write data into DynamicsCRM Table.
-
Click on OK button to save DynamicsCRM Destination configure setting UI.
-
Thats all, you can run or execute your package project and verify your data.
How to Bulk Delete data into DynamicsCRM using DynamicsCRM Destination.
-
Double click on DynamicsCRM Destination for configure it.
-
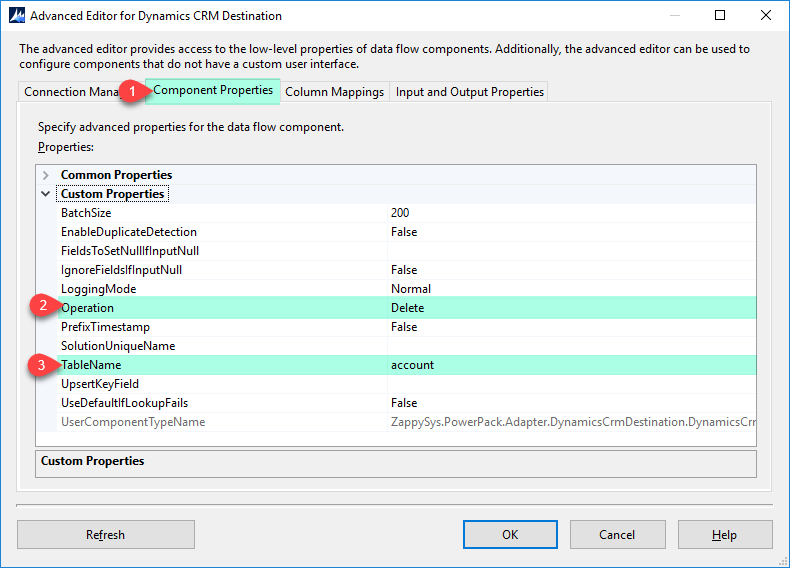
Here, in the Component Properties, set Operation to Delete and select TableName.
-
In the Column Mappings, map columns you want write data into DynamicsCRM Table.

-
Click on OK button to save DynamicsCRM Destination configure setting UI.
-
Thats all, you can run or execute your package project and verify your data.
How to Bulk Update data into DynamicsCRM using DynamicsCRM Destination.
-
Double click on DynamicsCRM Destination for configure it.
-
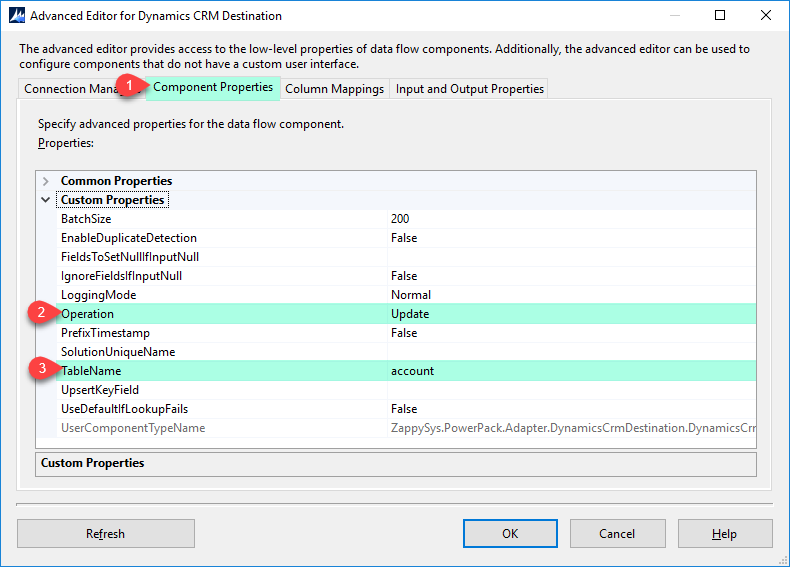
Here, in the Component Properties, set Operation to Update and select TableName.
-
In the Column Mappings, map columns you want write data into DynamicsCRM Table.

-
Click on OK button to save DynamicsCRM Destination configure setting UI.
-
Thats all, you can run or execute your package project and verify your data.
Properties
| Property Name |
Description |
| Operation |
Action you like to perform
Available Options (Use numeric value listed in bracket if you have to define expression on this property (for dynamic behavior).
| Option |
Description |
| Insert [0] |
Insert |
| Update [1] |
Update |
| UpdateOrInsert [2] |
UpdateOrInsert |
| Delete [3] |
Delete |
|
| UpsertKeyField |
Update / Upsert Key Field name. Enter Primary Key or Alternate Key. Alternate key field based on which you want to perform Upsert action (this field must be mapped on column mappings). Here is how you can define Alternate Key for an entity (i.e. Table) https://technet.microsoft.com/library/29e53691-0b18-4fde-a1d0-7490aa227898.aspx or https://msdn.microsoft.com/en-us/library/dn932139.aspx |
| UseDefaultIfLookupFails |
Use default value (or null value) when text to id lookup fails for any entity lookup or OptionSet (drop down style value) |
| EnableDuplicateDetection |
Set this to true if you do not want to allow duplicate records during the Insert, Upsert, or Update operation (By default, duplicate records are allowed). After setting this option to true, you must test the process to see Duplicate detection rule is triggered correctly or not. Depending on which entity you choose you may or may not have the duplicate detection rule set, some entities like accounts, contacts, and leads may already have this type of rule setup but not other entities (Check your Duplicate Detection Rules in the entity if duplicate detection fails). Behind the scene setting this EnableDuplicateDetection=true sends SuppressDuplicateDetection=false in the CRM API call. |
| SolutionUniqueName |
A String that specifies the unique name of the solution to which the operation applies. . |
| LoggingMode |
LoggingMode determines how much information is logged during Package Execution. Set Logging mode to Debugging for maximum log.
Available Options (Use numeric value listed in bracket if you have to define expression on this property (for dynamic behavior).
| Option |
Description |
| Normal [0] |
Normal |
| Medium [1] |
Medium |
| Detailed [2] |
Detailed |
| Debugging [3] |
Debugging |
|
| PrefixTimestamp |
When you enable this property it will prefix timestamp before Log messages. |
| DoNotCreateOutputs |
Enable / Disable Response Output. Checking this option can remove unwanted warnings about unused Columns and many times speedup performance so if output is not needed set this option to True so its removed. |
| TableName |
Target object name where you want like to write data. |
| BatchSize |
How many rows you want to send in each request. |
| IgnoreFieldsIfInputNull |
Set this option to True if you wish to ignore fields if input value is NULL. By default target field is set to NULL if input value is NULL. |
| FieldsToSetNullIfInputNull |
Comma separated CRM entity field names which you like to set as NULL when input value is NULL. This option is ignored if IgnoreFieldsIfInputNull is not set to True. |
| EnableParallelProcessing |
Enables sending requests using multiple threads to speed up processing. Try to adjust MaxParallelThreads property to test performance gain. This property is ignored if you EnableBulkMode=true. |
| MaxParallelThreads |
Max Parallel Threads to use to process requests. This property is only valid if you set EnableParallelProcessing=True. Valid values are 1 to 40. This property is ignored if you EnableBulkMode=true. |
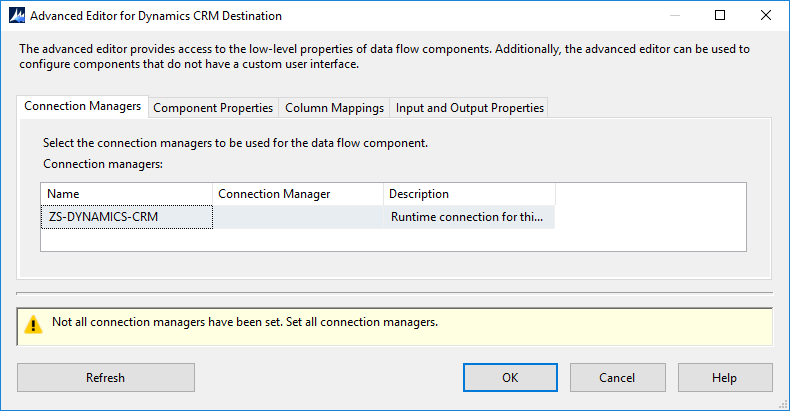
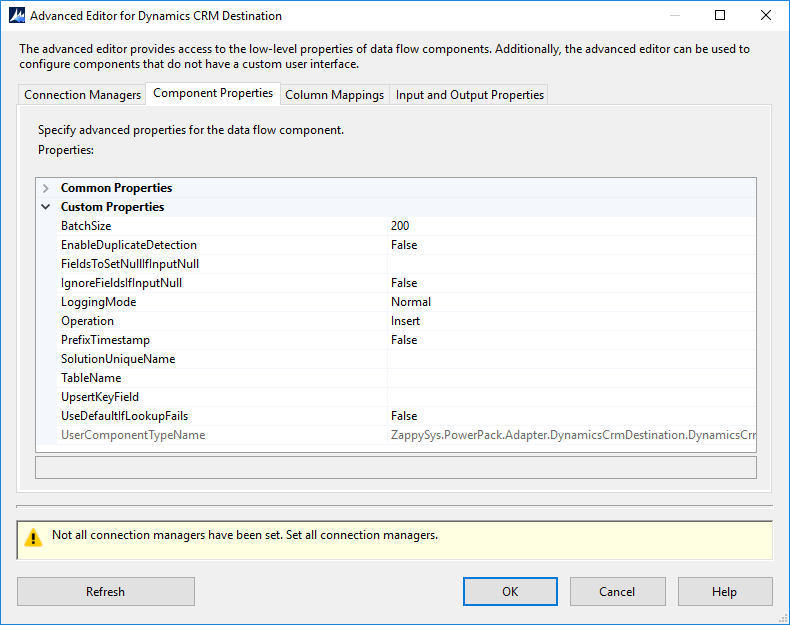
Setting UI
Handling Special DataTypes (PickList, Lookup, PartyList)
Dynamics CRM supports many datatypes which can be handled without any issue in ZappySys CRM Destination. However following three datatypes (i.e. PickList, Lookup, PartyList) require special handling when you insert/update or upsert.
1. PickList DataType
PickList datatype is simple dropddown style datatype which provides selection of predefined options (Enum in Programming Language) where user selects Text and behind the scene it stores the Numeric value for selection. In CRM Destination you can set PickList field by Text or Numeric value.
If you use Text as input then any non matching entry will result into error. If you wish to ignore errors and insert as null then set
UseDefaultIfLookupFails option
2. Lookup DataType
Lookup datatype allows to refer record from different table just like foreign key in relational database. Here are some important point about this datatype.
- This field is special type of foreign key which holds reference to related records but also holds referenced entity type (e.g. lead, account, contact). In typical foreign key you can only reference to one table.
- If you are not sure which fields are Lookup type field in CRM Destination then perform these steps. ([1]. Right click on CRM Destination field [2] Goto Input and Output Properties [3] Expand DynamicsCrmDestinationInput [4] Expand External columns and click on each column. You will see custom properties like AttributeType and LinkedEntity
- If you use Text lookup then any non-matching entry will result into error. If you wish to ignore errors for non-match and insert as null then set UseDefaultIfLookupFails option to true for CRM Destination.
Now lets review few ways to pass input data for Lookup datatype. You can use any of the following format as your input data.
-
Text format - Id Lookup:
You can set Lookup field using following simple input format (key/value pair). Id is related record Id from different table. Type is related record type (i.e. account, lead, contact). Type is optional so if you don't specify it then first allowed type will be assumed in alphabetical order (e.g. account).
Syntax:
RECORD_ID[=TYPE_NAME];
Examples:
0fe3ac7c-d63d-e811-a953-000d3a37468c

--OR--

0fe3ac7c-d63d-e811-a953-000d3a37468c=account
-
JSON format - Id Lookup:
You can also use JSON Format as your input data to set Lookup type field. Where RECORD_ID is related record Id from different table. Type is related record type (i.e. account, lead, contact). Type is optional so if you don't specify it then first allowed type will be assumed in alphabetical order (e.g. account).
Syntax:
[{"id":"RECORD_ID" ,"type":"RECORD_TYPE"}]
Examples:
[{"id":"0fe3ac7c-d63d-e811-a953-000d3a37468c"}]
--OR--
[{"id":"0fe3ac7c-d63d-e811-a953-000d3a37468c", "type":"account"}]
-
JSON format - Text Lookup (**SLOW** - Local Caching Needed):
You can also use JSON Format to lookup by Text rather than Id. However this approach can be very slow if you are doing lookup against very large entity so use Text Lookup only if necessary.
text is related record's primary field value (if field is not supplied) --OR-- value of the field name you supplied.
field is name of column (e.g. firstname) on which you like to perform lookup. If you don't specify field in your json then PrimaryNameAttribute will be used to determine field name. Use Dynamics CRM Source FetchXML mode and on the Object Browser goto Table Info tab to find PrimaryNameAttribute to determine primary name field for selected entity.
Syntax:
[{"text":"VALUE" ,"type":"LOOKUP_RECORD_TYPE","field":"LOOKUP_FIELD_NAME"}]
Examples:
[{"text":"ZappySys"}]
--OR--
[{"text": "ZappySys", "type": "account"}]
--OR--
[{"text": "ZappySys", "type": "account", "field": "name"}]
3. PartyList DataType
Certain entities like
Appointment support special type of fields for (e.g.
requiredattendees) which can hold reference to multiple records from multiple tables. Here are some important point about this datatype.
- This field is special type of foreign key which holds reference to many related records in many types of entities (e.g. lead, account, contact). In typical foreign key you can only reference to one table.
- If you are not sure which fields are Lookup type field in CRM Destination then perform these steps. ([1]. Right click on CRM Destination field [2] Goto Input and Output Properties [3] Expand DynamicsCrmDestinationInput [4] Expand External columns and click on each column. You will see custom properties like AttributeType and LinkedEntity
- You can also use CRM Source to preview PartyList field and see how it outputs data (CRM SOurce will output PartyList as JSON format).
- If you use Text lookup then any non-matching entry will result into error. If you wish to ignore errors for non-match and insert as null then set UseDefaultIfLookupFails option to true for CRM Destination.
Now lets review few ways to pass input data for PartyList datatype. You can use any of the following format as your input data.
-
Text format - Id Lookup:
You can set PartyList field using following simple input format (key/value pairs). Id is related record Id from different table. Type is related record type (i.e. account, lead, contact). Type is optional so if you don't specify it then first allowed type will be assumed in alphabetical order (e.g. account).
Syntax:
RECORD_ID_1[=TYPE_NAME];RECORD_ID_2[=TYPE_NAME];....RECORD_ID_N[=TYPE_NAME];
Examples:
0fe3ac7c-d63d-e811-a953-000d3a37468c

--OR--

0fe3ac7c-d63d-e811-a953-000d3a37468c;6329dbd0-4e1c-e511-80d3-3863bb347ba8=lead

--OR--

0fe3ac7c-d63d-e811-a953-000d3a37468c=account;6329dbd0-4e1c-e511-80d3-3863bb347ba8=lead
-
JSON format - Id Lookup:
You can also use JSON Format as your input data to set PartyList field. Where RECORD_ID is related record Id from different table. Type is related record type (i.e. account, lead, contact). Type is optional so if you don't specify it then first allowed type will be assumed in alphabetical order (e.g. account).
Syntax:
[{"id":"RECORD_ID_1" ,"type":"RECORD_TYPE"}, {"id":"RECORD_ID_2" ,"type":"RECORD_TYPE"} ... {"id":"RECORD_ID_N" ,"type":"RECORD_TYPE"}]
Examples:
[{"id":"0fe3ac7c-d63d-e811-a953-000d3a37468c"}]
--OR--
[{"id":"0fe3ac7c-d63d-e811-a953-000d3a37468c", "type":"account"}]
--OR--
[{"id":"0fe3ac7c-d63d-e811-a953-000d3a37468c"}, {"type":"lead","id":"6329dbd0-4e1c-e511-80d3-3863bb347ba8"}]
--OR--
[{"id":"0fe3ac7c-d63d-e811-a953-000d3a37468c", "type":"account"}, {"type":"lead","id":"6329dbd0-4e1c-e511-80d3-3863bb347ba8"}]
-
JSON format - Text Lookup (**SLOW** - Local Caching Needed):
You can also use JSON Format as to lookup by Text rather than Id. However this approach can be very slow if you are doing lookup against very large entity so use Text Lookup only if necessary.
text is related record's primary field value (if field is not supplied) --OR-- value of the field name you supplied.
field is name of column (e.g. firstname) on which you like to perform lookup. If you don't specify field in your json then PrimaryNameAttribute will be used to determine field name. Use Dynamics CRM Source FetchXML mode and on the Object Browser goto Table Info tab to find PrimaryNameAttribute to determine primary name field for selected entity.
Syntax:
[{"text":"VALUE_1" ,"type":"LOOKUP_RECORD_TYPE","field":"LOOKUP_FIELD_NAME"}, {"id":"VALUE_2" ,"type":"LOOKUP_RECORD_TYPE","field":"LOOKUP_FIELD_NAME"} ... {"text":"VALUE_N" ,"type":"RECORD_TYPE","field":"LOOKUP_FIELD_NAME"}]
Examples:
[{"text":"ZappySys"}]
--OR--
[{"text": "ZappySys", "type": "account"}]
--OR--
[{"text": "ZappySys", "type": "account", "field": "name"}]
--OR--
[{"text": "ZappySys", "type": "account", "field": "name"}, {"text": "Bob Smith", "type": "lead", "field": "fullname"}]
--OR--
[{"text": "ZappySys", "type": "account"}, {"text": "Bob Smith", "type": "lead", "field": "fullname"}]
Articles / Tutorials
Click here to see all articles for [SSIS Dynamics CRM Destination] category
|
|
What’s New In this release we focused on fixing some bugs with Dynamics CRM Source , Dynamics CRM Destination and Reporting Services Task. Version 2.9.6.10621 [Jun 24, 2019] New Features/Improvements NEW: Excel Source – Add option to read from any sheet by number rather than hard coded table name (e.g. $4$ , $5$ … ) Bug fixes […]
|
|
|
Introduction In our previous article, we talked about how to read from Dynamics CRM. Now let’s look at how to Load data into Dynamics CRM using SSIS. We will see a few important aspects of loading data into Dynamics CRM Online (i.e. Dynamics 365) and On-premises / IFD (Internet facing hosted instance). We will show you how to […]
|
Copyrights reserved. ZappySys LLC.


