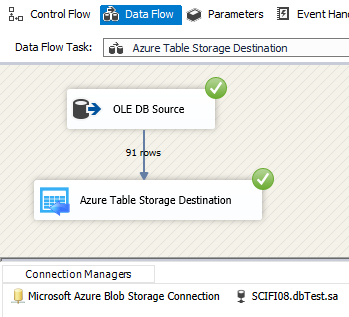
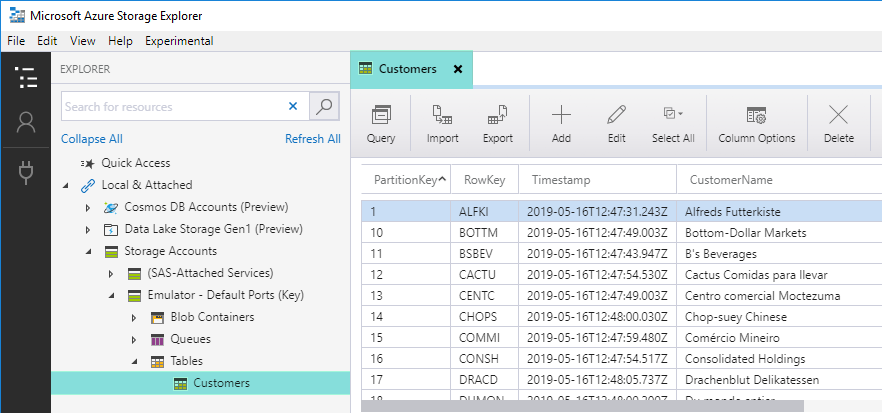
SSIS Azure Table Destination Adapter (Bulk Load,Write,Copy NoSQL Data)
PreviousNext

Azure Table Storage Destination can be used to bulk insert large amount of records to Azure Table Storage from any data source using SSIS. Azure Table Storage is a cloud based NoSQL data storage service from Microsoft Azure

Download SSIS PowerPack

Content

Video Tutorial

Coming soon...

Step-By-Step

In this tutorial you will learn how to use write data into Azure Table Storage Destination Table. You can use
ZS DummyData Source for practice it(In this case its from SQL Server Source).
  1. In order to connect to Azure Storage Service from SSIS you will need Storage AccountName and AccessKey. Ask your SysAdmin or responsible person to provide that information to you. Here is sample Account Name and Access Key(this is just example key which may differ in your case)
    Account Name: mystorageaccount
    Access Key: Eby8vdM02xNOcqFlqUwJPLlmEtlCDXJ1OUzFT50uSRZ6IFsuFq2UVErCz4I6tq/K1SZFPTOtr/KBHBeksoGMGw==

    Microsoft also provides offline simulator to test Azure Storage functionality. This is great way to try out Azure Storage functionality without worrying about Cost but we strongly recommend you to test everything with Azure Cloud Account before going to Production. Click here to read more how to get your Storage Account Name and Access Key


    If you don't have Azure Storage account then its easy to get FREE Trial Azure Storage account or use your MSDN to get credit each month which will be more than enough for real testing. If you prefer to avoid all this hassle then Microsoft provides another great way to test Azure Storage functionality in totally offline mode on your local machine. You can just download Azure Storage Emulator and start testing. Click here to learn more how to configure Azure Storage Emulator for Testing and Development purpose.

  2. For this sample exercise we will need new Azure Storage Table. To create new Table perform following steps
    • first make sure you have valid azure cloud account or get local storage emulator for testing Click on create table under Azure Storage
    • Connect to Azure Storage Account using your favorite client tool and create new Azure Storage Table (Call it Customers for this demo)
      Create Azure Storage Table - SSIS Destination
  3. Once you have created Azure Storage Table and you got valid Account Name and AccessKey (for local emulator you don't need this) you may proceed to create new SSIS package. In BIDS/SSDT create new SSIS package
  4. From the SSIS toolbox drag and drop Data Flow Task on the control flow designer surface.
    SSIS Data Flow Task - Drag and Drop
  5. Double click on the DataFlow task to see DataFlow designer surface.
  6. Here, In Visual Studio, drag and drop the OLE DB Source and Azure Table Storage Destination in the design surface and join the components with the blue arrow.
    SSIS Azure Table Storage Destination - Drag and Drop
  7. Now, we need two connection, OLE DB Connection and Azure Storage Connection. Click here to create Azure Storage Connection.

How to create OLE DB Connection.

  1. Let's, Right click on Connection Managers Panel to Create OLEDB Connection, so you can use Source and Context Menu will appear, Select New OLEDB Connection from the Context Menu.
    SSIS OLEDB - Connection
  2. Now, click on New Button for create Connection.
    SSIS OLEDB - Connection
  3. Let's Configure Connection Manager, just Follow steps one by one as we have created.
    SSIS OLEDB - Connection
  4. Click on OK button to save configure Setting UI.

How to write data into Azure Table Storage from SQL Server using Azure Table Storage Destination.

  1. Double click on OLE DB Source for configure it.
  2. Lets Configure in Connection Manager, just follow below image steps.
    SSIS OLEDB Connection Configure
  3. Click OK to Save OLEDB Source Editor UI Settings.
  4. Now double click Azure Table Storage Destination to configure it.
  5. On [Connection Manager] tab select Azure Storage Connection manager.
    Configure SSIS Azure Table Storage Destination Adapter - Connection Tab
  6. Click on [Component Properties] tab and select AccessMode=Table and Pick destination Table from Tables dropdown list.
    Configure SSIS Azure Table Storage Destination Adapter - Component Tab
  7. Click on [Mappings] tab and verify mapping. If target table is new table and its empty then all input columns will be automatically mapped (Except PartitionKey and RowKey). Drop CustomerID, CompanyName mappings and reconnect as shown below.. This is just to make sure PrimaryKey columns are mapped. If table is existing table with some data then you can manually pick mapping columns by dragging it from source list to target list.
    Configure SSIS Azure Table Storage Destination Adapter - Mapping Tab
  8. Click OK to save settings.
  9. Execute the package and verify target data.
    Execute SSIS Azure Table Storage Destination Adapter - Load Data
    SSIS Load Test - View Azure Storage Table Data - Record Count Check

Component Properties

Property Name Description
AccessMode Indicates Access Mode of for target (e.g. Table or Sql Query).
TableName Target table name where you want to write data.
SqlCommand Specifies SQL query which can contain fields and table name for target. Where clause is ignored.
BatchSize Indicates how many records are written to target in a single request. Setting this value to 0 will try to insert all record in one big request (not recommended).

Output Column Properties

Error handling

  • This component supports error output.
  • Any bad value will cause Error or Truncation (e.g. If your sample value is 5 character long but output column length is set to 3 chars). If you have error output attached with RedirectRow option on Error, Truncation then you can capture bad rows along with exact reason of error.
  • Use error handling tab to set option for error handling. By default component fails on any data error or truncation issue

Remarks

Settings UI

SSIS Azure Table Storage Destination - Setting UI

Performance Tuning

To get highest performance always sort records by partition key when you read from source. Choose Azure Table ParitionKey carefully. General guideline is do not select highly unique key as Partition key. For example if you want to store Customers then choose CustomerID as RowKey but CountryName as PartitionKey. Records with same partition key (i.e. Country) resides on the same server giving you better performance. Click here to read more on this topic

Azure Table Storage Destination FAQs

See Also

References

Articles / Tutorials

Click here to see all articles for [SSIS Azure Table Storage Destination] category
How to Read/Write Azure Table Storage data in SSIS

How to Read/Write Azure Table Storage data in SSIS

Introduction In our previous blog, we saw how to read/write Azure Blob Storage Files in SSIS (CSV, JSON, XML Format files). Now in this blog, we will see how to Read/Write Azure Table Storage data in SSIS. To illustrate, we will use ZappySys SSIS PowerPack, which includes several tasks to import/export data from multiples sources to multiple destinations like […]


Copyrights reserved. ZappySys LLC.