|
SSIS Upsert Destination
|
 
|
|
SSIS Upsert Destination
|
|

|
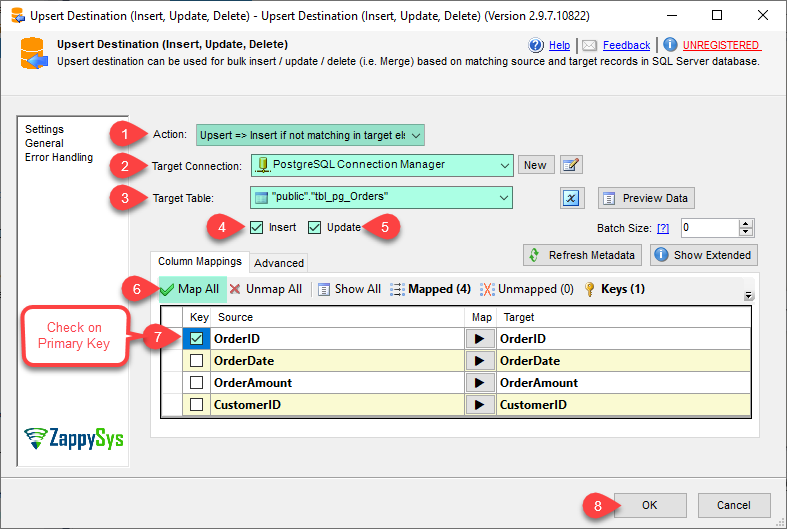
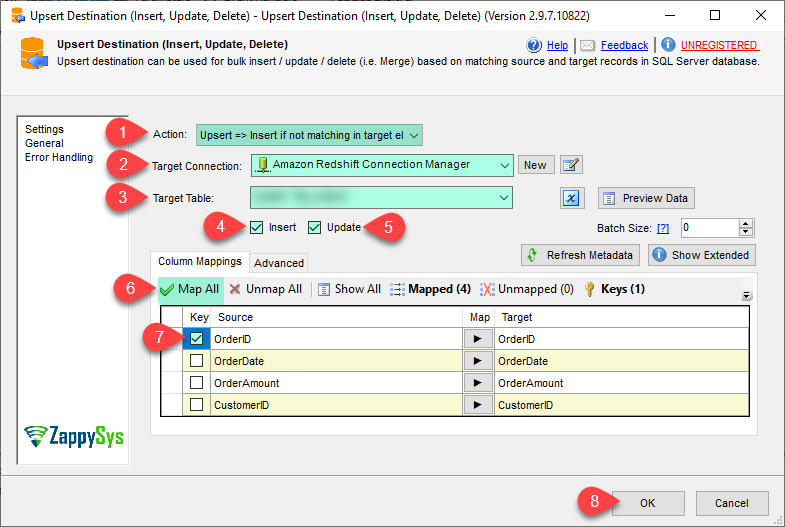
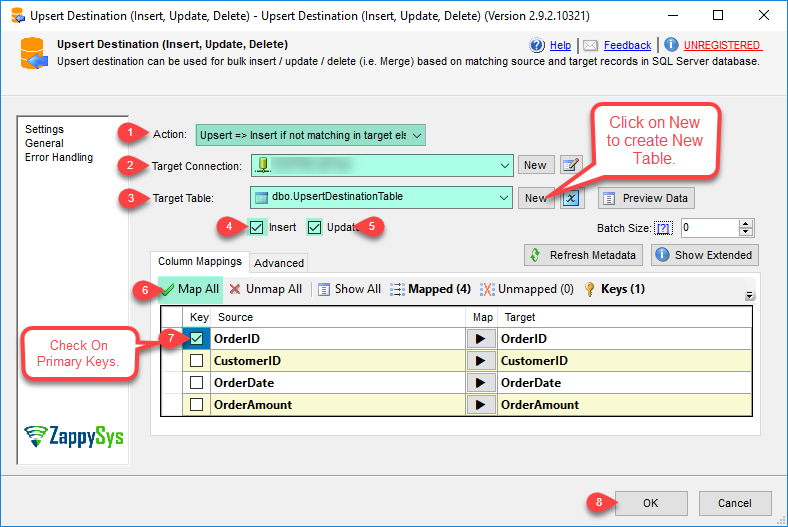
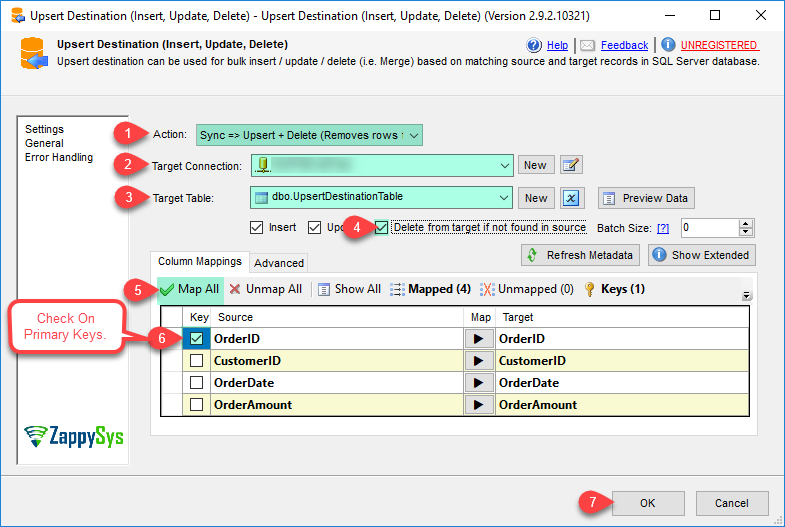
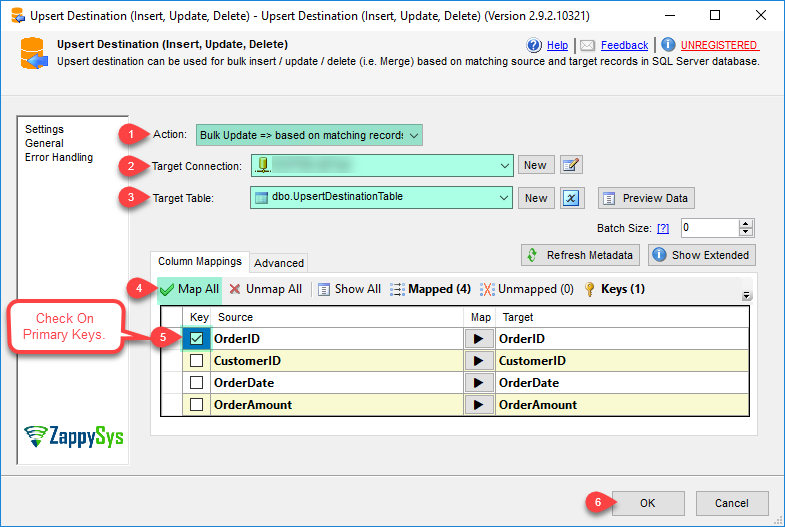
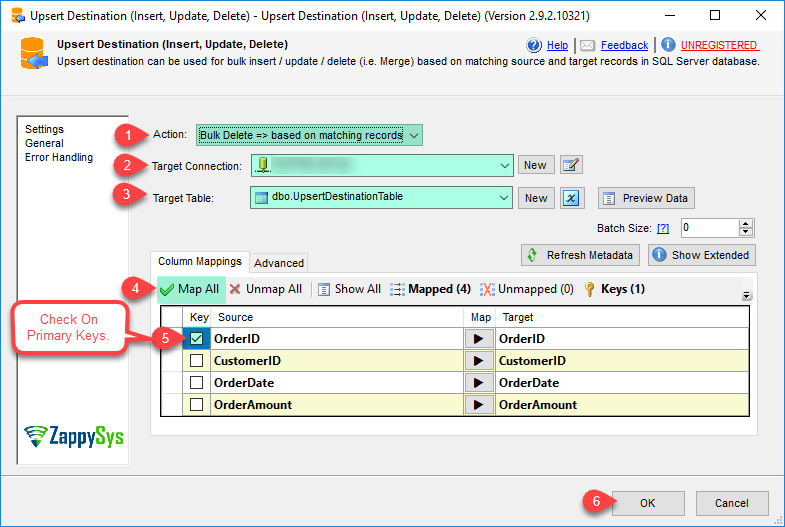
Upsert destination
can be used to synchronize data from source to target. It supports Bulk Upsert (insert
if does not exist else update) and bulk delete. The Upsert destination
is used no synchronize data between source and destination in few clicks.

|


| Property Name | Description | ||||||||||
|---|---|---|---|---|---|---|---|---|---|---|---|
| LoggingMode | LoggingMode determines how much information is logged during Package Execution. Set Logging mode to Debugging for maximum log.
|
||||||||||
| PrefixTimestamp | When you enable this property it will prefix timestamp before Log messages. | ||||||||||
| DoNotCreateOutputs | Enable / Disable Response Output. Checking this option can remove unwanted warnings about unused Columns and many times speedup performance so if output is not needed set this option to True so its removed. | ||||||||||
| TableName | Target table name where you like insert, update or delete records | ||||||||||
| BatchSize | Commit batch size (0=Commit once all source rows are consumed). You can Change Batch Size to commit in smaller chunks too if error handling needed. | ||||||||||
| Action | Action you like to perform (e.g. Upsert, Insert, Update, Delete or Sync)
|
||||||||||
| EnableInsert | INSERT source rows to target if they don't exist in target table (Only for Sync or Upsert Action) | ||||||||||
| EnableUpdate | UPDATE source rows to target if they exist in target table (Only for Sync or Upsert Action) | ||||||||||
| EnableDelete | DELETE target rows if missing in source (Only for Sync or Upsert Action) | ||||||||||
| CustomTempTableName | User defined Temp table to hold source result before final merge. This table is truncated before each data load. Unlike auto temp table, custom temp table is not dropped after process is finished. | ||||||||||
| TempPostExecuteCommand | SQL command you like to execute after source data is loaded into temp table. For example you can use this option to issue Custom SQL to delete duplicate rows from Staging Table right before final merge. This command is executed before issuing final merge on target table. Along with variable placeholders, you can also use special placeholders [%target_table%], [%temp_table%] and [%target_keys%] | ||||||||||
| PreExecuteCommand | SQL command you like to execute before starting load in target table (e.g. DROP INDEX on target). Along with variable placeholders, you can also use special placeholders [%target_table%], [%temp_table%] and [%target_keys%] | ||||||||||
| PostExecuteCommand | SQL command you like to execute at the end once target table is update (e.g. REBUILD or CREATE INDEX on target table). Along with variable placeholders, you can also use special placeholders [%target_table%], [%temp_table%] and [%target_keys%] | ||||||||||
| DuplicateRemovalMode | Specifies what to do if you encounter duplicate records in source data. You can use first row in the group or keep last row or throw error.
|
||||||||||
| DuplicateOrderBy | Specifies field name based on Duplicate record is sorted. You can enter one or more columns based on you like sorting (e.g. col1 asc, col2 desc, upper(col3) desc). If you do not specify anything then default sort is based on Key field(s). By default UI will warn you if you enter custom value. If you do not wish to be prompted on the UI for custom expression then you can enter /*NO-PROMPT*/ anywhere in the value (e.g. LastUpdated DESC /*NO-PROMPT*/) | ||||||||||
| RowCompareMode | Defines how to check for modified row for Update Action. Default is check by Key match (Update all rows which exists on target by matching Keys from source and target).
|
||||||||||
| EnableCreatedOn | Enables writing row create date/time to the selected target column if row is inserted. | ||||||||||
| EnableLastUpdatedOn | Enables writing row update date/time to the selected target column if row is updated. | ||||||||||
| ColumnForCreatedOn | Indicates target table column name which you like to set for row create action date/time. After row insert this column will be updated automatically with the current server date/time (only if you set column name here). If you map this column from source input then it takes precedence. | ||||||||||
| ColumnForLastUpdatedOn | Indicates target table column name which you like to set for row update action date/time. After row update this column will be updated automatically with the current date/time (only if you set column name here). If you map this column from source input then it takes precedence. | ||||||||||
| CustomTableHints | Custom hints for merge if supported by database engine. E.g. in SQL Server you can issue WITH (TABLOCK) hint if you dont want to lock target table during merge operation allowing other processes to access it while merge is performed. Leaving this value blank will use system default hints (i.e. WITH (HOLDLOCK) for MS SQL and blank for other engines). If you do not wish to use any hints then enter {none} |


