Authentication User Credentials
Description
Use delegated access (User Credentials) whenever you want to let a signed-in user work with their own resources or resources they can access. Whether it's an admin setting up policies for their entire organization or a user deleting an email in their inbox, all scenarios involving user actions should use delegated access. [API reference]
Instructions
Follow these simple steps below to create Microsoft Entra ID application with delegated access:
automation@my-company.com).
When you use a personal account which is tied to a specific employee profile and that employee leaves the company,
the token may become invalid and any automated processes using that token will start to fail.
- Navigate to the Azure Portal and log in using your credentials.
- Access Microsoft Entra ID.
-
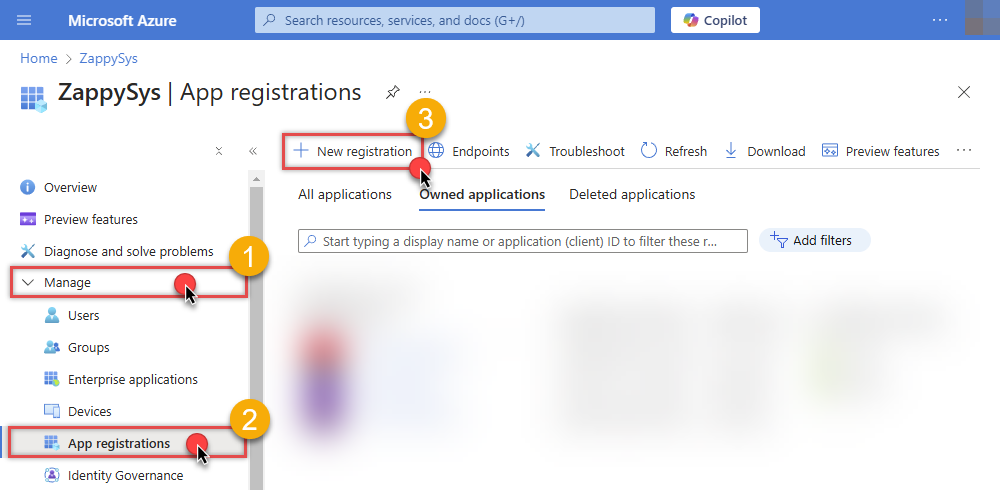
Register a new application by going to App registrations and clicking on New registration button:
 INFO: Find more information on how to register an application in Graph API reference.
 -
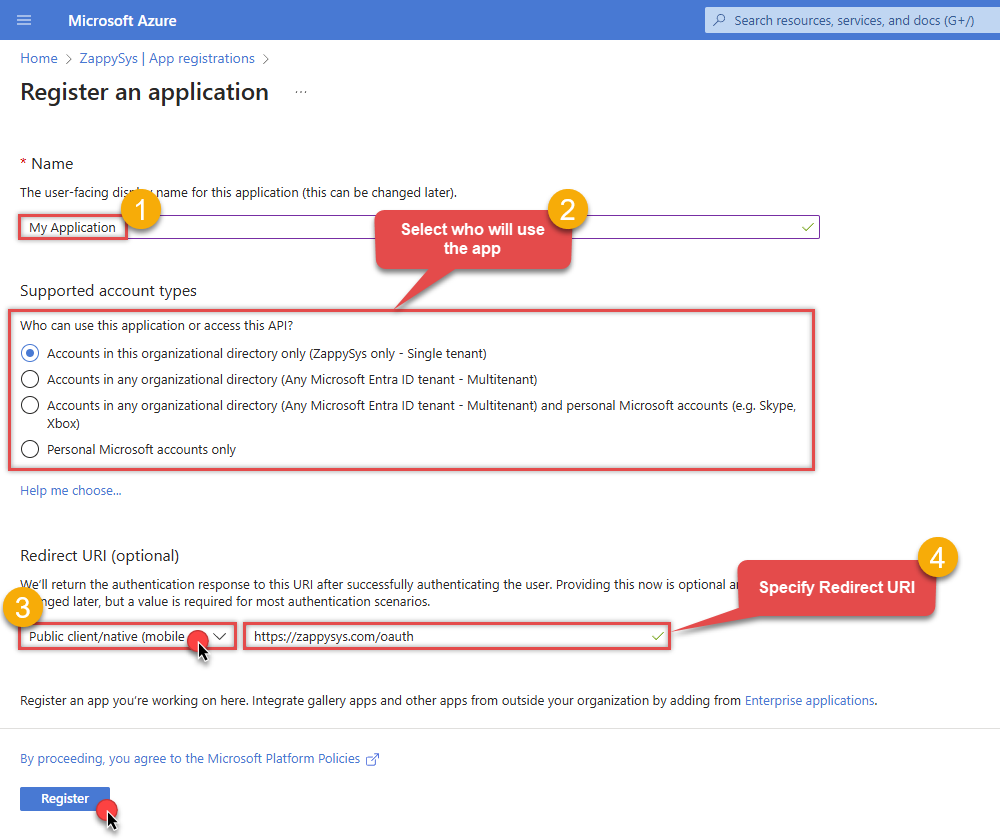
When configuration window opens, configure these fields:
-
Supported account type
- Use
Accounts in this organizational directory only, if you need access to data in your organization only.
- Use
-
Supported account type
-
Redirect URI:
- Set the type to
Public client/native (mobile & desktop). - Use
https://zappysys.com/oauthas the URL.
- Set the type to
-
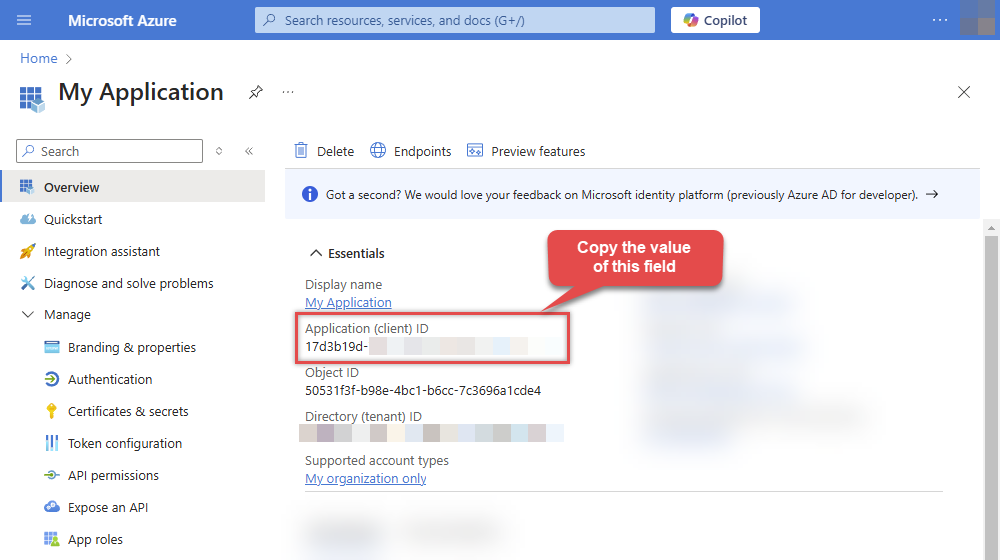
After registering the app, copy the Application (client) ID for later:

-
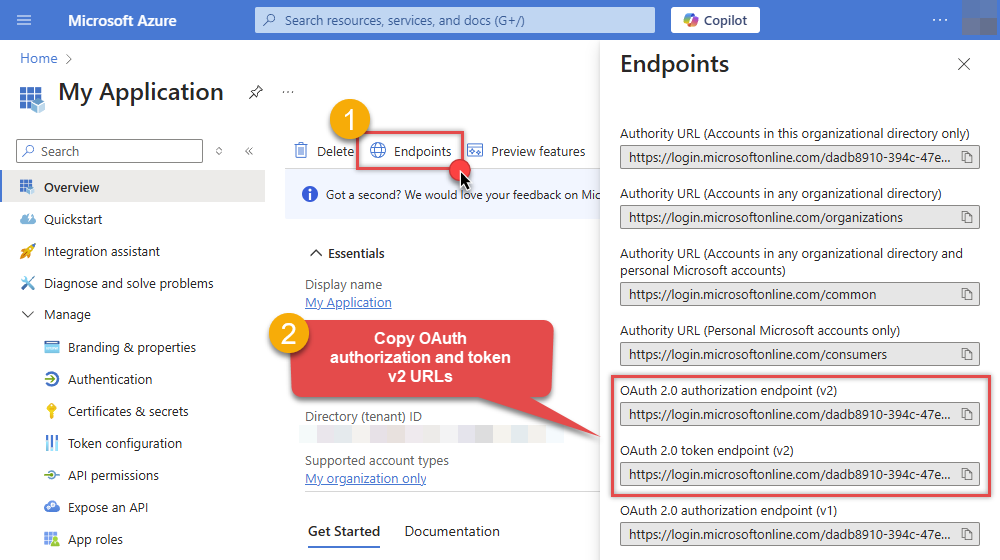
Copy OAuth authorization endpoint (v2) & OAuth token endpoint (v2) URLs to use later in the configuration:

-
Now go to SSIS package or ODBC data source and use the copied values in User Credentials authentication configuration:
- In the Authorization URL field paste the OAuth authorization endpoint (v2) URL value you copied in the previous step.
- In the Token URL field paste the OAuth token endpoint (v2) URL value you copied in the previous step.
- In the Client ID field paste the Application (client) ID value you copied in the previous step.
-
In the Scope field use the default value or select individual scopes, e.g.:
-
offline_access -
https://analysis.windows.net/powerbi/api/Workspace.Read.All -
https://analysis.windows.net/powerbi/api/Dataset.Read.All -
https://analysis.windows.net/powerbi/api/Dataset.ReadWrite.All
-
- Press Generate Token button to generate Access and Refresh Tokens.
- Click Test Connection to confirm the connection is working.
- Optional step. Choose Default Workspace from the drop down menu.
- Choose Default Dataset from the drop down menu.
- Done! Now you are ready to use the API Connector!

Parameters
| Parameter | Required | Default value | Options | ||||||||||||||
|---|---|---|---|---|---|---|---|---|---|---|---|---|---|---|---|---|---|
|
Name:
Label: Authorization URL |
YES |
|
|||||||||||||||
|
Name:
Label: Token URL |
YES |
|
|||||||||||||||
|
Name:
Label: Client ID |
YES | ||||||||||||||||
|
Name:
Label: Scope Permissions you want to use. |
YES |
offline_access~https://analysis.windows.net/powerbi/api/Workspace.Read.All~https://analysis.windows.net/powerbi/api/Dataflow.ReadWrite.All~https://analysis.windows.net/powerbi/api/Dataset.ReadWrite.All
|
|
||||||||||||||
|
Name:
Label: Default Dataset (select after generating tokens) |
YES | ||||||||||||||||
|
Name:
Label: Client Secret |
|||||||||||||||||
|
Name:
Label: Redirect URI (must match App Redirect URI) The ReturnUrl must match the URL on the Authentication page for your Application (in Azure Portal, Azure Active Directory > App registrations > Application) |
|
||||||||||||||||
|
Name:
Label: Default Workspace (Keep Empty for My Workspace - select after generating tokens) Leave value empty to use your Power BI default Workspace |
|||||||||||||||||
|
Name:
Label: RetryMode |
RetryWhenStatusCodeMatch
|
|
|||||||||||||||
|
Name:
Label: RetryStatusCodeList |
429|503
|
||||||||||||||||
|
Name:
Label: RetryCountMax |
20
|
||||||||||||||||
|
Name:
Label: RetryWaitTimeMs |
1000
|
||||||||||||||||
|
Name:
Label: RetryMultiplyWaitTime |
True
|
||||||||||||||||
|
Name:
Label: Login options Choose this if you want to force login prompt or permission prompt. |
|
