|
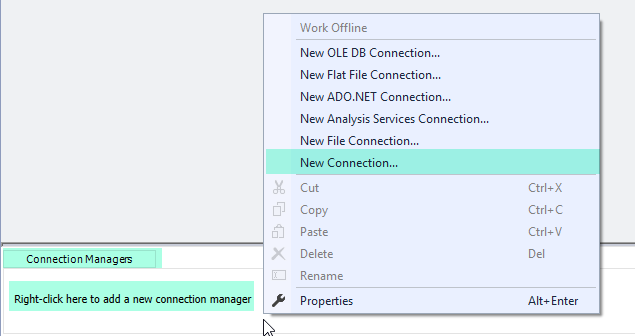
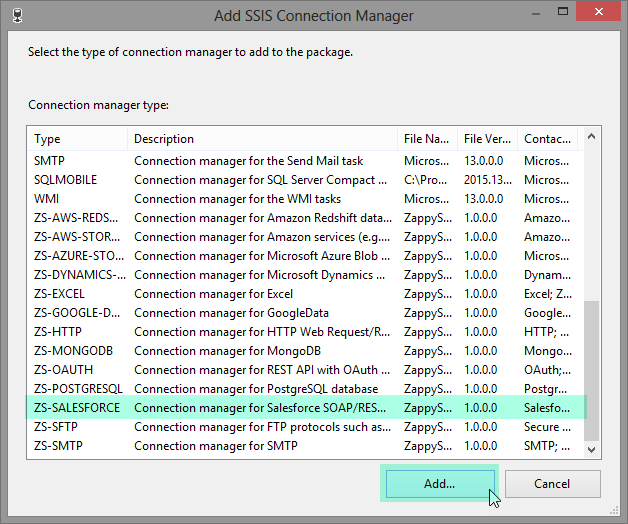
SSIS Salesforce API Task
|
 
|

|
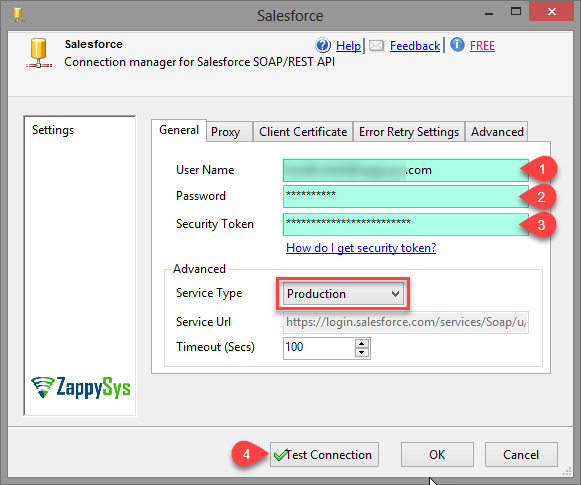
     User Name : yourusername@yourcompanyname.com
Security Token : 1Abcd2efg3uHL4bda9PTS2l7

click here to learn how to obtain Salesforce Security Token.

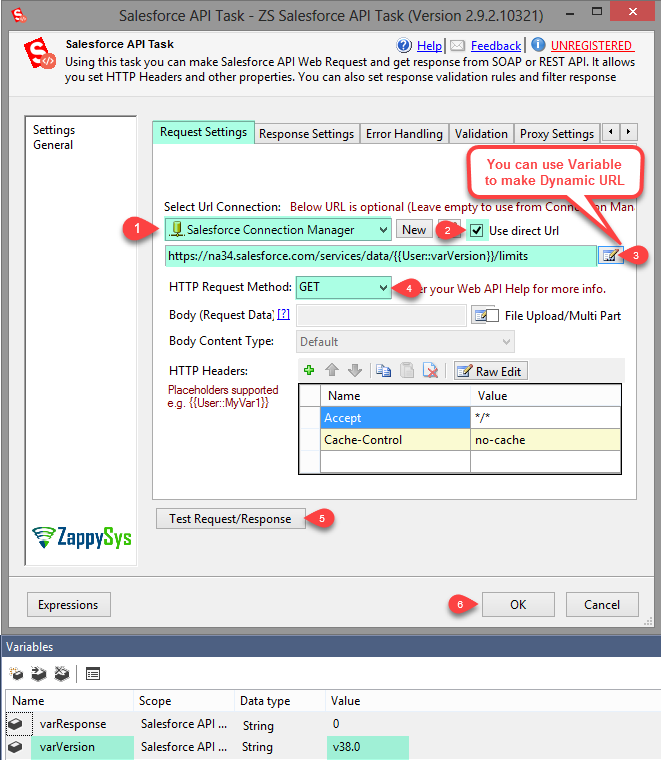
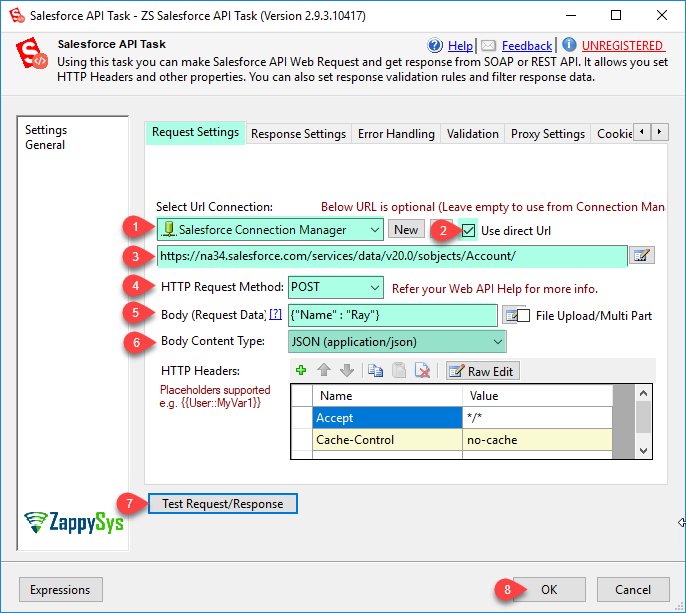
https://na34.salesforce.com/services/data/{{User::varVersion}}/limits
https://na34.salesforce.com/services/data/v20.0/sobjects/Account/Pass Request Data, For more information you can check Click here and set Body Content Type to JSON(application/json).
{"Name" : "Ray"}
| Property Name | Description | ||||||||||||||||||||||||||
|---|---|---|---|---|---|---|---|---|---|---|---|---|---|---|---|---|---|---|---|---|---|---|---|---|---|---|---|
| SupportConnectionLessUrl | |||||||||||||||||||||||||||
| EnableStatusCheck | Enable status check loop. When this option is enabled web requests are tried every N seconds to check desired value in response. Once desired value is found response is returned. Error is returned if failure indicator found or timeout occurs (i.e. Max iteration reached and still no success value found in the response). | ||||||||||||||||||||||||||
| StatusCheckMaxWaitSeconds | Maximum wait time in seconds until we need to keep checking for success value or failure value indicator. | ||||||||||||||||||||||||||
| StatusFieldFilterType | Extract type for success value / failed value field. For JSON Examples: $.status.value, For Xml Examples: ./AuthInfo/Token/text() --or-- ./Auth/@Token --or-- //*[local-name() = 'ResponseData']
|
||||||||||||||||||||||||||
| StatusFieldFilterExpr | |||||||||||||||||||||||||||
| StatusCheckIterationWaitSeconds | Wait time between each iteration for status check | ||||||||||||||||||||||||||
| StatusCheckForFailedValue | Enable check to look for failure indicator. By default only SuccessValue is searched in response unless you set this option to true. Set StatusFailedValue to indicate failure regex / string pattern. | ||||||||||||||||||||||||||
| StatusSuccessValue | Regex pattern or string value you like to search for Success indicator (e.g. Done|Success|Ok ). If you dont want to use Regex match then change StatusFieldFilterType. | ||||||||||||||||||||||||||
| StatusContinueValue | Regex pattern or string value you like to search to continue status check (e.g. Done|Success|Ok ) If this value is found then status check is continue without checking for success or failure value. If you dont want to use Regex match then change StatusFieldFilterType. | ||||||||||||||||||||||||||
| StatusFailedValue | Regex pattern or string value you like to search for Failure indicator (e.g. Cancelled|Aborted|Failed ). Set StatusCheckForFailedValue=true to use this value. If you dont want to use Regex match then change StatusFieldFilterType. | ||||||||||||||||||||||||||
| IsMultiPartUpload | Set this option if you want to upload file(s) (i.e. POST RAW file data) or send data using Multi-Part encoding method (i.e. Content-Type: multipart/form-data). Multi-Part request allows you to mix key/value and upload files in same request. On the other hand raw upload allows only single file upload (without any key/value) ==== Raw Upload (Content-Type: application/octet-stream) ===== To upload single file in raw mode check this option and specify full file path starting with @ sign in the Body (e.g. @c:\data\myfile.zip ) ==== Form-Data / Multipart Upload (Content-Type: multipart/form-data) ===== To treat your Request data as multi part fields you must specify key/value pairs separated by new lines into RequestData field (i.e. Body). Each key value pair is entered on new-line and key/value are separated using equal sign (=). Preceding and trailing spaces are ignored also blank lines are ignored. If field value has some any special character(s) then use escape sequence (e.g. For NewLine: \r\n, For Tab: \t, For at (@): \@). When value of any field starts with at sign (@) its automatically treated as File you want to upload. By default file content type is determined based on extension however you can supply content type manually for any field using this way [ YourFileFieldName.Content-Type=some-content-type ]. By default File Upload Field always includes Content-Type in the request (non file fields do not have content-type by default unless you supply manually). For some reason if you dont want to use Content-Type header in your request then supply blank Content-Type to exclude this header altogather [e.g. SomeFieldName.Content-Type= ]. In below example we have supplied Content-Type for file2 and SomeField1, all other fields are using default content-type. See below Example of uploading multiple files along with additional fields. If some API requires you to pass Content-Type: multipart/form-data rather than multipart/form-data then manually set Request Header => Content-Type: multipart/mixed (it must starts with multipart/ else will be ignored). file1=@c:\data\Myfile1.txt file2=@c:\data\Myfile2.json file2.Content-Type=application/json SomeField1=aaaaaaa SomeField1.Content-Type=text/plain SomeField2=12345 SomeFieldWithNewLineAndTab=This is line1\r\nThis is line2\r\nThis is \ttab \ttab \ttab SomeFieldStartingWithAtSign=\@MyTwitterHandle |
||||||||||||||||||||||||||
| AddMultiPartPostamble | Some API server requires Multi-Part Requests to be ended by new line characters (i.e. \r\n). Enable this option if you face error such as - Unexpected end of MIME multipart stream. MIME multipart message is not complete - | ||||||||||||||||||||||||||
| MultiPartBoundary | If your API requires custom boundary parameter then set this parameter. If you keep this blank then unique boundary is auto generated for each request (e.g. ---------------------------WebKitFormBoundarye0105838dcb14a098a9a3f355f7dc233). This option is ignored if you didn't set IsMultiPartUpload option to True | ||||||||||||||||||||||||||
| DisableAutoConvertMultiPartStream | |||||||||||||||||||||||||||
| TreatResponseAsMultiPart | |||||||||||||||||||||||||||
| PreventAutoRedirect | By default HTTP Status 301, 302, 307 and 308 redirects automatically to new URL (Follows Location Header in Response). For some reason you want to disable it then set this option. | ||||||||||||||||||||||||||
| AllowAuthRedirectToAnyDomain | By default when redirect happens (i.e. HTTP Code 301, 302, 307 and 308) to a different Host (domain or IP) then it removes the authorization header before redirecting to a new Host. If you trust the new host and you like to pass credentials after redirect then set this option. Without setting this option your HTTP request might fail. | ||||||||||||||||||||||||||
| RequestTimeoutMs | HTTP request timeout in milliseconds. Enter 0 to use system default timeout. | ||||||||||||||||||||||||||
| SecurityProtocol | Specifies which security protocol is supported for HTTPS communication. Using this option you can enable legacy protocol or enforce to use latest version of security protocol (Note: TLS 1.2 is only supported in SSIS 2014 or Higher).
|
||||||||||||||||||||||||||
| EnableCompressionSupport | Enable support for gzip or deflate compression (for deflate you must turn on [Tls 1.0 Or Higher] Option on Advanced Settings - Security Protocol for HTTPS). When you check this option compressed response automatically de-compressed saving bandwidth. This option is only valid if web server supports compressed response stream. Check your API documentation for more information. | ||||||||||||||||||||||||||
| EnableRequestCompression | Enable this option if you like to compress request body (i.e. Content-Encoding: gzip). Enabling this option can speedup data transfer especially when you are sending large amount data (i.e. Upload file) | ||||||||||||||||||||||||||
| EnableSplitStreamForUpload | Enable Chunked Upload option for very large file (Only if API supports this) | ||||||||||||||||||||||||||
| BytesPerSplit | Default Chunk Size in Bytes when EnableSplitStreamForUpload is turned on for large file upload. 0=Default value (32MB i.e. 32 * 1024 * 1024 Bytes) | ||||||||||||||||||||||||||
| ContentRangeHeader | Content Range Header Name to send Bytes information (i.e. Range Counter). Default=Content-Range | ||||||||||||||||||||||||||
| ContentRangeValueTemplate | Header value template to send Bytes information. You can use 3 placeholders anywhere in the template {next-range-start}, {next-range-end} and {total-bytes}. When you keep this value blank it uses default value. Default Value=bytes {next-range-start}-{next-range-end}/{total-bytes} | ||||||||||||||||||||||||||
| PartsResponseTemplate | Template for combined responses of all parts. If this template is not defined then only last response is returned. You can use placeholder {all-responses} anywhere in the template. This is useful to gather part ids or other useful response information after each part is uploaded. All responses are joined using comma and new line. | ||||||||||||||||||||||||||
| AllowUnsecureSuite | AllowUnsecureSuite | ||||||||||||||||||||||||||
| IgnoreCertificateErrors | IgnoreCertificateErrors | ||||||||||||||||||||||||||
| RequestUrl | Request URL where you want to submit HTTP Request | ||||||||||||||||||||||||||
| RequestUrlConnection | HTTP Connection Manager for WebRequest to specified URL | ||||||||||||||||||||||||||
| RequestMethod | Request method (e.g. GET, PUT, POST...) | ||||||||||||||||||||||||||
| RequestContentType | Specifies content type for data you wish to POST. If you select Default option then system default content type will be used (i.e. application/x-www-form-urlencoded). If you specify Content-Type header along with this option then header value takes precedence.
|
||||||||||||||||||||||||||
| OverrideConnectionUrl | When this option is checked you can use Direct URL instead of using URL coming from selected HTTP connection manager (This option is only valid when RequestAccessMode = UrlFromConnection) | ||||||||||||||||||||||||||
| RequestHeaders | Headers you want to send along with your request | ||||||||||||||||||||||||||
| RequestData | Data you want to send along with request. This is not supported if Request Method is GET | ||||||||||||||||||||||||||
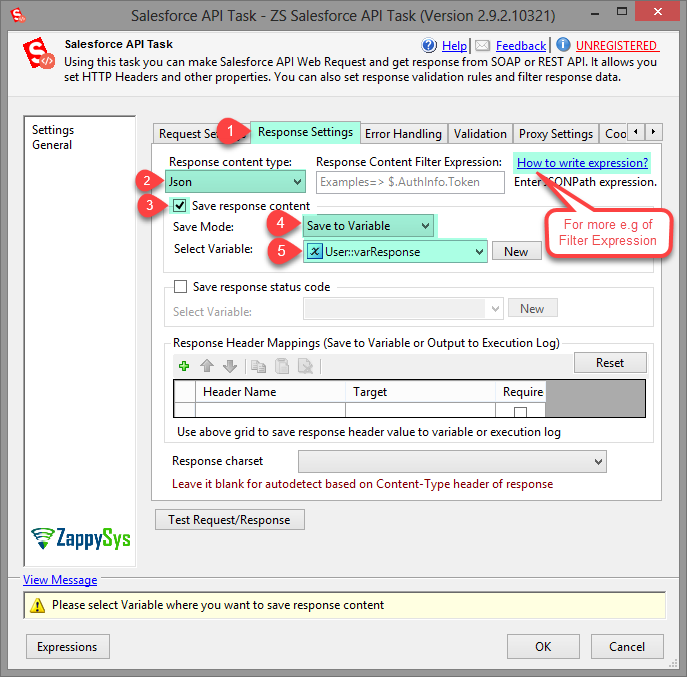
| SaveResponse | Check this option if you want to save response to variable or file | ||||||||||||||||||||||||||
| SaveResponseStatusCode | Check this option if you want to save response status code (numeric) to variable | ||||||||||||||||||||||||||
| ResponseAccessMode | Determines how to save response content
|
||||||||||||||||||||||||||
| SaveAsBinary | Treat response data as binary data rather than text data. Check this option when you downloading data which is not in text format or doesn't have encoding (e.g. zip, mp3, jpeg). This option is not available when you save response to Variable. When this option is checked ResponseCharset option is ignored. | ||||||||||||||||||||||||||
| ResponseDataFilePath | File path where response content should be saved | ||||||||||||||||||||||||||
| ResponseHeaderMappings | Http response header mappings | ||||||||||||||||||||||||||
| ResponseCookieMappings | Cookie mapping. Use this setting to map cookie value to variable | ||||||||||||||||||||||||||
| CookieContainerVariable | Cookie Container can be used to maintain state between multiple web requests. Example: You can login to site like wordpress and then extract any private page content by simply passing authentication cookies using this variable. | ||||||||||||||||||||||||||
| ConvertXmlToJson | Convert XML Response to JSON. This setting is helpful to consume services which support XML format but not JSON. By converting XML to JSON you can then consume data using other components/tasks such as JSON Source, JSON Parser. | ||||||||||||||||||||||||||
| ResponseDataVariable | Variable name where response content should be saved | ||||||||||||||||||||||||||
| ResponseStatusCodeVariable | Variable name where you want to save response status code | ||||||||||||||||||||||||||
| ResponseContentType | Response content type
|
||||||||||||||||||||||||||
| ResponseContentFilter | If you selected ResponseContentType=XML or JSON then use this property to filter Response Content using JSONPath or XPath expression. | ||||||||||||||||||||||||||
| ContinueOnResponseFilterError | Continue on response filter error (i.e. Filter property referenced in expression (JSON/XML/RegX) not found in response) | ||||||||||||||||||||||||||
| ResponseCharset | Specifies content encoding for response. Leave this blank to auto detect based on Content-Type header. When you specify this property then charset sent in response header is ignored (e.g. Content-Type: text/plain; charset=utf-8). | ||||||||||||||||||||||||||
| ValidateResponse | If you want to validate for certain condition after response received check this option | ||||||||||||||||||||||||||
| ValidationRules | Validation rules for response | ||||||||||||||||||||||||||
| ConsumeResponseOnError | When error occurs no data is returned. Use this option to get content eventhough error occurs. When this option is checked you can't use [continue on error when specific string found in response] option | ||||||||||||||||||||||||||
| ContineOnAnyError | Continue when any type of exception occurs during http request | ||||||||||||||||||||||||||
| ContineOnErrorForMessage | Continue on error when specified substring found in response | ||||||||||||||||||||||||||
| ContineOnErrorForStatusCode | Continue on error when specified status code returned from web server | ||||||||||||||||||||||||||
| ErrorStatusCodeToMatch | Status code to match when error occurs and ContineOnErrorForStatusCode option is true. If Response status code matches to this code then task continues to run | ||||||||||||||||||||||||||
| ErrorStatusCodeToMatchRegex | Status code(s) to match - separated by vertical bar (e.g. 404|405). When error occurs and ContineOnErrorForStatusCode option is true then if StatusCode matches to this code(s) then task continues to run | ||||||||||||||||||||||||||
| MatchForEqual | Check for Equal or Not-Equal StatusCode when you set [ContineOnErrorForStatusCode] option | ||||||||||||||||||||||||||
| ErrorSubstringToMatch | Error substring to match when error occurs and ContineOnErrorForMessage option is true. If Response status code matches to this code then task continues to run | ||||||||||||||||||||||||||
| ContineOn404Error | Continue if response code 404 (Usually returned when specified Url is not found) | ||||||||||||||||||||||||||
| SaveErrorFlagToVariable | Save Boolean flag into SSIS variable if error is detected (Only valid if error handling options checked) | ||||||||||||||||||||||||||
| ErrorFlagVariableName | Variable name where you want to store error flag (Only valid if error handling options checked) | ||||||||||||||||||||||||||
| LoggingMode |
|
||||||||||||||||||||||||||
| PrefixTimestamp | When you enable this property it will prefix timestamp before Log messages. |