Getting Started
Video Tutorial
Coming Soon...
Step-By-Step
In this section you will learn how to Export data to specified file format (e.g. JSON, XML, CSV, Excel, PDF or HTML).
-
Firstly, You need to Download and Install ZappyShell.
-
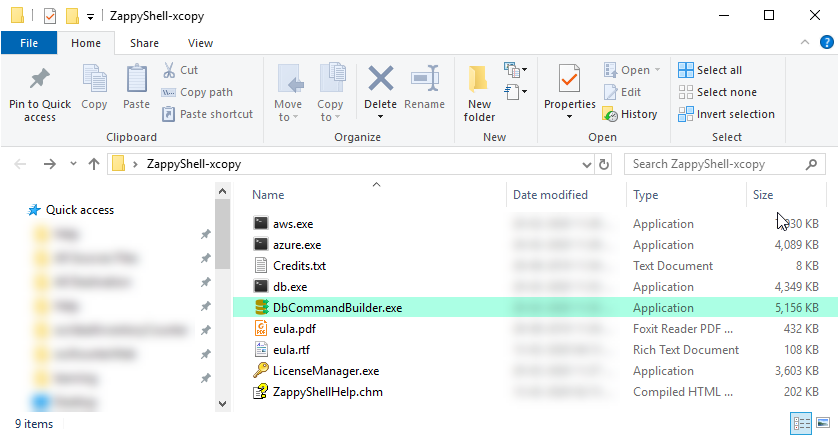
Once you finished first step, Find ZappyShell Folder or Directory and Open it.
-
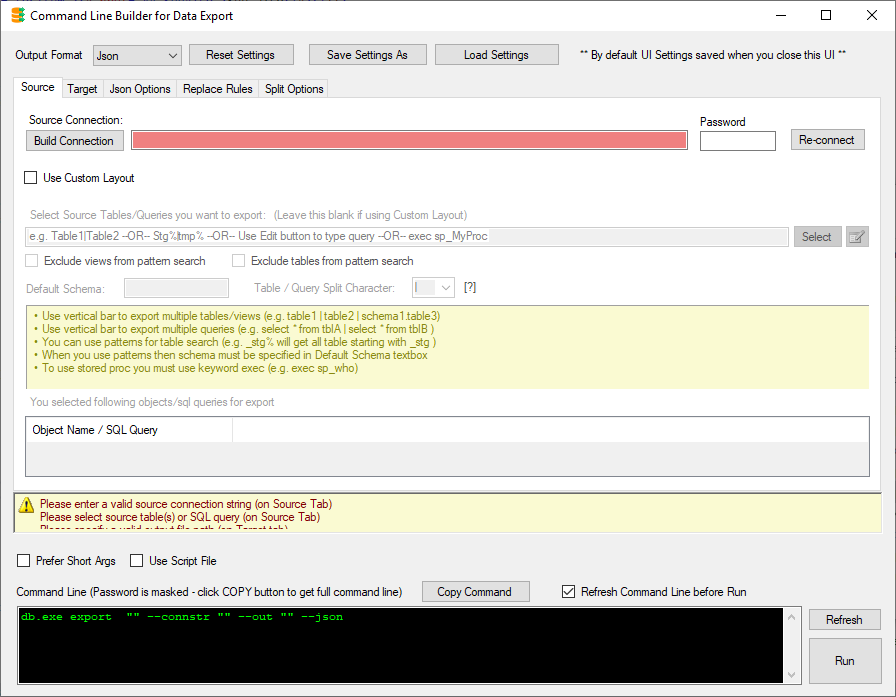
Now, Double click on the DBCommandBuilder.exe to open it.
-
Firstly, Select any Suitable Output Format before we configure otherwise you will lose configure settings.
Note : This is same for JSON/XML/CSV/Excel file too. For an example If you want to export data as JSON, Just Set Output Format to JSON.

-
Now, We need SQL Server Connection For Source.
How to create MS SQL Server Connection.
-
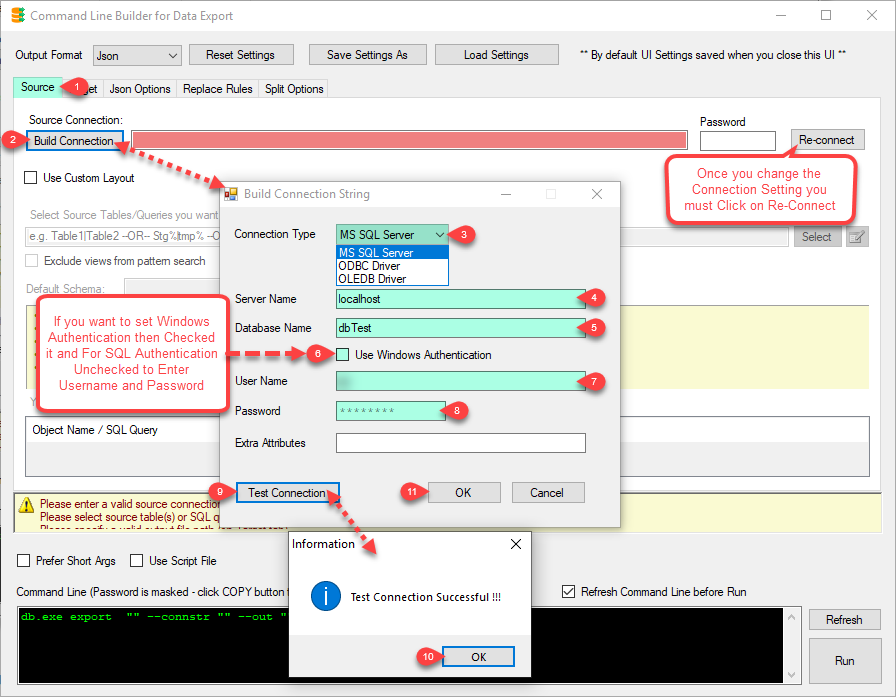
In the Source Tab, Click on Build Connection button to Create MS SQL Server Connection, so you can use Source and Window will appear,
Select Connection Type to MS SQL Server from the list of connection and Enter Correct Credentials.
After all Click on Test Connection button to see our settings are OK.
Note : Here you can set ODBC Driver and OLEDB Driver connection too If you do not need MS SQL Server.
-
Click on OK button to save connection configure setting UI.
How to Export data from SQL Server Table to JSON / XML file Default(Without Custom) Layout
In this section you will learn how to generate JSON / XML data file from SQL Server Database using DBCommandBuilder.(In this case its Default Layout).
Note : For XML Default Layout click here.
-
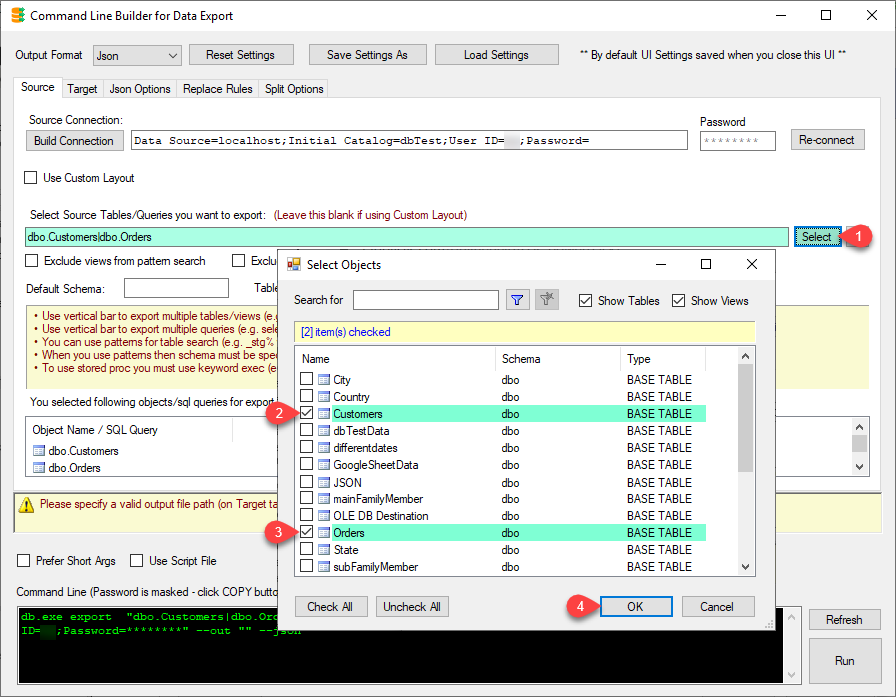
Let's, Generate JSON files for selected tables. Set Source Connection we have created, click on Select for Select Source Table you want to export.
-
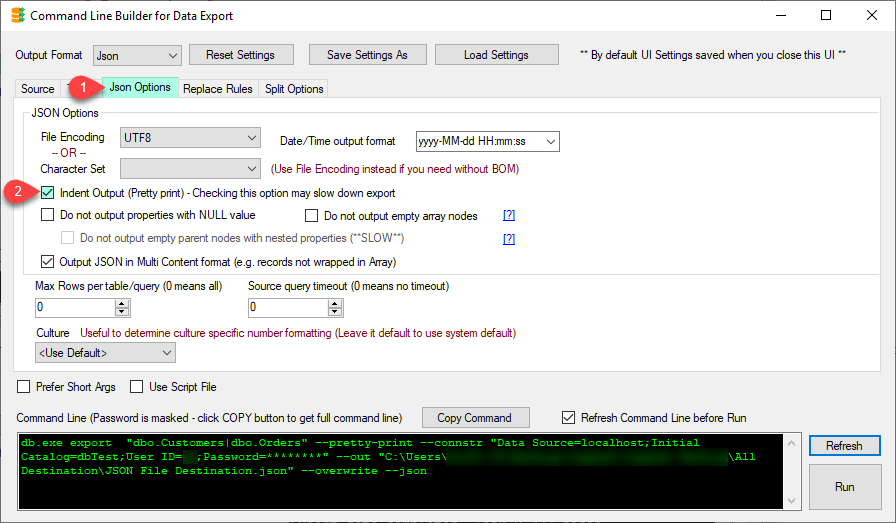
Let's, Configure in JSON Options Tab, check on Indent Output (Pretty Print).
-
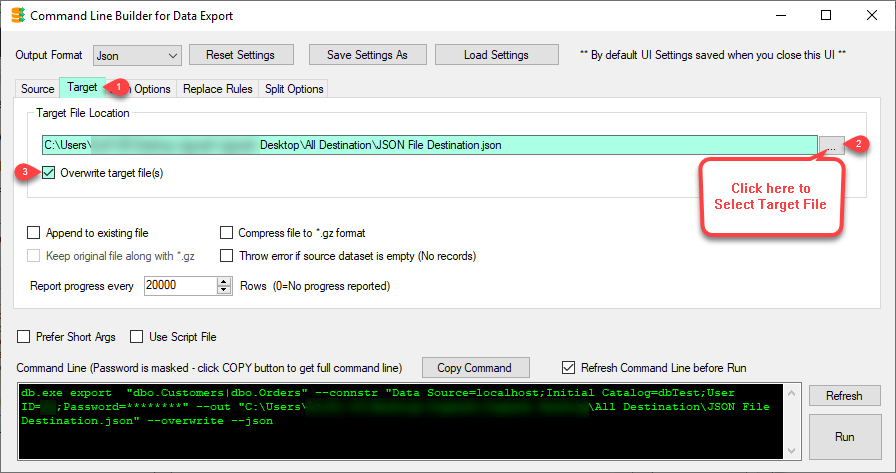
Now, set Target Path and Other Options, Select Target Location from Browse Button. Check on Overwrite target file(s) if you want it. You can Check on Compress file to *.gz format.
-
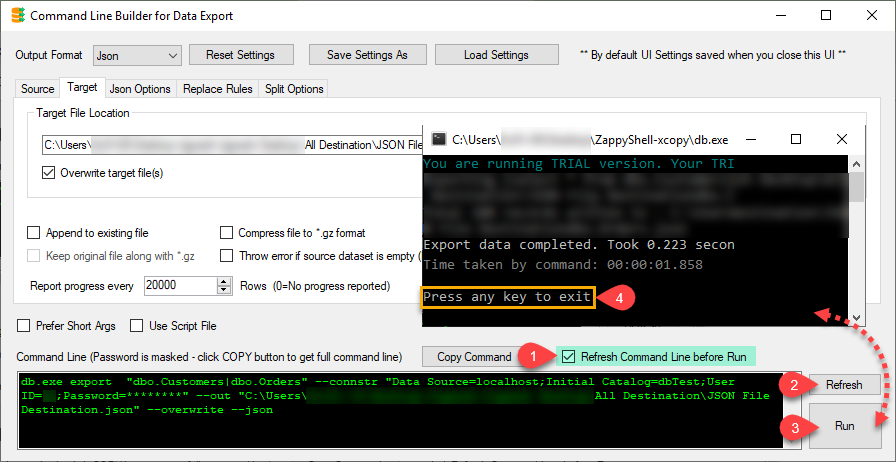
Check on Refresh Command Line before Run or Click on Refresh button and Click on Run button, Terminal Window will appear.
Check Execution Results and Press Any Key to Exit.
-
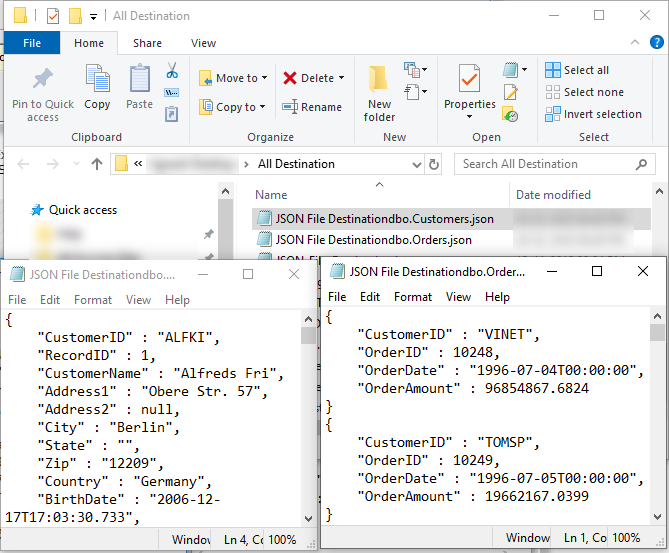
Open JSON File and Verify data.
How to Export data from SQL Server Table to JSON / XML file With Custom Layout
In this section you will learn how to generate JSON / XML data file from SQL Server Database using DBCommandBuilder.(In this case its Custom Layout).
Note : For XML Custom Layout click here.
-
Check on Custom Layout, Make sure Check on Use Custom Layout from Source Tab to see Custom Layout Tab until it will hide from Properties.
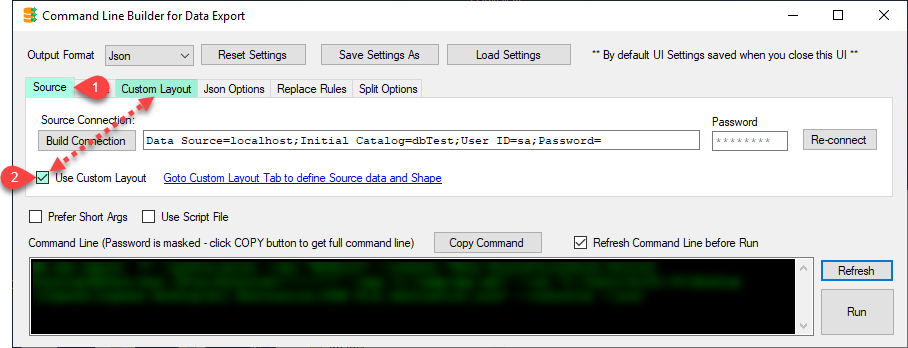
-
Now go to Custom Layout tab and Add Dataset with just few clicks.
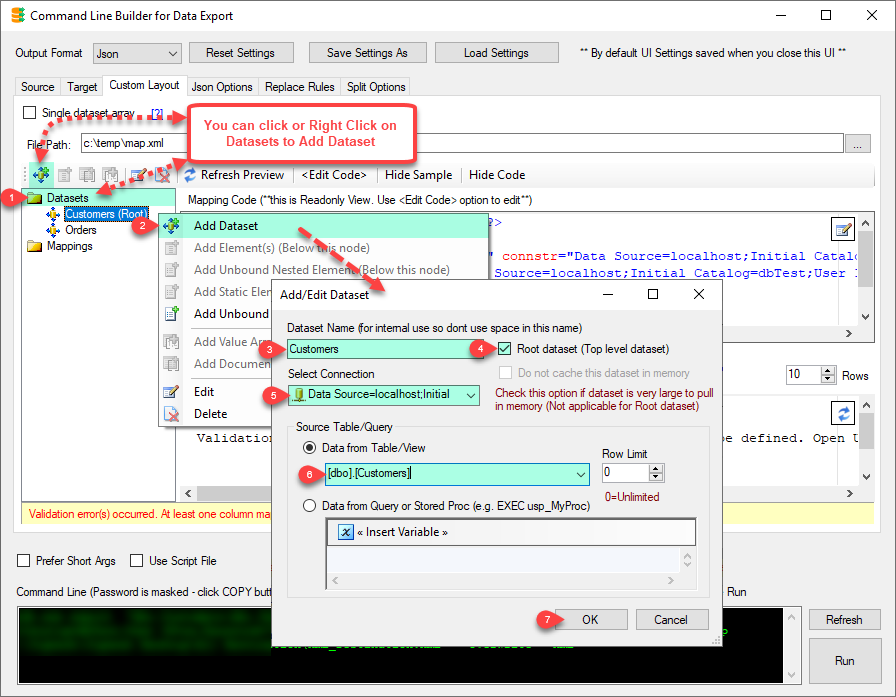
-
Now, Right Click on Mappings from left panel of UI, select Add Element(s) (Below this node).
And then, In Add/Edit Element dialogbox, select Add Multiple (Bound) and check on Columns.
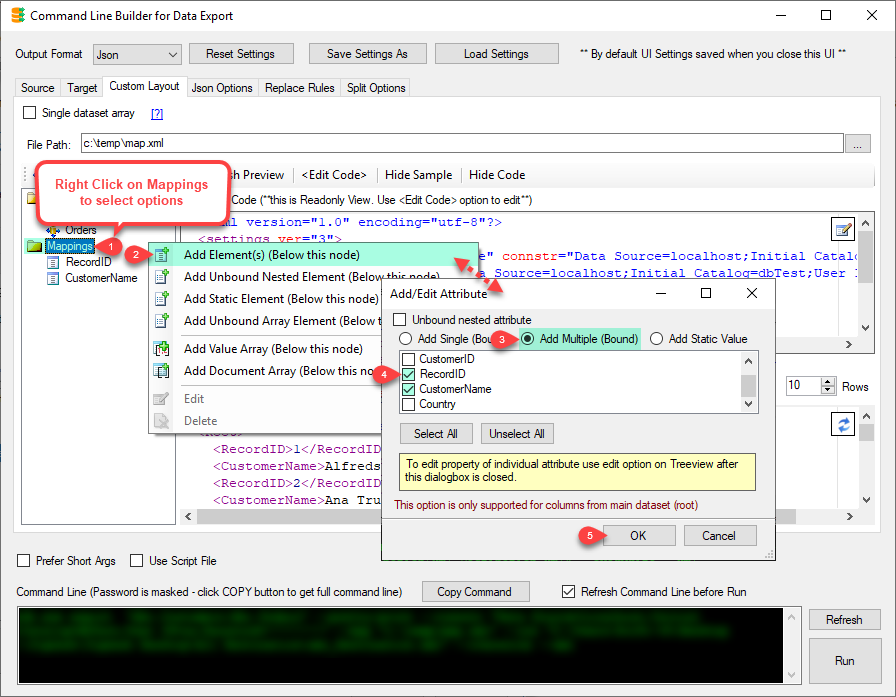
-
Here, Right Click on Mappings from left panel of UI, select Add Unbound Nested Element (Below this node). And then, In Add/Edit Attribute dialogbox, enter Output Alias name.
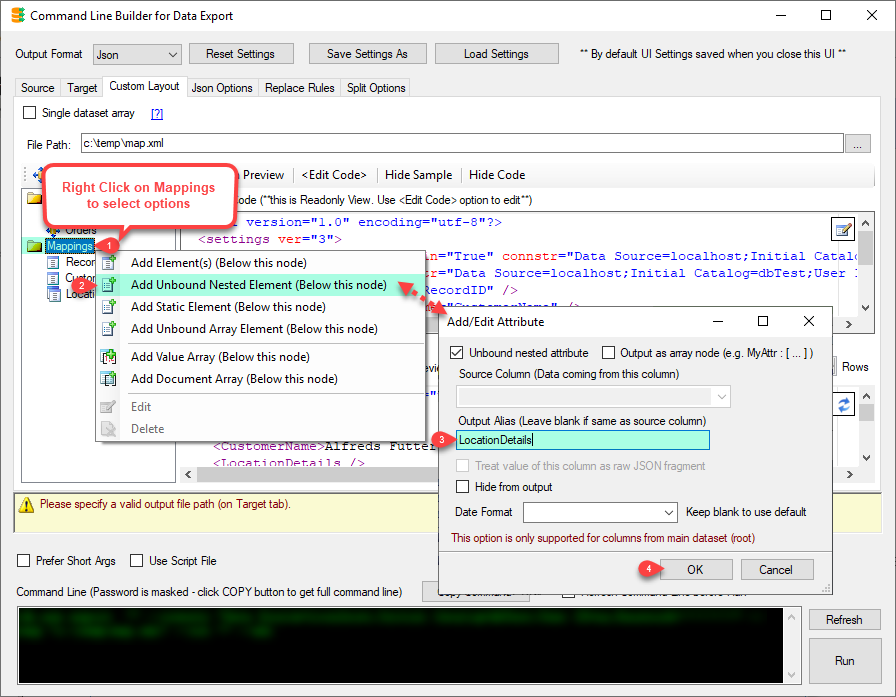
-
Now, Right Click on LocationDetails element from left panel of UI, select Add Element(s) (Below this node). And then, In Add/Edit Attribute dialogbox for Select Add Multiple (Bound) and check on Columns.
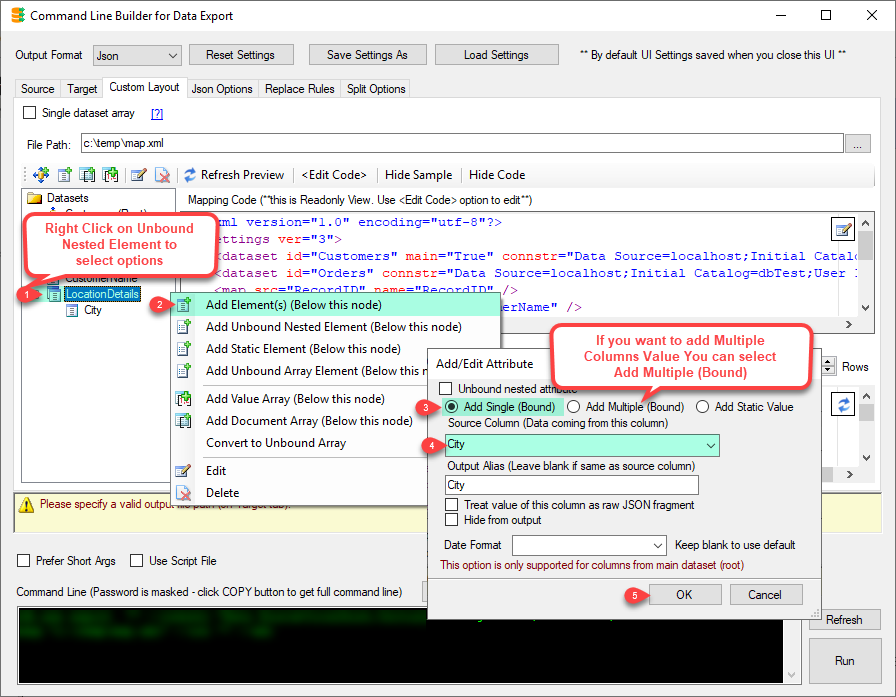
-
Here, Right Click on Mappings from left panel of UI, select Add Document Array (Below this node). And than, configure Add/Edit Element (Array of rows) like below image.
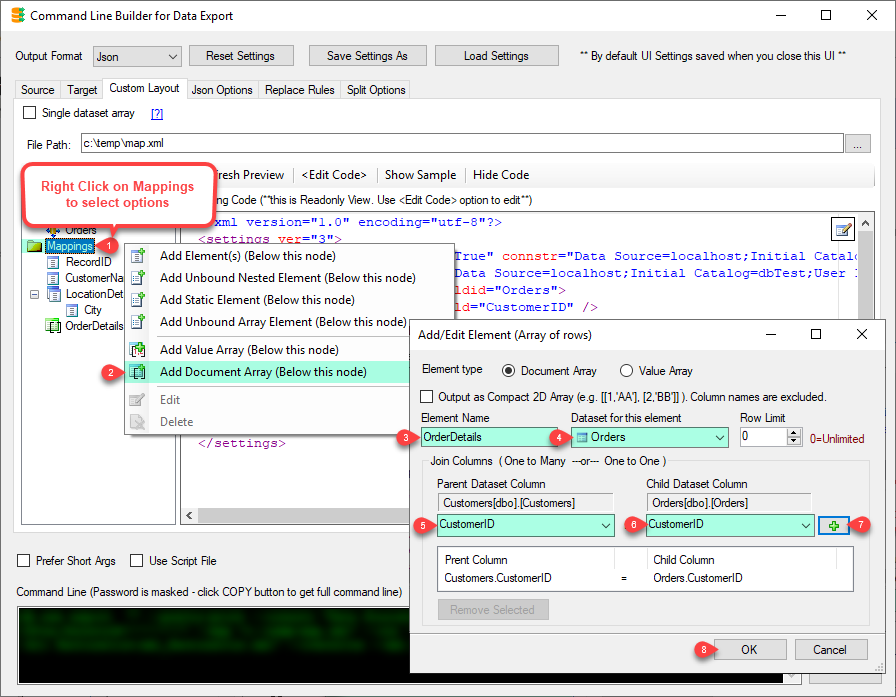
-
Now, Right Click on OrderDetails from left panel of UI, select Add Element(s) (Below this node). And then, In Add/Edit Attribute dialogbox for Select Add Multiple (Bound) and check on Columns.
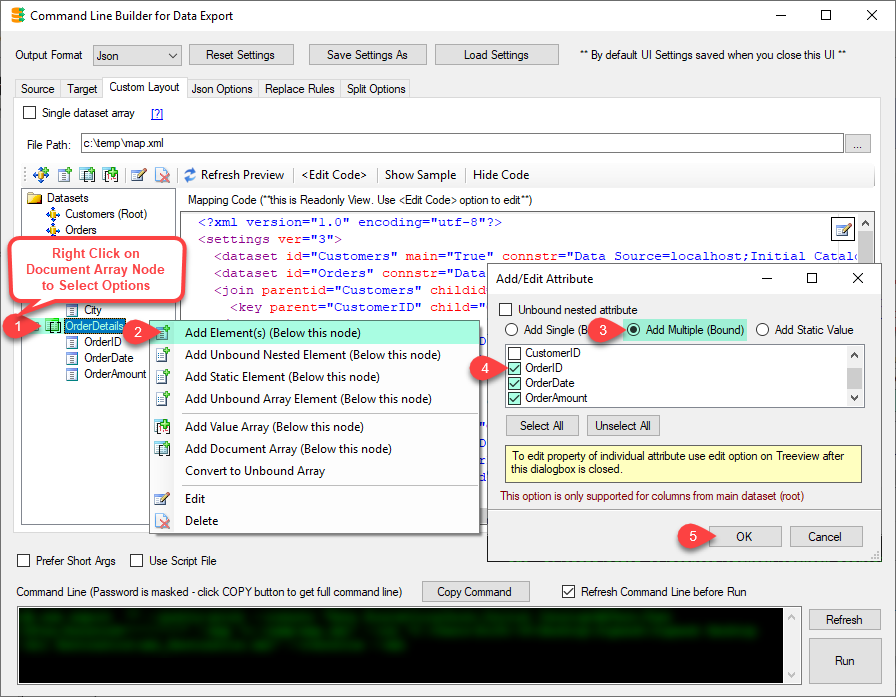
-
Let's, Configure in JSON Options Tab, check on Indent Output (Pretty Print).

-
Now, set Target Path and Other Options, Select Target Location from Browse Button. Check on Overwrite target file(s) if you want it. You can Check on Compress file to *.gz format.

-
Check on Refresh Command Line before Run or Click on Refresh button and Click on Run button, Terminal Window will appear.
Check Execution Results and Press Any Key to Exit.

-
Open JSON File and Verify data.
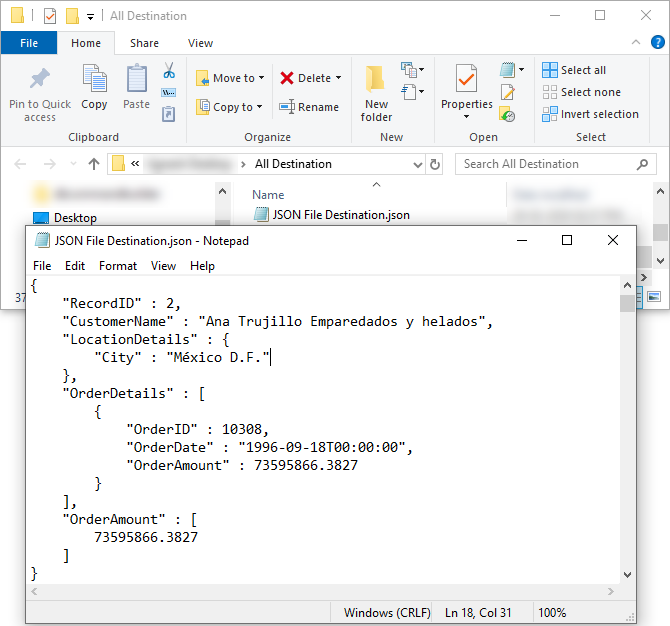
How to Export data from SQL Server Table to Excel file
In this section you will learn how to generate Excel data file from SQL Server Database using DBCommandBuilder.
-
Let's, Generate Excel files for selected tables. Set Source Connection we have created, click on Select for Select Source Table you want to export.
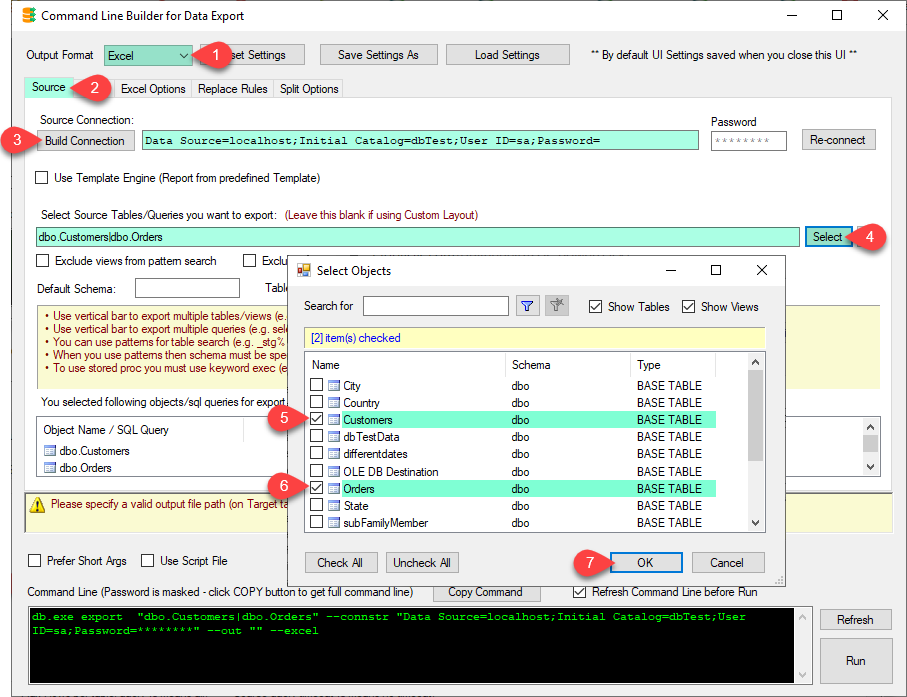
-
Let's, Configure in Excel Options, use Column Delimiter and you can change Date/Time output format as per your required.
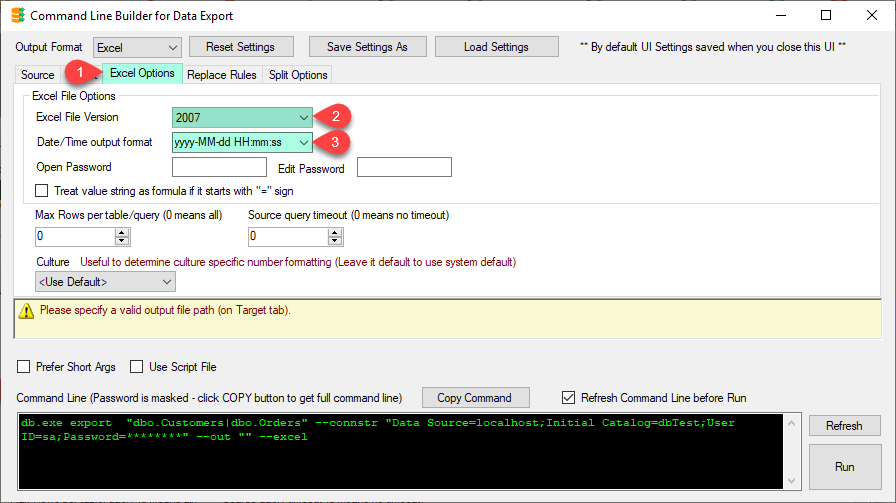
-
Now, set Target Path and Other Options, Select Target Location from Browse Button. Check on Overwrite target file(s) if you want it. You can Check on Compress file to *.gz format.
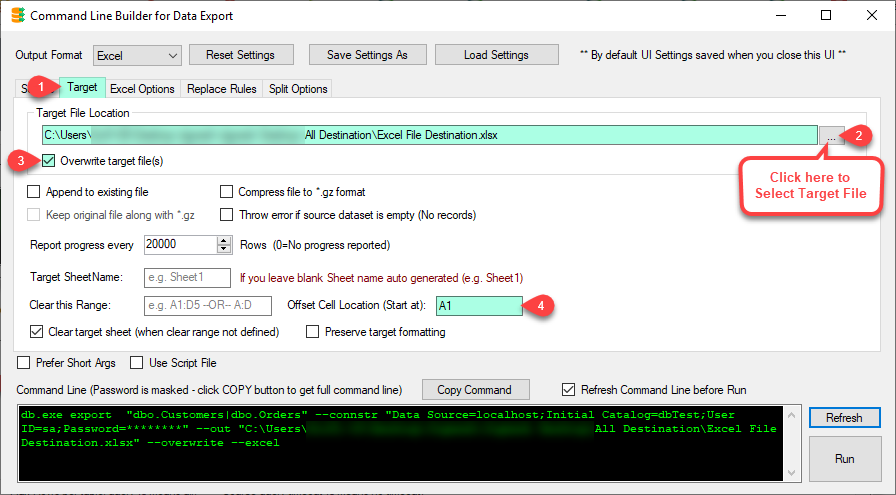
-
Check on Refresh Command Line before Run or Click on Refresh button and Click on Run button, Terminal Window will appear.
Check Execution Results and Press Any Key to Exit.
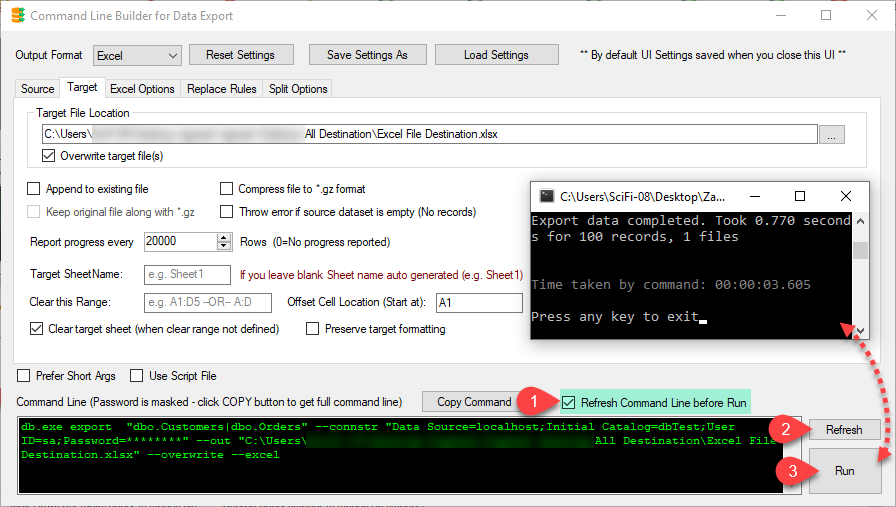
-
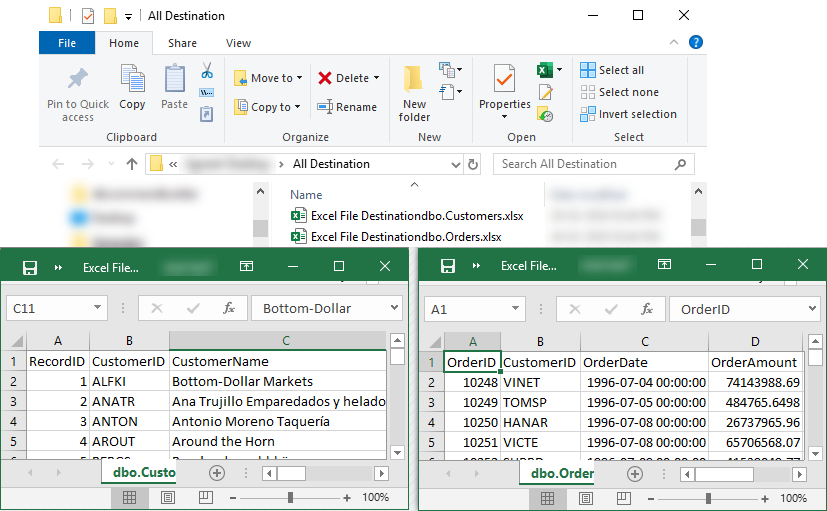
Open Excel File and Verify data.
-
Note :
For Excel Report using a Template Engine, Please click here to read Blog(There is Same UI, Just follow the steps).
For Split Option, Please click here to read Blog(There is Same UI, Just follow the steps).
How to Export data from SQL Server Table to CSV file
In this section you will learn how to generate CSV data file from SQL Server Database using DBCommandBuilder.
-
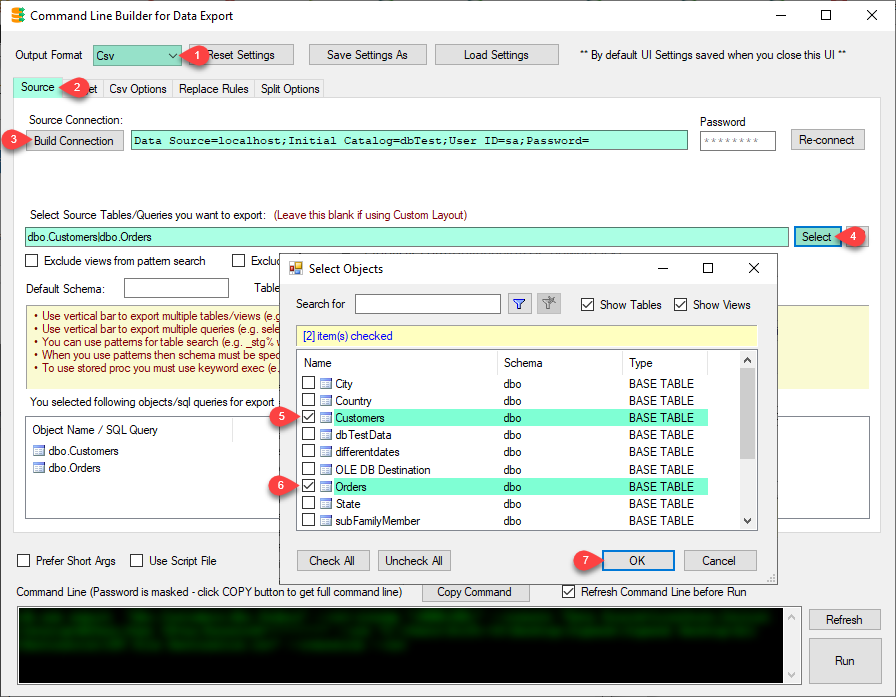
Let's, Generate CSV files for selected tables. Set Source Connection we have created, click on Select for Select Source Table you want to export.
-
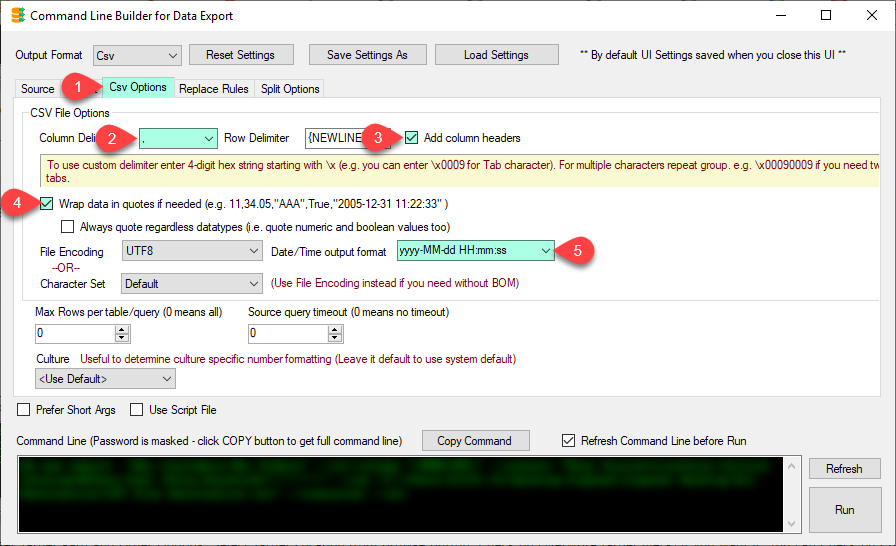
Let's, Configure in CSV Options, use Column Delimiter and you can change Date/Time output format as per your required.
-
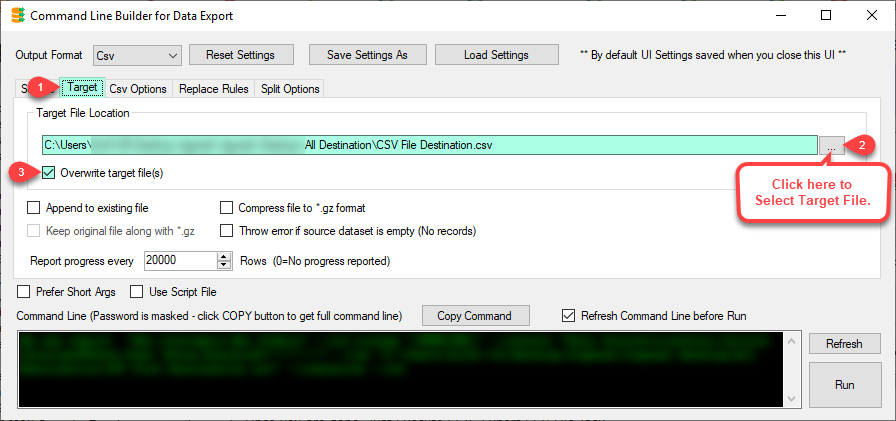
Now, set Target Path and Other Options, Select Target Location from Browse Button. Check on Overwrite target file(s) if you want it. You can Check on Compress file to *.gz format.
-
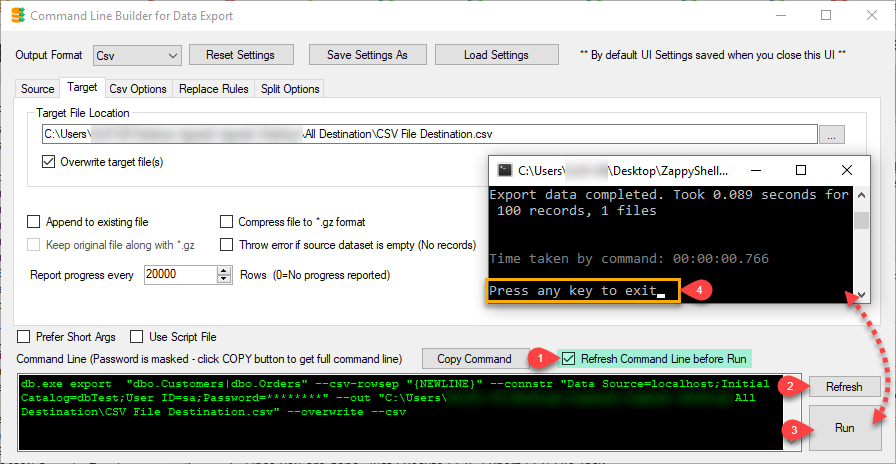
Check on Refresh Command Line before Run or Click on Refresh button and Click on Run button, Terminal Window will appear.
Check Execution Results and Press Any Key to Exit.
-
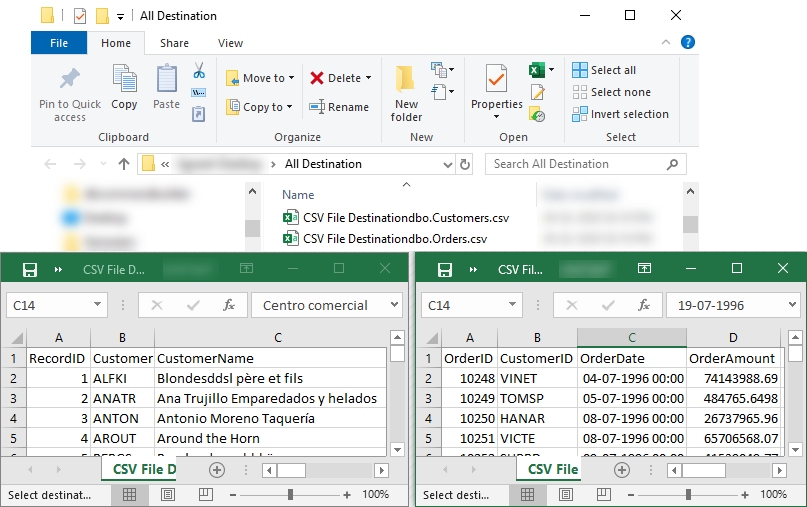
Open CSV File and Verify data.
-
Note :
For Split Option, Please click here to read Blog(There is Same UI, Just follow the steps).
See Also
Please refer this URL about more information, there is Same UI, Just follow the steps
Articles / Tutorials
Please refer this URL about more information, there is Same UI, Just follow the steps
|
|
Introduction SQL Server 2012 and all previous versions lacking native JSON support, same theory is true for their ETL Platform SSIS. If you are one of them who wants to export JSON from SQL Server or any other RDBMS like MySQL, Oracle then you can easily output complex JSON using any of the following components. Five ways of […]
|
|
|
Introduction In this post you will see how to generate XML which has namespace and prefix for elements. We will use SSIS XML Generator Transform for this purpose. Common pattern would be generate XML SOAP message using XML Generator Transform and send to Web service using SSIS Web API Destination. For full tutorial on how […]
|
|
|
Introduction In our previous post we saw how to create excel dynamically in SSIS. Now let’s advance further and find out how to create Excel reports in SSIS using Powerful Template engine (introduced in PowerPack 2.7.4)Â Â In this post you will learn how to use ZappySys Export Excel Task to export data from Multiple SQL Tables […]
|
|
|
Limitation of SSIS Excel Source/Destination SSIS comes with out of the box support for read/write to Excel. But its very restrictive if you want to make things dynamic because any metadata inside DataFlow cannot be changed at runtime. Here are few problems using native Excel Source or Destination. Metadata cannot be changed at runtime Datatype […]
|
|
|
How to convert SQL Server to CSV in SSIS There are several tricks related to CSV. For example, dates, working with variables, converting text, working with stored procedures. In this article, we will work with several tips to convert SQL Server data to the CSV format using CSV. For this article, we will use the following ZappySys component: […]
|
Calling Command Line
Commands can be executed in three different ways
1. Interactive Mode: Launch ZappyShell application and then use interactive mode to execute context specific command. In this mode session doesn't terminate until you issue [exit] command. To execute context specific command you must change context before running that command otherwise you may get an error such as 'Unknown command xyz'.
Syntax:
CONTEXT:> COMMAND [OPTION1 OPTION2...]
2. Direct Mode: Pass command name and option(s) directly on command line. This method is helpful if you have single command you want to execute and exit the shell once command completes. You may use this method if you calling ZappyShell commands from Batch file or any other script such as PowerShell/Python script files.
Syntax:
db.exe [CONTEXT] COMMAND [OPTION1 OPTION2...]
3. Execute Script File: ZappyShell supports calling command from script file using EXEC command. Script file allows you to execute multiple commands in one single file. You can also put comments and wrap options on new line to make long commands more readable.
Syntax:
db.exe exec [OPTION1 OPTION2...]
Here is sample of script file. You can enter multiple commands, enter comments, wrap arguments on new lines with multi-line approach.
sample-script.txt
#this is sample script file
setopt width 100
setopt height 80
#change command context
blob
#example of multi line command (new line must start with - or -- to be treated as single command)
put c:\files\*.txt /testroot
  --overwrite
  --content-disposition text\plain
exit 0
Here is how you can execute on command line
c:\zappyshell>db.exe exec c:\sample-script.txt
Available Context
| Context |
Commands |
Description |
| db |
4 Command(s) |
commands to perform database related operations |
www.zappysys.com | Products | All copyrights reserved. ZappySys LLC.


