Authentication Service Account (Using *.json OR *.p12 key file)
Description
Service accounts are accounts that do not represent a human user. They provide a way to manage authentication and authorization when a human is not directly involved, such as when an application needs to access Google Cloud resources. Service accounts are managed by IAM. [API reference]
Instructions
Follow these steps on how to create Service Account to authenticate and access Google Calendar API in SSIS package or ODBC data source:
Step-1: Create project
This step is optional, if you already have a project in Google Cloud and can use it. However, if you don't, proceed with these simple steps to create one:
-
First of all, go to Google API Console.
-
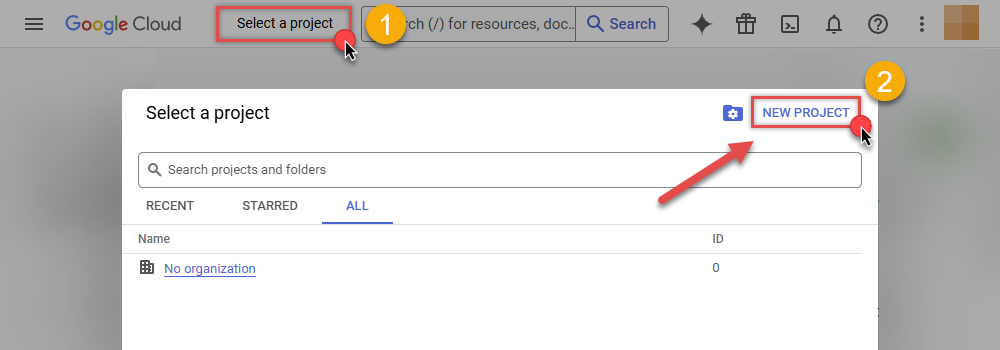
Then click Select a project button and then click NEW PROJECT button:
-
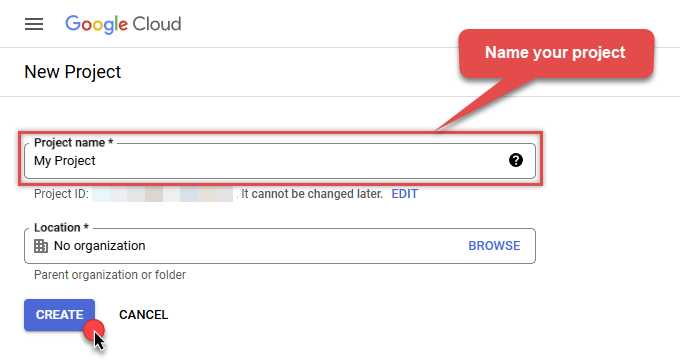
Name your project and click CREATE button:
-
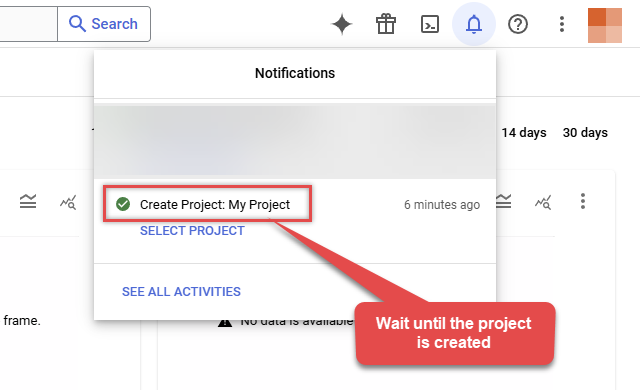
Wait until the project is created:
- Done! Let's proceed to the next step.
Step-2: Enable Google Calendar API
In this step we will enable Google Calendar API:
-
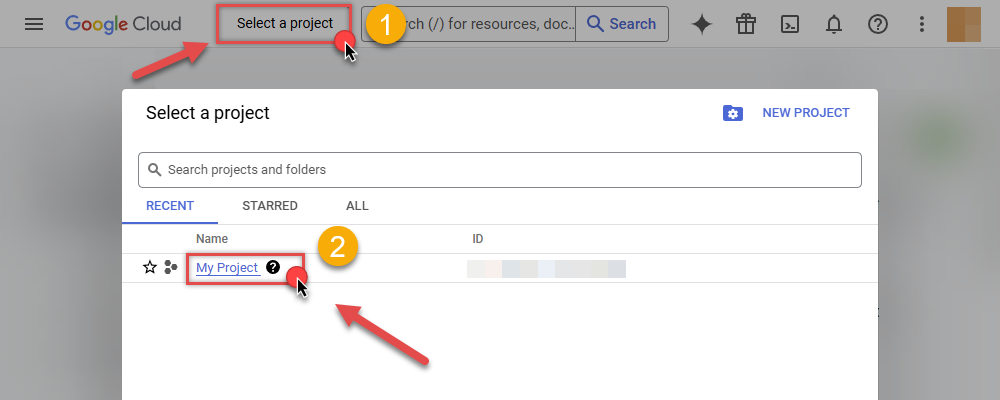
Select your project on the top bar:
-
Then click the "hamburger" icon on the top left and access APIs & Services:
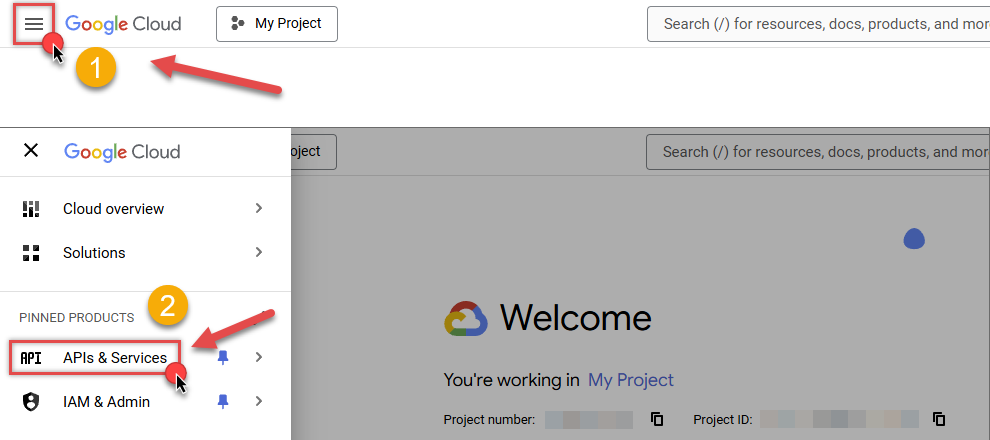
-
Now let's enable several APIs by clicking ENABLE APIS AND SERVICES button:
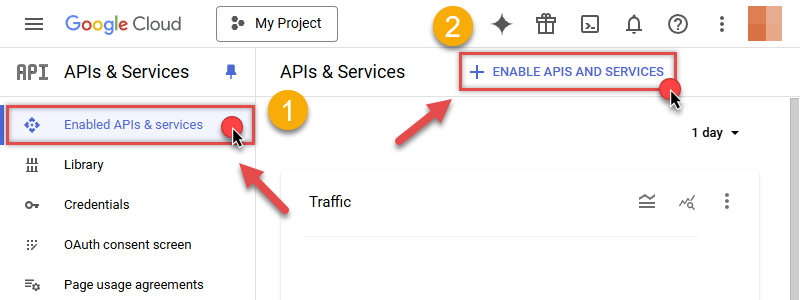
-
In the search bar search for
Search Consoleand then locate and select Search Console API: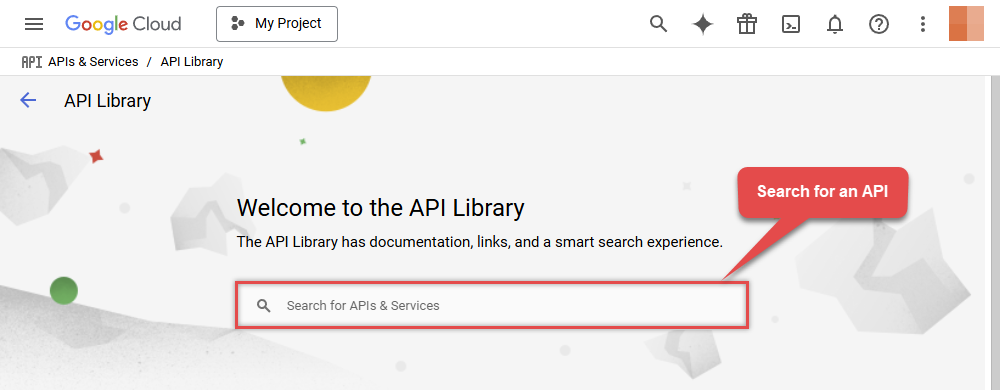
-
Enable Search Console API:

- Done! Let's proceed to the next step.
Step-3: Create Service Account
Use the steps below to create a Service Account in Google Cloud:
-
First of all, go to IAM & Admin in Google Cloud console:
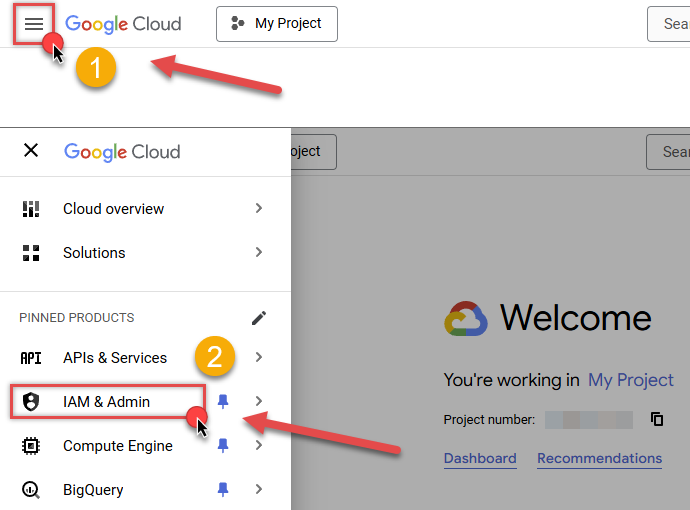
-
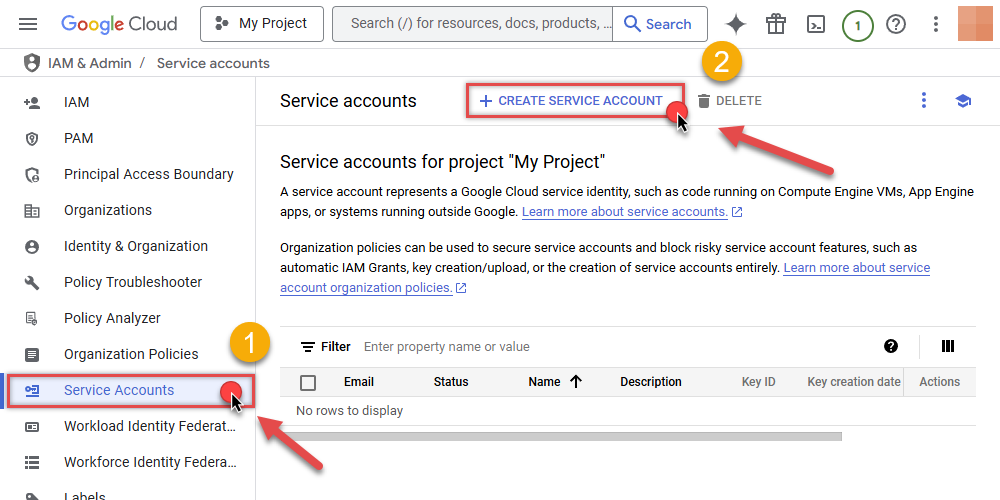
Once you do that, click Service Accounts on the left side and click CREATE SERVICE ACCOUNT button:
-
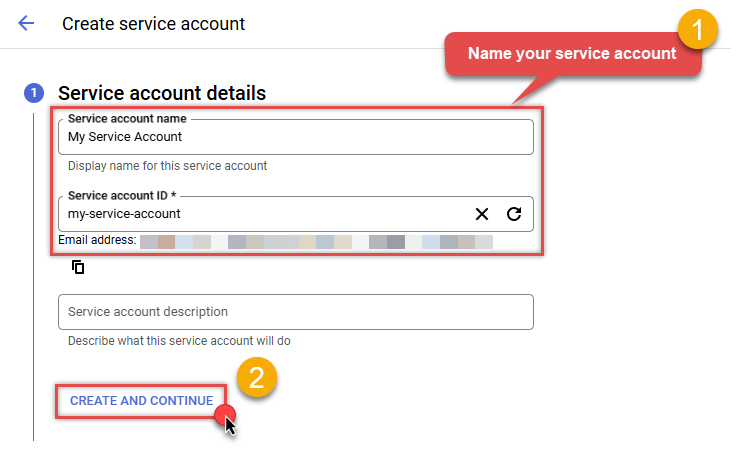
Then name your service account and click CREATE AND CONTINUE button:
-
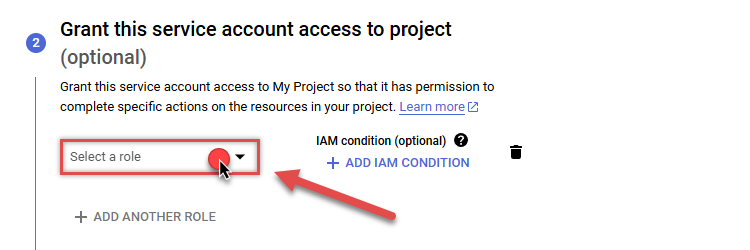
Continue by clicking Select a role dropdown and start granting service account Project Viewer roles:
-
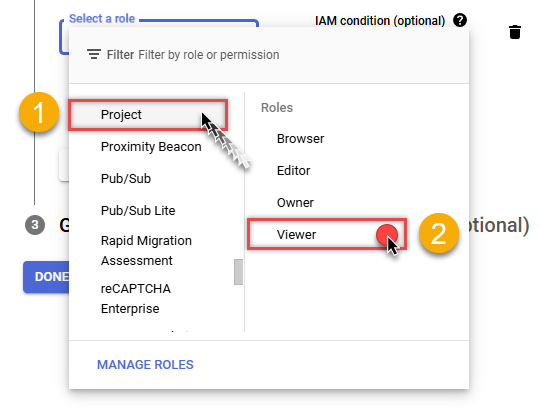
Find Project group and select Viewer role:
-
Finish adding roles by clicking CONTINUE button:
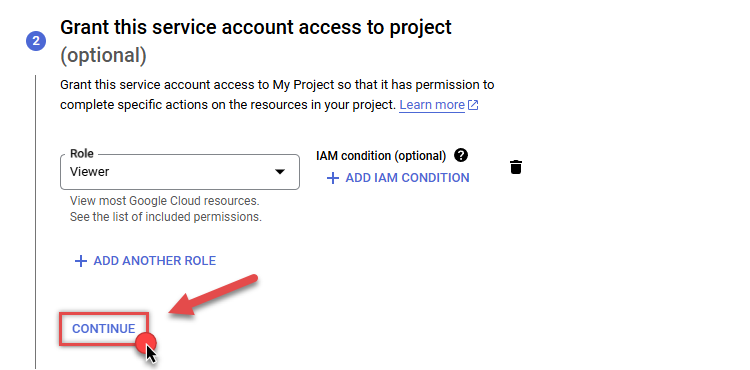 You can always add or modify permissions later in IAM & Admin.
 -
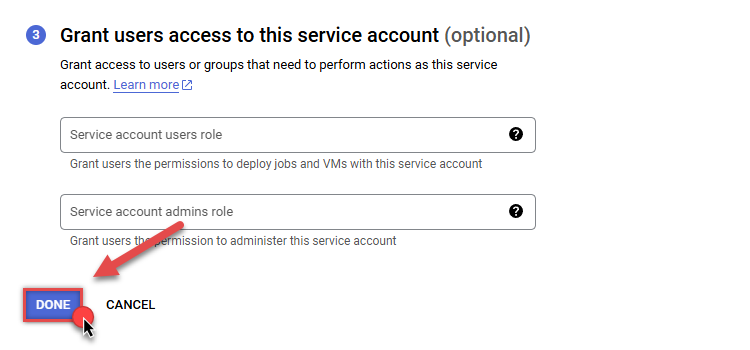
Finally, in the last step, just click button DONE:
-
Done! We are ready to add a Key to this service account in the next step.
Step-4: Add Key to Service Account
We are ready to add a Key (P12 certificate) to the created Service Account:
-
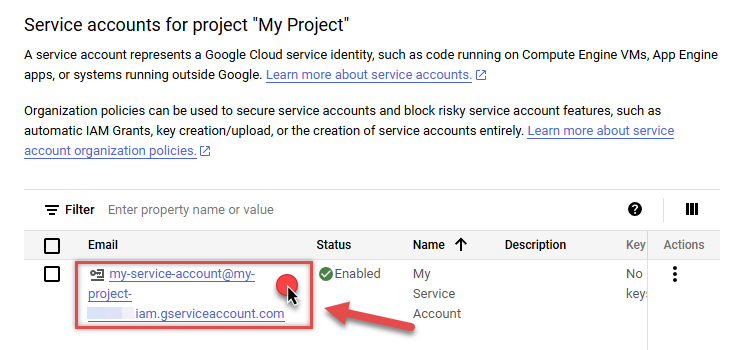
In Service Accounts open newly created service account:
-
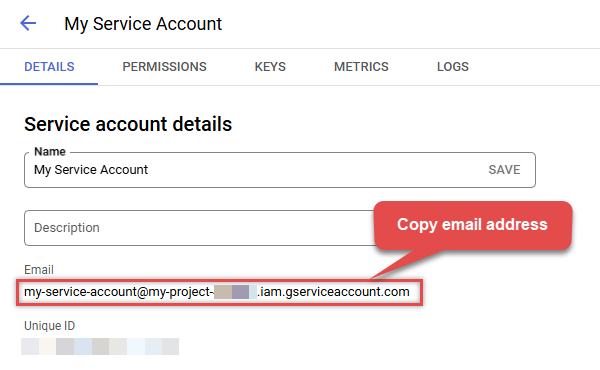
Next, copy email address of your service account for the later step:
-
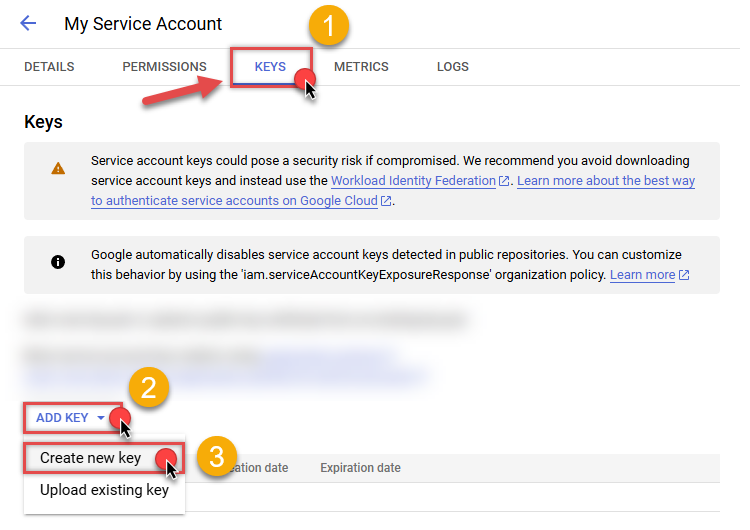
Continue by selecting KEYS tab, then press ADD KEY dropdown, and click Create new key menu item:
-
Finally, select P12 option and hit CREATE button:
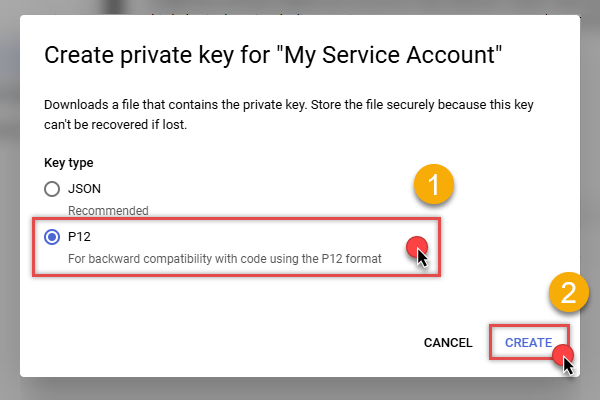
- P12 certificate downloads into your machine. We have all the data needed for authentication, let's proceed to the last step!
Step-5: Grant Access in Google Search Console
Now it's time to grant Google Search Console read/write permissions to the created service account:
- Go to Google Search Console.
- Open your verified site property (e.g.,
https://example.com). - In the left-hand menu, click Settings.
- Under Users and permissions, click it to open the user management panel.
- Click the Add user button.
- In the email field, enter the service account email, e.g.,
my-bot@your-project-id.iam.gserviceaccount.com. - Choose the permission level:
- Full – can view all data and take actions.
- Restricted – can only view data.
- Click Add to save.
Note: This is required so the API calls from the service account can access your site's data.
Step-6: Configure connection
-
Now go to SSIS package or ODBC data source and configure these fields in Service Account authentication configuration:
- In the Service Account Email field paste the service account Email address value you copied in the previous step.
- In the Service Account Private Key Path (i.e. *.p12) field use downloaded certificate's file path.
- Done! Now you are ready to use Google Search Connector!
Parameters
| Parameter | Required | Default value | Options | ||||||||
|---|---|---|---|---|---|---|---|---|---|---|---|
|
Name:
Label: Service Account Email This is service account email ID (e.g. some_name@my_project.iam.gserviceaccount.com) |
YES | ||||||||||
|
Name:
Label: Service Account Private Key Path (i.e. *.p12) File path for p12 file (i.e. Private Key file for service account). Keep this key file secure |
YES | ||||||||||
|
Name:
Label: Scope |
https://www.googleapis.com/auth/webmasters.readonly
|
||||||||||
|
Name:
Label: RetryMode |
RetryWhenStatusCodeMatch
|
|
|||||||||
|
Name:
Label: RetryStatusCodeList |
403|429
|
||||||||||
|
Name:
Label: RetryCountMax |
5
|
||||||||||
|
Name:
Label: RetryMultiplyWaitTime |
True
|
||||||||||
|
Name:
Label: Impersonate As (Enter Email Id) |
