Authentication Service Account (Using *.json OR *.p12 key file)
Description
Service accounts are accounts that do not represent a human user. They provide a way to manage authentication and authorization when a human is not directly involved, such as when an application needs to access Google Cloud resources. Service accounts are managed by IAM. [API reference]
Instructions
Follow these steps on how to create Service Account to authenticate and access BigQuery API in SSIS package or ODBC data source:
Step-1: Create project
This step is optional, if you already have a project in Google Cloud and can use it. However, if you don't, proceed with these simple steps to create one:
-
First of all, go to Google API Console.
-
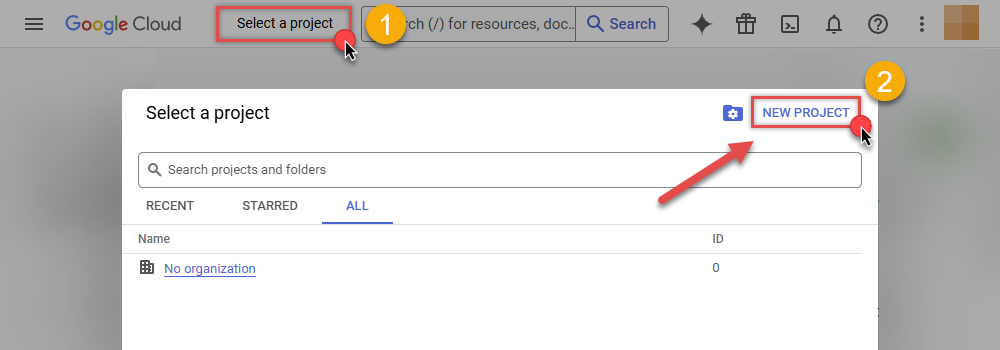
Then click Select a project button and then click NEW PROJECT button:
-
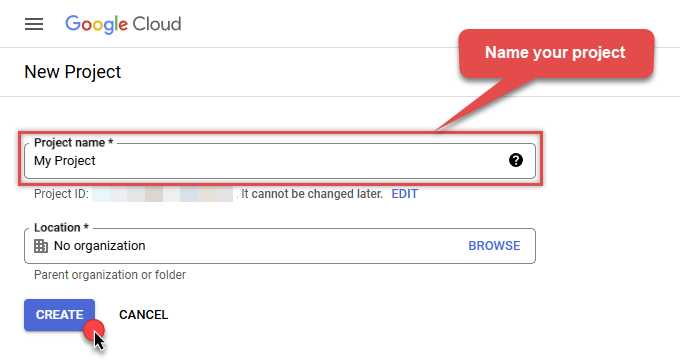
Name your project and click CREATE button:
-
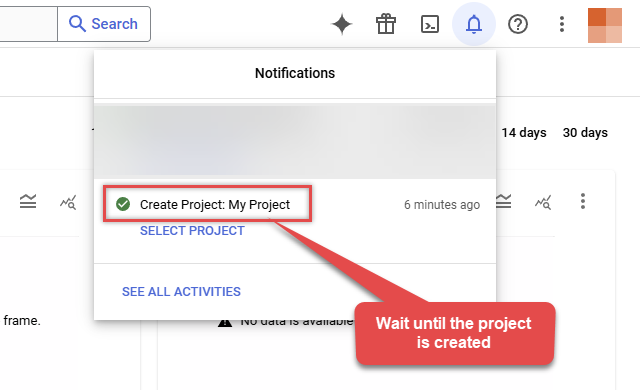
Wait until the project is created:
- Done! Let's proceed to the next step.
Step-2: Enable Google Cloud APIs
In this step we will enable BigQuery API and Cloud Resource Manager API:
-
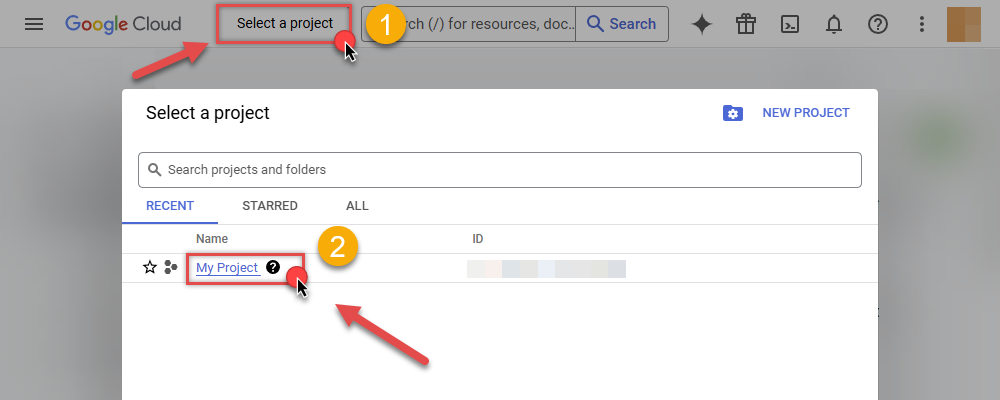
Select your project on the top bar:
-
Then click the "hamburger" icon on the top left and access APIs & Services:
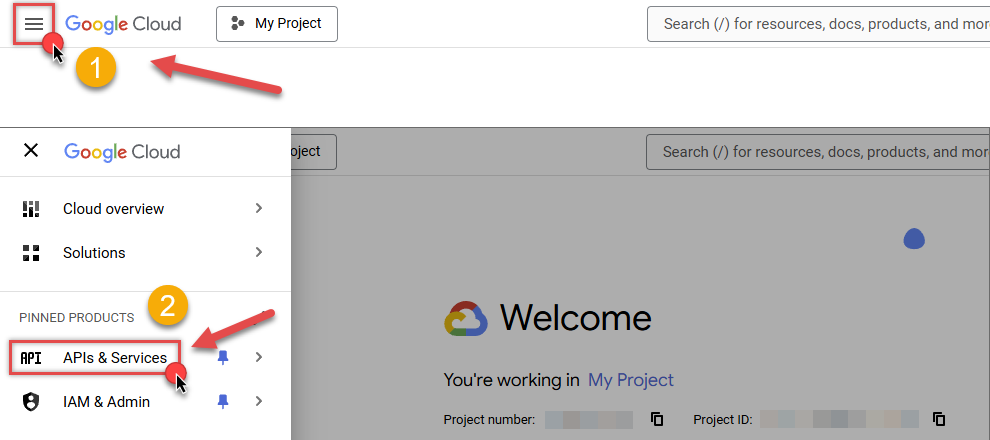
-
Now let's enable several APIs by clicking ENABLE APIS AND SERVICES button:
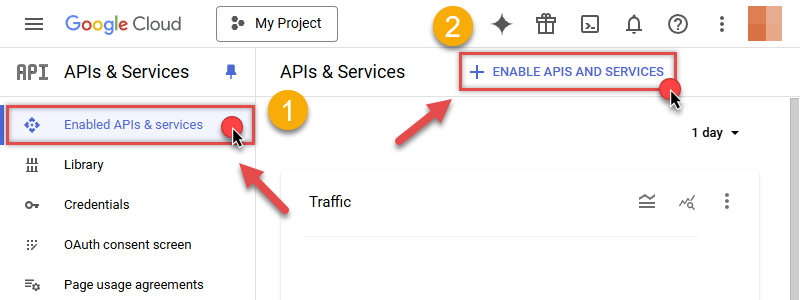
-
In the search bar search for
bigquery apiand then locate and select BigQuery API: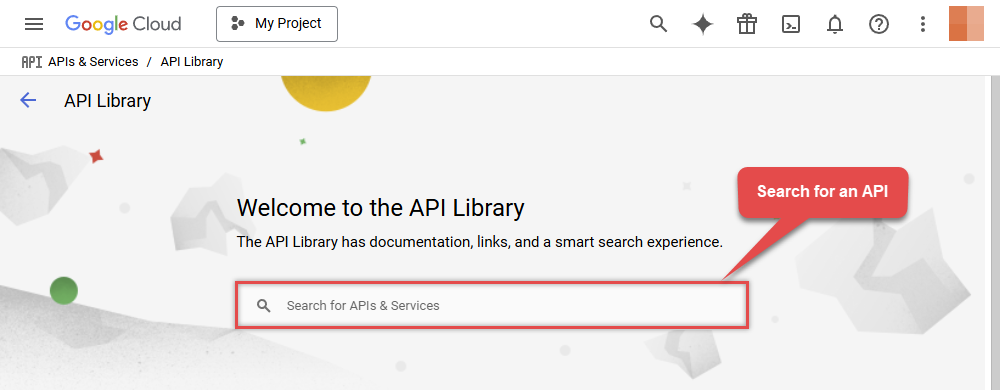
-
If BigQuery API is not enabled, enable it:
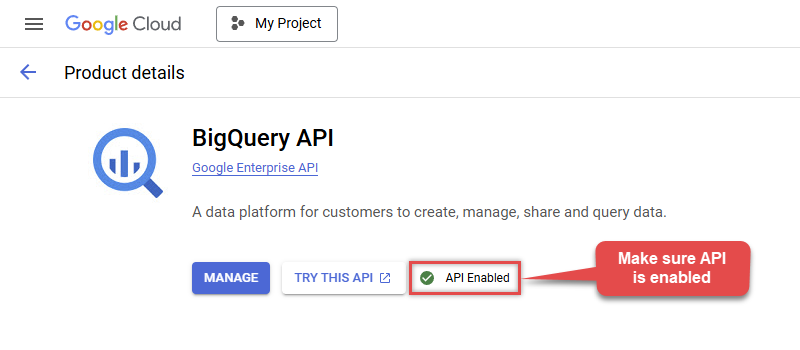
-
Then repeat the step and enable Cloud Resource Manager API as well:
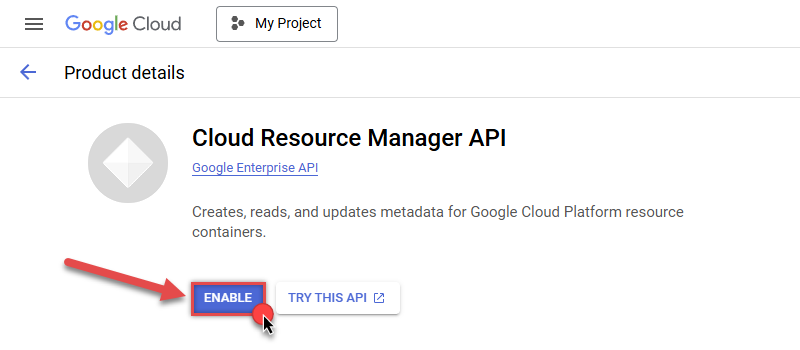
- Done! Let's proceed to the next step and create a service account.
Step-3: Create Service Account
Use the steps below to create a Service Account in Google Cloud:
-
First of all, go to IAM & Admin in Google Cloud console:
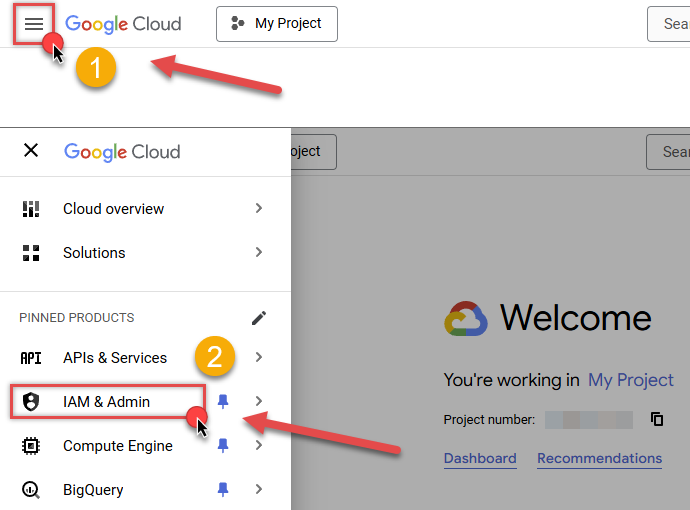
-
Once you do that, click Service Accounts on the left side and click CREATE SERVICE ACCOUNT button:
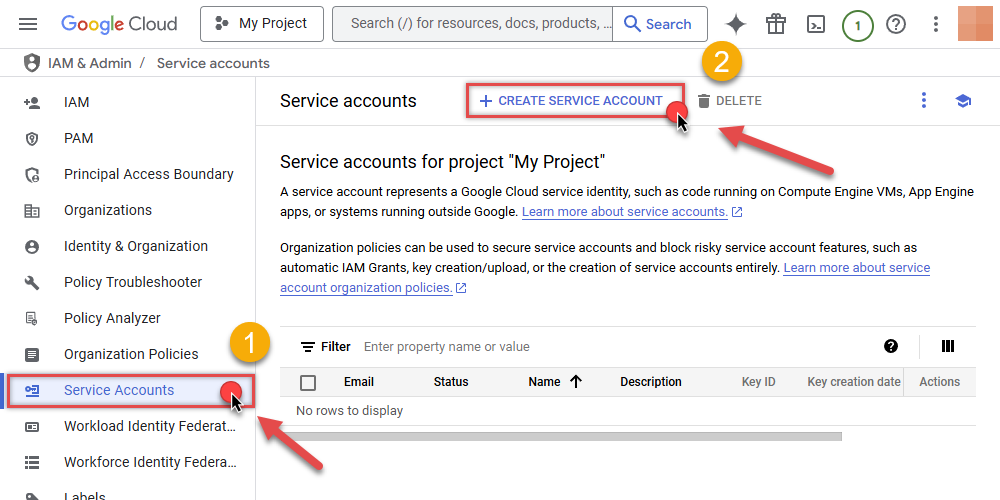
-
Then name your service account and click CREATE AND CONTINUE button:
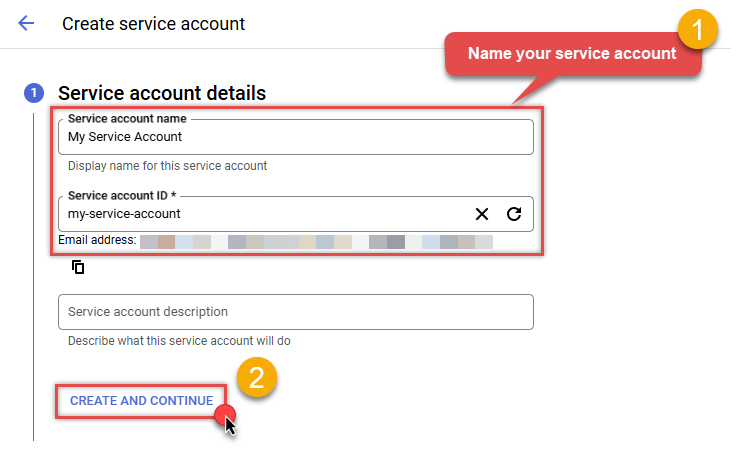
-
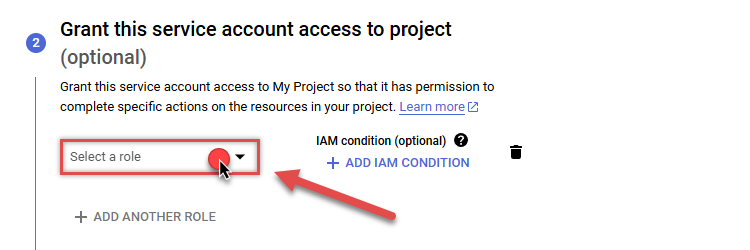
Continue by clicking Select a role dropdown and start granting service account BigQuery Admin and Project Viewer roles:
-
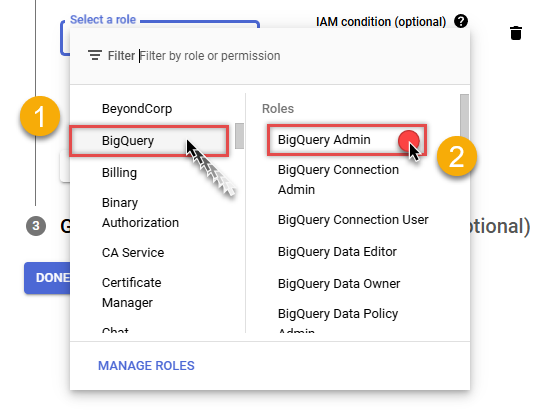
Find BigQuery group on the left and then click on BigQuery Admin role on the right:
-
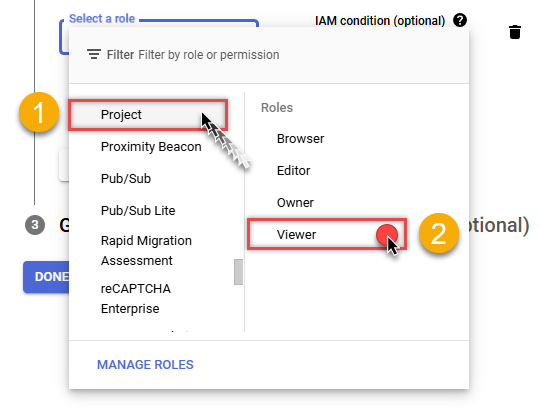
Then click ADD ANOTHER ROLE button, find Project group and select Viewer role:
-
Finish adding roles by clicking CONTINUE button:
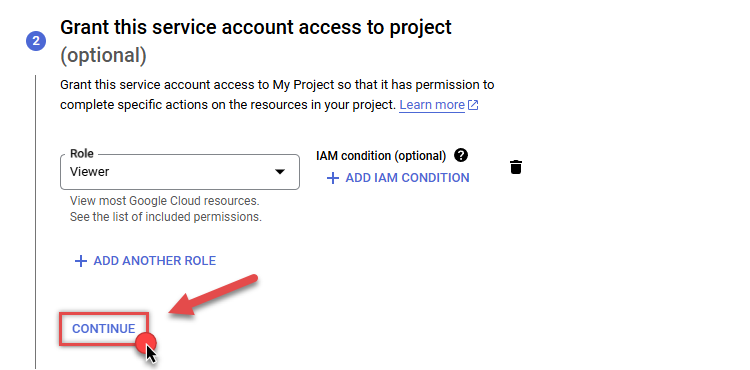 You can always add or modify permissions later in IAM & Admin.
 -
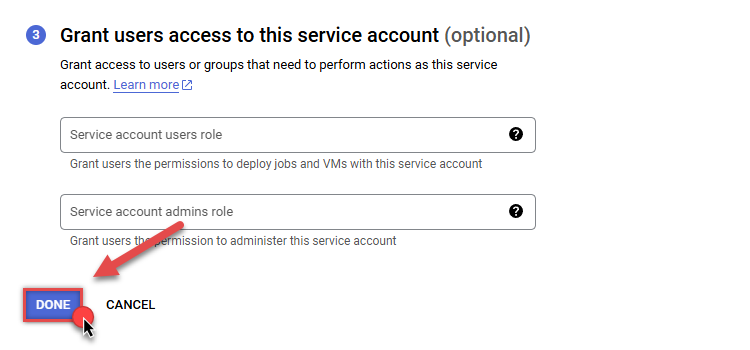
Finally, in the last step, just click button DONE:
-
Done! We are ready to add a Key to this service account in the next step.
Step-4: Add Key to Service Account
We are ready to add a Key (JSON or P12 key file) to the created Service Account:
-
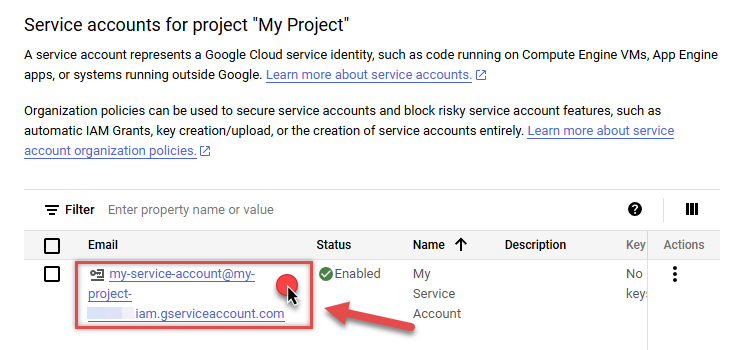
In Service Accounts open newly created service account:
-
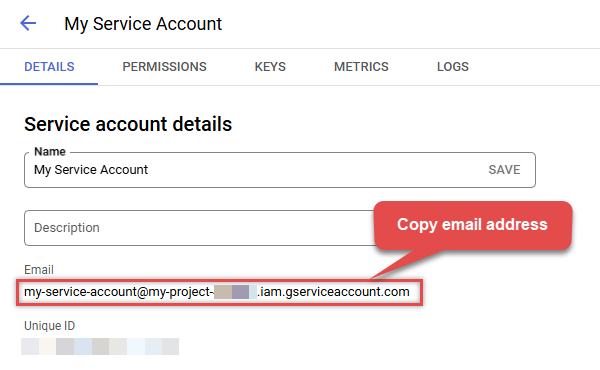
Next, copy email address of your service account for the later step:
-
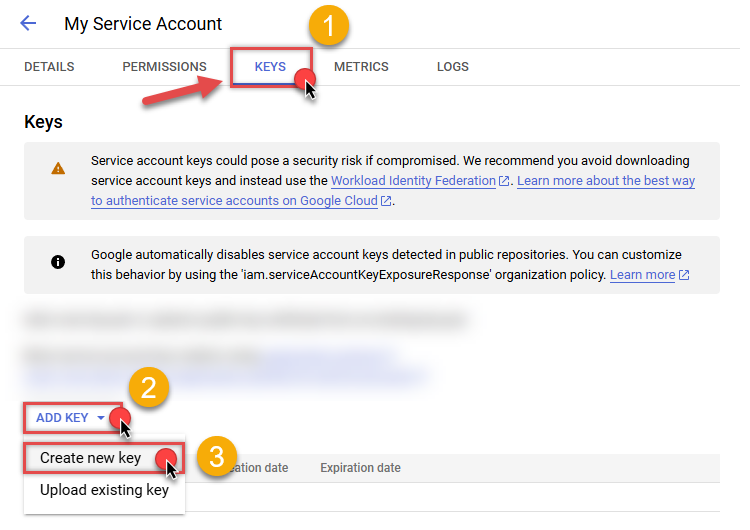
Continue by selecting KEYS tab, then press ADD KEY dropdown, and click Create new key menu item:
-
Finally, select JSON (Engine v19+) or P12 option and hit CREATE button:
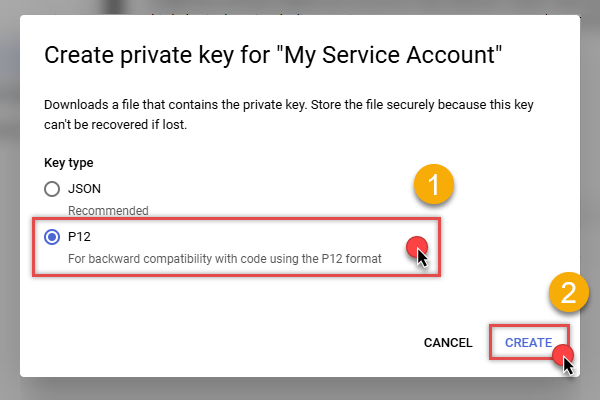
- Key file downloads into your machine. We have all the data needed for authentication, let's proceed to the last step!
Step-5: Configure connection
-
Now go to SSIS package or ODBC data source and configure these fields in Service Account authentication configuration:
- In the Service Account Email field paste the service account Email address value you copied in the previous step.
- In the Service Account Private Key Path (i.e. *.json OR *.p12) field use downloaded certificate's file path.
- Done! Now you are ready to use Google BigQuery Connector!
Parameters
| Parameter | Required | Default value | Options | ||||||||||||||||||||||||||||||||||||||||||||||||||||||||||||||||||||||||||||||||
|---|---|---|---|---|---|---|---|---|---|---|---|---|---|---|---|---|---|---|---|---|---|---|---|---|---|---|---|---|---|---|---|---|---|---|---|---|---|---|---|---|---|---|---|---|---|---|---|---|---|---|---|---|---|---|---|---|---|---|---|---|---|---|---|---|---|---|---|---|---|---|---|---|---|---|---|---|---|---|---|---|---|---|---|
|
Name:
Label: Service Account Email This is service account email ID (e.g. some_name@my_project.iam.gserviceaccount.com) |
YES | ||||||||||||||||||||||||||||||||||||||||||||||||||||||||||||||||||||||||||||||||||
|
Name:
Label: Service Account Private Key Path (i.e. *.json OR *.p12) File path for JSON Key or p12 file (i.e. Private Key file for service account). Keep this key file secure |
YES | ||||||||||||||||||||||||||||||||||||||||||||||||||||||||||||||||||||||||||||||||||
|
Name:
Label: ProjectId Login to https://console.cloud.google.com/bigquery and choose Project dropdown at the top to see list of Projects. Over there you will find ProjectID next to ProjectName. You need to get ProjectID which has BigQuery API support enabled. |
YES | ||||||||||||||||||||||||||||||||||||||||||||||||||||||||||||||||||||||||||||||||||
|
Name:
Label: DatasetId (Choose after ProjectId) Default Dataset Name you like to use when listing tables (e.g. MyDataset). |
YES | ||||||||||||||||||||||||||||||||||||||||||||||||||||||||||||||||||||||||||||||||||
|
Name:
Label: Scope Permission(s) you like to request |
https://www.googleapis.com/auth/bigquery https://www.googleapis.com/auth/bigquery.insertdata https://www.googleapis.com/auth/cloud-platform https://www.googleapis.com/auth/cloud-platform.read-only https://www.googleapis.com/auth/devstorage.full_control https://www.googleapis.com/auth/devstorage.read_only https://www.googleapis.com/auth/devstorage.read_write
|
||||||||||||||||||||||||||||||||||||||||||||||||||||||||||||||||||||||||||||||||||
|
Name:
Label: RetryMode |
RetryWhenStatusCodeMatch
|
|
|||||||||||||||||||||||||||||||||||||||||||||||||||||||||||||||||||||||||||||||||
|
Name:
Label: RetryStatusCodeList |
429
|
||||||||||||||||||||||||||||||||||||||||||||||||||||||||||||||||||||||||||||||||||
|
Name:
Label: RetryCountMax |
5
|
||||||||||||||||||||||||||||||||||||||||||||||||||||||||||||||||||||||||||||||||||
|
Name:
Label: RetryMultiplyWaitTime |
True
|
||||||||||||||||||||||||||||||||||||||||||||||||||||||||||||||||||||||||||||||||||
|
Name:
Label: Job Location The geographic location where the job should run. For Non-EU and Non-US datacenters we suggest you to supply this parameter to avoid any error. |
|
||||||||||||||||||||||||||||||||||||||||||||||||||||||||||||||||||||||||||||||||||
|
Name:
Label: Impersonate As (Enter Email Id) |
