|
SSIS Amazon Redshift Data Transfer Task (AWS Redshift Datawarehouse Bulk Copy, Import, Export)
|
 
|
|
SSIS Amazon Redshift Data Transfer Task (AWS Redshift Datawarehouse Bulk Copy, Import, Export)
|
|

|
Amazon Redshift Data Transfer Task can be used for bulk import data to Amazon Redshift. Source data can be Flat File, ODBC, OLEDB or ADO.net source. This task uses multiple threads to upload data in parallel and optionally compress data files to speedup process.

|

SELECT top 500 ROW_NUMBER() Over (Order By cu.CustomerID),
cu.*, ord.OrderID, ord.OrderDate, OrderAmount
FROM Customers cu, Orders ord
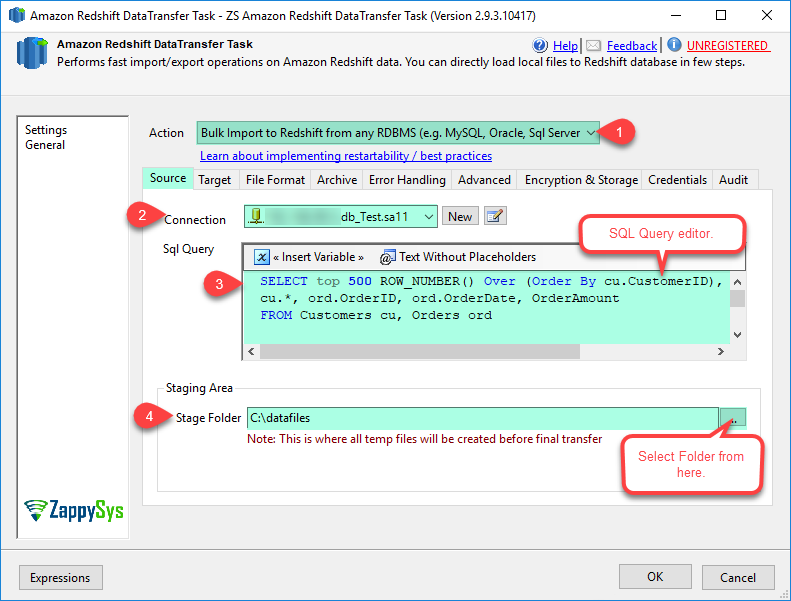


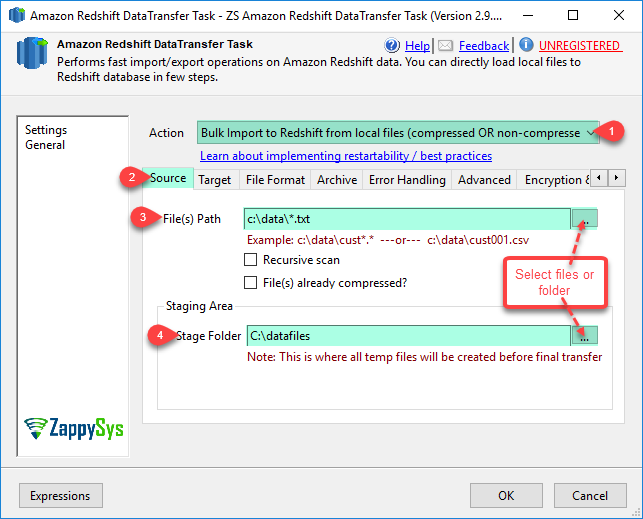
Note: If you want to operation with multiple files then use wild card pattern as below (when you use wild card pattern in source path then system will treat target path as folder regardless you end with slash ).

Examples:
c:\data\file123.txt (single file)
c:\data\file*.txt (all files starting with file)
c:\data\subfolder\*.txt (all files with .csv Extension and located under folder subfolder)
| Property Name | Description | ||||||||||||||||||
|---|---|---|---|---|---|---|---|---|---|---|---|---|---|---|---|---|---|---|---|
| Action |
Specifies action you want to perform
|
||||||||||||||||||
| LoadOptions | Additional load options for Redshift COPY command. Most of options are available through UI but if you find something is missing and you want to set additional option during Redshift Copy command after files upload to Amazon S3 Stage area then use this property. For example to turn off statistic update and encoding to UTF8 specify Load Options= ENCODING UTF8 STATUPDATE OFF. Check COPY command for more available options | ||||||||||||||||||
| MaxParallelThreads | Maximum number of parallel operations. By default total threads are CPU CORES * 8 | ||||||||||||||||||
| IsSourceFilesCompressed | If you specify Action=ImportLocalFilesToRedshift and your source data files are already compressed in GZIP format then check this option. When this option is checked system skips compress file step before uploading. if this option is not checked then by default system will compress data before uploading unless you specified AlwaysCompressFilesBeforeTransfer=False | ||||||||||||||||||
| SourceConnection | Connection manager name for source data when Action=ImportRelationalDataToRedshift selected. Connection type can be OLEDB or ADO.net | ||||||||||||||||||
| SourcePath | File path or pattern for source files for Action=ImportLocalFilesToRedshift. Files have to be in CSV format using any single character column delimiter (e.g. {|}, {tab}, {comma}). You can use wildcard chars (* or ?) to specify multiple files (e.g. c:\data\customer*.dat.???) [*=any character(s), ?=any one character] | ||||||||||||||||||
| IncludeFilesFromSubFolders | If your SourcePath contains files in nested sub folders then check this option to scan files recursively | ||||||||||||||||||
| SourceStagePath | Staging folder path where intermediate files will be generated after extracting data from source system. Staging folder is also used to generate compressed files before actual upload process. | ||||||||||||||||||
| SourceQuery | Source SQL Query to extract data from relational data source. Records are streamed and then dumped to staging files. It may generate multiple data files depending on MaxRowsPerFile and SplitFiles setting | ||||||||||||||||||
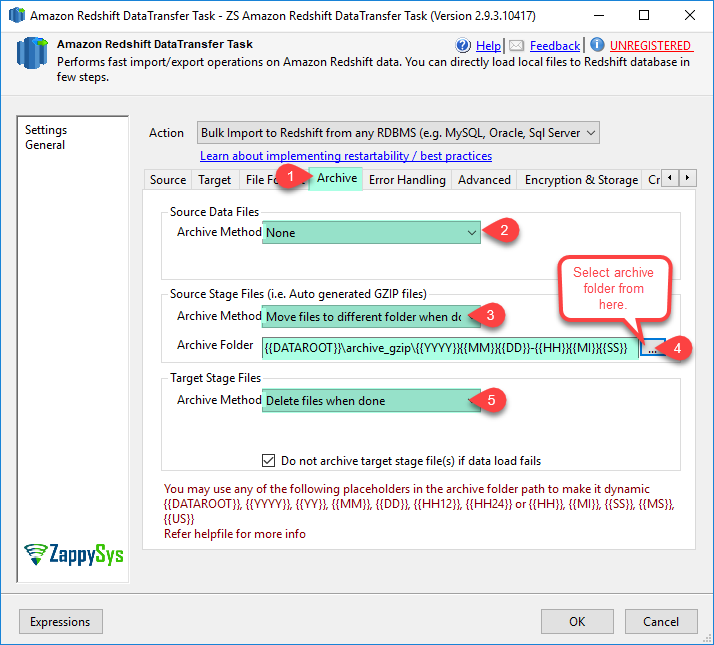
| SourceArchiveMethod |
Specifies archive action for source files
|
||||||||||||||||||
| SourceStageArchiveMethod |
Specifies archive action for source staging files (*.gz files created from datafiles are considered as source stage files)
|
||||||||||||||||||
| SourceArchiveFolder |
Archive folder path for source files. This option is only valid when SourceArchiveMethod=Move. Path can contain format specifier for timestamp. Valid format specifiers are as below.
Example: c:\data\archive_data\{{YYYY}}-{{MM}}-{{DD}} |
||||||||||||||||||
| SourceStageArchiveFolder |
Archive folder path for source stage files. This option is only valid when SourceStageArchiveMethod=Move. Path can contain format specifier for timestamp. Valid format specifiers are as below.
Example: c:\data\archive_gzip\{{YYYY}}-{{MM}}-{{DD}} |
||||||||||||||||||
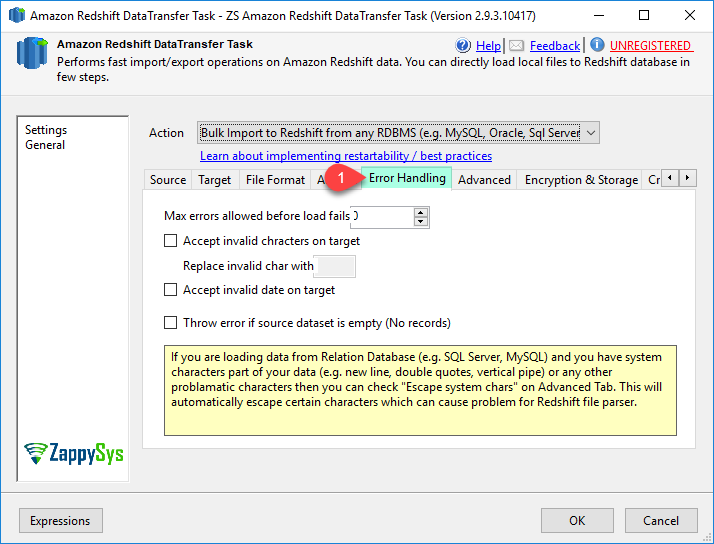
| EscapeSystemChars |
When this option is specified, the backslash character (
If you specify the ESCAPE option in combination with the REMOVEQUOTES option, you can escape and retain quotes (
Note
The control character You cannot use the ESCAPE option for FIXEDWIDTH loads, and you cannot specify the escape character itself; the escape character is always the backslash character. Also, you must ensure that the input data contains the escape character in the appropriate places. Here are some examples of input data and the resulting loaded data when the ESCAPE option is specified. The result for row 4 assumes that the REMOVEQUOTES option is also specified. The input data consists of two pipe-delimited fields: 1|The quick brown fox\[newline] jumped over the lazy dog. 2| A\\B\\C 3| A \| B \| C 4| 'A Midsummer Night\'s Dream' The data loaded into column 2 looks like this: The quick brown fox jumped over the lazy dog. A\B\C A|B|C A Midsummer Night's Dream
Note
Applying the escape character to the input data for a load is the responsibility of the user. One exception to this requirement is when you reload data that was previously unloaded with the ESCAPE option. In this case, the data will already contain the necessary escape characters.
The ESCAPE option does not interpret octal, hex, unicode, or other escape sequence notation. For example, if your source data contains the octal linefeed value ( In order to escape newlines in data that originates from Windows platforms, you might need to use two escape characters: one for the carriage return and one for the linefeed. Alternatively, you can remove the carriage returns before loading the file (for example, by using the dos2unix utility). |
||||||||||||||||||
| TargetStageArchiveMethod |
Specifies archive action for target staging files
|
||||||||||||||||||
| TargetStageArchiveFolder |
Archive folder path for target stage files. This option is only valid when TargetStageArchiveMethod=Move. Path can contain format specifier for timestamp. Valid format specifiers are as below.
Example: c:\data\archive_gzip\{{YYYY}}-{{MM}}-{{DD}} |
||||||||||||||||||
| TargetConnection | Target redshift database connection | ||||||||||||||||||
| TargetStageConnection | Amazon Storage Connection for S3 Staging area. Make sure you select correct region on Amazon Storage Connection otherwise your final load may fail. | ||||||||||||||||||
| TargetStagePath | This is the Amazon S3 path where local files will be uploaded before final Redshift Copy (COPY command reads data files from S3 Storage). Example: mybucket/stage | ||||||||||||||||||
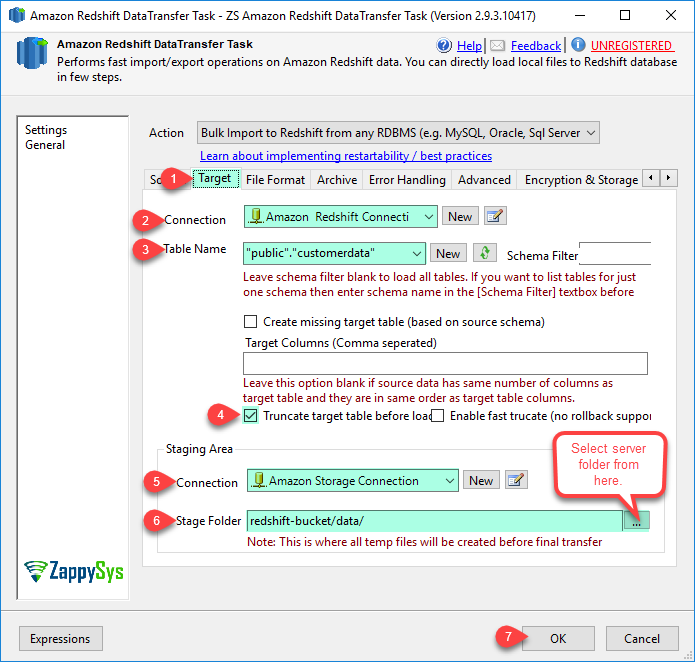
| TargetTable | Redshift table name where you want to load data. If table name doesn't contain schema name then table inside default schema (e.g. public) will be used. Examples of fully qualified table name ( public.customers --or-- "public"."customerdata"). Use of double quotes is optional in name but its recommended because when you have spaces inside object/schema name then not using double quotes can cause issue. Sometime you may have lots of tables in that case use Schema Filter in the UI to restrict table list from specified schema only. | ||||||||||||||||||
| MaxRowsPerFile | Maximum number of rows in a single file before splitting data into next file (Default is 1 Million rows per file but change this setting depending on your need. If your record is very wide then reduce this setting to make your file smaller). You always have to try out some performance settings to get optimal speed (e.g. MaxRowsPerfile, MaxParallelThreads etc) | ||||||||||||||||||
| MaxRowsAllFiles | This is Limit of total record you want to load into Redshift Database from relational source. This option is similar to TOP clause in SQL Server or LIMIT clause in MySQL/PostgreSQL. This option is not valid when Action=ImportLocalFilesToRedshift | ||||||||||||||||||
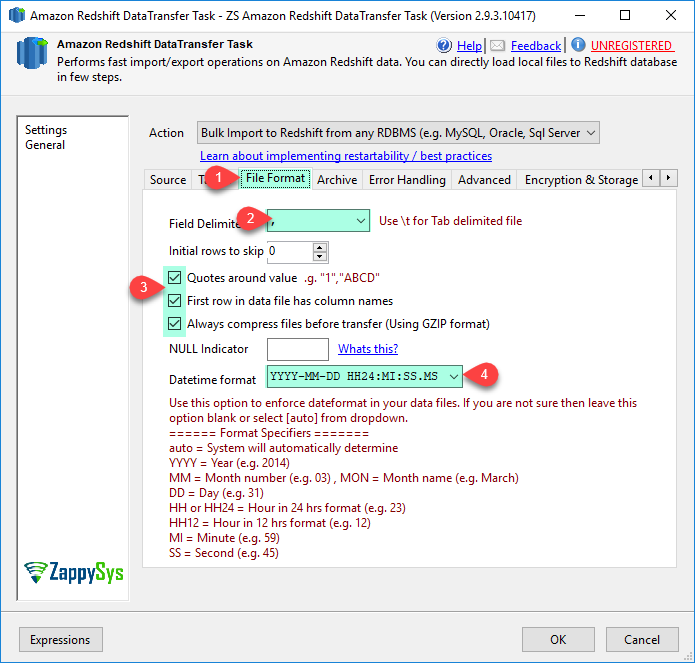
| FirstRowHasColumnNames | When this option indicates that flat file contains column names in the first row | ||||||||||||||||||
| TruncateTargetBeforeLoad | This option indicates that before target table load empty entire target table. Also check DoNotUseTransactionForTruncate setting. | ||||||||||||||||||
| DoNotUseTransactionForTruncate | Use this setting to truncate target table without using transactions to improve truncate speed (NOTE: When you use this setting you wont be able to rollback changes if anything goes bad during Load process) | ||||||||||||||||||
| SplitFiles | Specifies weather source sql query produces one big file or split records into multiple files based on MaxRowsPerFile setting. This option is only valid when Action=ImportRelationalDataToRedshift | ||||||||||||||||||
| NullStringAs |
Loads fields that match null_string as NULL, where null_string can be any string. This option cannot be used with numeric columns. To load NULL into numeric columns, such as INT, use an empty field. If your data includes a null terminator, also referred to as NUL (UTF-8 0000) or binary zero (0x000), COPY treats it as an end of record (EOR) and terminates the record. If a field contains only NUL, you can use NULL AS to replace the null terminator with NULL by specifying '\0' or '\000'. For example, NULL AS '\0' or NULL AS '\000'. If a field contains a string that ends with NUL and NULL AS is specified, the string is inserted with NUL at the end. Do not use '\n' (newline) for the null_string value. Amazon Redshift reserves '\n' for use as a line delimiter. The default null_string is '\N'.
Note: If you attempt to load nulls into a column defined as NOT NULL, the COPY command will fail. |
||||||||||||||||||
| TreatEmptyStringAsNull | Indicates that Amazon Redshift should load empty CHAR and VARCHAR fields as NULL. Empty fields for other data types, such as INT, are always loaded with NULL. Empty fields occur when data contains two delimiters in succession with no characters between the delimiters. EMPTYASNULL and NULL AS '' (empty string) produce the same behavior. | ||||||||||||||||||
| TargetColumns |
Comma separated target column list (e.g. column1 [, column2, ...]) Specifies an optional column list to load data fields into specific columns. The columns can be in any order in the COPY statement, but when loading from flat files, such as in an Amazon S3 bucket, their order must match the order of the source data. Order does not matter when loading from an Amazon DynamoDB table. Any columns omitted from the column list are assigned either the defined DEFAULT expression or NULL if the omitted column is nullable and has no defined DEFAULT expression. If an omitted column is NOT NULL but has no defined DEFAULT expression, the COPY command fails. If an IDENTITY column is included in the column list, then EnableIdentityColumnInsert must also be specified; if an IDENTITY column is omitted, then EnableIdentityColumnInsert cannot be specified. If no column list is specified, the command behaves as if a complete, in-order column list was specified (with IDENTITY columns omitted if EnableIdentityColumnInsert was also not specified). |
||||||||||||||||||
| DoNotDeleteStageFilesOnCopyFailure | Specifies weather to keep StageFiles eventhough archive method is set to Delete. This option is useful if you want to manually issue COPY command after failure and save processing time of extract, compress and upload | ||||||||||||||||||
| TreatBlankStringAsNull | Loads blank fields, which consist of only white space characters, as NULL. This option applies only to CHAR and VARCHAR columns. Blank fields for other data types, such as INT, are always loaded with NULL. For example, a string that contains three space characters in succession (and no other characters) is loaded as a NULL. The default behavior, without this option, is to load the space characters as is. | ||||||||||||||||||
| DelimiterForColumn | Single ASCII character that is used to separate fields in the input file, such as a pipe character ( | ), a comma ( , ), or a tab ( \t ). Non-printing ASCII characters are supported. ASCII characters can also be represented in octal, using the format '\ddd', where 'd' is an octal digit (0-7). The default delimiter is a pipe character ( | ), unless the CSV option is used, in which case the default delimiter is a comma ( , ). | ||||||||||||||||||
| QuotesAroundValue |
Surrounding quotation marks are removed from strings in the incoming data. All characters within the quotes, including delimiters, are retained. If a string has a beginning single or double quotation mark but no corresponding ending mark, the COPY command fails to load that row and returns an error. The following table shows some simple examples of strings that contain quotes and the resulting loaded values.
|
||||||||||||||||||
| DateFormat |
If no DATEFORMAT is specified, the default format is
If you want Amazon Redshift to automatically recognize and convert the date format in your source data, specify The date format can include time information (hour, minutes, seconds), but this information is ignored. The AS keyword is optional. For more information, see DATEFORMAT and TIMEFORMAT Strings . |
||||||||||||||||||
| AllowInvalidCharacters |
Enables loading of data into VARCHAR columns even if the data contains invalid UTF-8 characters. When AllowInvalidCharacters is specified, COPY replaces each invalid UTF-8 character with a string of equal length consisting of the character specified by replacement_char. (See ReplaceInvalidCharacterWith) For example, if the replacement character is ' The replacement character can be any ASCII character except NULL. The default is a question mark ( ? ). For information about invalid UTF-8 characters, see Multibyte Character Load Errors. COPY returns the number of rows that contained invalid UTF-8 characters, and it adds an entry to the STL_REPLACEMENTS system table for each affected row, up to a maximum of 100 rows per node slice. Additional invalid UTF-8 characters are also replaced, but those replacement events are not recorded. If ACCEPTINVCHARS is not specified, COPY returns an error whenever it encounters an invalid UTF-8 character. ACCEPTINVCHARS is valid only for VARCHAR columns. |
||||||||||||||||||
| ReplaceInvalidCharacterWith | When AllowInvalidCharacters is checked you can specify which character to use as replacement char for any invalid chars found | ||||||||||||||||||
| MaxAllowedErrorsBeforeFail |
If the load returns the error_count number of errors or greater, the load fails. If the load returns fewer errors, it continues and returns an INFO message that states the number of rows that could not be loaded. Use this option to allow loads to continue when certain rows fail to load into the table because of formatting errors or other inconsistencies in the data. Set this value to The actual number of errors reported might be greater than the specified MaxAllowedErrorsBeforeFail because of the parallel nature of Amazon Redshift. If any node in the Amazon Redshift cluster detects that MaxAllowedErrorsBeforeFail has been exceeded, each node reports all of the errors it has encountered. |
||||||||||||||||||
| TestLoad | Checks the validity of the data file without actually loading the data. Use the TestLoad option to make sure that your data file will load without any errors before running the actual data load. Running COPY with the NOLOAD option is much faster than loading the data since it only parses the files. | ||||||||||||||||||
| NumberOfInitialRowsToSkip | Treats the specified number_rows as a file header and does not load them. Use this option to skip file headers in all files in a parallel load. | ||||||||||||||||||
| IgnoreInvalidDateFormat | Allows any date format, including invalid formats such as 00/00/00 00:00:00, to be loaded without generating an error. Applies only to TIMESTAMP and DATE columns. Always use this option with the DateFormat option. If the date format for the data does not match the DateFormat specification, Amazon Redshift inserts a NULL value into that field. |
||||||||||||||||||
| TruncateStringToFitTarget | Truncates data in columns to the appropriate number of characters so that it fits the column specification. Applies only to columns with a VARCHAR or CHAR data type, and rows 4 MB or less in size. | ||||||||||||||||||
| RoundDecimalRatherThanTruncate | Rounds up numeric values when the scale of the input value is greater than the scale of the column. By default, COPY truncates values when necessary to fit the scale of the column. For example, if a value of 20.259 is loaded into a DECIMAL(8,2) column, COPY truncates the value to 20.25 by default. If RoundDecimalRatherThanTruncate is specified, COPY rounds the value to 20.26. The INSERT command always rounds values when necessary to match the column's scale, so a COPY command with the RoundDecimalRatherThanTruncate option behaves the same as an INSERT command. | ||||||||||||||||||
| EnableIdentityColumnInsert | Use EnableIdentityColumnInsert with tables that have IDENTITY columns if you want to override the auto-generated values with explicit values from the source data files for the tables. If the command includes a column list, that list must include the IDENTITY columns to use this option. The data format for EnableIdentityColumnInsert values must match the IDENTITY format specified by the CREATE TABLE definition. | ||||||||||||||||||
| IgnoreBlankLines | Ignores blank lines that only contain a line feed in a data file and does not try to load them. | ||||||||||||||||||
| TrimTrailingBlank | Removes the trailing whitespace characters from a VARCHAR string. Only applicable to columns with a VARCHAR data type. | ||||||||||||||||||
| AlwaysCompressFilesBeforeTransfer | When this option is specified then files are compressed to *.gz (GZIP) format. Compressing files saves network bandwidth, speed up upload significantly and saves cost of data transfer (Default: True) | ||||||||||||||||||
| UpdateStatisticsAfterLoad |
Governs automatic computation and refresh of optimizer statistics at the end of a successful COPY command. By default, if the STATUPDATE option is not used, statistics are updated automatically if the table is initially empty. See also Analyzing Tables. Whenever ingesting data into a nonempty table significantly changes the size of the table, we recommend updating statistics either by running an ANALYZE command or by using the STATUPDATE ON option. With STATUPDATE ON (or TRUE), statistics are updated automatically regardless of whether the table is initially empty. If STATUPDATE is used, the current user must be either the table owner or a superuser. If STATUPDATE is not specified, only INSERT permission is required. With STATUPDATE OFF (or FALSE), statistics are never updated. |
||||||||||||||||||
| AllowMissingTrailingColumns |
Allows data files to be loaded when contiguous columns are missing at the end of some of the records. The missing columns are filled with either zero-length strings or NULLs, as appropriate for the data types of the columns in question. If the EMPTYASNULL option is present in the COPY command and the missing column is a VARCHAR column, NULLs are loaded; if EMPTYASNULL is not present and the column is a VARCHAR, zero-length strings are loaded. NULL substitution only works if the column definition allows NULLs.
For example, if the table definition contains four nullable CHAR columns, and a record contains the values |
||||||||||||||||||
| LoggingMode | LoggingMode determines how much information is logged during Package Execution. Set Logging mode to Debugging for maximum log. |
 SSIS package "TestAll.dtsx"
starting. LICENSE Found: You are running Standard Edition. License for[Company=BW,User=ZappySys].
Exporting data from sql query to ...[C:\datafiles]
Executing query - select top 500 ROW_NUMBER()Over(order by a.CustomerID) Id , a.*,b.*,c.OrderID,c.OrderDate,c.Freight  from customers a,products b,orders c
Writing data to : C:\datafiles\public_customerdatabQCW_xcx0E6KdOIts4YZdQ.txt.001.part
Total 500 records written to : C:\datafiles\public_customerdatabQCW_xcx0E6KdOIts4YZdQ.txt.001.part
Export data completed. Took 0.115 seconds for 500 records, 1 files
Compressing data files...[Stage path: C:\datafiles]
Compress data files completed. Took 0.017 seconds
Uploading data files to S3 using total [32] threads...
Creating manifest file
Uploading Stream ...[119 bytes]
public_customerdatabQCW_xcx0E6KdOIts4YZdQ.manifest Transferred 100% (119 bytes)
New file created at bwtest-west2/public_customerdatabQCW_xcx0E6KdOIts4YZdQ.manifest, Size= 119
bytes Uploading C:\datafiles\public_customerdatabQCW_xcx0E6KdOIts4YZdQ.txt.001.part.gz ...[8.63
KB] C:\datafiles\public_customerdatabQCW_xcx0E6KdOIts4YZdQ.txt.001.part.gz Transferred 100% (8837
bytes) Deleted local file C:\datafiles\public_customerdatabQCW_xcx0E6KdOIts4YZdQ.txt.001.part.gz because DeleteWhenDone option is
enabled Transfer
  Summary: Total items :
  1  Successful :
  1      Failed :
  0    Canceled :
  0     Skipped :
  0 Time  taken :
  00:00:00.497 Max threads :
  4 Transferred : 8.63
  KB       Speed : 17.4
Kbps Upload data files completed. Took 1.228
seconds Truncating target table "public"."customerdata" because TruncateTargetBeforeLoad option is turned
on Starting redshift bulk
insert... Executing following
command: COPY "public"."customerdata" FROM 's3://bwtest-west2/public_customerdatabQCW_xcx0E6KdOIts4YZdQ.manifest' credentials'aws_access_key_id=xxxxxxx;aws_secret_access_key=yyyyyyyy' GZIP DELIMITER '|' DATEFORMAT 'YYYY-MM-DD HH24:MI:SS' TIMEFORMAT 'YYYY-MM-DD HH24:MI:SS' IGNOREHEADER 1 MANIFEST REGION 'us-west-2'
Completed redshift bulk insert. Took 2.823 seconds
Loaded total 500 rows, 1 files, total 501 lines scanned
Archiving cloud storage stage files...
Successfully deleted total 2 item(s)
Deleted cloud storage files because Archive method is set to Delete files
Cloud storage stage files archived. Took 0.672 seconds
RedShift Table loaded: UploadData data took total 5.1182928 sec
==========================================================
Summary: Data Transfer took total .....5.12 sec.
         Source file creation .........0.12 sec. 2.3% of total time
         compress file ................0.02 sec. 0.4% of total time
         Upload file ..................1.23 sec. 24.0% of total time
         truncate target table ........0.14 sec. 2.7% of total time
         Load data to target table ....2.94 sec. 57.4% of total time
         Archive target stage files ...0.67 sec. 13.1% of total time
==========================================================
         Total files uploaded .........1 (0.01 MB)
         Actual files loaded ..........1
         Total records loaded .........500
SSIS package "TestAll.dtsx" finished: Success.

