Introduction
Azure and AWS both are most popular Cloud Platforms. In this blog post we will learn how to copy or move Amazon S3 files to Azure Blob Storage without any coding or scripting (AWS to Azure File Copy / Migration Scenario). To achieve this objective we will use following Drag and Drop SSIS Tasks (i.e. Microsoft SQL Server Integration Services – ETL Platform for SQL Server). Following components are highly optimized for parallel copy/multi threading with secure connection (client side/serverside encryption).
| SSIS Azure Blob Storage Task |
| SSIS Amazon Storage Task (AWS S3) |
Concept : Fast Server Side Copy in Azure (Copy files into Azure Blob Storage)
Azure provides unique feature called server side file copy. Using this feature you can load or copy files into Azure Blob Storage without landing data to your local machine. As of now (March 2017) this type of feature is still missing in other Cloud Platform such as Amazon AWS and Google Cloud Platform – GCP.
Using server side copy feature in Azure… you can achieve following scenarios in SSIS without coding
- Move / Copy files from Amazon S3 to Azure Blob Storage
- Move / Copy files from Google Cloud Platform (GCP) to Azure Blob Storage
- Copy files from any public URL to Azure Blob Storage (Assuming URL doesn’t require credentials or its intranet URL)
In first two scenarios you need to have Source File URL using Authentication information inside URL (This is called Pre-Signed URL e.g. http://mycloud.com/myfile.zip?SIGNATURE-GOES-HERE ). All major Cloud Providers Support Pre-Signed URL so you can securely share files with other without sharing your actual Credentials. You can configure Pre-Signed URL to expires in certain time frame (Check your Cloud API documentation). If your file doesn’t need credentials to access then you don’t have to worry about Pre-Signed URL. Your source can be file URL (E.g. https://mysite.com/downloads/fil1.zip)
Pre-Signed URL for Google Cloud (GCP)
Here is more information how to get Pre-Signed URL for Google Cloud Platform (GCP) – Use gsutil command line
Pre-Signed URL for Amazon AWS (S3 file)
To create pre-signed URL for AWS S3 files you can use SSIS Amazon Storage Task and use Get Pre-Signed URL Action (Described in the below section). This action supports creating pre-signed URLs for multiple files using wildcard (e.g /mybkt/*.zip) or you can get single pre-signed URL. If you use pattern search then you will get DataTable back … which can be loop through using ForEach Loop task (Loop ADO Recordset option) . If you do not use wild card then only one URL returned in string format.
Prerequisites
Before we look at next section make sure following prerequisites are met
- You have obtained Amazon S3 Access Key and Secret Key to access desired files
- You have obtained Azure Storage Account Name and Account Key to access desired Blob Container. If you don’t have access to Azure then you can download Azure Storage Emulator for testing Purpose. Check this.
- You have basic knowledge of SSIS. If you dont then search for SSIS tutorial and there are many blogs / tutorials to get started 🙂
Step-By-Step – Create SSIS Package – Copy Amazon S3 Files to Azure Blob Storage
Now lets look at how to copy Amazon S3 files to Azure in few clicks. This approach doesn’t bring any data to your local system so its purely server to server copy and that is why its very fast and secure.
- First Download and Install SSIS PowerPack
- Once you install SSIS PowerPack. Create a new Sample SSIS Project and open Package
- From SSIS Toolbox Drag ZS Amazon Storage Task and drop on Control Flow surface. Rename it to Get S3 File Urls
- Double click S3 task to edit. From Action dropdown select (Get Amazon S3 Files Pre-Signed Url Option)
- Click New next to the Connection Dropdown to create Amazon Storage Connection. Enter your credentials and bucket region and Click Test. If you are not sure about your bucket region then check this article.
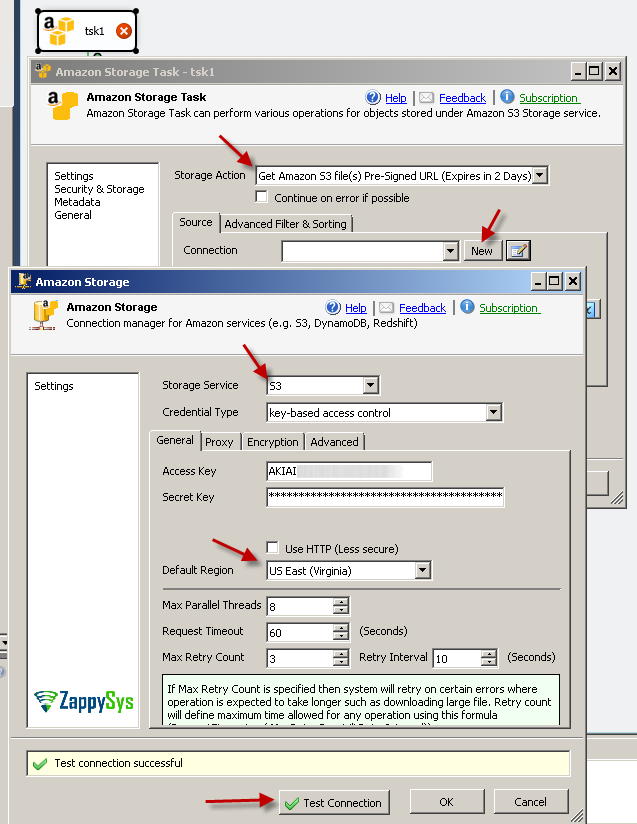
SSIS Amazon Storage Task – Create Pre-Signed URLs for multiple files stored in S3
- Now click on Advanced Tab and check Use region specific endpoint option
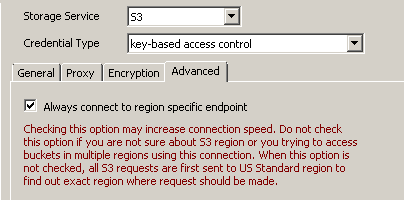
SSIS Amazon S3 Connection – Region specific endpoint option
- Once Test connection is green you can click OK to save connection.
- Once you back to Amazon Storage Task UI… Click on browse next to S3 file path. Her you can select one file or enter pattern to create URLs for multiple files.
- To save pre-signed URL(s) select Variable. If variable is not there then create new one… If you enter pattern in Source path then Variable must be Object datatype. For multiple URL it will return ADO Recordset (You can use with ForEach Loop Task). If you didn’t enter pattern in source path then variable can be string datatype.
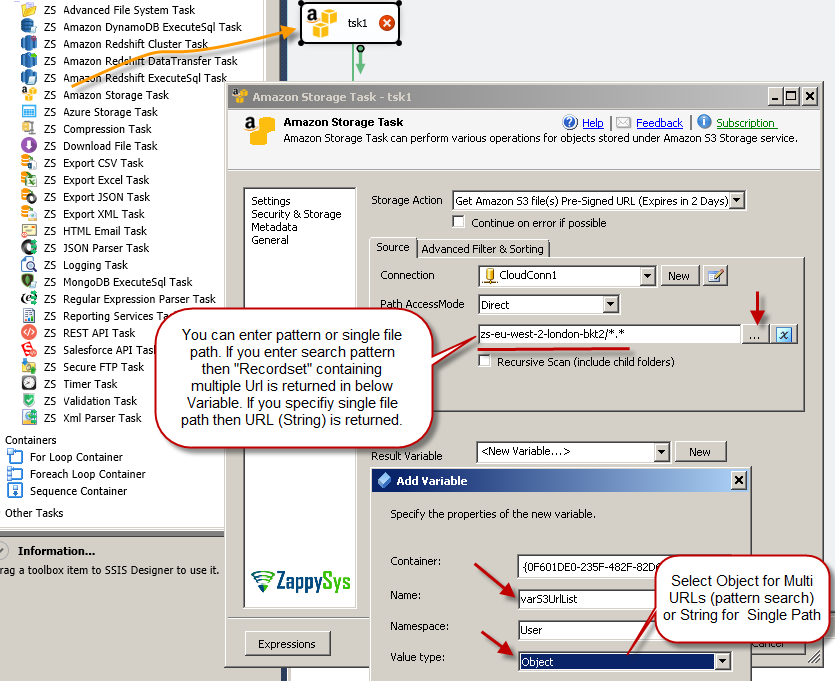
SSIS Amazon Storage Task – Save Pre-Signed URL to Variable (Save Multiple URL as Recordset )
- Now drag and drop ForEach Loop Container on the surface and configure like below
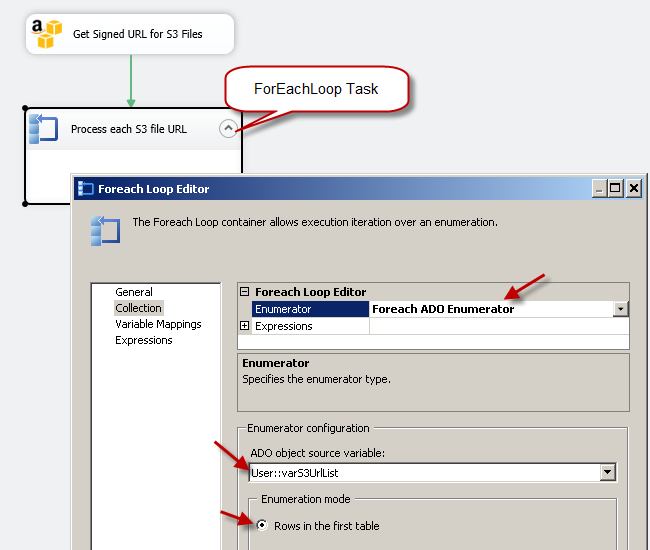
SSIS ForEach Loop Container Task – Loop through Amazon S3 file URL
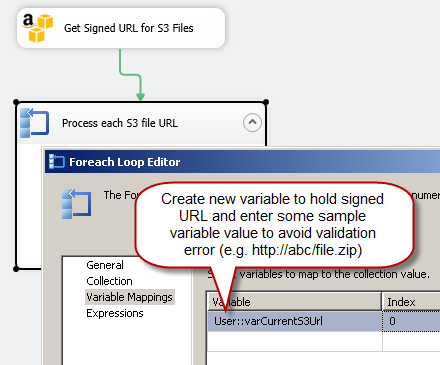
SSIS ForEach Loop Task – Variable Mappings
- Once Foreach Loop is configured you can drag ZS Azure Storage Task inside ForEach Loop Container
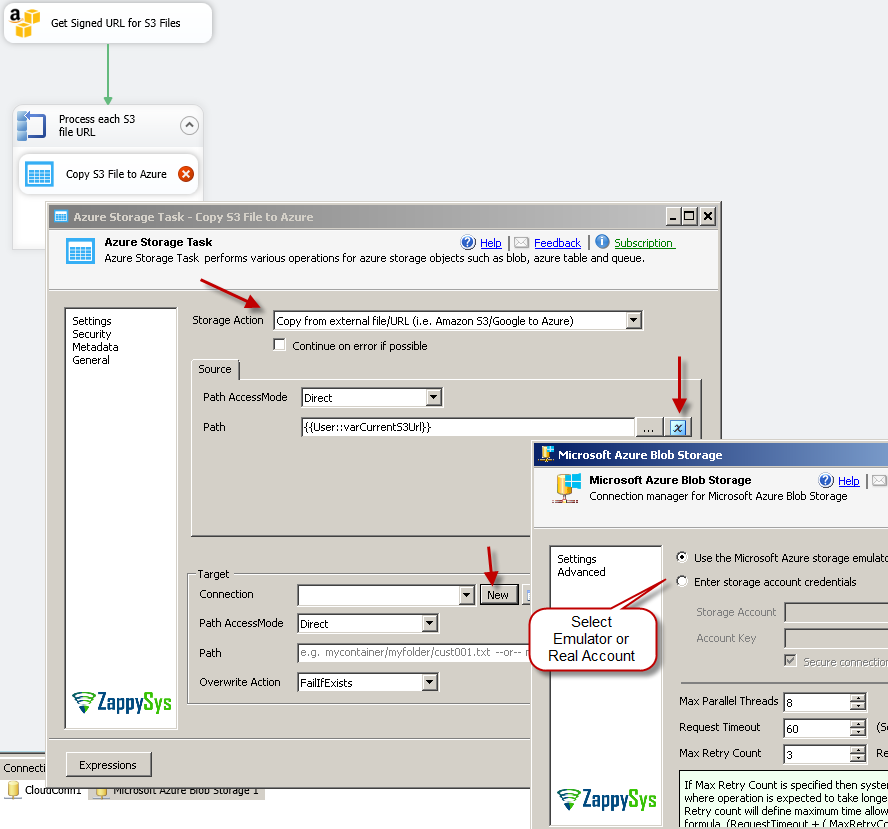
- Double click Azure storage task and select [Copy from external file] option from Action dropdown.
- In the source Path/URL we will enter variable name which holds current URL for ForEach Loop iteration. Easy way is click blue variable icon and select <<Insert Variable>>. Your placeholder may look like below.
1{{User::varCurrentS3Url}} - For target path … Click New Connection to create and configure new Azure Storage Connection like below. Enter Azure storage credentials and click test. If you don’t have real Azure credentials then you can use Azure Storage Emulator (Check this). Once connection is Configured click Test connection and click OK to save connection.
Azure Storage Task – Configure Blob Storage connection- Serverside Copy S3 files – AWS to Azure
- Once everything is configure you can save package and execute. This will copy S3 files to Azure Blob storage.
- Here is execution log
12345678SSIS package "C:\SSIS\Amazon-To-Azure-Copy.dtsx" starting.Information: 0x0 at Get Signed URL for S3 Files, Get Signed URL for S3 Files: You are running TRIAL version. It will expire in 29 day(s)Information: 0x0 at Get Signed URL for S3 Files, Get Signed URL for S3 Files: Reading [PRESIGNED-URL] property for zs-eu-west-2-london-bkt2/*.*Information: 0x0 at Copy S3 File to Azure, Copy S3 File to Azure: Copy started: Source=https://zs-eu-west-2-london-bkt2.s3.eu-west-2.amazonaws.com/cloudfile1.csv, Target=test1/Information: 0x0 at Copy S3 File to Azure, Copy S3 File to Azure: Copying https://zs-eu-west-2-london-bkt2.s3.eu-west-2.amazonaws.com/cloudfile1.csv ...Information: 0x0 at Copy S3 File to Azure, Copy S3 File to Azure: Copy started: Source=https://zs-eu-west-2-london-bkt2.s3.eu-west-2.amazonaws.com/cloudfile3.txt, Target=test1/Information: 0x0 at Copy S3 File to Azure, Copy S3 File to Azure: Copying https://zs-eu-west-2-london-bkt2.s3.eu-west-2.amazonaws.com/cloudfile3.txt ...SSIS package "C:\SSIS\Amazon-To-Azure-Copy.dtsx" finished: Success.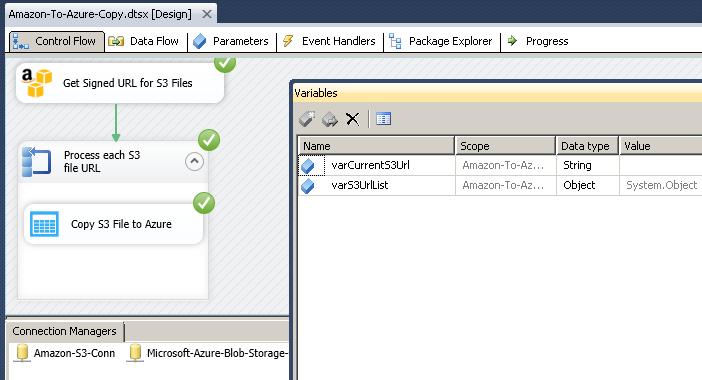
SSIS Package Execution – Copy Multiple S3 Files from
Amazon to Azure


How to move Amazon S3 files to Azure
In above example you saw how to copy files from Amazon S3 to Azure Blob Storage. But what if you want to Move… so once file is copied you want to delete from source. In that case its simple. Add one more Amazon S3 Task at the end so if all previous steps successful you can Issue delete files command using ZS Amazon Storage Task.
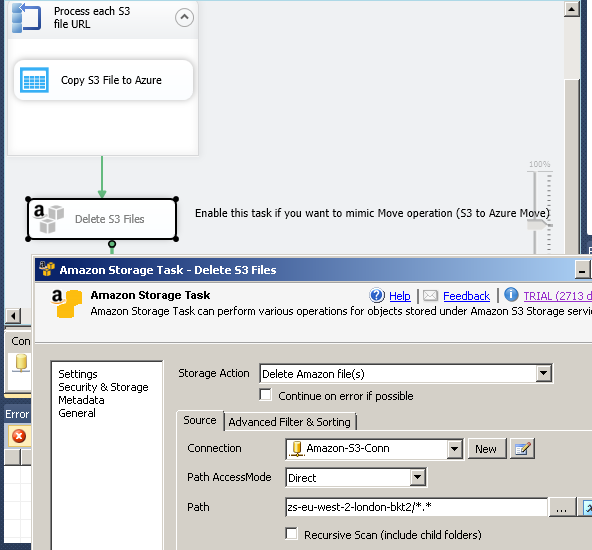
SSIS Delete Amazon S3 Files after Successful S3 to Azure Copy operation (This will mimic Move)
Download Sample SSIS Package
Click here to download sample SSIS file for SQL Server 2012, 2014, 2016
Conclusion
If you want to bring data from Amazon S3 to Azure in fastest way then technique described in this article can help you to cut down your data transfer time by several times. SSIS PowerPack comes with 45+ components and tasks which can give you drag and drop interface for your Cloud connectivity projects. It also comes with many connectors to help with JSON, XML, REST API related integration. Try SSIS PowerPack for FREE without any limitation and find out what else you can do with it.